Campaigns
Where Armorama group builds can be discussed, organized, and updates posted.
What If 3:Rise of the Machines Campaign
spoons
Visit this Community
England - East Anglia, United Kingdom
Joined: January 09, 2008
KitMaker: 527 posts
Armorama: 500 posts
Posted: Wednesday, March 13, 2013 - 02:23 AM UTC
And...finally


Now for the primer...
Bluestab
Visit this Community
South Carolina, United States
Joined: December 03, 2009
KitMaker: 2,160 posts
Armorama: 1,906 posts
Posted: Wednesday, March 13, 2013 - 03:07 AM UTC
Stephen, Wow. Some nice work there and it's a nice looking vehicle to boot. I like how you did the body and the suspension lift. Lots of nice little details too. Like the chains on the nerf bars. That's a great little added detail.
windysean
Visit this Community
Wisconsin, United States
Joined: September 11, 2009
KitMaker: 1,917 posts
Armorama: 735 posts
Posted: Wednesday, March 13, 2013 - 05:49 AM UTC
Yee haw! That's awesome. Like Bluestab said, lots of really good detail.
thanks for posting!
-Sean H.
Trisaw
Visit this Community
California, United States
Joined: December 24, 2002
KitMaker: 4,105 posts
Armorama: 2,492 posts
Posted: Wednesday, March 13, 2013 - 10:33 AM UTC
Stephen, that looks great and very original! Nice job on the custom jacking and tricking out of the vehicle.
17741907
Visit this Community
Istanbul, Turkey / Türkçe
Joined: December 05, 2007
KitMaker: 953 posts
Armorama: 705 posts
Posted: Wednesday, March 13, 2013 - 11:06 AM UTC
Great work Stephen...I like it very much...
Rob_Haelterman
Visit this Community
Oost-Vlaanderen, Belgium
Joined: October 01, 2008
KitMaker: 145 posts
Armorama: 139 posts
Posted: Sunday, March 17, 2013 - 02:25 AM UTC
Haven't posted much, even thogh I've been quietly admiring the nice work here.
Brought myself to painting the Jagdtiger Ausf E


Cheers
R
vonHengest
Visit this Community
Texas, United States
Joined: June 29, 2010
KitMaker: 5,854 posts
Armorama: 4,817 posts
Posted: Sunday, March 17, 2013 - 12:37 PM UTC
Stephen: That is some serious detailing/conversion you have going on there! Call me crazy, but I think I'm liking the undercarriage best.

Rob: I'm not sure if the camera is picking it up correctly, but I believe I see three tones?
Rob_Haelterman
Visit this Community
Oost-Vlaanderen, Belgium
Joined: October 01, 2008
KitMaker: 145 posts
Armorama: 139 posts
Posted: Sunday, March 17, 2013 - 05:27 PM UTC
@Jeremy,
the third might be the shading. Only two were applied: very dark and very pale green.

Cheers
R
tankmodeler
#417
Visit this Community
Ontario, Canada
Joined: March 01, 2004
KitMaker: 3,123 posts
Armorama: 2,539 posts
Posted: Tuesday, March 19, 2013 - 08:52 AM UTC
Right, then, here's my starting mess of sprues:


One the left is a Dragon M51 kit (actually some left overs from M50 and M51 kits) to the right is a Dragon M4A2 75 PTO and hidden in the mess is a Soviet 100mm barrel. Toss them gently with some glue and paint and eventually these will turn into...

D10 Sherman

Backstory

In 1956 the Israelis attacked across their shared border with Egypt. Defending, the Egyptians used the SU-100s supplied by their patrons, the Russians, and lost a lot of them by the time the war came to a close. Recognising that they needed greater firepower to counter the IS-3Ms in Egyptian service, the Israelis decided to press the 100mm D-10S guns into service, but found the SU-100 vehicle cramped and mechanically unreliable.

In a stroke of genious they created their own SU based on the M4A2 hull and the SU-100's gun & mounting. The resulting vehicle was seen to be interim from the start, yet was so effective that they soldiered on in reserve until 1973. Never upgraded with the HVSS suspension, they still received the Cummins engines fitted to the new M51.

During the Yom Kippur war, the last company of D10 Shermans was assigned to cover the southern portion of the valley near the "Booster", Tel el Mekhafi. Wiped out during the next two days' combat, their sacrifice was instrumental in allowing the Israeli 7th Brigade to hold out until reinforcements could arrive on the fourth day and stabilise the situation.

Clumsy and difficult to manoeuvre, enemy tankers still came to dread facing the well trained reservists in their antiquated SPs. To the end, many crews loved the big punch and low silhouette of their reliable "Tante SU".


Paul
gcdavidson
Visit this Community
Ontario, Canada
Joined: August 05, 2003
KitMaker: 1,698 posts
Armorama: 1,563 posts
Posted: Friday, March 22, 2013 - 07:14 AM UTC

Quoted Text


Physically, it is not possible for a tank to exist as the image shows...It simply would not be designed.
Paul


All I see is a side view...maybe the rest of the tank is 3x wider as well
gcdavidson
Visit this Community
Ontario, Canada
Joined: August 05, 2003
KitMaker: 1,698 posts
Armorama: 1,563 posts
Posted: Friday, March 22, 2013 - 07:15 AM UTC
Awesome looking beast Stephen!
Bluestab
Visit this Community
South Carolina, United States
Joined: December 03, 2009
KitMaker: 2,160 posts
Armorama: 1,906 posts
Posted: Friday, March 22, 2013 - 07:51 AM UTC
Update on Kimmie.

I decided to use some artistic license on her stowage. This thing is designed to roam through ruined cities. I figured stowage boxes to hold some of the tools. There's also a matte rof much of the kit's tools being missing. Anyway, I boorowed the boxes from the spares. I think they come from a Tamiya 2cm kit of some sort. The brass are the beginnings of the side skirt armor. The brass comes from old PE runners.


A couple of shots with the turret and some additional assembly done, including the "finished" side skirt mounts.


Speaking of side skirts...I was going to use mesh but changed my mind to go with solid plating. The mesh is a pain to work with and I figured the Germans would be going with the simplest solutions for this vehicle.


I'm still debating on a paint scheme. I'm probably going to make up some sort of urban camo; dark gray, light gray, red-brown, and dark yellow. I'm also debating on up-armoring the turret and bow. I'll probably go spaced armor there.
vonHengest
Visit this Community
Texas, United States
Joined: June 29, 2010
KitMaker: 5,854 posts
Armorama: 4,817 posts
Posted: Friday, March 22, 2013 - 02:35 PM UTC
Rob: Understood, looks good!

Paul: Welcome to the party
Nice back story covering the tech aspects.

Graeme: That design would cause the hull to buckle under the stress of the weight imposed on it, especially if it hat to go over uneven terrain where the suspension would not be able to keep the tracks in constant contact with the ground regardless of it's width.

Alex: This campaign is all about artistic license, don't let that hold you back here!
Everything looks like it is working out well for such a small chassis. I'm pretty sure that it's all going to look natural proportion-wise once primed and painted.
Bluestab
Visit this Community
South Carolina, United States
Joined: December 03, 2009
KitMaker: 2,160 posts
Armorama: 1,906 posts
Posted: Saturday, March 23, 2013 - 04:49 AM UTC
I stayed in last night and pushed ahead with Kimmie. I settled on a general idea for her camo scheme. It's a splinter pattern of dark and medium gray. I'll probably add some touches of dark yellow and red-brown.

Kimmie was pre-painted dark gray about ten years ago, so that's one step I didn't have to worry about. I masked her off using masking tape. It was really random with the ideas of keeping the vehicle more dark grey. I decided to leave the lower hull and rear hull solid dark gray. The side skirts will be covering the majority of the running gear and I think it'll contrast well.


A quick coat of light/medium gray. I usually let it sit about long enough to flush the AB, then get the tweezers to start removing paint.


Tape removed. You can see how there are some small areas of dark yellow on the side skirts. I'll probably will do some similar accents with the rest of the tank. I'm still debating on the red-brown.


I'll let it sit for a day or two to completely dry through. I still have to get the rest of the stowage together and probably a crewman. I'm thinking about putting it on a small base, nothing major.

If I can get this one wrapped up, I may try to finish up the year with one or two other ideas. I build stuff liek this anyway. I might as well at least shre the work while I am doing it. I don't want to start anything new until I decide what I am going to do with another campaign that I'm probably not going to be able to finish.

Imagine "The Running Man" meets Nascar, meets, pro-wrestling, meets Deathrace. The other idea is a zombie pest control service. I think both are not exactly right for the EOD 2 Campaign. The zombie one is dark humor and the auto one is just extreme violent auto sports. Anway, those are down the road a bit.
Trisaw
Visit this Community
California, United States
Joined: December 24, 2002
KitMaker: 4,105 posts
Armorama: 2,492 posts
Posted: Saturday, March 23, 2013 - 05:07 AM UTC
Very nice camo paint job, Alex! Looks great!
zontar
Visit this Community
Hawaii, United States
Joined: August 27, 2006
KitMaker: 1,646 posts
Armorama: 1,557 posts
Posted: Saturday, March 23, 2013 - 04:26 PM UTC
Alex: Kimmie is looking great!!! Camo is simple but effective (technique I mean, with a cool pattern, of course).

Happy Modeling, -Zon
Bluestab
Visit this Community
South Carolina, United States
Joined: December 03, 2009
KitMaker: 2,160 posts
Armorama: 1,906 posts
Posted: Sunday, March 24, 2013 - 03:42 AM UTC
Thanks guys.

While the paint was drying I carried on and got all the little bits together to add; spare track, pioneer tools, etc.
Last night, I went ahead and added the dark yellow and red-brown to the camo. I got up this morning and finished assembly. So Ladies and Gentlemen...may I introduce you to Kimmie.

I used a different mat for the background for these pictures and it really changes the way I see the colors. I'm color blind so it may look normal to yall. The white mat and the yellow and red-brown barely show and the grays look darker.

The skirts went on fine. I swapped out some of the tools for ones I had in the spares. The Alan pieces were pretty bad. I had to put the antena rest backwards because of the skirt mounts. I figure the German engineers would not have had a problem making it fold back as opposed to folding forwards.

Speaking of bad parts, the kit's indivudal tracks were not used. Instead, I used a set of Tamiya vinyl tracks. I had put these replacements in the kit box a decade ago. I did use the kit's tracks for the spare tracks. I have a set of wingnuts around here somewhere. If I can find them I'll use them for the spare track bar things.


She's basically done. She still needs some touch-ups. I probably won't do too much weathering out of fear of overdoing it. I have a figure set aside to paint badly. I plan on eventually placing it on a small base. Maybe park her in some ruins, waiting to ambush some approaching enemy troops. That'll probably be after I get some of my other campaigns caught up.

At some point I'll post the "finished pictures" with a small narrative telling what's going on. I still need to do my finished pictures for Carla.
tankmodeler
#417
Visit this Community
Ontario, Canada
Joined: March 01, 2004
KitMaker: 3,123 posts
Armorama: 2,539 posts
Posted: Tuesday, March 26, 2013 - 04:17 PM UTC

Quoted Text

All I see is a side view...maybe the rest of the tank is 3x wider as well


Nope, it's one KV hull wide.
tankmodeler
#417
Visit this Community
Ontario, Canada
Joined: March 01, 2004
KitMaker: 3,123 posts
Armorama: 2,539 posts
Posted: Tuesday, March 26, 2013 - 04:29 PM UTC
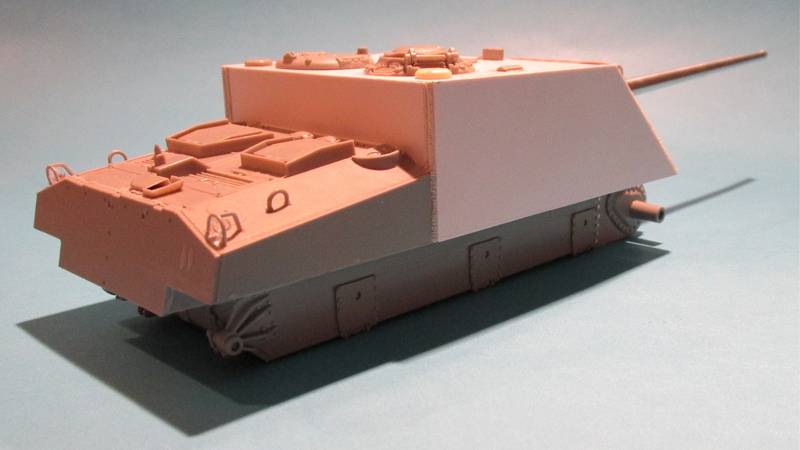
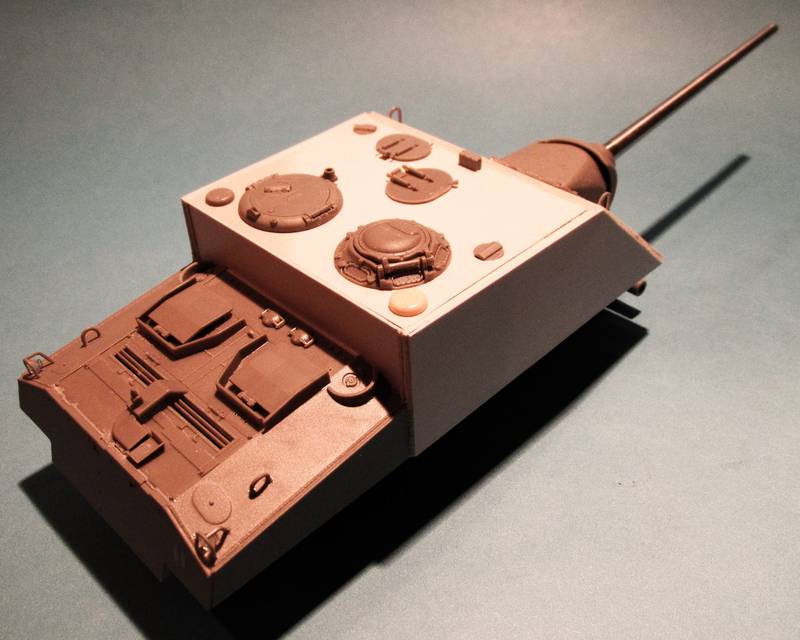
Some update photos of Tante SU.

The hull has had the hull extended upwards and then an addtiional 1.5" of armour added over the fighting compartment.Standard Sherman hatches & cupolas provide access to the 4 man crew.

The 100mm D10 tube makes a serious statement, don't it?


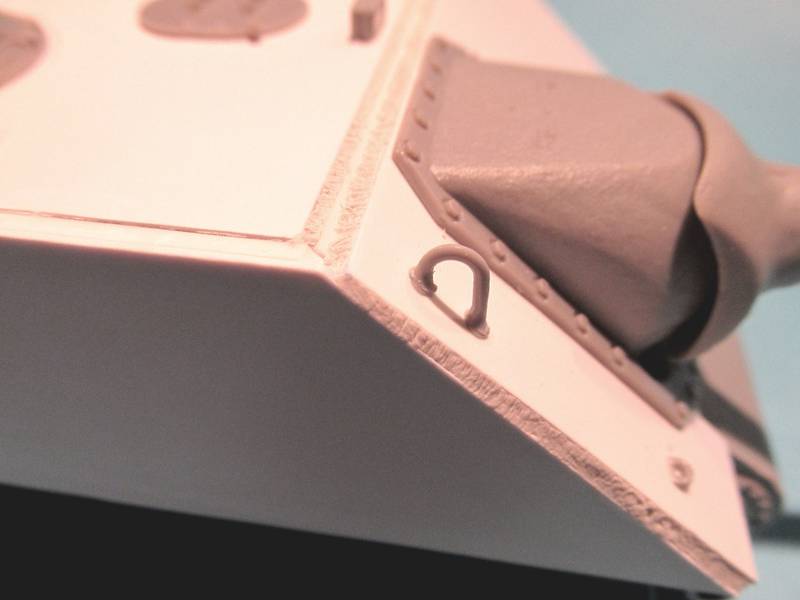
Here's how the applique plate fits over the standard hull armour. The welds are apoxy putty strings contoured with a knife blade.


Paul
Tiger_213
Visit this Community
California, United States
Joined: August 10, 2012
KitMaker: 1,510 posts
Armorama: 1,443 posts
Posted: Tuesday, March 26, 2013 - 04:37 PM UTC
Alex, I love the camouflage, though I sort of wish the sand and orange were more 'uniform'. Looks great though.

Paul, looks good. Are you going to add grousers? A gun lock (would be essential to wield that beast)?
tankmodeler
#417
Visit this Community
Ontario, Canada
Joined: March 01, 2004
KitMaker: 3,123 posts
Armorama: 2,539 posts
Posted: Tuesday, March 26, 2013 - 11:25 PM UTC

Quoted Text

Paul, looks good. Are you going to add grousers? A gun lock (would be essential to wield that beast)?


Glad you enjoy it.

Grousers? Or do you mean extended end connectors? In either case, no, I don't think so. The terrain on the Golan doesn't warrent them. It isn't mushy but firm & dry and the weight of the changes isn't significantly above the weight of the turret that was deleted. (I'm an engineer and I actually did a quick weight calculation of the additional armour, IU couldn't help myself ).

The gun, extra superstructure material and the applique add only about 2-3 tons to the weight of an all up Sherman, so the suspension could take it, though it would affect durability.

As for a gun travel lock, the SUs did not have an external one, it was internal, the breech was locked witha structure taht came down from the roof of the superstructure, as did the guns on htings like the Jagdpanther. Same here.
Bluestab
Visit this Community
South Carolina, United States
Joined: December 03, 2009
KitMaker: 2,160 posts
Armorama: 1,906 posts
Posted: Wednesday, March 27, 2013 - 03:59 AM UTC
Christopher,
Thanks. The pictures with it on the blue mat make the dark yellow and red-brown really stand out. That orange is actually red-brown. In real life, the yellow and red-brown are much more muted than in the blue mat pictures. I'll try to post some pictures of Kimmie on the white mat for comparison.

Paul R,
I like it. Realistically, I think a travel lock might be added to them by the IDF. However, I think it would look better without it. By the same token, with the VVSS I think grousers would really add to the beefy look of it. Did the IDF ever use grousers? I actually think the IDF would upgrade them to HVSS, especially if they were to remain in service up in to the 70s. That said, unless you have an extra set of HVSS gathering dust, I'd stay with the VVSS. I think it gives it an "old(er) warhorse" feel to it.


Tiger_213
Visit this Community
California, United States
Joined: August 10, 2012
KitMaker: 1,510 posts
Armorama: 1,443 posts
Posted: Wednesday, March 27, 2013 - 05:15 AM UTC
Wow Paul, I don't think you took this to seriously at all.... Cool to know there are some actual facts and figures behind your build though. Plus I learned something about the SU series!

Now that brings up another question Paul; what would be the effects of gun recoil on the one side of the suspension?
tankmodeler
#417
Visit this Community
Ontario, Canada
Joined: March 01, 2004
KitMaker: 3,123 posts
Armorama: 2,539 posts
Posted: Wednesday, March 27, 2013 - 05:18 AM UTC

Quoted Text

Paul R,
I like it. Realistically, I think a travel lock might be added to them by the IDF. However, I think it would look better without it. By the same token, with the VVSS I think grousers would really add to the beefy look of it. Did the IDF ever use grousers? I actually think the IDF would upgrade them to HVSS, especially if they were to remain in service up in to the 70s. That said, unless you have an extra set of HVSS gathering dust, I'd stay with the VVSS. I think it gives it an "old(er) warhorse" feel to it.


Well, I did explain away the HVSS in my backstory ( ) stating that these were supposed to be so temporary that they never had the suspension upgrade. They just lasted longer than expected.

I have never seen a photo of an Israeli Sherman with grousers or EECs. On firm ground or pavement, grousers actually put additional stresses on the suspension and significantly roughen the ride (plus they tear the crap out of the surface) so they are not used unless you have to and with the hard dry terrain of the Golan, they simply aren't needed.

As for an external travel lock, the Israelis may have added one, but there is a lot of space inside the superstructure above the breech and if the Egyptian SU-100s had an internal lock, then simply rremoving them and welding them into the D10 Sherman would have been easier than fabricating a brand new design and then welding it to the front of the surperstructure. If you look at the shape of the hull and where a travel lock would have to be placed, it's also clear that in combat the design would have to be somewhat complicated to clear the gun mount casting _and_ swing out of the way when the gun was in use. The short nose of the superstructure limits your possibilities. Simply hinging the lock forward doesn't work so it would have to be hinged in the middle as well and then fold for storage. Simpler to just weld the Soviet crap into the superstructure.

Or at least that's my story & I'm sticking to it!

Paul
tankmodeler
#417
Visit this Community
Ontario, Canada
Joined: March 01, 2004
KitMaker: 3,123 posts
Armorama: 2,539 posts
Posted: Wednesday, March 27, 2013 - 05:23 AM UTC

Quoted Text

Now that brings up another question Paul; what would be the effects of gun recoil on the one side of the suspension?


Given the long wheelbase and that the recoil forces are resolved primarily parallel to the ground, pretty minimal.

For an artilery piece where the gun carriage is essentially a transferse linear contact, the eccentricities in recoil from a non-central mounting are significant. The longer moment arm of the long wheelbase coupled to a stiff hull & superstructure mean that the loads are spread out almost as evenly as if the mount was central.

If the mount was waaaay off to the side (like directly over one track), then it would be an issue, but not here.

Ask an engineer a qeustion...