Campaigns
Where Armorama group builds can be discussed, organized, and updates posted.
Waste not want not, Unter falscher Flagge
jkb_sprint
Visit this Community
Thessaloniki, Greece / Ελλάδα
Joined: April 23, 2012
KitMaker: 402 posts
Armorama: 394 posts
Posted: Friday, August 30, 2013 - 07:20 PM UTC
Jose i looked into the camo issue for the KV and the most interesting i found was this one. At least it uses 3 colors.

http://ww2drawings.jexiste.fr/Files/1-Vehicles/Axis/1-Germany/03-sPanzers/PzKpfw-KV1-753(r)/PzKpfw-KV1-753(r).htm

The funny thing is that if it was an unmodified one, with the original Soviet hatches and gun configuration, the painting options are next to endless, but for this one options are very narrowed. Anyway have fun, looks like a good kit.
1721Lancers
Visit this Community
England - East Anglia, United Kingdom
Joined: March 21, 2012
KitMaker: 1,673 posts
Armorama: 1,640 posts
Posted: Saturday, August 31, 2013 - 03:07 AM UTC
Hi John,
the Crusader kit isn't that bad, just a couple of minor fit problems that easily sorted with a drill and knife. Mine is now in the cellar drying off after being primed.
Now to out the colours for the "Caunter Camo" .

Jose, look at this, I'd say Dunkelgelb with green stripes or possibly even green and red brown:
For discussion purposes only:


Paul
SHAKY962
Visit this Community
Buenos Aires, Argentina
Joined: May 21, 2012
KitMaker: 765 posts
Armorama: 438 posts
Posted: Saturday, August 31, 2013 - 04:17 AM UTC
@Paul,
Thanks for that.
Is yellow with green stripes.... Similar to the only color scheme of Trumpeter
jkb_sprint
Visit this Community
Thessaloniki, Greece / Ελλάδα
Joined: April 23, 2012
KitMaker: 402 posts
Armorama: 394 posts
Posted: Saturday, August 31, 2013 - 06:48 AM UTC
@ Paul good to hear that about the Crusader. I really like that tank a lot. I was thinking about getting a second one, the one you are building with the door knocker and build them together.

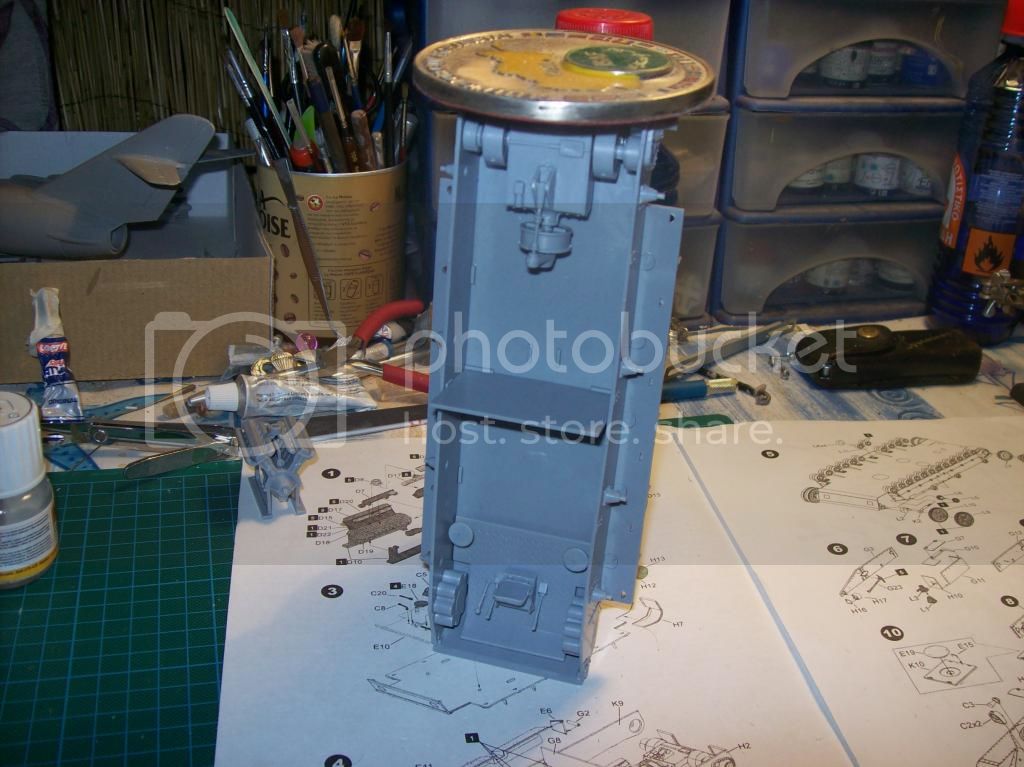
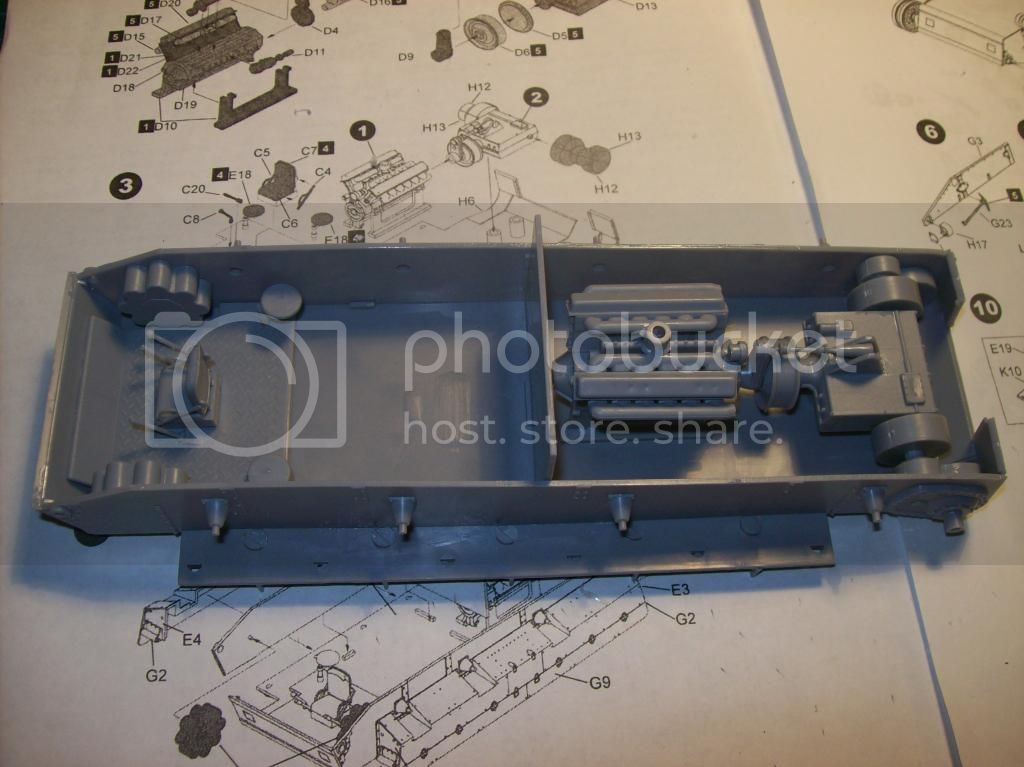
Some progress was made with the T 28. The interior of the lower hull is finished, ready to be primered and painted. Fit is excellent, honestly i never expected that and the only thing that actually required something more than glue was to place something heavy to get the forward section of the hull to glue without keeping them in place, without holding it, as you can see in the pic below. Having seen both the ICM and AER kit of this tank, i am amazed of how well this one is engineered!


1721Lancers
Visit this Community
England - East Anglia, United Kingdom
Joined: March 21, 2012
KitMaker: 1,673 posts
Armorama: 1,640 posts
Posted: Monday, September 02, 2013 - 03:18 AM UTC
Jose thats no problem mate, I like to help when I can

John what the hell are you using to weigh that down, is it an antique discus you found in your garden?
Are we going to be able to see any of the interior when she's done? It would be a shame not to.


Paul
jkb_sprint
Visit this Community
Thessaloniki, Greece / Ελλάδα
Joined: April 23, 2012
KitMaker: 402 posts
Armorama: 394 posts
Posted: Monday, September 02, 2013 - 04:05 AM UTC

Quoted Text

John what the hell are you using to weigh that down, is it an antique discus you found in your garden?
Are we going to be able to see any of the interior when she's done? It would be a shame not to.


Paul


I only wish i had found an antique discus in the garden! No, just a paper holder (or i think that is what this is called), but it did the job.... i needed to roll my self a cigarette fast, so i grabbed what was close. Unfortunately almost nothing will me visible, unless, i leave all the hatches open. I could do that, but the fact that i move every 2 to 3 years in a different part of the country, makes that a really bad idea.
Jessie_C
Visit this Community
British Columbia, Canada
Joined: September 03, 2009
KitMaker: 6,965 posts
Armorama: 47 posts
Posted: Monday, September 09, 2013 - 02:49 PM UTC
Hi all,

Chiming in with another wingy thingy. I'm going to do this one. It has quite a colourful history, being captured at the Dornier factory by the US Army, test flown by them, and then seconded to the RAF for more test flying. Thus it has 3 layers of markings painted on, painted out, painted on again and so forth. It's difficult to tell from the few photos of this airframe, but I suspect that it was intended to have been painted in RLM 81/82/76 but it's obvious that the forward cowling panels at the very least were either never painted, or are replacements from the factory floor. The underside colour is not clear, but there may well have been large areas which were left unpainted. That's my story and I'm sticking to it

The box top. Way back in ancient history Revell Germany released several kits from Monogram in these black boxes. In this case, it's the even more ancient Monogram Do 335

inside the box, showing off that lovely olive green Monogram plastic from the late '70s

And a quick taping together of the major airframe parts.

The kit offers the option to build both the single seat fighter and dual seat trainer. I think that in this case the trainer actually looks better than the single seat version, thus the reason I chose it. I'm building it straight out of the box with the exception of cobbled together decals from the spares box.
Nito74
Visit this Community
Lisboa, Portugal
Joined: March 04, 2008
KitMaker: 5,386 posts
Armorama: 4,727 posts
Posted: Monday, September 09, 2013 - 03:25 PM UTC
@john

Nice work there !
Nice engine and transmission, are the hatches separate for open/close positions ?

@Paul

Nice to see you here.. another fast build I guess
Or it might be another ribbon marathon with Sal ?

@Jessica

Great choice !
I love those odd late Luftwaffe birds !
I still haven't recovered from the A-model plastic rash... still considering entering one for the Yak Campaign..
1721Lancers
Visit this Community
England - East Anglia, United Kingdom
Joined: March 21, 2012
KitMaker: 1,673 posts
Armorama: 1,640 posts
Posted: Tuesday, September 10, 2013 - 02:15 AM UTC
Hi Jessica, that will be a cool build , maybe one day I might just go for that kit too. How does it line up to the Tamiya offering?


Quoted Text


@Paul

Nice to see you here.. another fast build I guess
Or it might be another ribbon marathon with Sal ?


John you sound a bit surprised to see me here?
Well I thought as I´m running this show , I may as well take part in it too .
As to the "ribbon marathon" well we'll wait and see .

Here's a very little progress on my Crusader.
I got her primed and the first camo on. Then then added the running gear so I could fit the side skirts, and then paint them in situ with the "Caunter camo".....


10.09.13 002


.... and then discovered that the front side skirts are the
worst fit ever (and John JKB, I was having positive thoughts about those parts since the day I opened the box , no negative waves here). So no point in winging, got some card out and remade them. They need the bolt heads adding still I´ll do that soon, and then the paint

10.09.13 003


10.09.13 004


Paul
SHAKY962
Visit this Community
Buenos Aires, Argentina
Joined: May 21, 2012
KitMaker: 765 posts
Armorama: 438 posts
Posted: Tuesday, September 10, 2013 - 02:49 AM UTC
@Jessica, beautiful!!!!! I love the Do-335....
@John, remember that is Italeri..... You always need to work or filling....
Jessie_C
Visit this Community
British Columbia, Canada
Joined: September 03, 2009
KitMaker: 6,965 posts
Armorama: 47 posts
Posted: Tuesday, September 10, 2013 - 02:57 AM UTC
The plastic is much more flimsy than a Tamiya kit, the fit is less precise and the detail isn't quite as sharp, but that's to be expected given that it's about 30 years older. It's got raised panel lines since that was state of the art in 1975. For the price difference I'm willing to put up with all that.
Nito74
Visit this Community
Lisboa, Portugal
Joined: March 04, 2008
KitMaker: 5,386 posts
Armorama: 4,727 posts
Posted: Tuesday, September 10, 2013 - 03:05 AM UTC

Quoted Text

Hi Jessica, that will be a cool build , maybe one day I might just go for that kit too. How does it line up to the Tamiya offering?


Quoted Text


@Paul

Nice to see you here.. another fast build I guess
Or it might be another ribbon marathon with Sal ?


John you sound a bit surprised to see me here?
Well I thought as I´m running this show , I may as well take part in it too .
As to the "ribbon marathon" well we'll wait and see .

Here's a very little progress on my Crusader.
I got her primed and the first camo on. Then then added the running gear so I could fit the side skirts, and then paint them in situ with the "Caunter camo".....


10.09.13 002


.... and then discovered that the front side skirts are the
worst fit ever (and John JKB, I was having positive thoughts about those parts since the day I opened the box , no negative waves here). So no point in winging, got some card out and remade them. They need the bolt heads adding still I´ll do that soon, and then the paint

10.09.13 003


10.09.13 004


Paul


Hi Paul,

Not surprised, just glad to see you're having fun !!
I like that base coat colour.
With so many Campaigns ending in the next months I'm sure you and Sal will give me plenty of work
SHAKY962
Visit this Community
Buenos Aires, Argentina
Joined: May 21, 2012
KitMaker: 765 posts
Armorama: 438 posts
Posted: Tuesday, September 10, 2013 - 03:17 AM UTC
@Jessica,
I agree with you. Its more cheap but you need to work a little more......
ltb073
Visit this Community
New York, United States
Joined: March 08, 2010
KitMaker: 3,662 posts
Armorama: 3,078 posts
Posted: Tuesday, September 10, 2013 - 04:34 AM UTC

Quoted Text


@Paul

Nice to see you here.. another fast build I guess
Or it might be another ribbon marathon with Sal


Hey I saw that
Paul is back on his hi octane And doing great work
I have 2builds to finish and 2 more to start before I start on my build here
Bluestab
Visit this Community
South Carolina, United States
Joined: December 03, 2009
KitMaker: 2,160 posts
Armorama: 1,906 posts
Posted: Tuesday, September 10, 2013 - 08:14 AM UTC
I worked in some time on the Aerosan.

Anyway, exterior paint.


Paint dry, I added the ski struts, engine cowl, and the front and rear body panels.


Added the guards and prop.


That's it for now.

1721Lancers
Visit this Community
England - East Anglia, United Kingdom
Joined: March 21, 2012
KitMaker: 1,673 posts
Armorama: 1,640 posts
Posted: Wednesday, September 11, 2013 - 02:15 AM UTC
Sal hi there, you can take your time my friend, this one runs until March next year.

Alex, she's looking good , your also getting very close
to completion


Paul
Bluestab
Visit this Community
South Carolina, United States
Joined: December 03, 2009
KitMaker: 2,160 posts
Armorama: 1,906 posts
Posted: Wednesday, September 11, 2013 - 02:45 AM UTC
Thanks Paul. I'm going to build a small base for it as well. If I don't, I can see me knocking the skis off. Plus, one of the ski supports is warped and I'll use the base to keep that ski square.

Jessie_C
Visit this Community
British Columbia, Canada
Joined: September 03, 2009
KitMaker: 6,965 posts
Armorama: 47 posts
Posted: Thursday, September 12, 2013 - 07:05 PM UTC
The assembly of this big beast goes quickly. Fuselage glued together. Getting all the various pieces to stay level with each other was a bit of a challenge. No Tamiya fit here

I needed a shim for the forward top engine cover

Wings glued on. There are monster gaps on either side at the wing roots which will require some ingenuity to fill, even with the tape holding the gaps as closed as I could get them
tinbanger
Visit this Community
Ontario, Canada
Joined: February 04, 2008
KitMaker: 2,507 posts
Armorama: 88 posts
Posted: Friday, September 13, 2013 - 12:49 AM UTC
Hi
This B-17G will be converted into a B-17E (I must be nuts!)and finished as captured and tested by the Japanese in 1942.

1721Lancers
Visit this Community
England - East Anglia, United Kingdom
Joined: March 21, 2012
KitMaker: 1,673 posts
Armorama: 1,640 posts
Posted: Saturday, September 14, 2013 - 02:15 AM UTC
Jessie, she's looking fine for her age

Richard, welcome in here to you, and a fine choice that is too
Is that the old Monogram kit with the beautiful interior?
I built that about 15 years ago I think, and she's still on show in my man cave, the thing is absolutely massive. I hope you cleared your bench of all other kits, you're gonna need that space


Paul
tinbanger
Visit this Community
Ontario, Canada
Joined: February 04, 2008
KitMaker: 2,507 posts
Armorama: 88 posts
Posted: Saturday, September 14, 2013 - 11:34 PM UTC
Hi Paul.
The kit has a Monogram info sheet and a mold date of 1979.
TacFireGuru
Visit this Community
Colorado, United States
Joined: December 25, 2004
KitMaker: 3,770 posts
Armorama: 2,263 posts
Posted: Thursday, September 19, 2013 - 02:26 PM UTC
And I've begun!


As you can see, the left (lower) half of the fuselage's nose broke.

Cockpit and engine mostly done. Once all the glue sets nice, I can start attaching those assemblies to the right (upper) half.

Mike
1721Lancers
Visit this Community
England - East Anglia, United Kingdom
Joined: March 21, 2012
KitMaker: 1,673 posts
Armorama: 1,640 posts
Posted: Friday, September 20, 2013 - 02:42 AM UTC
Endlich, der Luftwaffe Hawker Hurricane

Hi Mike, this is possibly going to be my favorite in here unless
someone turns up with a Spitfire modified with an Me 109 nose .
I'm sure you'll fix the structural problem with ease and nobody
will notice it later.

Cool choices everyone, now keep 'em coming


Paul
1721Lancers
Visit this Community
England - East Anglia, United Kingdom
Joined: March 21, 2012
KitMaker: 1,673 posts
Armorama: 1,640 posts
Posted: Saturday, September 21, 2013 - 05:30 AM UTC
Well then here we go, the start of the "Caunter camo" .
I have decided to do this per brush, as the camo is going to really beaten up by the end. And apart from anything, I just cannot be bothered to mask everything off
First paint Humbrol 31 with a drop of Humbrol 86:-

21.09.13 004


21.09.13 005


more tomorrow my fellow pirates


Paul
Bluestab
Visit this Community
South Carolina, United States
Joined: December 03, 2009
KitMaker: 2,160 posts
Armorama: 1,906 posts
Posted: Monday, September 23, 2013 - 07:05 AM UTC
Update. I was playing around with some ideas for a base. If I don't mount this thing on abase, I don't think the skis will last long. One idea I played with was the German flagged aerosan being passed by a group of Russian soldiers. Sort of the vehicle coming full circle. Then I decided to stick with it under German use. I figure it could be used as a snow version of a dispatch rider. So this is the original base concept. The sticks are temporary and set to keep the skis square for now.


I decided to play around a bit more. The prior base was a bit small and going larger would leave some empty spaces. I dug through the collection and pulled out a few figures as well as an old Tamiya kettekrad. I figure the dispatch rider is ready to leave. The maintenance guys are using the kettekrad to tow the aerosan out. The driver and his gunner are getting last minute instructions from the officer while the vehicle is prepped.