Mike, all I have to say is "WOW", keep up the good work.
Ronnie
Armor/AFV
For discussions on tanks, artillery, jeeps, etc.
For discussions on tanks, artillery, jeeps, etc.
Hosted by Darren Baker, Mario Matijasic
My first HEMTT - the Italeri LHS
Bigred69

Joined: December 27, 2015
KitMaker: 290 posts
Armorama: 249 posts

Posted: Sunday, August 28, 2016 - 01:58 AM UTC
Posted: Sunday, August 28, 2016 - 02:05 AM UTC
CORRECTIONS:
#1 - I spoke at length, early on about the #2 and #3 differentials having "gear reduction heads". That was incorrect. While these two differentials DO have gear heads they are simply the additional gearing required to pass the driveline through and onto the next differential. They are not reduction heads.
#2 Several pages ago I identified two square metal rods that clip to the edge of the frame, (driver's side rear) as ratchet "load-locks". That was incorrect. These two square rods form a folding ladder that the operator uses to gain access to the left and right fenders for inspection and maintenance. There are actually holes in the edge of each fender to engage hooks that secure this ladder when in use. The ladder can also be hooked into the front skid plate to clean the windshields.
Epi

Joined: December 22, 2001
KitMaker: 3,586 posts
Armorama: 2,556 posts

Posted: Sunday, August 28, 2016 - 02:05 AM UTC
Simply BEAUTIFUL work there Mike! 


Posted: Sunday, August 28, 2016 - 02:07 AM UTC
Posted: Sunday, August 28, 2016 - 02:33 AM UTC
Driver's side seat base from Eduard etch set. Seat base and fore/aft adjustment on left. Up/down adjuster on right.


Don't know if I should say this or not but given that the passenger side door doesn't ever open I am going to go with the stock (more or less) Italeri seat base on that side. I see no point in going through the heartache of building another one of these seat adjusters.


Don't know if I should say this or not but given that the passenger side door doesn't ever open I am going to go with the stock (more or less) Italeri seat base on that side. I see no point in going through the heartache of building another one of these seat adjusters.
Posted: Sunday, August 28, 2016 - 04:23 AM UTC
Thirian24

Joined: September 30, 2015
KitMaker: 2,493 posts
Armorama: 2,344 posts

Posted: Sunday, August 28, 2016 - 05:08 AM UTC
Quoted Text
CORRECTIONS:
#1 - I spoke at length, early on about the #2 and #3 differentials having "gear reduction heads". That was incorrect. While these two differentials DO have gear heads they are simply the additional gearing required to pass the driveline through and onto the next differential. They are not reduction heads.
Michael, these are called "Power Dividers"
Here is a generic illustration.

Posted: Sunday, August 28, 2016 - 06:17 AM UTC
We call them "over the shoulder" differentials as they pass the drive "over their shoulder"'.
Thanks for the incredible transparent artwork and for your participation!
Thanks for the incredible transparent artwork and for your participation!
Taylornic

Joined: January 10, 2005
KitMaker: 337 posts
Armorama: 332 posts

Posted: Sunday, August 28, 2016 - 07:49 AM UTC
Very impressive work, Mike!
Epi

Joined: December 22, 2001
KitMaker: 3,586 posts
Armorama: 2,556 posts

Posted: Sunday, August 28, 2016 - 09:10 AM UTC
Mike when your ready to cable up the radio, let me know. Your only going to need 2 coax cables for the antenna, 1 power cable, 1 cable for the speaker(if you install one), and the hand mike w/cable.
Posted: Sunday, August 28, 2016 - 10:55 AM UTC
I gotta travel over to revisit MikeyBugs thread (Looking for things to 3D print.) I think he did the radio but I know he did the speaker.
Thanks for the reminder!
Thanks for the reminder!
Epi

Joined: December 22, 2001
KitMaker: 3,586 posts
Armorama: 2,556 posts

Posted: Sunday, August 28, 2016 - 11:09 AM UTC
Yes, he did the speakers and if i had a decent cast of the single ASIP or SINCGAR radio, I would have sent it to.
Posted: Sunday, August 28, 2016 - 11:41 AM UTC
So then what will be my source for the correct radio for the HEMTT?
Epi

Joined: December 22, 2001
KitMaker: 3,586 posts
Armorama: 2,556 posts

Posted: Sunday, August 28, 2016 - 11:54 AM UTC
Mike,
It would have been Pro Arts but he shut down recently. D-Toys, Voyager, and E.T. Models has SINCGARS but to spend that money and only use the radio out of their sets is not good.
I really haven't seen anything worth the wild in plastic. There either to small or too big and look totally wrong.
I'll cast up a couple for you this weekend and you be the judge on how they look. And those I will definitely not charge you, because that is illegal.

bulivyf
Vendor

Joined: April 03, 2006
KitMaker: 2,450 posts
Armorama: 2,409 posts

Posted: Sunday, August 28, 2016 - 11:55 AM UTC
Michael, excellent build!
Posted: Sunday, August 28, 2016 - 12:08 PM UTC
Yea Pete, I found Pro Art but all that gear is fairly confusing. Did not know it was no longer available!
Posted: Sunday, August 28, 2016 - 12:35 PM UTC
Posted: Monday, August 29, 2016 - 02:38 AM UTC
Quoted Text
I didn't notice, but did your engine have a bottle for the ether start?
Dustin what color did you most often see the ether bottle painted? In photos I have seen bright red, rusty silver and most often whatever the vehicle body color is.
Thirian24

Joined: September 30, 2015
KitMaker: 2,493 posts
Armorama: 2,344 posts

Posted: Monday, August 29, 2016 - 02:42 AM UTC
Mostly orange and NATO green.
Thirian24

Joined: September 30, 2015
KitMaker: 2,493 posts
Armorama: 2,344 posts

Posted: Monday, August 29, 2016 - 02:43 AM UTC
The color I re-imagine when I think about it, is orange. If I were building this, that's the color I'd paint it.
Posted: Monday, August 29, 2016 - 06:24 AM UTC
Thirian24

Joined: September 30, 2015
KitMaker: 2,493 posts
Armorama: 2,344 posts

Posted: Monday, August 29, 2016 - 07:25 AM UTC
Looking good.
Posted: Monday, August 29, 2016 - 07:41 AM UTC
Posted: Monday, August 29, 2016 - 04:57 PM UTC
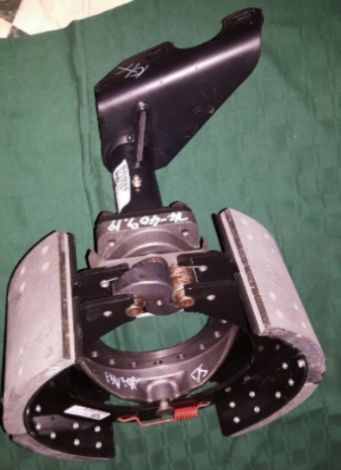
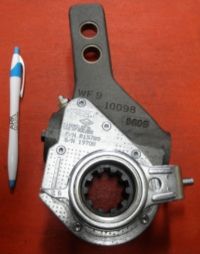
Working now on building a rear brake cylinder mounting bracket from a piece of large Evergreen C channel. I hope to include the slack adjusters and S cam rods.


I promise I will finally get to those hydraulic cylinders on the LHS. I started one cylinder and had problems so I have been holding off while planning my approach.


I promise I will finally get to those hydraulic cylinders on the LHS. I started one cylinder and had problems so I have been holding off while planning my approach.
Posted: Monday, August 29, 2016 - 06:27 PM UTC
On the left those are the front brake actuators as provided in the Real Models HEMTT engine set. On the right are the Trumpeter rear brakes as provided to me through the generosity of Epi since I had originally ordered the wrong engine set from RM! **


** (If you order the RM engine set specified for the Italeri kit YOU GET the rear brakes in the set as well! Of course being me, I did not read closely enough and instead ordered the engine for the Trumpeter kit thinking they were all the same!)


** (If you order the RM engine set specified for the Italeri kit YOU GET the rear brakes in the set as well! Of course being me, I did not read closely enough and instead ordered the engine for the Trumpeter kit thinking they were all the same!)
 |


