

1⁄35Sherman M4A3
20
Comments
The Running Gear
I started with the idler wheel. I used the Tamiya idler wheel, with the back face filled in using the front face of an old Dragon idler wheel from the scrap box. I filed down the old Dragon wheel, and then slowly sanded the outside edge to fit the Tamiya back. I also needed to drill out the Dragon wheel center to clear the Tamiya Polly cap. It sounds like a lot of work, but really was rather simple and easy to do, just took a little time and patience with all of the filing, and fitting. A little mud weathering will easily cover any imperfections later on. (Unless you are building a show room Sherman) For the road wheels, I used the kit supplied ones. All of the wheels had their grease fittings and relief valves added, simply by drilling a small depression, and adding Grant Line bolts. I didnt worry about the rear of the road wheels, since it was going to be mounted on a base, and I really dont have guest with flashlights and dental mirrors stopping in. The wheels were put aside as I assembled the running gear. Looking at loads of photos, and being no expert can be confusing. I noticed what appears to be a casting lip on the front face in some photos, and not on others. I simply assume that it was dependant upon who cast the pieces, and how fine they were finished up. I did like the look of those with the slightly raised lip, so I added these to mine, from .005 plastic sheet. In retrospect, I should have sanded them a little thinner, until just a hint showed. I then drilled the four holes for mounting the trailing arms. After cleaning up the rest of the seams, I added the bolts on the steel spring track guides, and a few missing bolts and grease fittings from once again, Grandt Line nuts and bolts. I then glued the bogies in place; I first taped the tracks down to a base, and then placed the hull and bogies in the track to try to keep everything lined up, until the glue dried.Back to the Hull
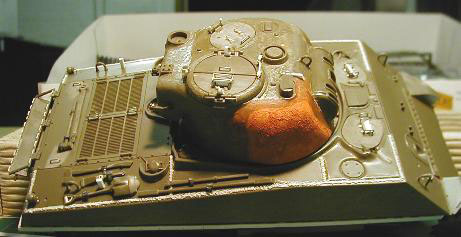
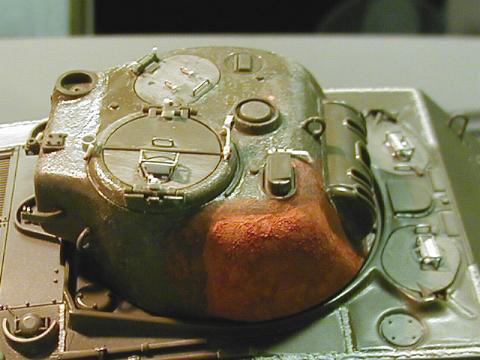
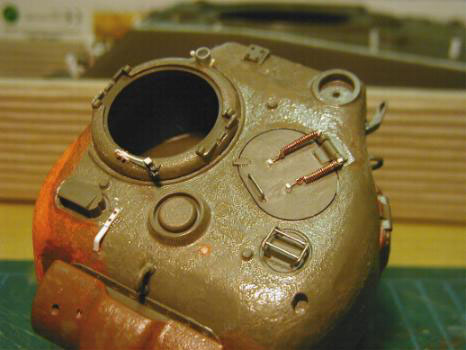
I guess by now, youve figured out that I bounce around when building my models. Here I added the missing bolts along the front edge that attaches the transmission housing to the hull, just in front of the leading bogie set. (Of course these were noticed by a member and pointed out after the bogies were glued in place, so a little tweezer work was needed) For these I used larger bolts from The Tichy Train Group. These are really nicely molded, and flash free, either slice from the little sprue with a #11 blade or drill holes and insert the little sprue stick into the hole. I then added the casting texture to the transmission housing. For this I used Testors Liquid Cement, and an old stiff, worn out paintbrush. Experience has taught me that several applications, building up to the texture I desired is better then trying it in one go. Out came the mini drills next, I drilled the drain holes for the fuel filler splash shields. I also drilled tiny holes next to each of the filler caps, and their hold down pins. In these holes I inserted a short piece of wire stripped from some brass screening to simulate fine retaining chains. (The kinking of the wire looks like fine chain, under a coat of paint, so try not to remove the kinking, or straighten it out, when installing.) Now for the fun part, making my own light guards. Not as difficult as one may imagine, actually a rather simple process. I first took a piece of Tamiya Masking Tape, and placed this over the kit items. I then ran a Sharpie over this, and ended up with the outline of the light guard. I then gently removed the tape, and placed it on some .10 plastic sheet, and traced it with a #11 blade. A couple of passes with the blade, and it was cleanly cut through. I didnt worry about the side support pieces, but concentrated on the upright curved piece. It took a few tries, a few slipped blades, and spoiled pieces, but I eventually made one for each of the lights and horn. Next came adding the curve top, or actually shaping the flat piece. Once again, this is nothing too difficult to do. I used several paper towels folded up into a small, soft square of paper, Masking tape held it together. To impart the curve, I gently rolled a drill bit pressing rather firmly on the section I wanted to curve; progressively smaller drills provided tighter curves that held their shape. The MkI eyeball guess at the proper angle was cut on the straight part, and I glued these to the hull in their respective positions. I then once again eyeballed the bracing pieces on. Tiny slivers of plastic card, and cement simulated the hull welds, and a little thinned Testors red putty simulated the other welds. For the horns cross pieces, I simply eyeballed the up-right first, then the two sidepieces. Moving rearward, I sliced off the molded tow cable bracket off the hull. I then took evergreen plastic rod, and glued in into the hull recessed weld marks. Out came the old hot knife, and homemade temperature controller, which also doubles as my Dremels speed controller. I textured the weld beads with a broken tipped # 11 blade in the hot knife, and a medium temperature. Afterwards, a few coats of liquid cement softened the look. Continuing to move rearward, I added the engine door stops/supports. At first I made then too small, and a member pointed this out, so off they came and larger ones installed. The tools are all the kits tools, with the straps and brackets removed, and new straps from lead foil, and brackets either from lead foil, or plastic card added. The buckles are also made from lead foil. Again, a rather simple technique, I simply cut a strip a little wider than the straps, and then cut tiny squares. The belt part passing through is simulated by simply impressing a semi-curved piece of brass into the foil. Since the foil is rather soft, a plastic piece shape, or even a shaped hardwood toothpick will also impart the impression of a belt passing over the inside section of a buckle. Continuing rearward, I thinned the exhaust deflector thingy, added a few details from rod, and glued it in place.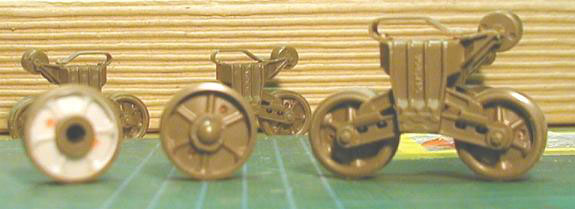

About the Author


FROM: FLORIDA, UNITED STATES
I'm rewriting this in a much more humoristic way, to help over inflate my ego, and place my self on a pedestal, because I don't have a life, and plastic models are the only thing I live for. I plead guilty as charged to excessive babble, light hearted humor, and continued encouragement to youngsters...
Comments

Great article! Interesting to read and about a very nice tank: the M4A3 Sherman! I hope to build one one of these days - after my current projects - and I read it very carefully! Very good article Dave!
Cheers and happy modelling!
Prato
JUL 16, 2006 - 07:25 PM

Gday Grumps!
Glad that this has been given the exposure it deserves
I remember following this build last year(?) and was intrigued at some of the techniques you applied... Then in reading this Feature, I discover more... The weathering technique you describe is surely worth trying out... The results look great!
Also your dab hand at that wolf on the right hullside is fantastic
Cheers for the Feature, and the quality photos...
Brad
JUL 16, 2006 - 07:52 PM

All these posts and no one has noticed that the feature's title reads "Sherman A4A3" instead of M4A3? :-) :-)
Title typo aside, the article and pics look good, Dave!
JUL 17, 2006 - 04:13 AM

Hi Dave,
For someone who constantly undermines his modelling prowess..... you might just be the most talented modeller around!!! Great build Dave!
Frank
JUL 17, 2006 - 05:50 AM

Read the article,WOW!! Just shows what can be done with time and effort, and no photoetch/ after-market. Excellent article, Thanx !!
JUL 17, 2006 - 08:02 PM

Nice one Grumpy. Im sure that will have a high read count within a very short time. Some nice little tips explained also, using the tape to transfer the design onto thinner plastic sheet, is something I´ll remember.
Who said you can´t teach an old dog new tricks?? :-) :-)
JUL 17, 2006 - 08:20 PM
Dave, I'm glad I found this. I have a 1/32nd Sherman (The old Monogram kit) I've been working on. The light guards for it were snaped in several places (like they seem to always be) and I had concerns about how to build new ones with that funky backwards curve. After seeing how well your's came out, I not worried about that curve anymore.
As an aside, does anyone know if they make armor decals for this scale? The kit's were missing....like I said..it's the old kit.
SEP 10, 2006 - 09:41 AM

love the tank build and the fact its a no aftermartket just shows all that stuff isnt realy needed i am now working on same model and keep coming back to the post just to see how its done
marvelous
spyder50
NOV 17, 2007 - 04:20 PM

Nice to here from you again Vinnie,your stuff was always helpful
Good work Dave,I like your handling of the OD
APR 10, 2012 - 04:52 AM
Copyright ©2021 by Dave O'Meara. Images and/or videos also by copyright holder unless otherwise noted. The views and opinions expressed herein are solely the views and opinions of the authors and/or contributors to this Web site and do not necessarily represent the views and/or opinions of Armorama, KitMaker Network, or Silver Star Enterrpises. All rights reserved. Originally published on: 2006-07-17 00:00:00. Unique Reads: 40262

WEB HOSTING BY


Copyright ©2021 Armorama and Kitmaker Network, a subsidiary of Silver Star Enterprises
All Rights Reserved. Please read our Conditions of Use and Privacy Policy.
All Rights Reserved. Please read our Conditions of Use and Privacy Policy.