

1⁄35Sherman M4A3
20
Comments
Back to the front
OK, well work our way there; I next added the sand shields brackets. Looking at some photos, and then a photo example of the Eduards set, I mistakenly took the weld beads for a small spacer, and added small sections of .005 sheet behind the brackets. I drilled the mounting holes with a small drill along the bracket. And we are back at the front. Nothing really major to add here now, I made up the holders for the headlight plugs, but read that the head lights were usually removed when in combat, so for something different, I installed the plugs into where the headlights would be, drilled out the holders, and again added a short piece of that kinked screen wire for a retaining chain. I then added the little clasp that holes the travel lock in place. I made up the tow cable from a few strains of twisted wire, and installed them. I have found that passing the wire over a candle flame before twisting, makes the job easier, and the cable remains soft and flexible after twisting.Hatches-Hatches- Hatches
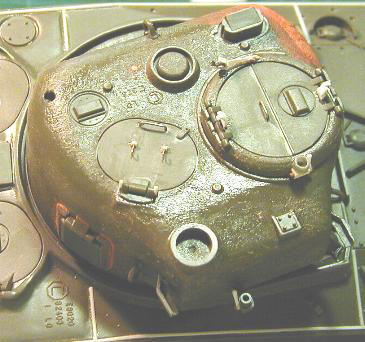
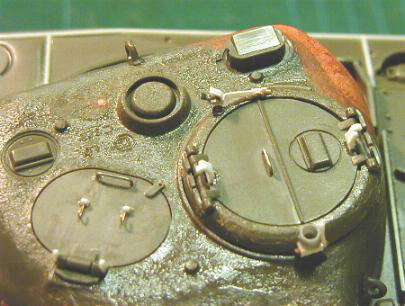
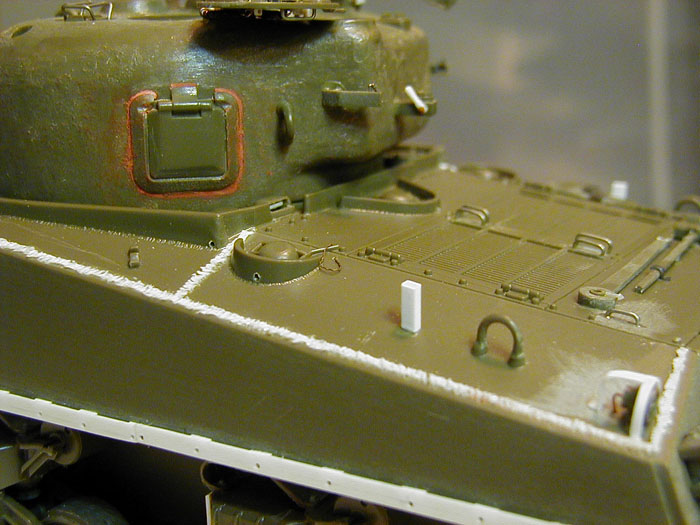
I decided to add the inside details, using the photos from the Walk Around. Once again this is not really a difficult task. They really are nothing more than a few simple shapes glued together to form the periscopes. On the outside it was the same thing, a few simple shapes glued together to form one. The periscope guards were not that hard to make either. First I drilled four holes for the mounting of the outside legs. This gives a good grip, and strong base to work on. Then by trial and error, I bend some soft wire, until I got a decent fit and look. The cross pieces are simply the same soft wire cut to fit, again by trial and error, with a few small pieces being added for latches and levers etc. So far I dont believe anything done is really beyond the reach of the average modeler. For the commanders hatch, the holdbacks were added along with the rest of the details, I added the loaders hatch hold back, and also made up a set of springs from fine wire, but you really cant see them unless you turn the tank over. (I do not allow my guest to do this either.) All hatches were left off at this time to be added at the end.Turret
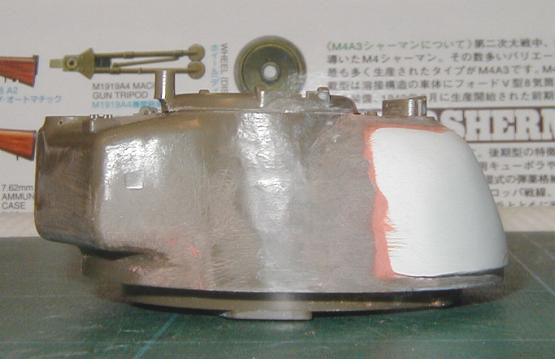
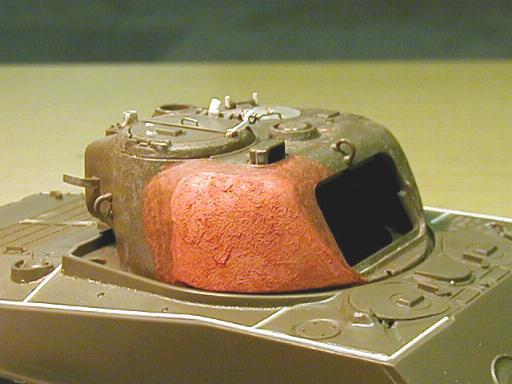
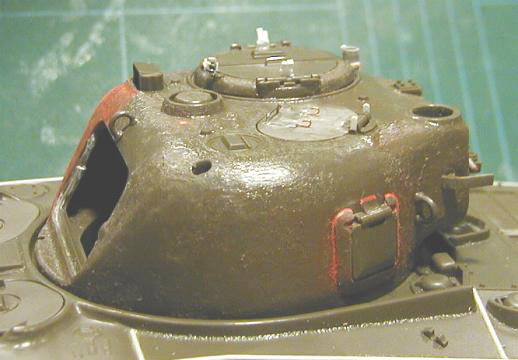
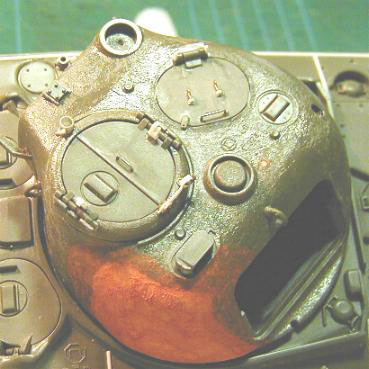
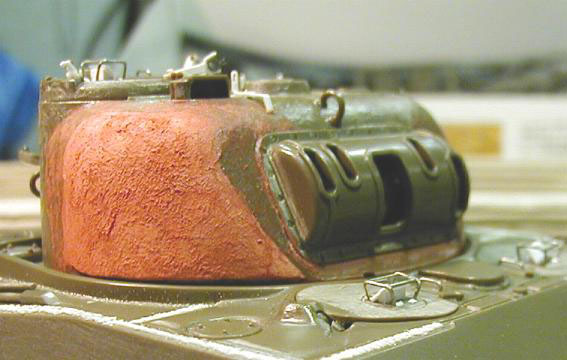
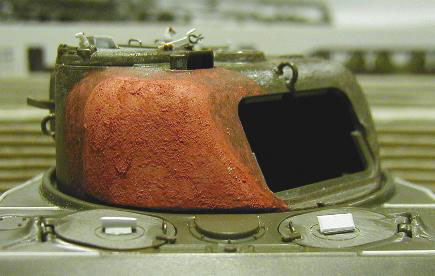
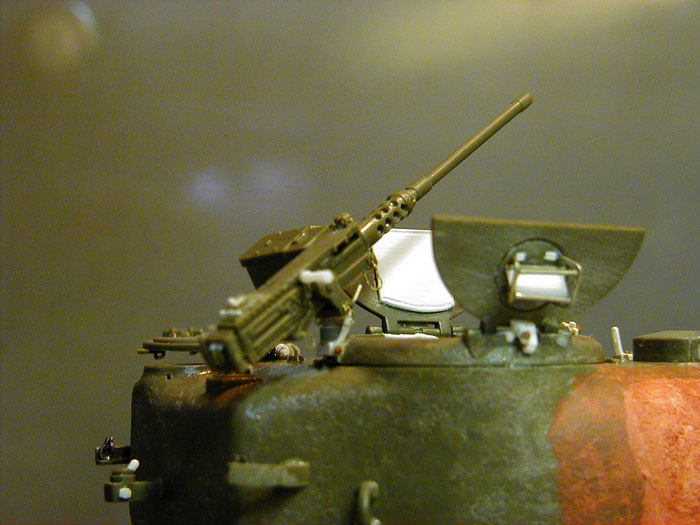
This is one of the newer Tamiya kits, so the loaders hatch is already molded, so you can pass over that section on the tweak list. I added the turret cheek bulge from MilliPut, simply because thats what I had in my work locker. I first made a template for the bottom edge, and drew a line to show me the fattest part on the bulge. I then put on layers of Milliput, smoothing with wet fingers until it came to a somewhat correct looking bulge. I let this cure for a day or two, no other reason than my days off, then did a final sanding to shape. I then added the turret pistol port, and smooth this in. I added the texture to the plastic sections using good old fashion Testors Liquid Cement. For the Milliput section, a thinned mixture of Testor Red Putty, thinned with Testors Liquid Cement was stippled on, and blended in to the surrounding areas. (Heres an old timers tip- if you contaminate your Testors Liquid Cement with putty, it will lose its bonding strength, so keep a separate bottle for this use.) A few small details were added to the rear for the clamps for the .50 cal. I made up the .50 cal holding bracket on the commanders hatch from some .005 sheet, and a few Grandt Line nuts, along with the sighting vane..50 Cal
I first removed the molded thing for a cocking handle, and added one carved from plastic rod. It took about 5 minutes to make one. I then rebuilt the rear sight, drilled out the front sight, and barrel, and deepened the cooling holes. Retaining chains were again simulated with the kinked screen wire.Hull MG
Again the cooling holes were deepened, and the barrel drilled out.Main Gun
Nothing more than the kit barrel, carefully sanded.Rear Storage Rack
I sanded off the molded tie downs, and made new ones from .10 plastic rod glued to tiny pieces of .10 plastic card. The straps were made from painted paper, threaded through after the gear was glued in place, with buckles made from lead foil.Coming Together
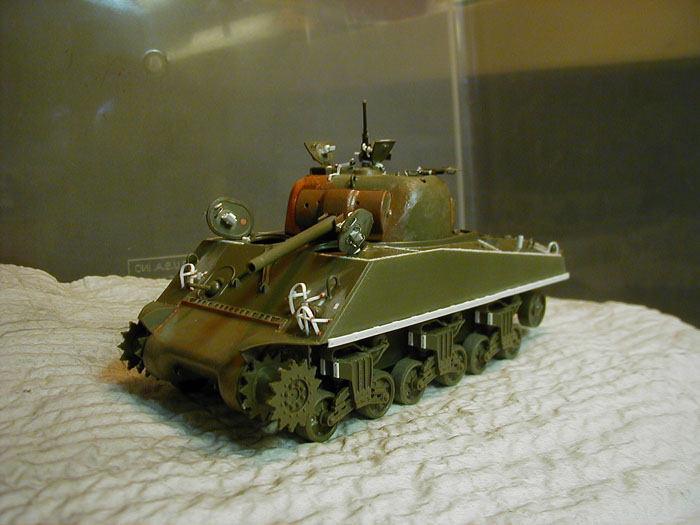
I started by painting the hull, and running gear, nothing special, I used MM OD. The rubber sections of the wheels were painted Polly S Grimy Black. I then added the mud. For this I use Elmers Latex Wood Filler. (Walnut) I mix in some static grass; saw dust, grit and gravel (sand, and railroad ballast.) a little white glue to help the stickiness. I then apply this to hull bottom, running gear etc. If its too thick, thin with a little water. I try not to get it on the wheel surfaces, and washed off any mistakes. For the tracks, I first Pinned then to a board on each end, and airbrushed a coat of Badger Accuflex flat black on them. The end connectors, and guide teeth I painted with Polly S railroad colors- Stainless Steel. I was then shocked how bright they were, looked more like chrome plating!!!! OH what to do???? I eventually figured out that a few coats of Tamiya Smoke would tone the brightness down, and it did!!! I normally use enamels, but for vinyl tracks and vinyl tires I use acrylics. The pads etc were painted with Polly S Grimy Black, the dry brushed with a lighter gray, that I just grabbed from the paint draw. Since the lower hull was done I moved up on the hull for more painting and weathering.


About the Author


FROM: FLORIDA, UNITED STATES
I'm rewriting this in a much more humoristic way, to help over inflate my ego, and place my self on a pedestal, because I don't have a life, and plastic models are the only thing I live for. I plead guilty as charged to excessive babble, light hearted humor, and continued encouragement to youngsters...
Comments

Great article! Interesting to read and about a very nice tank: the M4A3 Sherman! I hope to build one one of these days - after my current projects - and I read it very carefully! Very good article Dave!
Cheers and happy modelling!
Prato
JUL 16, 2006 - 07:25 PM

Gday Grumps!
Glad that this has been given the exposure it deserves
I remember following this build last year(?) and was intrigued at some of the techniques you applied... Then in reading this Feature, I discover more... The weathering technique you describe is surely worth trying out... The results look great!
Also your dab hand at that wolf on the right hullside is fantastic
Cheers for the Feature, and the quality photos...
Brad
JUL 16, 2006 - 07:52 PM

All these posts and no one has noticed that the feature's title reads "Sherman A4A3" instead of M4A3? :-) :-)
Title typo aside, the article and pics look good, Dave!
JUL 17, 2006 - 04:13 AM

Hi Dave,
For someone who constantly undermines his modelling prowess..... you might just be the most talented modeller around!!! Great build Dave!
Frank
JUL 17, 2006 - 05:50 AM

Read the article,WOW!! Just shows what can be done with time and effort, and no photoetch/ after-market. Excellent article, Thanx !!
JUL 17, 2006 - 08:02 PM

Nice one Grumpy. Im sure that will have a high read count within a very short time. Some nice little tips explained also, using the tape to transfer the design onto thinner plastic sheet, is something I´ll remember.
Who said you can´t teach an old dog new tricks?? :-) :-)
JUL 17, 2006 - 08:20 PM
Dave, I'm glad I found this. I have a 1/32nd Sherman (The old Monogram kit) I've been working on. The light guards for it were snaped in several places (like they seem to always be) and I had concerns about how to build new ones with that funky backwards curve. After seeing how well your's came out, I not worried about that curve anymore.
As an aside, does anyone know if they make armor decals for this scale? The kit's were missing....like I said..it's the old kit.
SEP 10, 2006 - 09:41 AM

love the tank build and the fact its a no aftermartket just shows all that stuff isnt realy needed i am now working on same model and keep coming back to the post just to see how its done
marvelous
spyder50
NOV 17, 2007 - 04:20 PM

Nice to here from you again Vinnie,your stuff was always helpful
Good work Dave,I like your handling of the OD
APR 10, 2012 - 04:52 AM
Copyright ©2021 by Dave O'Meara. Images and/or videos also by copyright holder unless otherwise noted. The views and opinions expressed herein are solely the views and opinions of the authors and/or contributors to this Web site and do not necessarily represent the views and/or opinions of Armorama, KitMaker Network, or Silver Star Enterrpises. All rights reserved. Originally published on: 2006-07-17 00:00:00. Unique Reads: 40262

WEB HOSTING BY


Copyright ©2021 Armorama and Kitmaker Network, a subsidiary of Silver Star Enterprises
All Rights Reserved. Please read our Conditions of Use and Privacy Policy.
All Rights Reserved. Please read our Conditions of Use and Privacy Policy.