

1⁄35Foggy Morning at Krinkelt-Rocherath
14
Comments
Building the Dragon Panzer IV Late J
The Hull The build of the Panzer IV went relatively smoothly, however there were some problems encountered along the way. These included: (1) poorly diagrammed instructions, especially as to the positioning of mesh shurtzen supports and the location of the holes to be drilled in the hull top; (2) the turret side armor did not fit properly and required significant sanding and carving; (3) removing parts from the sprues was an ordeal as the placement of the sprue connections was not always the best; (4) however, the most significant problem was the fit of the hull top and bottom as one or both parts seemed to be warped, leaving a gap of approximately 3 mm at the rear of the hull. I bought a set of hobby clamps from Home Depot and after applying liberal amounts of glue to the two halves of the hull, I clamped them together over night. This resolved the major gap at the rear of the hull and left only a minor gap at the front that was corrected with putty. While the clamped hull was drying, I repaired the turret skirt hinges that had been damaged when removing the part from the sprue by cutting replacements from spare styrene and gluing them on.The Tracks On the positive side, the tracks were easy to assemble, just time consuming. Over a period of evenings I removed the tracks from the sprues and cleaned them up. Next I glued the two lengths together that were to go on the sides of the hull (according to the instructions). I then counted the remaining lengths and divided them in half. I then placed a length of double-sided tape on my cutting surface and started assembling the track. The tape served two ends: (1) it held the track length together during the assembly and during the transfer to the tank and (2) it kept the run of links straight. I used tweezers to put the tracks together by simply pressing the links together. Once the length appeared long enough (I simply set the tank down on to the assembled but unglued tracks and eyeballed it) I applied Testors liquid glue using the brush from the bottle, allowing the glue to flow between the links. I let the tracks sit for a few minutes and then lifted the taped run off the cutting surface and wrapped it around the sprocket, roadwheels and return rollers and removed the tape. I had to add another link to the run and then connected the two ends and glued. I also applied a small amount of the liquid glue to the return rollers. I added some sag to the track and set the model aside to allow it to dry. The first side required 96 links. I repeated the process the next evening for the other side and that side required 97 links (which left a large number of spare links for me to use as additional armor protection added to the tank). The actual assembly of the run of tracks took about 1.25 hours per side.
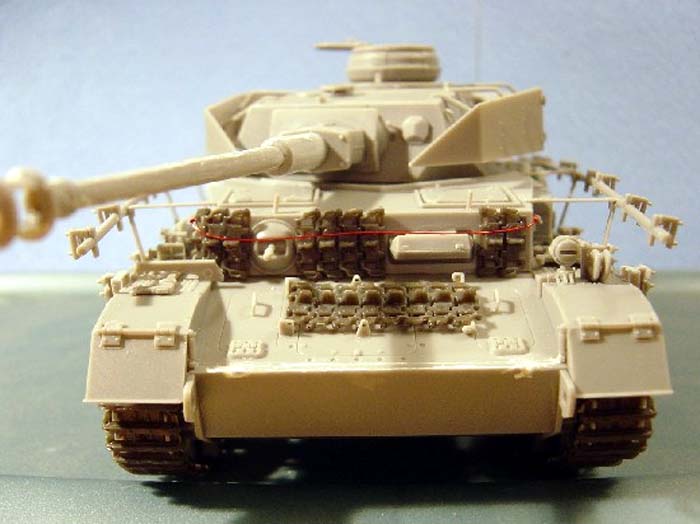
The Details I attached an antenna (made from florist wire) and a tow cable (made with aftermarket hooks and craft floss purchased at Michaels), after finding several pictures of Panzer IV's showing this manner of carrying the tow cable. I also added additional track to (1) the lower front hull by scratch building a bar across the front lower hull and adding the track and (2) the front vertical surface of the hull.
I also test fit the torso of the Verlinden tank commander inside the unique turret hatch (i.e. no actual opening into the turret) of the PIV. He sat too far out of the hatch and would need an adjustment to his height.
Painting the Panzer IV
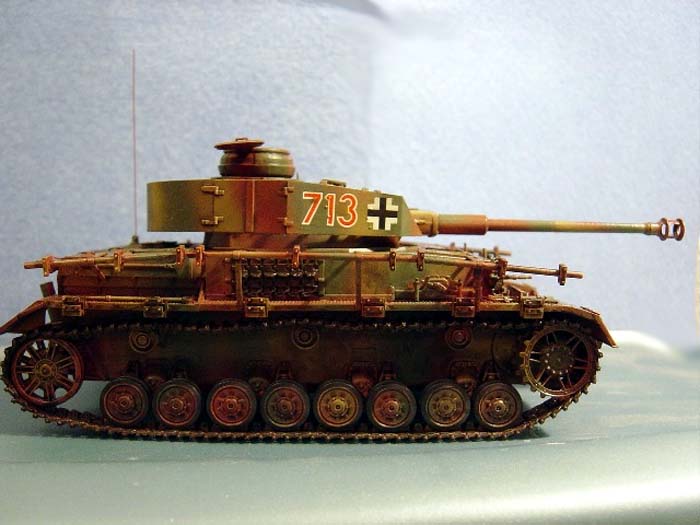
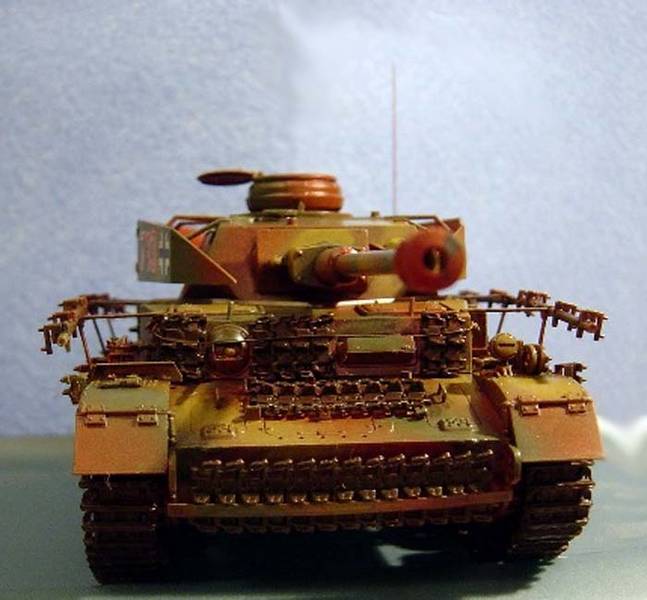
Initially, I primed the Panzer IV using Modelmaster (MM) acrylic gray primer. After a great deal of reading various Panzer IV references, I determined that the Panzer IV modeled in this Dragon kit is a model that was not produced until October 1944 (mesh schurtzen, commanders hatch, hooks on the side turret, new style exhausts). This meant that it would not have zimmerit and that the ambush scheme would not have been the manner in which it was painted. Instead, the appropriate paint scheme appeared to be: base coat of oxide red primer with the primer 2/3s covered by Dunkelgelb and Panzer Oliv Grun. I decided to go with this scheme. I painted the base coat with PollyScale (PS) Oxide Red, one of their model railroad colors. The paint went on smooth to the hull, however there were major problems with the paint on the turret. It was so bad that I decided to strip the paint and do it over. I removed the still fresh paint (within an hour of initially painting the turret) using off-brand windex. The red paint came right off with some light scrubbing with an old toothbrush, however the primer was not impacted. I believe the paint had become too thin when I added additional paint during the painting. I allowed the turret to dry overnight. The next night I re-sprayed the turret with the PS oxide red and made sure I did not thin it as much. Still having time that evening, I went ahead and applied the camouflage colors: PS Dunkelgelb and PS Panzer Oliv Grun. Finally, I did a light misting of dunkelgelb over the entire tank to blend in the colors. I painted the roadwheels using PS scale black. I did two coats of FA Raw Umber paint on the tracks, including those on the tank itself.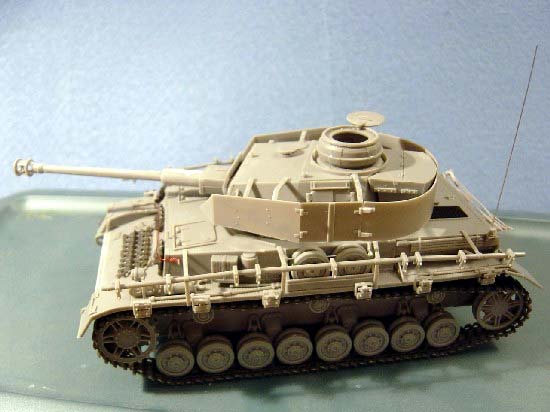
About the Author


Comments


Awesome Job Keith!!!! Your article is excellent, very informative and well written. It is a great extension to the diorama it describes. The dio itself is wonderfully done as well. Congrats my friend. Excellent work Cheers Kevin
MAY 10, 2005 - 07:11 AM

Kevin -
Outstanding job. PzKpfw IV, figures, details, and the overall execution are all top rate. Very well suppoted theme. Special thanks on the Article as this was very informative and helpful. Hope my "Ardennes" diorama comes out half as good. Fantastic job.
Blade48mrd
MAY 10, 2005 - 07:18 AM

Thanks for the positive comments everyone. Sometimes being an obsessive note taker has its benefits!
Mike, I ordered the Heki Grass from Scenic Express in Pennsylvania. They have a website, but you have to call their 1-800 number to order. They offered great service. Check out this thread for more details than you probably wanted to know: LINK
Hope this helps.
Keith
MAY 10, 2005 - 08:06 AM

Keith:
Lovely work on that "Bulge" dio. And the article is first class as well, as so many other have said. But dude, your figs are really first class! I think those may be my favorite 1:35th scale figs I've seen on the Big A since I came aboard in April. Congratulations on very nice photos as well.
Keep 'em coming
MAY 10, 2005 - 08:08 AM

thx keith and excellent work once more.hope to see some more kick butt work with heki grass from you as well looks wonderful
MAY 11, 2005 - 10:08 AM
Great dio. I really like it. Panzer, building, figures and groundwork looks great.
MAY 11, 2005 - 05:31 PM

I must congratulate you on the detail of your diorama.
While I was looking at your building I thought about something that I wanted to do for a diorama. Create a building that has burnt down. Obviously smoke would have poured out of the windows, blackening the outside of the windows and the areas above the windows in a v-shape!
Dieter
MAY 11, 2005 - 06:01 PM

Your research is all very thorough, but if I may make a criticism? IMHO the grass is too green (it is mid-December), and the ground is not muddy or wet enough. It didn't snow much until after Christmas, but it was just mild enough to rain and drizzle constantly, making very messy conditions - especially where tanks were driving.
SEP 06, 2006 - 07:35 AM
Thank you for this in depth description of your dio.
I like the scene you made very much and it is well composed.
I would have loved to see some slates on the roof. I also agree about the colour of the grass. A bit more of a early winter look would be nice.
Thank you also for your construction tips for the Panzer IV. I seriously need to reread other reviews of it also, i was not aware that the kit has such problems.
Congratulations
Claude
SEP 06, 2006 - 11:19 AM
Copyright ©2021 by Keith Middleton. Images and/or videos also by copyright holder unless otherwise noted. The views and opinions expressed herein are solely the views and opinions of the authors and/or contributors to this Web site and do not necessarily represent the views and/or opinions of Armorama, KitMaker Network, or Silver Star Enterrpises. All rights reserved. Originally published on: 2005-05-10 00:00:00. Unique Reads: 22152

WEB HOSTING BY


Copyright ©2021 Armorama and Kitmaker Network, a subsidiary of Silver Star Enterprises
All Rights Reserved. Please read our Conditions of Use and Privacy Policy.
All Rights Reserved. Please read our Conditions of Use and Privacy Policy.