

1⁄35Foggy Morning at Krinkelt-Rocherath
14
Comments
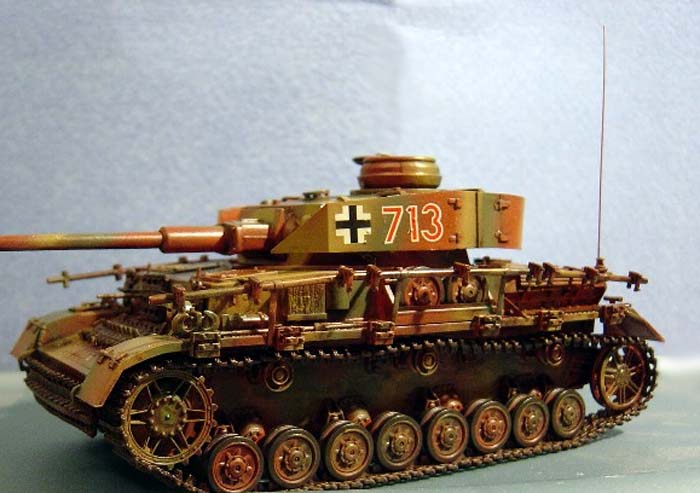
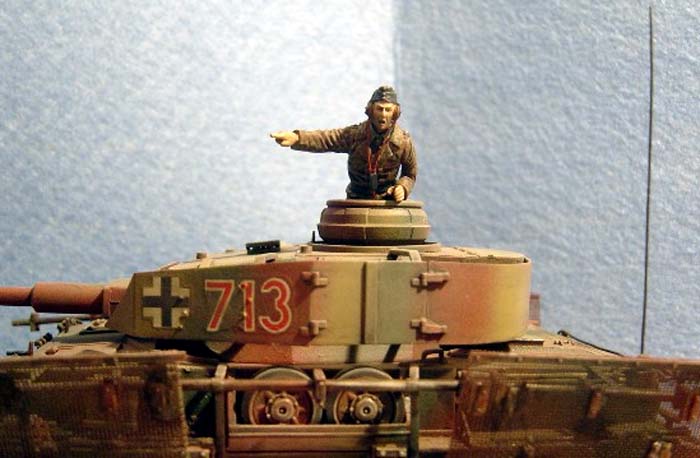
I sprayed the tank with MM Acryl Gloss coat. After the gloss coat had dried, I applied the kit decals. I used decal-setting solution to try and get the decals to go down smoothly. I am not sure what happened, but one of the numbers dried with a very noticeable fold in it. My efforts to remove the fold by applying additional decal setting solution failed miserably and resulted in a large tear in the decal. So, I scratched it off completely. Luckily, the number that I chose was the one that had three included in the kit, so I applied the new decal along with liberal amounts of decal setting solution in effort to get it to dry smoothly. The next evening, I applied the gloss coat over the decals in preparation for the washes.
The first wash was an all over wash using Raw Umber and Lamp Black highly thinned in odorless mineral spirits. I then wiped this down using both a damp rag and also Q-tips dampened with clean thinner. After allowing that to dry for a while, I applied a second wash, this one a pin wash, using the residue of the black wash with a mix of Indian Red, Van Dyke Brown and Lamp Black. Once again, I went over this with dampened Q-tips. The Panzer IV was then set aside to dry completely.
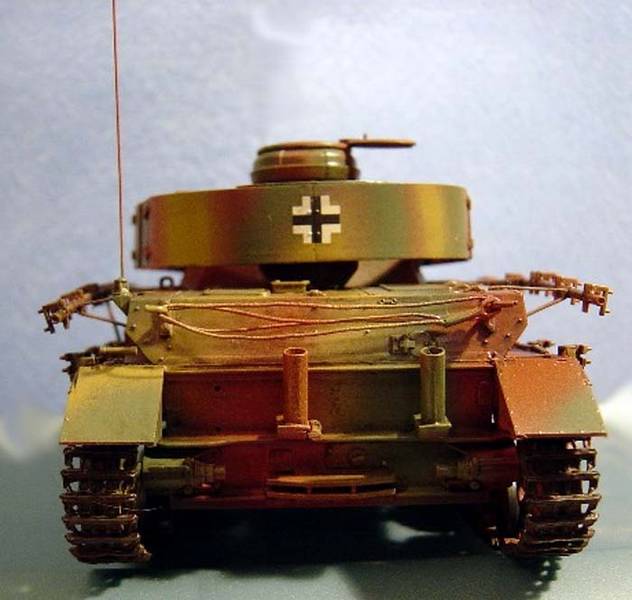
After the washes had completely dried, I sprayed the Panzer IV with MM Acryl Flat. The Panzer IV was then I dry-brushed with unbleached titanium oil paint. The tow cable was painted with FolkArt (FA) Metallic Gunmetal and Graphite mixed together in about equal proportions. The turret hatch interior area was then painted flat black. The exhausts were painted with Instant Rust rusting solution and I then applied several coats of the rust inducing liquid. The pioneer tools were painted with MM Wood and Humbrol Gunmetal. I then polished the Humbrol. I test fit the mesh schurtzen and decided that I needed to wait until after I had applied the mud to the inside of the lower hull before they were attached to the tank.
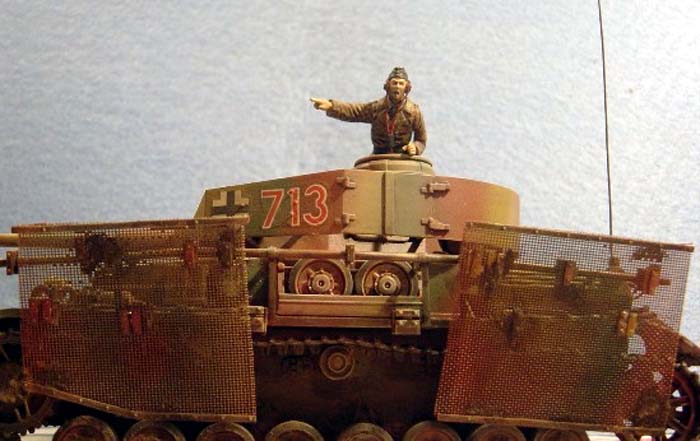
I applied mud to the Panzer IV using MMP pigments and Liquitex brand Matte Medium. After adding mud to the areas I felt were appropriate, I brushed on dry powders throughout. After allowing that to dry, I added the mesh schurtzen using superglue. This was a tricky proposition as the angle was bad and you could not see through the schurtzen well enough to see where they should be attached. The assembly of the shurtzen supports was also part of the problem as the Dragon instructions left a great deal to be desired in terms of the exact placement of the respective pieces. Eventually I had to remove several of the supports on each side and re-position them so that the shurtzen fit somewhat properly. After allowing the schurtzen to dry overnight, I added additional mud to the schurtzen to hide the glue spots.
The first wash was an all over wash using Raw Umber and Lamp Black highly thinned in odorless mineral spirits. I then wiped this down using both a damp rag and also Q-tips dampened with clean thinner. After allowing that to dry for a while, I applied a second wash, this one a pin wash, using the residue of the black wash with a mix of Indian Red, Van Dyke Brown and Lamp Black. Once again, I went over this with dampened Q-tips. The Panzer IV was then set aside to dry completely.
After the washes had completely dried, I sprayed the Panzer IV with MM Acryl Flat. The Panzer IV was then I dry-brushed with unbleached titanium oil paint. The tow cable was painted with FolkArt (FA) Metallic Gunmetal and Graphite mixed together in about equal proportions. The turret hatch interior area was then painted flat black. The exhausts were painted with Instant Rust rusting solution and I then applied several coats of the rust inducing liquid. The pioneer tools were painted with MM Wood and Humbrol Gunmetal. I then polished the Humbrol. I test fit the mesh schurtzen and decided that I needed to wait until after I had applied the mud to the inside of the lower hull before they were attached to the tank.
I applied mud to the Panzer IV using MMP pigments and Liquitex brand Matte Medium. After adding mud to the areas I felt were appropriate, I brushed on dry powders throughout. After allowing that to dry, I added the mesh schurtzen using superglue. This was a tricky proposition as the angle was bad and you could not see through the schurtzen well enough to see where they should be attached. The assembly of the shurtzen supports was also part of the problem as the Dragon instructions left a great deal to be desired in terms of the exact placement of the respective pieces. Eventually I had to remove several of the supports on each side and re-position them so that the shurtzen fit somewhat properly. After allowing the schurtzen to dry overnight, I added additional mud to the schurtzen to hide the glue spots.
About the Author


Comments


Awesome Job Keith!!!! Your article is excellent, very informative and well written. It is a great extension to the diorama it describes. The dio itself is wonderfully done as well. Congrats my friend. Excellent work Cheers Kevin
MAY 10, 2005 - 07:11 AM

Kevin -
Outstanding job. PzKpfw IV, figures, details, and the overall execution are all top rate. Very well suppoted theme. Special thanks on the Article as this was very informative and helpful. Hope my "Ardennes" diorama comes out half as good. Fantastic job.
Blade48mrd
MAY 10, 2005 - 07:18 AM

Thanks for the positive comments everyone. Sometimes being an obsessive note taker has its benefits!
Mike, I ordered the Heki Grass from Scenic Express in Pennsylvania. They have a website, but you have to call their 1-800 number to order. They offered great service. Check out this thread for more details than you probably wanted to know: LINK
Hope this helps.
Keith
MAY 10, 2005 - 08:06 AM

Keith:
Lovely work on that "Bulge" dio. And the article is first class as well, as so many other have said. But dude, your figs are really first class! I think those may be my favorite 1:35th scale figs I've seen on the Big A since I came aboard in April. Congratulations on very nice photos as well.
Keep 'em coming
MAY 10, 2005 - 08:08 AM

thx keith and excellent work once more.hope to see some more kick butt work with heki grass from you as well looks wonderful
MAY 11, 2005 - 10:08 AM
Great dio. I really like it. Panzer, building, figures and groundwork looks great.
MAY 11, 2005 - 05:31 PM

I must congratulate you on the detail of your diorama.
While I was looking at your building I thought about something that I wanted to do for a diorama. Create a building that has burnt down. Obviously smoke would have poured out of the windows, blackening the outside of the windows and the areas above the windows in a v-shape!
Dieter
MAY 11, 2005 - 06:01 PM

Your research is all very thorough, but if I may make a criticism? IMHO the grass is too green (it is mid-December), and the ground is not muddy or wet enough. It didn't snow much until after Christmas, but it was just mild enough to rain and drizzle constantly, making very messy conditions - especially where tanks were driving.
SEP 06, 2006 - 07:35 AM
Thank you for this in depth description of your dio.
I like the scene you made very much and it is well composed.
I would have loved to see some slates on the roof. I also agree about the colour of the grass. A bit more of a early winter look would be nice.
Thank you also for your construction tips for the Panzer IV. I seriously need to reread other reviews of it also, i was not aware that the kit has such problems.
Congratulations
Claude
SEP 06, 2006 - 11:19 AM
Copyright ©2021 by Keith Middleton. Images and/or videos also by copyright holder unless otherwise noted. The views and opinions expressed herein are solely the views and opinions of the authors and/or contributors to this Web site and do not necessarily represent the views and/or opinions of Armorama, KitMaker Network, or Silver Star Enterrpises. All rights reserved. Originally published on: 2005-05-10 00:00:00. Unique Reads: 22152

WEB HOSTING BY


Copyright ©2021 Armorama and Kitmaker Network, a subsidiary of Silver Star Enterprises
All Rights Reserved. Please read our Conditions of Use and Privacy Policy.
All Rights Reserved. Please read our Conditions of Use and Privacy Policy.