Constructive Feedback
For in-progress or completed build photos. Give and get contructive feedback!
1/25th Tiger 1
sgtreef
Visit this Community
Oklahoma, United States
Joined: March 01, 2002
KitMaker: 6,043 posts
Armorama: 4,347 posts
Posted: Thursday, April 24, 2008 - 10:50 PM UTC
Great looking job Matt.
I almost forgot about this build.
Coming along beautifully.
And you have more patience then most.
lespauljames
Visit this Community
England - South West, United Kingdom
Joined: January 06, 2007
KitMaker: 3,661 posts
Armorama: 2,764 posts
Posted: Friday, April 25, 2008 - 03:09 AM UTC
nice one. just whized through the whole post. fantastic. you must have one good friend to be doing this for!
Keep it up!
James
cfsfido
Visit this Community
Zuid-Holland, Netherlands
Joined: April 25, 2008
KitMaker: 42 posts
Armorama: 39 posts
Posted: Sunday, May 25, 2008 - 02:54 AM UTC
Matt :


Quoted Text

Not wanting to jump right back on the wingnuts, I looked around for something else to tackle. And oh boy, did I find a biiiggg problem. Is it me...or are the swing arms facing the wrong direction?


According to this picture, your swing arms are just fine.

Fido
neil22
Visit this Community
Cotes-d`Armor, France
Joined: August 12, 2007
KitMaker: 292 posts
Armorama: 281 posts
Posted: Sunday, May 25, 2008 - 10:04 AM UTC
that looks an amazing build.
i just have one question........... how did you turn the barrel for the machine gun? i know u used a grill to give power, but what did you use to shape the brass rod? could u do a small picture guide?

cheers
neil
PITERPANZER
Visit this Community
Gdańsk, Poland
Joined: September 11, 2005
KitMaker: 319 posts
Armorama: 316 posts
Posted: Monday, May 26, 2008 - 09:34 PM UTC

Quoted Text

Matt :


Quoted Text

Not wanting to jump right back on the wingnuts, I looked around for something else to tackle. And oh boy, did I find a biiiggg problem. Is it me...or are the swing arms facing the wrong direction?


According to this picture, your swing arms are just fine.

Fido


Fido,sorry You`re wrong.Be careful and look where is kubelblende for mg.
Somebody changes negative for this pic to wrong side.
cfsfido
Visit this Community
Zuid-Holland, Netherlands
Joined: April 25, 2008
KitMaker: 42 posts
Armorama: 39 posts
Posted: Tuesday, May 27, 2008 - 03:32 AM UTC
Piotr :
I could still have it wrong , but I flipped the picture, and when viewed like this,

the swing arms still seem to face towards the rear just like Matt's model. BTW thanks for the warning, I will check out all my reference photos more closely next time.

Fido
alanmac
Visit this Community
United Kingdom
Joined: February 25, 2007
KitMaker: 3,033 posts
Armorama: 2,953 posts
Posted: Tuesday, May 27, 2008 - 04:22 AM UTC

Quoted Text

Piotr :
I could still have it wrong , but I flipped the picture, and when viewed like this,

the swing arms still seem to face towards the rear just like Matt's model. BTW thanks for the warning, I will check out all my reference photos more closely next time.

Fido


I think you will find because of the torison bar suspension arrangement on set faces front, the other towards the rear.

So if the set was on the other side as shown in the correctly orientated photograph then they would be correct.

Alan
alanmac
Visit this Community
United Kingdom
Joined: February 25, 2007
KitMaker: 3,033 posts
Armorama: 2,953 posts
Posted: Tuesday, May 27, 2008 - 04:29 AM UTC
To confirm check out the image here

http://www.tiger-tank.com/secure/gallery8.htm

Alan
gbyrnsie
Visit this Community
Canada
Joined: July 12, 2006
KitMaker: 770 posts
Armorama: 38 posts
Posted: Tuesday, May 27, 2008 - 04:35 AM UTC
Matt, Thanks for sharing your work, it is truely brilliant and inspirational. I'm just starting a Tiger project so I'm glad I found this thread it is going to help me tremedously.

GB
Ostketten
Visit this Community
Massachusetts, United States
Joined: May 08, 2006
KitMaker: 111 posts
Armorama: 82 posts
Posted: Thursday, May 29, 2008 - 12:51 AM UTC
Hi all,

Sorry for not responding sooner, had a few days off and wasn't getting to the PC.

First off, thanks all for commenting, your comments definately keep me going!

Second, more pics to come soon on the rear plate. Haven't made a lot of progress recently, but when certain phases are complete, it will come together quickly! (the rear plate that is).

Jimmy, Jeff, James, thanks for watching!

GL Walker, thank you for the attempt for help. I scoured a lot of refrences before posting that particular comment so I wouldn't get flamed on it. I sincerely appreciate your assistance. And you too Piotr! Don't think I would have cought the reverse image

Gary, glad I can be "brilliant and inspirational", just wish the significant other would see it that way too!
Neil, I used some basic tools to turn the barrel, simple things that most modelers have handing around. Various files, some sanding sticks, but mostly a chisel blade X Acto blade as a sort of gouge. Honestly, I don't know if I have the time to do a little photo guide, would nees someone to take the pics while I do the work as well. Perhaps Iif I can find the time I'll make one. Feel free to E Mail or message me offline if you have any specific questions though.

Did I miss anyone? Alan thanks!

More pics soon!

Matt
DAK66
Visit this Community
Tennessee, United States
Joined: April 28, 2006
KitMaker: 286 posts
Armorama: 120 posts
Posted: Monday, June 16, 2008 - 07:04 AM UTC
nice work
Ostketten
Visit this Community
Massachusetts, United States
Joined: May 08, 2006
KitMaker: 111 posts
Armorama: 82 posts
Posted: Tuesday, June 24, 2008 - 06:22 AM UTC
Thanks Doug!
Ostketten
Visit this Community
Massachusetts, United States
Joined: May 08, 2006
KitMaker: 111 posts
Armorama: 82 posts
Posted: Tuesday, June 24, 2008 - 08:22 AM UTC
OK Guys, here we go again!

Here's what I've been up to on the Big Tigg. When the weather gets warmer, my modeling output slows waaayyy down lol.

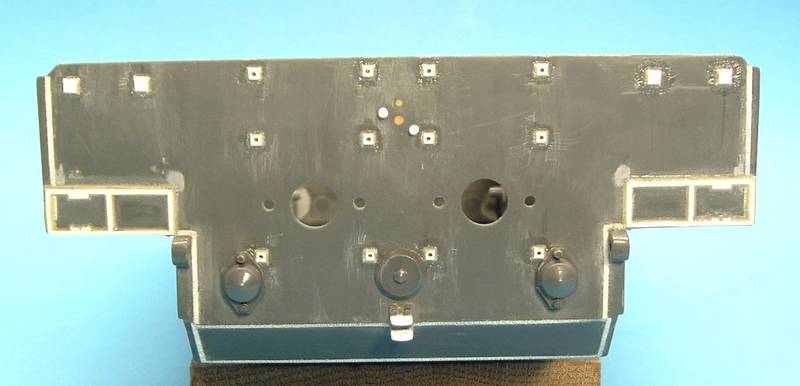
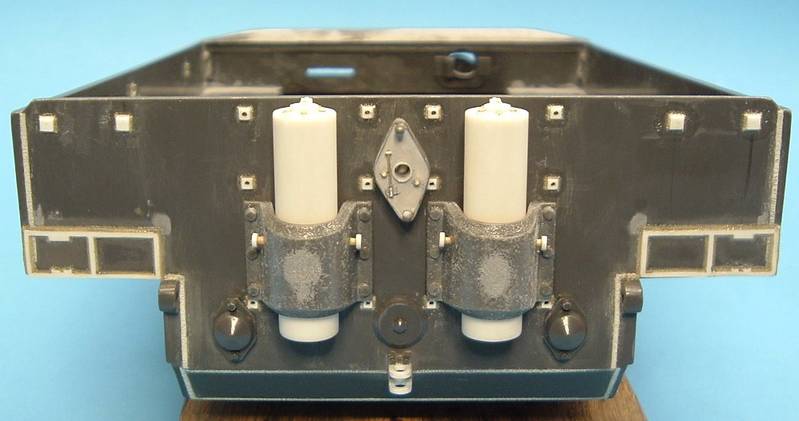
Here is the rear hull with the basic details installed:


I had to add the exhaust shield mounting studs and Feifel mounting points. Of course, weld beads have been added also, there EVERYWHERE on a tank!

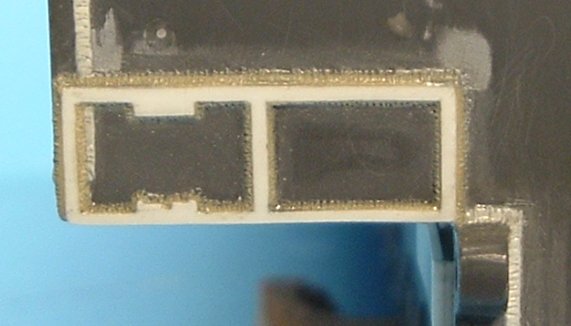
The rear fender mounting plates were scratch built, glued on, and the entire exterior and interior lengths weld beaded up.


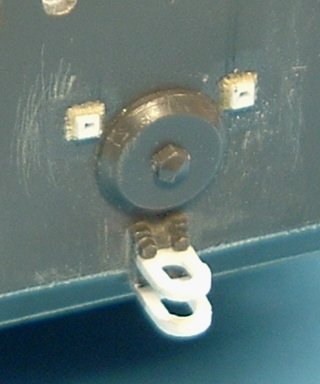
The tow hitch on the kit was crap (not to mention one part was broken off), so I scratched a couple new parts for it.


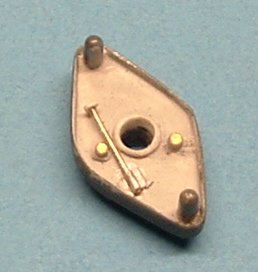
The manual starter crank plate got a lot of detailing as well. First, I drilled through the center and added a section of styrene tube. The studs were made from short sections of brass rod, inserted and glued through the back. The start pin was scratched from wire, printer’s aluminum and styrene. My sloppiness in removing the sink holes was covered up with Mr Surfacer 500 on the inner surface of the plate.


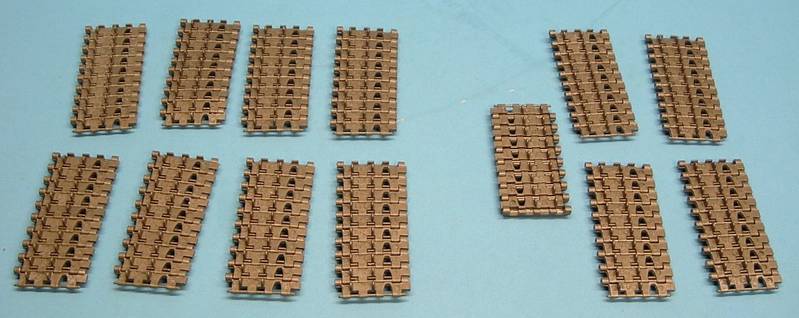
I've also been slowly working on the individual track links, which are horrible.


As you can see, there isn’t one, not two, but THREE prominent sink holes on the inner surface of each track. Then there is that nasty part number, on every link....
The tracks are made of some sort of soft vinyl/plastic stuff making them difficult to clean up neatly. I'm thinking of freezing them to stiffen the plastic, and then do a thorough cleaning.
Oh yeah, there is also some kind of whacky pin on the track face that needs to be removed.


Here is a mock up of the completed sub assemblies held in place with Fun Tack:


Moving on, I restarted work on the Feifel air cleaners again. You might remember that I had already built these parts


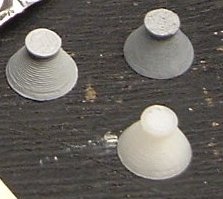
and had a hard time creating the cone shaped bottoms. I got some help from a friend, who whipped up this drawing for me in Ideas 12


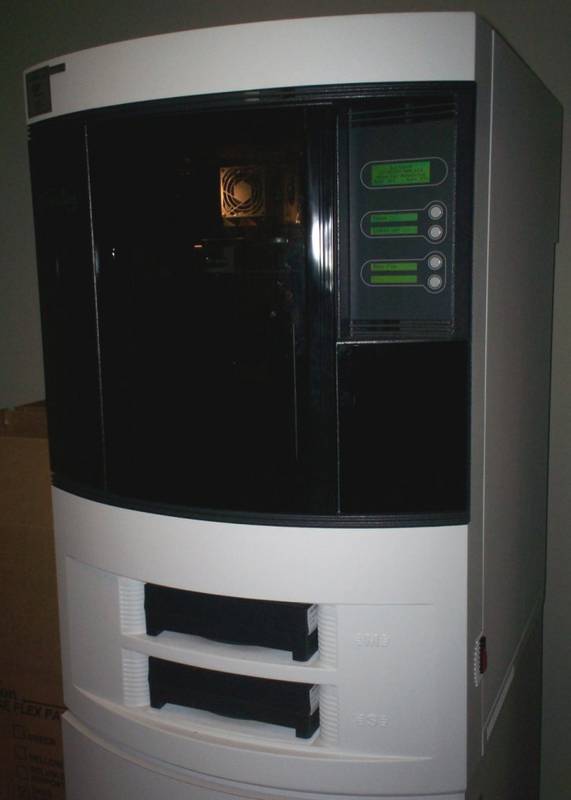
from dimensions I had provided. My friend Yiyan then used this awesome piece of technology/machinery to create the parts for me.


It's a Dimension SST Rapid Protype machine. Basically it takes the drawing, digitally interprets it and lays a layer of a plastic resiny material down layer by layer until whatever shape is made.


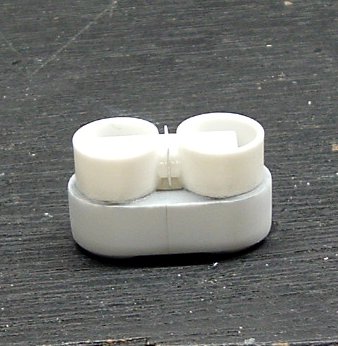
Very easy to create parts this way, but kind of sucks, each different layer leaves a step. The steps required multiple layers of Tamiya putty and Mr Surfacer to smooth out.

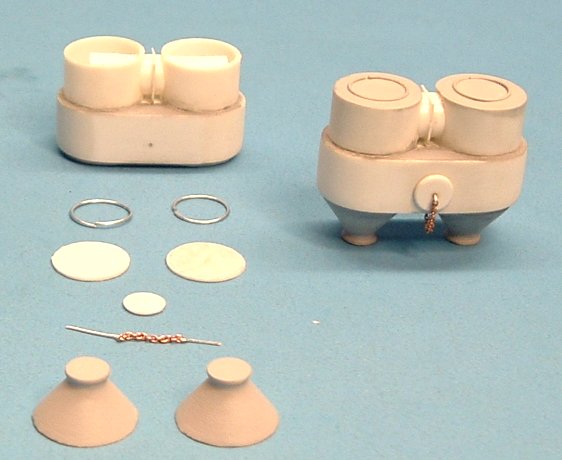
Circular plastic lids needed to be attached to the top of the Feifels. After that I attached the "cones" to the bottom of the "cans".

Another small diameter circle was cut from Evergreen stock and attached to the middle of the cans. Some wire and 40 link per inch chain was used to finished that off. Hoops from the wire that you get in Fruil tracks was used to create the hoops, then glued them to the top of the cans. Finally, some Mr Surfacer was brushed on to even the whole thing out.

The composite parts on the left, the finished Feifel on the right:


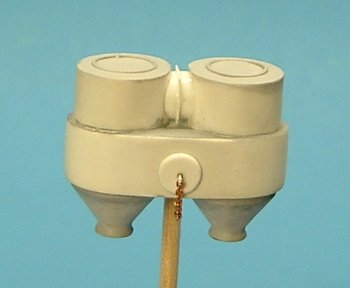
Still needed is some more chain on the bottom covers of the cones, and add the pipes that go to the engine compartment, but the Feifels are basically done at this point.


Next up will be the rack to hold the toolbox.

Tanks for watching, that's it for now!

Matt
Rattler
Visit this Community
Texas, United States
Joined: November 23, 2002
KitMaker: 512 posts
Armorama: 277 posts
Posted: Monday, July 21, 2008 - 08:23 AM UTC
WoooooHoooooo

Awesome updates there Matt, I've kinda been AWOL lol sorry... man the kitty is really flowing smoothly!!!!!! lol build faster I wanna see more LOL


Looking forward to the next update


Chris
SIRNEIL
Visit this Community
England - South East, United Kingdom
Joined: July 30, 2007
KitMaker: 658 posts
Armorama: 599 posts
Posted: Monday, July 21, 2008 - 09:25 AM UTC

Quoted Text

from dimensions I had provided. My friend Yiyan then used this awesome piece of technology/machinery to create the parts for me.


hi matt
the company i work for has got the same kind of machine it fires a laser through a special type of liquid resin. then after its run its program hey presto a solid peice of resin made to the finest of tolerence.
technology gone mad !!!!
big tigg still looking great.........
neil
DaZ319
Visit this Community
England - East Anglia, United Kingdom
Joined: July 17, 2008
KitMaker: 8 posts
Armorama: 7 posts
Posted: Monday, July 21, 2008 - 11:23 AM UTC
I don't believe it! ! ! ! !

This is an amazing thread, I cannot even comprehend your actual ability, you have inspired me to try lots of different things when building, and to have a go at scratch building!

Keep up the good work, very enjoyable from this seat, nightmare from yours I guess

Congratulations so far, looking forward to more!
Ostketten
Visit this Community
Massachusetts, United States
Joined: May 08, 2006
KitMaker: 111 posts
Armorama: 82 posts
Posted: Wednesday, July 23, 2008 - 06:11 AM UTC
Hi guys,

Chris, thanks for the encouragement. As to building faster... well, who knows if that will happen! Right now, when working on the Feifels, I found some new documentation on the mounting brackets from David Byrden's awsome Tiger1 site, and had to move the mounting points. That simple little task took the wind out of my sails lol. Plus, being summertime in the US, I want to be outside! I have a boat that needs a lot of work, so that has been taking a good chunk of time. I did start a model OOB for my IPMS Club Build. I'm afraid to say what it is, as I might be ostrasized by my fellow tread heads

Neil,
Technology is great .. when it works right. I can say that, cause I work in IT From what Yiyan told me, that rapid prototyper is one of the lower end models, they can get as expensive as a quarter million or more! Sounds like the lazer/resin is a couple notches above what we have here:) Have you ever had any parts made on it? If so, how did they come out?

Daren,
Give scratch building a try! It's actually very rewarding when your able to reproduce an item with a degree of accuracy. One of the best things about scratchin' is that you don't waste a lot of $$$ on materials. Most of the things scratched on the Tiger have been built more than once, cause I wasn't happy with the first try. Theres a cubby on my desk thats filled with failed attempts. So give it a try!

Thanks again gents!
SIRNEIL
Visit this Community
England - South East, United Kingdom
Joined: July 30, 2007
KitMaker: 658 posts
Armorama: 599 posts
Posted: Wednesday, July 23, 2008 - 06:36 AM UTC
hi matt
the company i work for is called the martin-baker aircraft company (we make ejection seats) and the machine they have is for prototype work. they also make small scale resin ejection seats for long service retirements.i do wonder if some of the bigger model companys use this kind of machine for there pre production work. it really is amazing to see something solid being made out of liquid... and no i havent had anything made for myself i'm alowed to look but not allowed to touch..
all the best
neil
PITERPANZER
Visit this Community
Gdańsk, Poland
Joined: September 11, 2005
KitMaker: 319 posts
Armorama: 316 posts
Posted: Saturday, November 01, 2008 - 09:38 PM UTC
Matt ,where are YOU ? I wat,wait .......
Rattler
Visit this Community
Texas, United States
Joined: November 23, 2002
KitMaker: 512 posts
Armorama: 277 posts
Posted: Sunday, November 02, 2008 - 06:50 AM UTC
Hiya Matt

No worries on the building time... was just poken fun, but seriously.. you are doing a BEAUTIFUL job on the tiger... I'm very pleased to see any updates that you post. Even have a few of My local club guys checking out the thread as well... plust with all the work you're doing on this tiger I don't expect it rushed... hehehe I'd have to come up there an smack ya around if you rushed this project... hehehe... Now then for the boat.. and being summer time.. I don't blame ya

Can't wait to see more progress...


Chris

P.S. btw what did you build OOB ??? hmmmmmm
Jamesite
Visit this Community
United Kingdom
Joined: December 05, 2006
KitMaker: 2,208 posts
Armorama: 2,152 posts
Posted: Monday, November 03, 2008 - 04:39 AM UTC
Great to see some more progress Matt,

You continue to impress in every post, so don't let us down now!

James
Ostketten
Visit this Community
Massachusetts, United States
Joined: May 08, 2006
KitMaker: 111 posts
Armorama: 82 posts
Posted: Monday, November 03, 2008 - 09:06 AM UTC
Hi James,

Funny that you should comment, I was just looking at your " One Week Stug IV". Have one of those built up on the shelf, no where near as nice as that though!

Apologies for the lack of updates recently, got burnt out with the Big Tig for a while. Been taking a short break from that project and moves on to something else for a while. Come Jan, I think I will have had sufficient time off to tackle it again. Hopefully Aber's set will be out by then to ease the pain! I do enjoy the challenge of scratchbuilding though, just not every single little detail lol

Thanks for your comment James!

Matt
Jamesite
Visit this Community
United Kingdom
Joined: December 05, 2006
KitMaker: 2,208 posts
Armorama: 2,152 posts
Posted: Tuesday, November 04, 2008 - 02:28 AM UTC

Quoted Text

Hi James,

Funny that you should comment, I was just looking at your " One Week Stug IV". Have one of those built up on the shelf, no where near as nice as that though!

Apologies for the lack of updates recently, got burnt out with the Big Tig for a while. Been taking a short break from that project and moves on to something else for a while. Come Jan, I think I will have had sufficient time off to tackle it again. Hopefully Aber's set will be out by then to ease the pain! I do enjoy the challenge of scratchbuilding though, just not every single little detail lol

Thanks for your comment James!

Matt


Thanks Matt.

I know exactly what you mean about getting burnt out with a project,thats exactly why I got started on that stug.

Good luck with it!

James
jimz66
Visit this Community
Connecticut, United States
Joined: December 15, 2006
KitMaker: 1,165 posts
Armorama: 1,105 posts
Posted: Tuesday, November 04, 2008 - 11:56 AM UTC
Keep going Matt. Looking great so far. Hope to see this one at the spring and fall shows of 2009. Best of luck.
Ostketten
Visit this Community
Massachusetts, United States
Joined: May 08, 2006
KitMaker: 111 posts
Armorama: 82 posts
Posted: Tuesday, December 30, 2008 - 04:38 AM UTC
Hi Chris,


Quoted Text

P.S. btw what did you build OOB ??? hmmmmmm


I know this isn't exactly the right thread, or site to post these, but, hey.. you asked what I was building OOB!

Hope none of my fello Treadheads kick me out of the trenches for this one


We had an African Theater club build and I decided to shock the general membership with this choice.

Back to the Tiger in January, watch for updates soon!

Matt