Sup Matt,
MAN... she is a beauty !!!!!!!!! nice clean build nice sublte weathering.. a well taken care of bird... excellent build Matt...
LOL now get back to the BIG Kitty... since it's close enough to Jan LOL
looking forward to some updates on the Tiger
Chris
Constructive Feedback
For in-progress or completed build photos. Give and get contructive feedback!
For in-progress or completed build photos. Give and get contructive feedback!
Hosted by Darren Baker, Dave O'Meara
1/25th Tiger 1

Rattler

Joined: November 23, 2002
KitMaker: 512 posts
Armorama: 277 posts

Posted: Tuesday, December 30, 2008 - 05:42 AM UTC
Logan

Joined: September 30, 2004
KitMaker: 523 posts
Armorama: 400 posts

Posted: Tuesday, December 30, 2008 - 08:24 AM UTC
HI
WOW !! You are truly a master builder !!! How you were able to turn a 1/25 TIGER into a 1/72 (?) B-24 is truly awe inspiring indeed ...
Look fwd to your updates in the new year !
T
WOW !! You are truly a master builder !!! How you were able to turn a 1/25 TIGER into a 1/72 (?) B-24 is truly awe inspiring indeed ...

Look fwd to your updates in the new year !
T
MCR

Joined: July 15, 2004
KitMaker: 464 posts
Armorama: 407 posts

Posted: Friday, January 09, 2009 - 01:07 PM UTC
Well? Where's our update? 
Mark

Mark

Ostketten

Joined: May 08, 2006
KitMaker: 111 posts
Armorama: 82 posts

Posted: Saturday, January 10, 2009 - 04:04 AM UTC
Quoted Text
Well? Where's our update?
Mark
Coming soon, back in process of building something so I CAN post an update!


Rattler

Joined: November 23, 2002
KitMaker: 512 posts
Armorama: 277 posts

Posted: Saturday, January 10, 2009 - 08:34 AM UTC
WoooooooHoooooooo 


 Update ...yeah...


 Update ...yeah...
DioRandy

Joined: October 04, 2007
KitMaker: 108 posts
Armorama: 84 posts

Posted: Saturday, January 10, 2009 - 09:11 AM UTC
Is this the motorized (battery operated) kit?
I've pledged to build mine after I retire and I just turned 50. All the parts are still in the factory-sealed packaging. So, I'll be keeping a close eye on your progress.
I've pledged to build mine after I retire and I just turned 50. All the parts are still in the factory-sealed packaging. So, I'll be keeping a close eye on your progress.

Ostketten

Joined: May 08, 2006
KitMaker: 111 posts
Armorama: 82 posts

Posted: Tuesday, January 13, 2009 - 05:49 AM UTC
Quoted Text
Is this the motorized (battery operated) kit?
I've pledged to build mine after I retire and I just turned 50. All the parts are still in the factory-sealed packaging. So, I'll be keeping a close eye on your progress.
Hi,
No this is not the motorized kit. The Tamiya kit I have has an interior with it, albeit not very accurate. I do have the 1/25 Academy kits of the Panther and Jadgpanther that were motorized. Someday the panther will get a rehab and the Jadg will be built!
Look for an update tomorrow on the Big Tig. Actually built some more on it last night!

Matt

Ostketten

Joined: May 08, 2006
KitMaker: 111 posts
Armorama: 82 posts

Posted: Wednesday, January 14, 2009 - 07:06 AM UTC
Hi All,
Well, its January, and I'm back at the Tiger build. Time for an update!

Did some work on the drivers bulletproof glass and the hull hatches. Lets talk about the glass first.
I cut some rough rectangular squares out of a clear acetate sheet I have a stock of, then painted one face with Tamiya clear green,
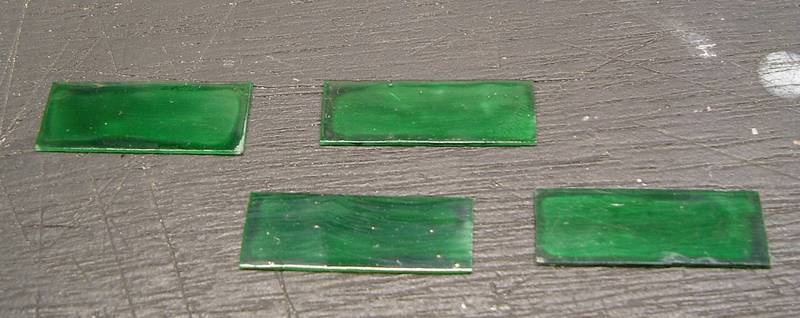
I glued them together with super glue by attaching Evergreen stock to 3 of the 4 edges. I wanted to build up a thickness.
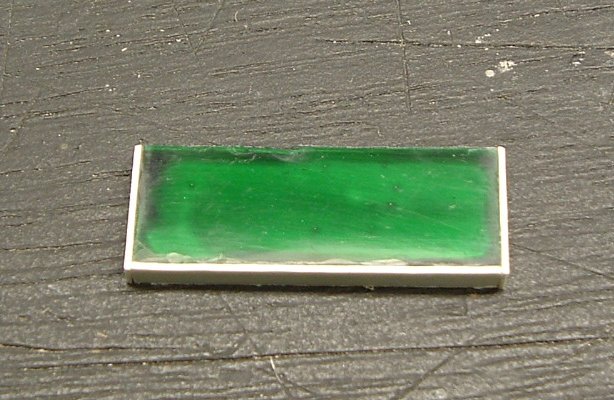
Contrary to popular belief, super glue will NOT fog clear parts, as long as there is a constant airflow around it while drying. The vapors from the glue setting is what cause fogging. This little assembly isn't pretty, but dosent have to be.
A while ago I cut off the moulded on drivers glass detail on the interior and opened the vision slit. Now, I simply glued the glass in. Voila! see through bulletproof glass!
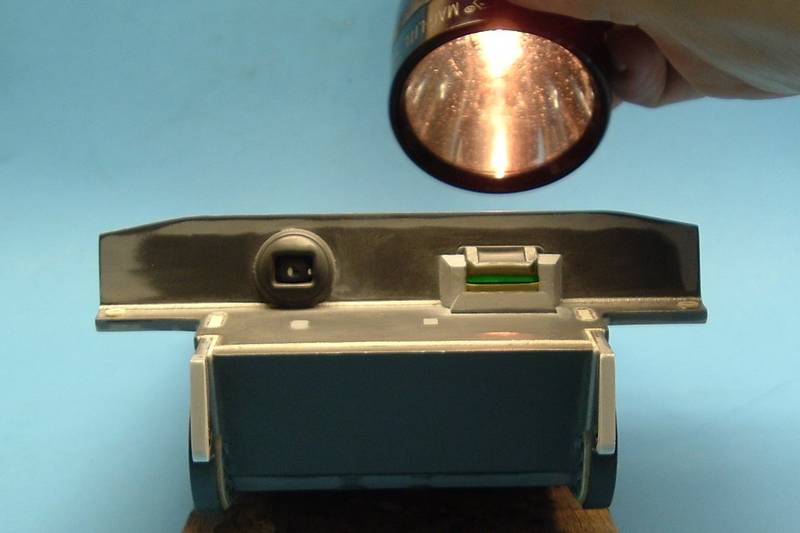
There are a couple of reinforcing scrap Evergreen pieces there, as the interior surface was well hacked up removing the moulded detail.
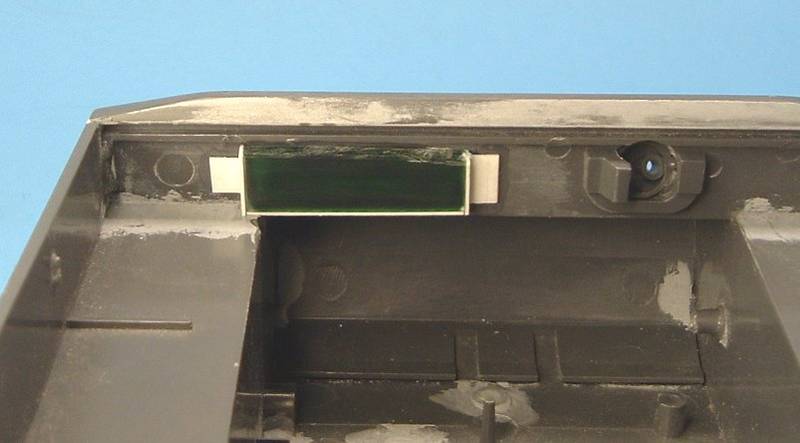
On to the hatches!
Looking at them, they have a nice episcope holder moulded on the interior, but the kit itself dosen't have any episcopes included! I chose to hack that off, as it will never be seen, and open the hole for the episcopes.
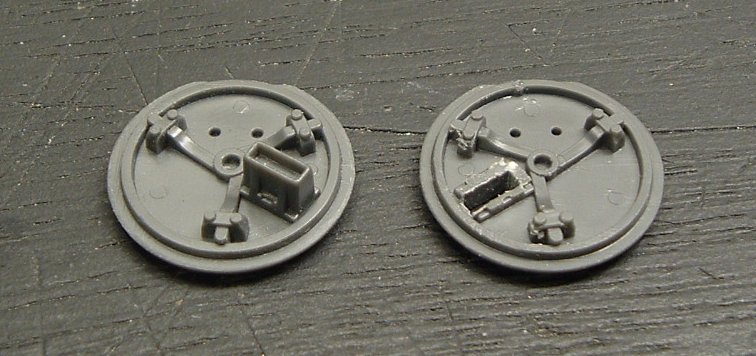
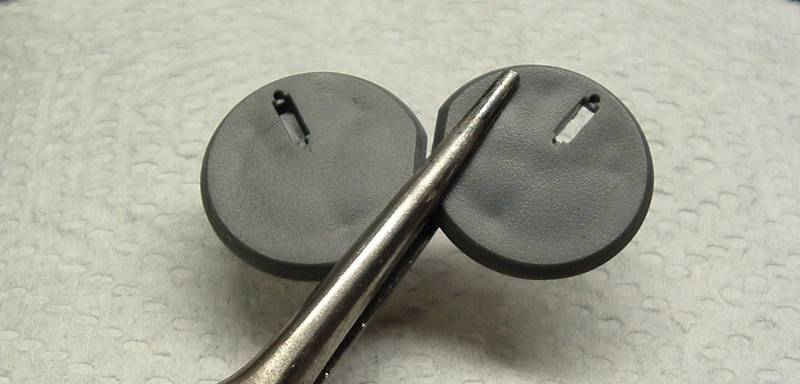
You might notice three prominent sink holes on the top of the hatches as well. These got the ole Tamiya putty filling job.
Episcopes were made from some thick and thin scrap Evergreen pieces. The thin ones had a rectangle cut from them to imitate the overhang for the glass, then glued to the thick pieces. (I took pictures of this process, but were so whited out, they were unusable)
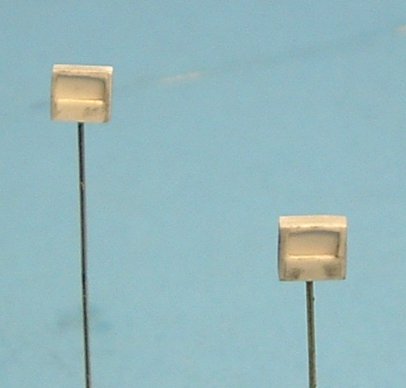
The last thing I've done recently was attached the episcope armored guards, and create the weld beads at their bases.
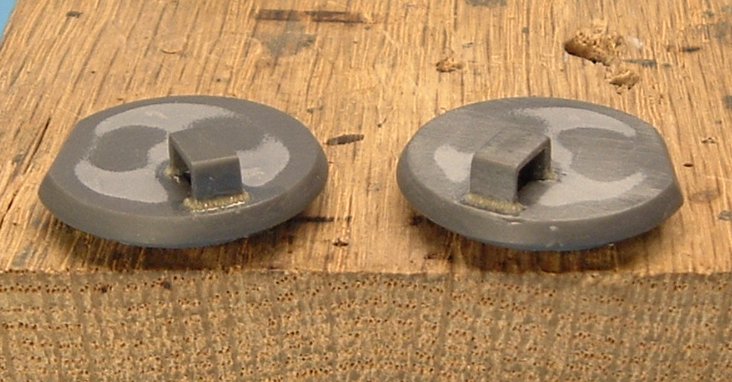
Next step is to paint and install the episcopes, give the hatches a little texture with Mr Surfacer 500, and install to the hull top.
More updates as I make progress on the Tiggy!
Matt
Well, its January, and I'm back at the Tiger build. Time for an update!


Did some work on the drivers bulletproof glass and the hull hatches. Lets talk about the glass first.
I cut some rough rectangular squares out of a clear acetate sheet I have a stock of, then painted one face with Tamiya clear green,

I glued them together with super glue by attaching Evergreen stock to 3 of the 4 edges. I wanted to build up a thickness.

Contrary to popular belief, super glue will NOT fog clear parts, as long as there is a constant airflow around it while drying. The vapors from the glue setting is what cause fogging. This little assembly isn't pretty, but dosent have to be.
A while ago I cut off the moulded on drivers glass detail on the interior and opened the vision slit. Now, I simply glued the glass in. Voila! see through bulletproof glass!

There are a couple of reinforcing scrap Evergreen pieces there, as the interior surface was well hacked up removing the moulded detail.

On to the hatches!
Looking at them, they have a nice episcope holder moulded on the interior, but the kit itself dosen't have any episcopes included! I chose to hack that off, as it will never be seen, and open the hole for the episcopes.


You might notice three prominent sink holes on the top of the hatches as well. These got the ole Tamiya putty filling job.
Episcopes were made from some thick and thin scrap Evergreen pieces. The thin ones had a rectangle cut from them to imitate the overhang for the glass, then glued to the thick pieces. (I took pictures of this process, but were so whited out, they were unusable)

The last thing I've done recently was attached the episcope armored guards, and create the weld beads at their bases.

Next step is to paint and install the episcopes, give the hatches a little texture with Mr Surfacer 500, and install to the hull top.
More updates as I make progress on the Tiggy!
Matt

SIRNEIL

Joined: July 30, 2007
KitMaker: 658 posts
Armorama: 599 posts

Posted: Wednesday, January 14, 2009 - 07:33 AM UTC
WOO HOO 


MATT AND THE BIG KITTY ARE BACK...............


neil..........


MATT AND THE BIG KITTY ARE BACK...............


neil..........


Jamesite

Joined: December 05, 2006
KitMaker: 2,208 posts
Armorama: 2,152 posts

Posted: Thursday, January 15, 2009 - 12:25 AM UTC
Yes its great to see some more progress on this one Matt, keep it coming!
James
James


PITERPANZER

Joined: September 11, 2005
KitMaker: 319 posts
Armorama: 316 posts

Posted: Saturday, January 17, 2009 - 10:12 PM UTC
I`m happy to see You back . I would recall that the periscopes are available as a PE kit for Panther (limited serie) .
jimz66

Joined: December 15, 2006
KitMaker: 1,165 posts
Armorama: 1,105 posts

Posted: Monday, January 19, 2009 - 03:45 AM UTC
Great to see this one back on the bench Matt. Thanks for that great update.

Ostketten

Joined: May 08, 2006
KitMaker: 111 posts
Armorama: 82 posts

Posted: Thursday, January 22, 2009 - 06:05 AM UTC
Hi All,
Time for a weekly update.
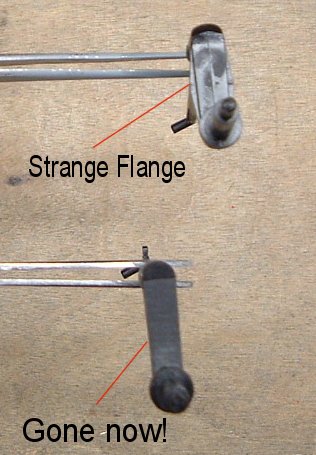
Didn't get a whole lot done over the weekend, due to the damn swing arms. For some reason, Tamiya added a strange flange on each side of every single swing arm. Not to mention there is an abundance of heavy seam lines on them as well! It takes me approximately 20 to 25 mins to thoroughly clean up each swing arm. Yuk, talk aboutboring and tedious job.
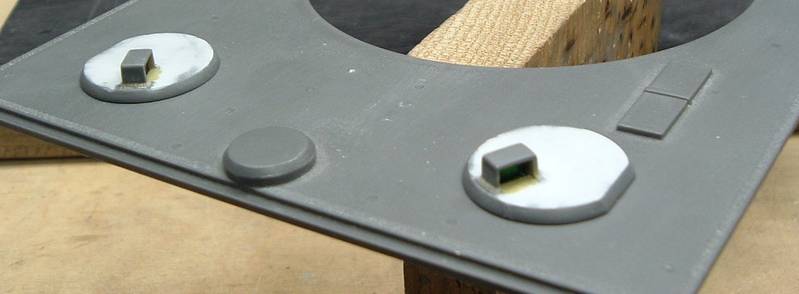
It was pretty random work done last weekend, I got the Drivers and RO hatches finished, installed the painted episcopes and mounted the hatches themselves.
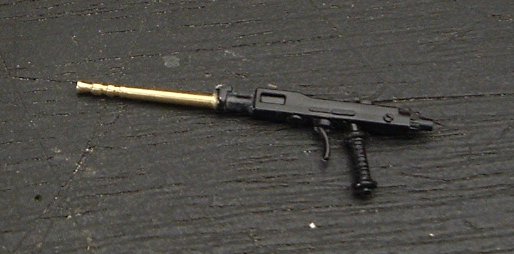
Mounted the previously made MG barrel to the receiver. The overall length of the MG looks short, but you'll never see it through closed hatches! It was only added it to counter balance the weight of the brass barrel.
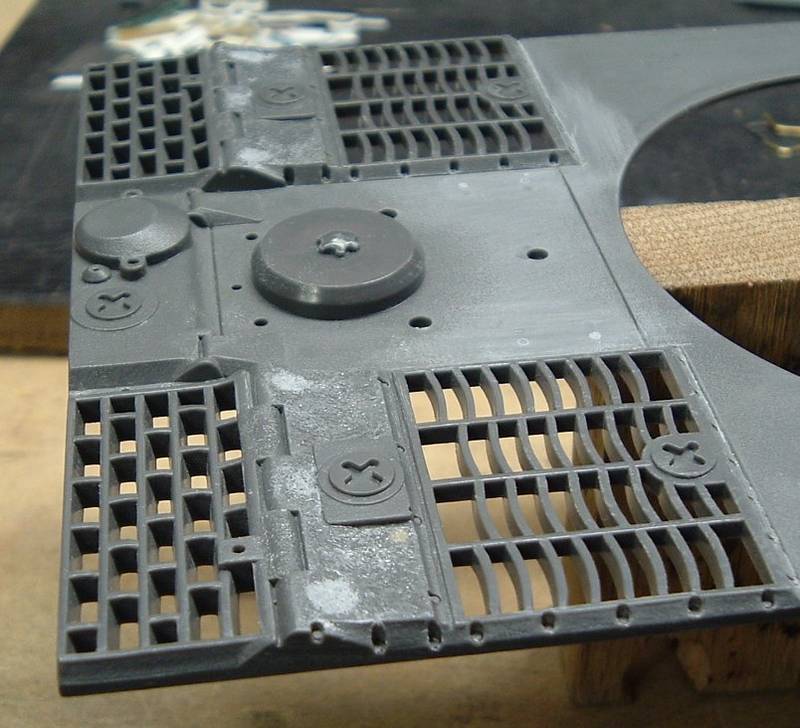
Some sink marks were filled on the engine deck cooling grates and cast texture applied with liquid cement and a stiff brush.
I finally bit the bullet and made the mounting points for the wing nuts that go around the kugleblende from some scrap PE fret. Man, those were tiny and difficult to make the same!
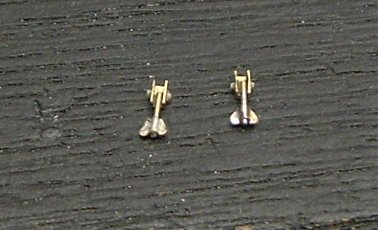
After that, they were mounted to the glacis, and then got the Mr Surfacer texture treatment.
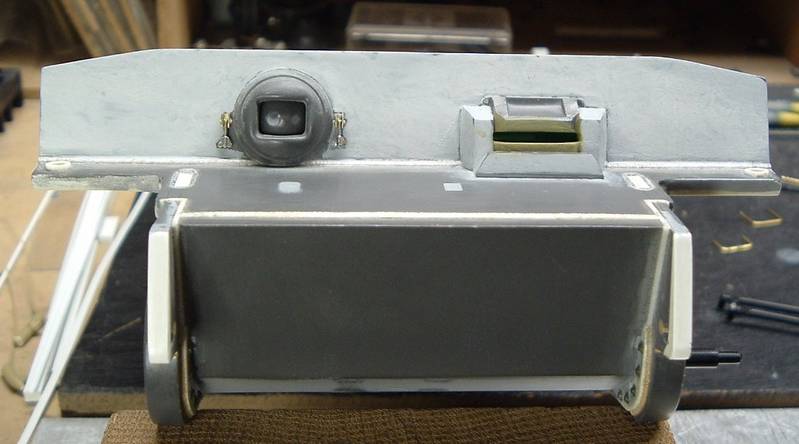
The aim of the game now is to get the lower hull buttoned up!
I’m currently working on some engine deck and schnorkel cover details.
More to follow...sometime soon

Matt
Time for a weekly update.
Didn't get a whole lot done over the weekend, due to the damn swing arms. For some reason, Tamiya added a strange flange on each side of every single swing arm. Not to mention there is an abundance of heavy seam lines on them as well! It takes me approximately 20 to 25 mins to thoroughly clean up each swing arm. Yuk, talk aboutboring and tedious job.


It was pretty random work done last weekend, I got the Drivers and RO hatches finished, installed the painted episcopes and mounted the hatches themselves.

Mounted the previously made MG barrel to the receiver. The overall length of the MG looks short, but you'll never see it through closed hatches! It was only added it to counter balance the weight of the brass barrel.

Some sink marks were filled on the engine deck cooling grates and cast texture applied with liquid cement and a stiff brush.

I finally bit the bullet and made the mounting points for the wing nuts that go around the kugleblende from some scrap PE fret. Man, those were tiny and difficult to make the same!

After that, they were mounted to the glacis, and then got the Mr Surfacer texture treatment.

The aim of the game now is to get the lower hull buttoned up!
I’m currently working on some engine deck and schnorkel cover details.
More to follow...sometime soon


Matt

Ostketten

Joined: May 08, 2006
KitMaker: 111 posts
Armorama: 82 posts

Posted: Monday, February 16, 2009 - 12:30 PM UTC
Hi everyone,
Time for a smallish update.
Been working on the engine deck details in preparation to button the hull up.
Had to scratch build the hinge for the schnorkel cover. While I was at it, the cover had some cast texture added.
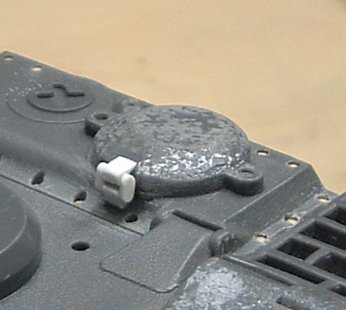
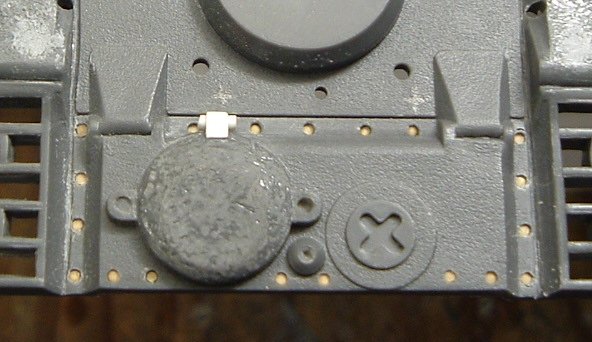
Moving on, I noticed the entire engine deck is missing many small details, such as the countersunk bolts on the rear hatch. I drilled holes in the correct positions, then inserted stretched sprue from the bottom, and marked a position flush with the deck.
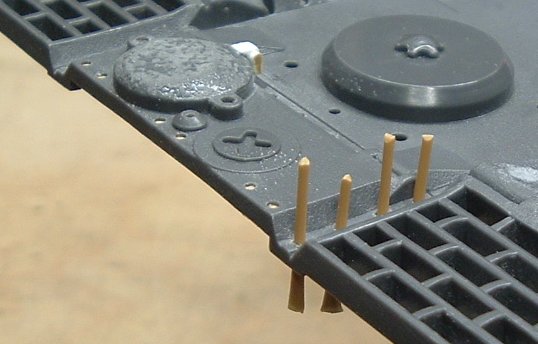
The sprue was cut short, and inserted from under the deck, stopping just shy of being flush. The excess was trimmed from the bottom. This process is much like filling unwanted holes in the hull deck, except no sanding on top!
Here is a pic of the finished rear hatch.
Next up was the engine hatch itself. Following diagrams from David Byrden's site, I scratched the underwater travel locks and hatch locks (the round stuff on the engine hatch)
The hatch locks were made by punching out a disk of Evergreen, then punching a square hole in then, with a little fine trimming to get 'em the right shape. The underwater travel locks were a bit more complicated. First, I drilled out some spare Panther tool holders (the ones for the tow clevis), then sliced off a small slice, and glued then to the engine deck. These needed to be sanded down, and after that, a cross shape was carved in them with an X Acto. Final step was to drill a .020" hole and insert brass rod from beneath, to create the lock itself. It really should be square, but this is better than nothing!
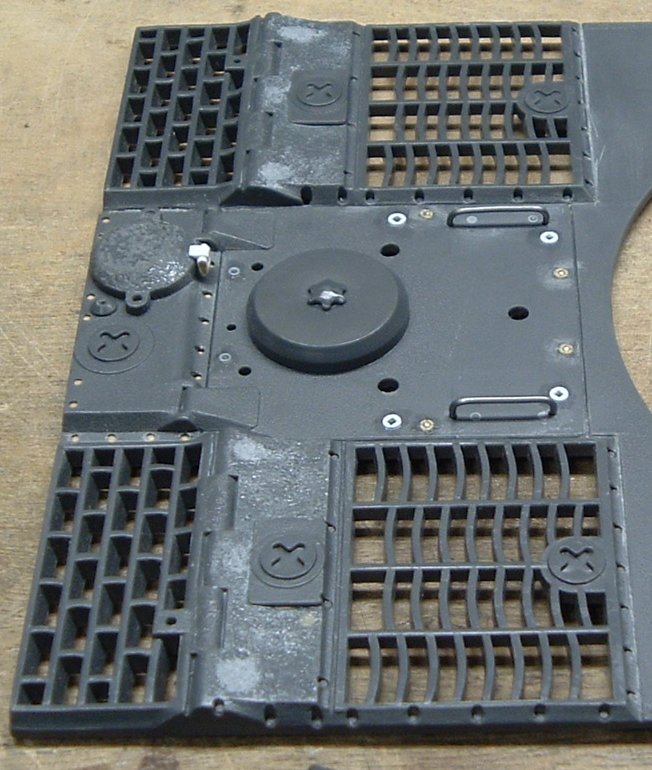
Last thing was to add a pair of hatch handles from some soft steel wire.
Here is a shot of the engine deck from underneath to show all the things drilled and filled.
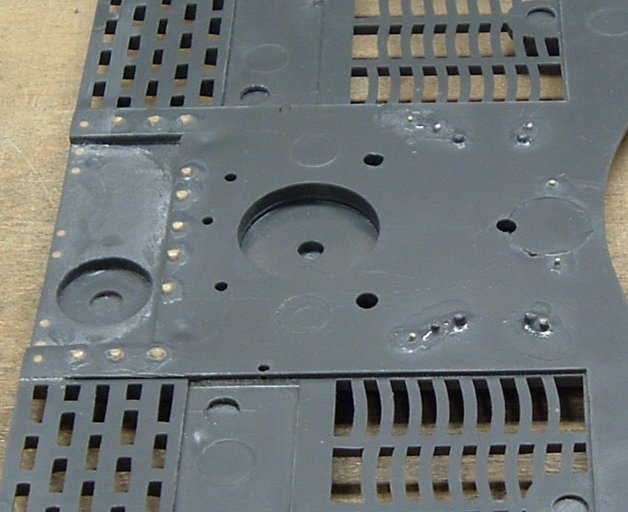
Matt
Time for a smallish update.
Been working on the engine deck details in preparation to button the hull up.
Had to scratch build the hinge for the schnorkel cover. While I was at it, the cover had some cast texture added.

Moving on, I noticed the entire engine deck is missing many small details, such as the countersunk bolts on the rear hatch. I drilled holes in the correct positions, then inserted stretched sprue from the bottom, and marked a position flush with the deck.

The sprue was cut short, and inserted from under the deck, stopping just shy of being flush. The excess was trimmed from the bottom. This process is much like filling unwanted holes in the hull deck, except no sanding on top!
Here is a pic of the finished rear hatch.

Next up was the engine hatch itself. Following diagrams from David Byrden's site, I scratched the underwater travel locks and hatch locks (the round stuff on the engine hatch)
The hatch locks were made by punching out a disk of Evergreen, then punching a square hole in then, with a little fine trimming to get 'em the right shape. The underwater travel locks were a bit more complicated. First, I drilled out some spare Panther tool holders (the ones for the tow clevis), then sliced off a small slice, and glued then to the engine deck. These needed to be sanded down, and after that, a cross shape was carved in them with an X Acto. Final step was to drill a .020" hole and insert brass rod from beneath, to create the lock itself. It really should be square, but this is better than nothing!

Last thing was to add a pair of hatch handles from some soft steel wire.
Here is a shot of the engine deck from underneath to show all the things drilled and filled.

Matt
pebblemonkey

Joined: January 26, 2009
KitMaker: 180 posts
Armorama: 151 posts

Posted: Monday, February 16, 2009 - 11:51 PM UTC
Hi Matt,
Your certainly proving there is Life in a Old kit!
Very impressive, can't wait to see the finished results, hope your friend appreciates the wait and effort you've done


Matt
Your certainly proving there is Life in a Old kit!
Very impressive, can't wait to see the finished results, hope your friend appreciates the wait and effort you've done


Matt

alanmac

Joined: February 25, 2007
KitMaker: 3,033 posts
Armorama: 2,953 posts

Posted: Tuesday, February 17, 2009 - 12:04 AM UTC
Hi Matt
Still dropping in to see the progress on this marathon project. Can understand you needing to take a break from it now and then.
Mine will have to wait it's turn, a long way down the list.
Updates look good with your usual attention to detail and flair for solving how to achieve the look required.
I think Tamiya must be impressed as well as I hear talk they are re releasing the old girl in the near future. Maybe they'll include a link to this blog in their instructions.
Alan
Still dropping in to see the progress on this marathon project. Can understand you needing to take a break from it now and then.
Mine will have to wait it's turn, a long way down the list.
Updates look good with your usual attention to detail and flair for solving how to achieve the look required.
I think Tamiya must be impressed as well as I hear talk they are re releasing the old girl in the near future. Maybe they'll include a link to this blog in their instructions.

Alan
scratchmod

Joined: November 07, 2008
KitMaker: 796 posts
Armorama: 763 posts

Posted: Tuesday, February 17, 2009 - 01:27 AM UTC
Hey Matt
I been following your build and your doing some amazing work on that old kit. I built that same model six years ago, but it looked nowhere near what you've done here,awesome work buddy, look forward to seeing this tiger built then painted.
Rob
I been following your build and your doing some amazing work on that old kit. I built that same model six years ago, but it looked nowhere near what you've done here,awesome work buddy, look forward to seeing this tiger built then painted.
Rob
Jamesite

Joined: December 05, 2006
KitMaker: 2,208 posts
Armorama: 2,152 posts

Posted: Tuesday, February 17, 2009 - 01:45 AM UTC
Loving the progress Matt!
Great work as always, saw one of these old kits built up with interior at a recent model meet and it was certainly impressive, that one had been converted to a mid production model and had a full crew which was interesting.
Can't wait for more,
James
P.S. are you going to do the two different mesh types of the engine deck screens? ie. I beleive there was a finer type under the usual square holed stuff provided in PE sets.
James


Ostketten

Joined: May 08, 2006
KitMaker: 111 posts
Armorama: 82 posts

Posted: Tuesday, February 17, 2009 - 06:16 AM UTC
Hi Guys,
Matt, I hope that my buddy appreciates this as well, and hope that appreciate = a case of beer! Great name BTW
Alan, thanks for watching still. As to Tamiya re releasing this big cat, well, a link to the blog would be nice, but a consulting fee would be even nicer!


Rob, thanks for the kind words. I'm sure yours turned out just fine! Nice work on your Booby trapped Sturm as well. I really like the detail of the potato mashers strapped to the mortar rocket. Too cool! Perhaps we will bump into each other at an AMPS East soon. And Happy Birthday BTW!
James, if that modeler converted this Early to a Mid, I empathize with him. You think that I'm doing a lot of work? I didn't have to scratch a new cupola! lol Must have looked great with a crew in it. Any pics? Did that modeler correct the wrong facing swing arms? Actually, I've been toying with that idea recently. Still on the fence about correcting it though. If it gets screwed up, there goes the whole lower hull.
As to the two sizes of mesh, I recall seeing a pic like that somewhere. Perhaps I can do that. I already have the Aber set for the grilles, somethign a little finer underneath wouldnt be a big prob. Thanks for the tip!
Matt
Matt, I hope that my buddy appreciates this as well, and hope that appreciate = a case of beer!
 Great name BTW
 Alan, thanks for watching still. As to Tamiya re releasing this big cat, well, a link to the blog would be nice, but a consulting fee would be even nicer!


Rob, thanks for the kind words. I'm sure yours turned out just fine! Nice work on your Booby trapped Sturm as well. I really like the detail of the potato mashers strapped to the mortar rocket. Too cool! Perhaps we will bump into each other at an AMPS East soon. And Happy Birthday BTW!
James, if that modeler converted this Early to a Mid, I empathize with him. You think that I'm doing a lot of work? I didn't have to scratch a new cupola! lol Must have looked great with a crew in it. Any pics? Did that modeler correct the wrong facing swing arms? Actually, I've been toying with that idea recently. Still on the fence about correcting it though. If it gets screwed up, there goes the whole lower hull.
As to the two sizes of mesh, I recall seeing a pic like that somewhere. Perhaps I can do that. I already have the Aber set for the grilles, somethign a little finer underneath wouldnt be a big prob. Thanks for the tip!
Matt

PITERPANZER

Joined: September 11, 2005
KitMaker: 319 posts
Armorama: 316 posts

Posted: Saturday, February 21, 2009 - 02:10 AM UTC
Hello Matt!
Probably it`s to late for You project ,but if ....

Great progress by the way ! Wait more ,on 1-25SAF too !
Probably it`s to late for You project ,but if ....

Great progress by the way ! Wait more ,on 1-25SAF too !
MCR

Joined: July 15, 2004
KitMaker: 464 posts
Armorama: 407 posts

Posted: Thursday, June 11, 2009 - 09:12 AM UTC
Nearly four months without an update?
I'm having withdrawals!
Surely, something new has been done?
Mark
I'm having withdrawals!

Surely, something new has been done?

Mark
UserDude

Joined: September 06, 2004
KitMaker: 28 posts
Armorama: 20 posts

Posted: Thursday, June 11, 2009 - 12:30 PM UTC
alanmac

Joined: February 25, 2007
KitMaker: 3,033 posts
Armorama: 2,953 posts

Posted: Thursday, June 11, 2009 - 01:01 PM UTC
Quoted Text
This is new...
http://www.network54.com/Forum/47207/thread/1244489324/Tamiya+1-25th+Tiger+I+turret+and+hull+corrections-
What a post asking about the accuracy of this kit and in turn I post a link to this thread to show Matt's efforts, so you post a link to that thread to show a link to this one

UserDude

Joined: September 06, 2004
KitMaker: 28 posts
Armorama: 20 posts

Posted: Friday, June 12, 2009 - 07:37 AM UTC
No offense intended...
Just sharing information...
Just sharing information...


PITERPANZER

Joined: September 11, 2005
KitMaker: 319 posts
Armorama: 316 posts

Posted: Tuesday, September 08, 2009 - 10:53 PM UTC
Matt,where are You? What happend with Your relation?
 |


