Hosted by Darren Baker
'They were no Heroes' Singapore, 1942 (1:35)

captnenglish

Joined: May 20, 2008
KitMaker: 1,184 posts
Armorama: 770 posts

Posted: Friday, October 10, 2008 - 02:23 PM UTC
Chas, this is turning out to be great piece, thanks for sharing

youngc

Joined: June 05, 2007
KitMaker: 2,166 posts
Armorama: 1,080 posts

Posted: Saturday, October 11, 2008 - 04:56 AM UTC
Hmm lots of things to ponder and lots of info gathered, thanks guys. My preference is to do a raised water surface, but as I said, that's a long way off. Thanks to everyone who made a contribution over the last few days.
Anyway, a little bit of progress on the dock wall. I ripped the top stone layer off and replaced it with this improved version. Eventually there will be a stone pillar running up the length of the wall, so far, as you can see I have only done 3 slabs.

Chas
Anyway, a little bit of progress on the dock wall. I ripped the top stone layer off and replaced it with this improved version. Eventually there will be a stone pillar running up the length of the wall, so far, as you can see I have only done 3 slabs.

Chas

youngc

Joined: June 05, 2007
KitMaker: 2,166 posts
Armorama: 1,080 posts

Posted: Sunday, October 12, 2008 - 01:32 AM UTC
Today I had time to lay down a basecoat for the man. This is the first time I have used Vallejo acrylic and I must say I am very impressed with its flat, easy application.

Chas

Chas
seb43

Joined: August 30, 2005
KitMaker: 2,315 posts
Armorama: 2,158 posts

Posted: Sunday, October 12, 2008 - 03:14 AM UTC
Well an other masterpiece from chase
Look so good.
BTW how many dio are you working in the same time ???
Seb
Look so good.
BTW how many dio are you working in the same time ???
Seb

youngc

Joined: June 05, 2007
KitMaker: 2,166 posts
Armorama: 1,080 posts

Posted: Sunday, October 12, 2008 - 03:23 AM UTC
Hi Seb me mate,
I'm working on just 2 dioramas at the moment, this one and 'Defenders of Pointe-du-Hoc'. Plus, I'm running the palm tree tutorial. Everything will come to a sudden halt in a few weeks time when exam week comes around! So, I'm making the most of my holiday!
Thanks for taking the time to follow my builds and comment Seb,
Chas
I'm working on just 2 dioramas at the moment, this one and 'Defenders of Pointe-du-Hoc'. Plus, I'm running the palm tree tutorial. Everything will come to a sudden halt in a few weeks time when exam week comes around!
 So, I'm making the most of my holiday!
Thanks for taking the time to follow my builds and comment Seb,
Chas

youngc

Joined: June 05, 2007
KitMaker: 2,166 posts
Armorama: 1,080 posts

Posted: Monday, October 13, 2008 - 02:59 AM UTC
Diorama base
Here I have done some more work on the diorama. Past the row of stone on the top will be the rail line.

M.P
DO NOT PANIC! I have glued the head to an Airfix 1/32 torso only for painting! Once the real torso is painted, I will attach the painted head to its real body.

Chas
Here I have done some more work on the diorama. Past the row of stone on the top will be the rail line.

M.P
DO NOT PANIC! I have glued the head to an Airfix 1/32 torso only for painting! Once the real torso is painted, I will attach the painted head to its real body.

Chas

youngc

Joined: June 05, 2007
KitMaker: 2,166 posts
Armorama: 1,080 posts

Posted: Tuesday, October 14, 2008 - 12:56 AM UTC
Hmm, no replies? I'm either doing everything right, or this must be a really boring topic! I think the latter. 
Diorama base
Anyways here is a bit more progress. The whole stone area was covered in 'Spakfilla' to get the grout effect. Once dry, the filler will be sanded down, just leaving the grout in between each stone.

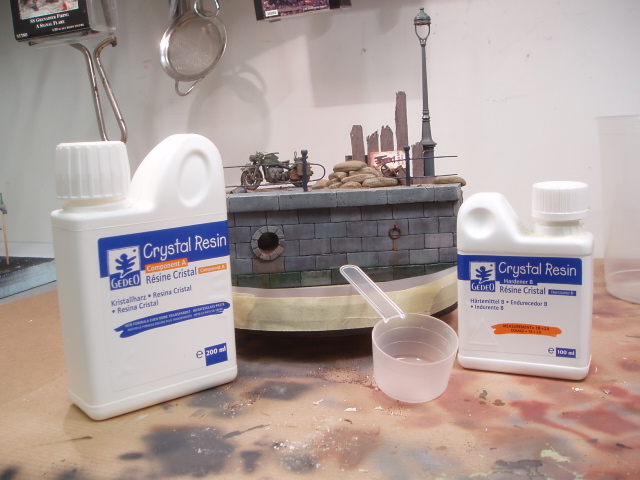
Ok I've got a question about resin water. I've used resin before but only to make small puddles. I need a run down on the basics, the do's and don'ts. Here are the products I will be using.

Help will be appreciated!

Diorama base
Anyways here is a bit more progress. The whole stone area was covered in 'Spakfilla' to get the grout effect. Once dry, the filler will be sanded down, just leaving the grout in between each stone.

Ok I've got a question about resin water. I've used resin before but only to make small puddles. I need a run down on the basics, the do's and don'ts. Here are the products I will be using.

Help will be appreciated!

Bratushka

Joined: May 09, 2008
KitMaker: 1,019 posts
Armorama: 657 posts

Posted: Tuesday, October 14, 2008 - 01:31 AM UTC
Hi! I am enjoying following your build! I had to go back and look at the head on the torso again. I didn't notice at first glance how small the head was! The grout effect stuff you mentioned- is it across the entire front surface of the stone or more localized?
I'm also very keen to see how you do the water. To me it is probably the most intimidating thing to do in a diorama. I have seen some absolutely masteful works including underwater scenes that look to be 10 - 12 inches tall filled solid with the polymer or whatever is used. This is such a make it or break it addition! Are you going to do a trial with the materials first or just diving in (pun intended!)?
Great story behind your theme as well!
jba

Joined: November 04, 2005
KitMaker: 1,845 posts
Armorama: 777 posts

Posted: Tuesday, October 14, 2008 - 02:19 AM UTC
Quoted Text
the do's and don'ts!
DO make a waterprof base (test it with water no less, then dry it throughly
DO wear a gas mask, the fumes of the stuff is toxic and will send you straight to bed if you put your nose too close
DO store the diorama in the garden shed as the resin withh keep on pouring out toxic fumes practically forever.

bill1

Joined: August 14, 2005
KitMaker: 3,938 posts
Armorama: 520 posts

Posted: Tuesday, October 14, 2008 - 03:46 AM UTC
Yo Chas,
About the water you want to use...resin...two components.
I' did it to...

This "wall" is not enough to keep the reisn in place wyhle its still in running mode... trust me i now
When i added the resin on the dio it driped out by small drips between the groundwork en the tape...because my dio was almost ready...the water setting must be good...i don't want to wast my work on the dio now. So i sitted almost the hole time next to the dio to keep the resin inside the river. And that was a long time!!!
But after all...i fixed it well...but i learned a lot of it.
Make a good wall
First make a testcase
Work in layers
Seal it off whyle its drying...dust can easly fal in to it...
Make sure you have plenty of time do it...surtenly on the last fase...where you put the rimples in it ore want add some things to the resin..like a bird ore leaves...


Greetz Nico
About the water you want to use...resin...two components.
I' did it to...

This "wall" is not enough to keep the reisn in place wyhle its still in running mode... trust me i now

When i added the resin on the dio it driped out by small drips between the groundwork en the tape...because my dio was almost ready...the water setting must be good...i don't want to wast my work on the dio now. So i sitted almost the hole time next to the dio to keep the resin inside the river. And that was a long time!!!
But after all...i fixed it well...but i learned a lot of it.
Make a good wall
First make a testcase
Work in layers
Seal it off whyle its drying...dust can easly fal in to it...
Make sure you have plenty of time do it...surtenly on the last fase...where you put the rimples in it ore want add some things to the resin..like a bird ore leaves...


Greetz Nico


youngc

Joined: June 05, 2007
KitMaker: 2,166 posts
Armorama: 1,080 posts

Posted: Tuesday, October 14, 2008 - 04:29 AM UTC
Quoted Text
The grout effect stuff you mentioned- is it across the entire front surface of the stone or more localized?
Hi Jim, I'm not quite sure what you mean there

Quoted Text
Are you going to do a trial with the materials first or just diving in (pun intended!)?
I'm definitely going to have a practise before I get my feet wet with this diorama (gotta love those puns).
JB, thanks. As usual your knowledge is extremely helpful!
Nico, wow nice diorama! Thanks for the info, it looks as if I've got a lot of preparation to do before I even pour my first layer of resin!
Chas
1969

Joined: December 16, 2005
KitMaker: 2,864 posts
Armorama: 303 posts

Posted: Tuesday, October 14, 2008 - 06:00 AM UTC
hi Chas by the looks of the resin you have shown it is very similar to the one i used for the Krupp Protze dio.i think you need to mix between 1 & 2% of hardener.i used some digital scales and poured 100g of resin and mixed with only 1% hardener and with this mix i was able to pour a layer 25mm thick in one go without any problems.The secret is the thicker the pour the less hardener,too much hardener and you will create too much heat in the cure and it could split or crack,with thinner pours you can add more hardener.
For tinting the water i used Humbrol enamel paint.
Go for it mate its a lot easier than it sounds but do take JBA advice regarding safety,he should know he uses plenty of the stuff.
Steve
For tinting the water i used Humbrol enamel paint.
Go for it mate its a lot easier than it sounds but do take JBA advice regarding safety,he should know he uses plenty of the stuff.
Steve


Bratushka

Joined: May 09, 2008
KitMaker: 1,019 posts
Armorama: 657 posts

Posted: Tuesday, October 14, 2008 - 07:10 AM UTC
Quoted Text
Hmm, no replies? I'm either doing everything right, or this must be a really boring topic! I think the latter.
Diorama base
Anyways here is a bit more progress. The whole stone area was covered in 'Spakfilla' to get the grout effect. Once dry, the filler will be sanded down, just leaving the grout in between each stone.
Ok I've got a question about resin water. I've used resin before but only to make small puddles. I need a run down on the basics, the do's and don'ts. Here are the products I will be using.
Help will be appreciated!
i was referring to the Spakfilla in my question. looking at it again i see you did cover the entire front of the wall with it. my question should have been how do you manage to sand it off and leave it only between the stones? i would think that the irregularities in the stone surfaces would make this difficult to do. sorry i wasn't clearer.
seb43

Joined: August 30, 2005
KitMaker: 2,315 posts
Armorama: 2,158 posts

Posted: Tuesday, October 14, 2008 - 08:53 AM UTC
Chas
I am very please to see your work and progress it is really great and I am really impressed by your talent. this is amazing for a youngster. It seems that you have a lot of free time to do your dio.
My working time is reducing every day for me unfortunatly.

Cheers
Seb
I am very please to see your work and progress it is really great and I am really impressed by your talent. this is amazing for a youngster. It seems that you have a lot of free time to do your dio.
My working time is reducing every day for me unfortunatly.


Cheers
Seb
DioramaDoctor

Joined: October 14, 2008
KitMaker: 2 posts
Armorama: 1 posts

Posted: Tuesday, October 14, 2008 - 11:12 AM UTC
Chas
Great story about your relative. Having lived in Singapore in the early 80's I was thrilled to have read and experienced all the fantastic stories of the fall of Singapore and its gloried history. I am a WWII NUT! I eat sleep and drink WWII pacific theatre!! Every story has increditable acts of courage and fortitude. All these scenios impact the dioramas of which I am trying to depict and all at 1/72 scale! One being nearly 300 square feet ! Your diorama your thinking of I can tell you that I stood at that very spot in the quay and all the coolie boats strung together by the docks. Sorry to say, todays Singapore is quite different then those days. I was there when out of the jungle they were tearing down was a jap pill box! nestled along the ne shore by changi airport..alas completely distroyed to make way for high rises.
I had longed to visit Auzzie land numerous times but failed in my attempts now I am working in Alaska of all places!!! Oil and Gas makes the world around as they say...anywho I have " joined " several of these modeling sites never to get a reply from anyone but i do hope you will indeed write back. I have so many " war stories " to share...
Tony Ring
[email protected]
or
[email protected]

youngc

Joined: June 05, 2007
KitMaker: 2,166 posts
Armorama: 1,080 posts

Posted: Wednesday, October 15, 2008 - 12:58 AM UTC
Hi Steve, would 1% hardener be enough for the resin to totally set?
Jim, the stone surface is pretty flat, when I get around to sanding it, the filler will sand off the flat surface and only remain in the cracks and joins between each stone. You'll see!
Seb, not much time for modelling now that school has started up again. I'll only have time on weekends now! Thankyou for your compliments. Everything I have learnt has been from this site and the wonderful modellers who take the time to help me.
Tony, it sounds you and I could make a good pair, I am also extremely interested in Pacific War history, particularly that of the Australian and Japanese military forces. May I ask, do you have any pictures of the quay or docks that you saw during your time in Singapore? I am finding it very hard to find reference pictures. I will write you an email shortly so we can get to know each other better. By the way, I'd love to see some of these 1:72 dioramas you are working on, they sound very impressive!
Chas

youngc

Joined: June 05, 2007
KitMaker: 2,166 posts
Armorama: 1,080 posts

Posted: Saturday, October 18, 2008 - 03:41 AM UTC
G'day,
A good day's work put in today.
Diorama base
The result of a good bashing and tearing, to simulate bomb/strafe damage.

Primed:

Part of the pipeline glued in place.

Detailed shots of the damaged pipeline. Note the bolt detail, MIG's bolts are brilliant and very easy to use.


Here I have added some more dockside elements. I am happy with the wooden pilings, but I think the bollards are a bit 'typical' and crowd the scene. So, I removed them and took a chunk of primer off in the process!


Here is the last piece of pipeline glued in place.

Man w/gramophone
This was my first time painting a face with Vallejo acrylics, how did I go? I really love the paints, so easy to work with.


The clothes are only at basecoat stage, I'm still waiting on some dark brown paints to complete the shadows.
Thanks for following,
Chas
A good day's work put in today.
Diorama base
The result of a good bashing and tearing, to simulate bomb/strafe damage.

Primed:

Part of the pipeline glued in place.

Detailed shots of the damaged pipeline. Note the bolt detail, MIG's bolts are brilliant and very easy to use.


Here I have added some more dockside elements. I am happy with the wooden pilings, but I think the bollards are a bit 'typical' and crowd the scene. So, I removed them and took a chunk of primer off in the process!


Here is the last piece of pipeline glued in place.

Man w/gramophone
This was my first time painting a face with Vallejo acrylics, how did I go? I really love the paints, so easy to work with.


The clothes are only at basecoat stage, I'm still waiting on some dark brown paints to complete the shadows.
Thanks for following,
Chas

captnenglish

Joined: May 20, 2008
KitMaker: 1,184 posts
Armorama: 770 posts

Posted: Saturday, October 18, 2008 - 04:21 AM UTC
So far the groundwork looks very realistic. I'd like to a close up of the figure if that is possible, but I say everything coming along quite nicely.

Beaver2206

Joined: November 03, 2007
KitMaker: 61 posts
Armorama: 56 posts

Posted: Saturday, October 18, 2008 - 05:37 AM UTC
Love the blog dude, this is taking shape beautifully!
Stuart
Stuart
Posted: Saturday, October 18, 2008 - 09:15 AM UTC
Chas,
Well, so far I think your work on the dock area is fantastic. I really like the detail work including the damage and the pipeline. I am enthusiastically looking forward to further progress on this piece.
Cheers,
Charles
Well, so far I think your work on the dock area is fantastic. I really like the detail work including the damage and the pipeline. I am enthusiastically looking forward to further progress on this piece.
Cheers,
Charles

exer

Joined: November 27, 2004
KitMaker: 6,048 posts
Armorama: 4,619 posts

Posted: Saturday, October 18, 2008 - 09:21 AM UTC
Quoted Text
M.P
DO NOT PANIC! I have glued the head to an Airfix 1/32 torso only for painting! Once the real torso is painted, I will attach the painted head to its real body.
Chas
LOL That would be one stocky MP

Just catching up with this thread, the dock looks very good as does the pipeline. Nice to see the Mi9g bolt heads put to good use.
gringe88

Joined: April 23, 2006
KitMaker: 64 posts
Armorama: 57 posts

Posted: Saturday, October 18, 2008 - 12:46 PM UTC
chas, ive been following your build for a while now. the dock's coming together nice. i just noticed that behind the shorter piece of the pipline, theres no damage to the dock itself.
jba

Joined: November 04, 2005
KitMaker: 1,845 posts
Armorama: 777 posts

Posted: Saturday, October 18, 2008 - 08:25 PM UTC
Nice damage so far 

slodder

Joined: February 22, 2002
KitMaker: 11,718 posts
Armorama: 7,138 posts

Posted: Sunday, October 19, 2008 - 12:09 AM UTC
Nice updates. Technique wise you're nailing it. Things are looking good. The 1st figure is great.

youngc

Joined: June 05, 2007
KitMaker: 2,166 posts
Armorama: 1,080 posts

Posted: Sunday, October 19, 2008 - 12:31 AM UTC
Quoted Text
So far the groundwork looks very realistic. I'd like to a close up of the figure if that is possible, but I say everything coming along quite nicely.
Thanks Matthew, I haven't finished the figure's face just yet, still the eyes to do. As I said I'm still waiting on some Vallejo black to complete these things. As soon as it's done, I'll post a better photo.

Thanks Stuart 'dude'!

Charles, thankyou for your kind comment. I am also enthusiastically waiting to see your next diorama. Your latest 'Berlin' diorama was excellent!
Thanks Pat. I try only to review products that I can see myself actually using/building. I would think it's a bit selfish had I reviewed the product and then just chucked it in a draw, never to be built, where-as people who missed out on the review may have actually intended to build it.

Matt, thanks for following along. I will try to add some damage to the place you have indicated.
JB and Scott, you two have got to be some of the most experienced dio-makers around, so it's good to here from you that I'm going in the right direction.
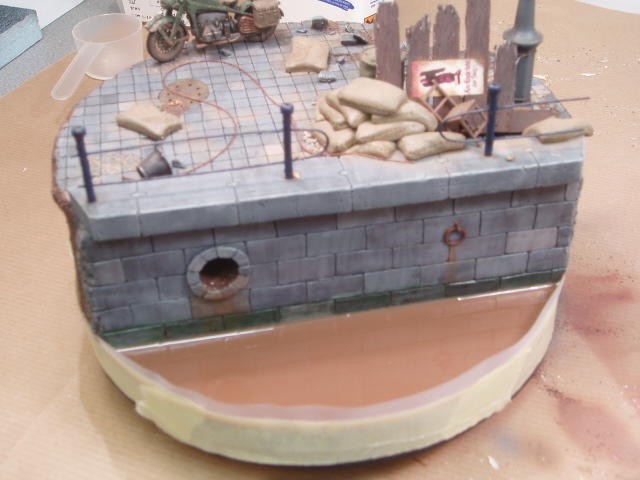
Progress for today was to simply finish waterproofing the base in preparation for the resin. I sealed the bottom section of the wall and the picture frame edges with wood glue. As you may have noticed, the base flooring is made out of glass so there's no way any resin can leak through.
I had some friends around today for a musical jam, so I'm sorry, no further progress until next Saturday night.
Chas
 |


