

Hi Tracklink2 love dioramas
so will keep a watch on how this is going like the layout & the postioning of the crews bodies.
Hopefully when I've finished mine that will be on a small diorama. Have stalled at the moment trying to figure out how the frame work should be.
Not having much luck finding reference pictures to work from.
Campaigns
Where Armorama group builds can be discussed, organized, and updates posted.
Where Armorama group builds can be discussed, organized, and updates posted.
Hosted by Darren Baker, Richard S.
Self Propelled Indirect Fire

muddyfields

Joined: February 04, 2006
KitMaker: 884 posts
Armorama: 622 posts
Posted: Sunday, August 17, 2008 - 09:16 PM UTC

gamodelmaker

Joined: May 07, 2008
KitMaker: 186 posts
Armorama: 129 posts

Posted: Monday, August 18, 2008 - 09:38 AM UTC
i got my tracks in the mail today from sprubrothers. but before i tackle these, i want to finish a m577 that i am working on for a gb on fsm.
SGTJKJ

#041

Joined: July 20, 2006
KitMaker: 10,069 posts
Armorama: 4,677 posts

Posted: Tuesday, August 19, 2008 - 07:57 AM UTC
Nice diorama layout, tracklink2. Looking forward to see more 


tracklink2
Joined: March 07, 2007
KitMaker: 131 posts
Armorama: 120 posts

Posted: Wednesday, August 20, 2008 - 07:29 AM UTC
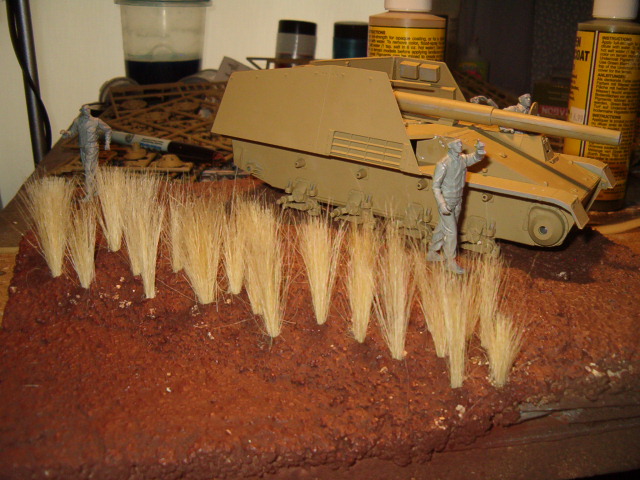
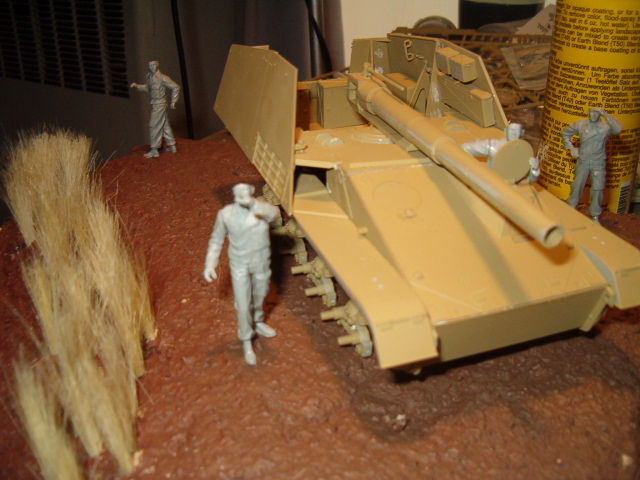
i've been in a ground work mood the past few day - this is what i have so far- the low area will be turned into a small pond or stream bank
vanize
Joined: January 30, 2006
KitMaker: 1,954 posts
Armorama: 629 posts
Posted: Wednesday, August 20, 2008 - 05:30 PM UTC
Looks like a great layout, Tracklink - glad to have a diorama in this campaign too.
I feel compelled to say that the guy behind Hummel just looks weird. the other figures are quite successful, but that one is just in too unnatural of a pose for it not to detract from the whole. I don't think you need him in there anyway.
I feel compelled to say that the guy behind Hummel just looks weird. the other figures are quite successful, but that one is just in too unnatural of a pose for it not to detract from the whole. I don't think you need him in there anyway.

INDIA11A

Joined: January 09, 2005
KitMaker: 577 posts
Armorama: 446 posts

Posted: Saturday, August 23, 2008 - 07:54 AM UTC
My WIP for this campaign, an AFV Club M-40. Built the major sub-assembies and figured I had better put a coat of paint on before it got to the point of not having access to the nucks and granies.  No major problems other than the ejector pin marks and lengthening the 155 tube.
Question for our gunners? Would the beast be loaded at elevation or would it be "leveled", loaded & then elevated?
Thanx
Doug
 .file" BORDER="0">
No major problems other than the ejector pin marks and lengthening the 155 tube.Question for our gunners? Would the beast be loaded at elevation or would it be "leveled", loaded & then elevated?
Thanx
Doug
.file" BORDER="0"> gamodelmaker
Joined: May 07, 2008
KitMaker: 186 posts
Armorama: 129 posts
Posted: Saturday, August 23, 2008 - 12:34 PM UTC
great looking m40 so far. hows the fiting of the kit i been thinking of getting it for the collection.
INDIA11A
Joined: January 09, 2005
KitMaker: 577 posts
Armorama: 446 posts
Posted: Saturday, August 23, 2008 - 01:33 PM UTC
Fit is good but lots of ejector pin marks and the some delicate parts attached with HUGE tags on the sprues. Extra care required to remove. Small PE fret for the engine grills.
Overall very nice.
Doug
Overall very nice.
Doug

PantherF
Joined: June 10, 2005
KitMaker: 6,188 posts
Armorama: 5,960 posts

Posted: Sunday, August 24, 2008 - 08:40 AM UTC
I just realized I'm almost finished with my build and haven't taken anymore WIP pictures (not plates) so I'll get some up soon! 
Everyone is moving along pretty fast as well too! They all look great so far.
Everyone is moving along pretty fast as well too! They all look great so far.

gamodelmaker
Joined: May 07, 2008
KitMaker: 186 posts
Armorama: 129 posts
Posted: Sunday, August 24, 2008 - 01:25 PM UTC
i have a m109 coming in the snail mail the next few days and i may build it before this gb ends but i have serveal other that i must do frist.. i have a m977 that i want to get done before i tackle those darn tracks for the m108 and build a m1126 to before end od october gets. here why is thier never enough time in the day or the year when you have something you really wnat to do.

Nito74

Joined: March 04, 2008
KitMaker: 5,386 posts
Armorama: 4,727 posts
Posted: Monday, August 25, 2008 - 02:32 AM UTC
To start this campaign I'll do the Brummbar, if I can manage the Wespe will be next...
DT61
Joined: September 18, 2005
KitMaker: 1,226 posts
Armorama: 819 posts

Posted: Monday, August 25, 2008 - 05:55 AM UTC
I will be working on the Tamiya Wespe and its almost completed Will submit pictures soon.
Darryl
Will submit pictures soon.Darryl
tracklink2
Joined: March 07, 2007
KitMaker: 131 posts
Armorama: 120 posts
Posted: Monday, August 25, 2008 - 07:13 AM UTC
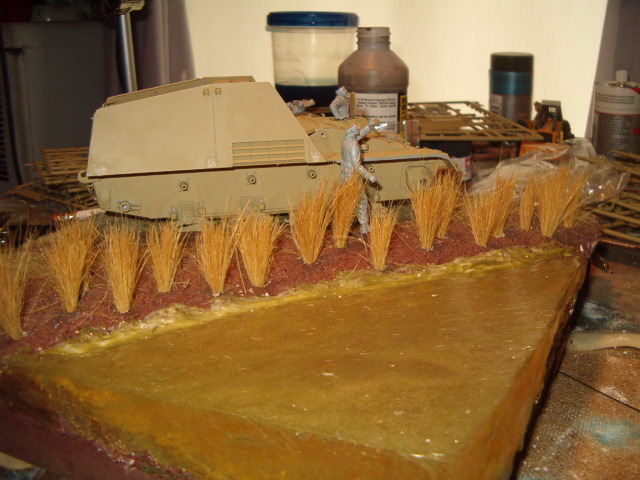 - i got the pond finished i'm just waiting on the "water effects" that i used to level out the shore line to finish drying and go clear - does it pass for pond water?
 PantherF
Joined: June 10, 2005
KitMaker: 6,188 posts
Armorama: 5,960 posts
Posted: Monday, August 25, 2008 - 09:54 AM UTC
A few progress pictures. Like I said, before I knew it things were moving along so well and fast that it's just about ready for some paint. Then add the tools, etc.


muddyfields
Joined: February 04, 2006
KitMaker: 884 posts
Armorama: 622 posts
Posted: Tuesday, August 26, 2008 - 03:14 AM UTC
Hi
Havn't much to show yet as I've only made some small struts & brackets at the moment.
It's a lot of trial & error more error than anything at the moment.
Still trying to figure out how the racks were raised & lowered.

Havn't much to show yet as I've only made some small struts & brackets at the moment.
It's a lot of trial & error more error than anything at the moment.
Still trying to figure out how the racks were raised & lowered.

pigsty

Joined: January 16, 2007
KitMaker: 1,226 posts
Armorama: 451 posts
Posted: Tuesday, August 26, 2008 - 04:40 AM UTC
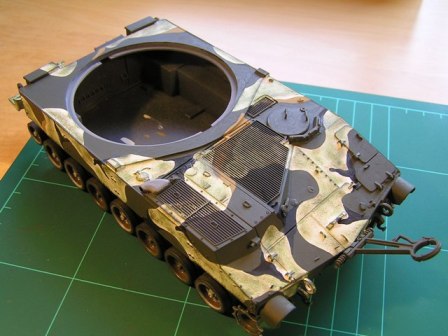
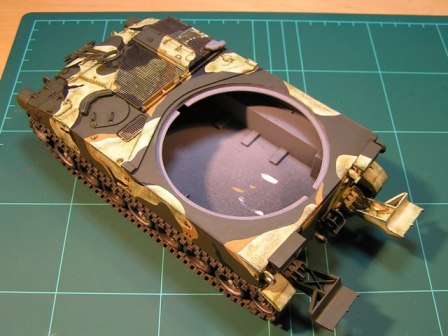
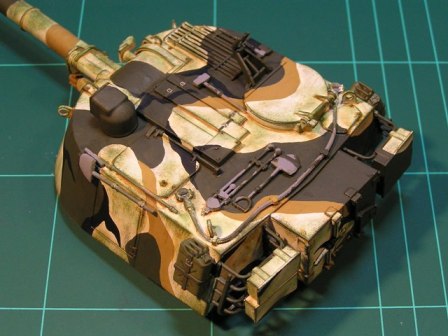
At last, some more progress with my M109A2. Here's the hull, just to show how it looks in basic camouflage. Again, there seems to be far too little sand.
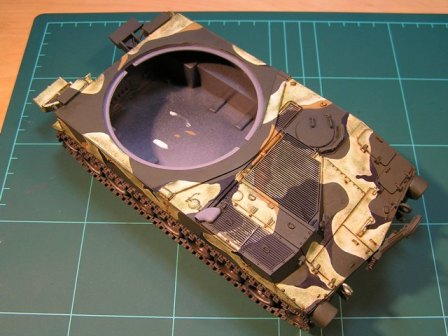
Now for the weathering. The idea here is that the vehicle has been hastily whitewashed for an exercise, rather than being depot-painted in a proper winter scheme. So the green, sand and black are a good coat, while the white is wearing away in the rain. Stage 1: a coarse dry-brush of light green (actually Humbrol 120, IDF/AF green) all over the white.
Stage 2: after a second coat of grass green and a third of forest green, each lighter than the one before and less extensive, you get this. Still very stark Im planning to tone it down with a wash. The heavy weathering along the gun barrel is where rain is really washing away the white.
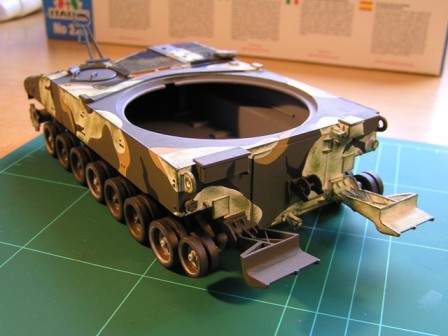


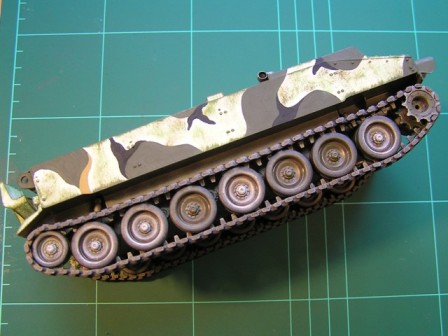
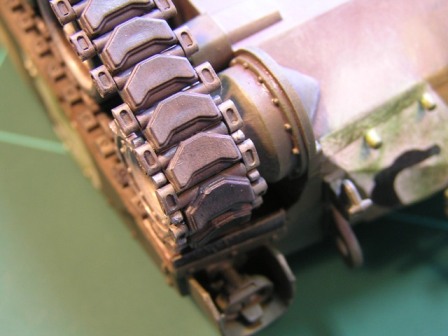
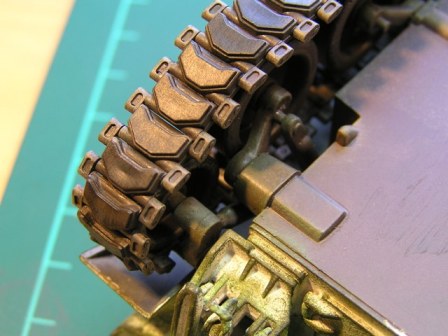
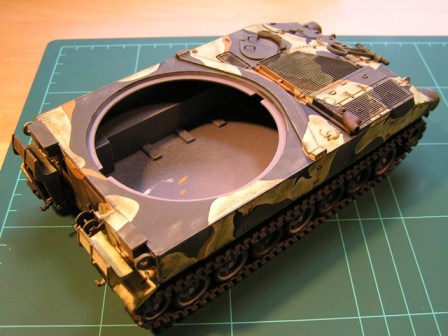
And here are the tracks in situ. It turns out that 81 links per side is too many and the right number actually seems to 78. Which is nice, since it leaves six spares. The kits instructions clearly show 81; photos, and the AFV Club box, show 79; and 78 fit well enough with about the right amount of sag. Although the left side is tighter than the right, despite the sprockets and idlers being exactly opposite each other. All of which only goes to show something or other.
Pigstys top tip: install the sprockets after the tracks. They can be forced around the sprockets at a pinch (from the front) but youll find it much easier not to. Pigstys top tip number two: if, like me, youve assembled the tracks in long sections and are connecting them at the last stage, position the upper joint somewhere between the second and fifth road wheels. Why? because the sides of the hull poke out further there, making it easier to press the tracks against them while you search and search for the little hole to stick the little pin in without bits dropping off. And Pigstys top tip no.3: these tracks tend to flex slightly because the end-connectors, while a tight fit, have some free play; and because theres no stretch in them, you cant straighten the runs just by pulling on them. The way I did it was to wrap the tracks round the running gear and then use tweezers to turn each connector into the right alignment. Result nice even runs, mostly.
To fix the tracks I ran a little Liquid Poly over the outer end connectors, plus any that I could reach on the inner side. That was why I left the ends unpainted. Then I painted and dry-brushed the ends the same way as the rest; I decided not to add any graphite, as it seemed fine with just the dirt.
Also installed at this stage: the rear mudguards. I left them off until now to make the tracks easier to add, but at a guess, Id say you could get away without doing that. But a bit of dry-brushing with the same mix of greens and youd hardly know the difference.

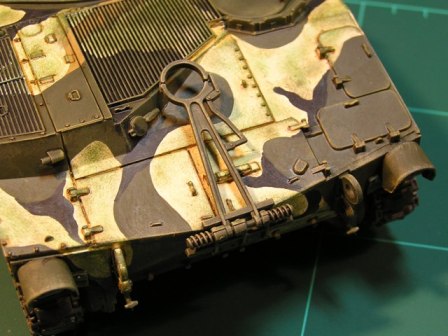
Robert asked a couple of weeks ago what colour the driver's periscopes shoud be painted. (Sorry, I've been away.) I think they're armoured covers and so shouldn't have the glass showing - that's how I'm doing mine.
Now for the weathering. The idea here is that the vehicle has been hastily whitewashed for an exercise, rather than being depot-painted in a proper winter scheme. So the green, sand and black are a good coat, while the white is wearing away in the rain. Stage 1: a coarse dry-brush of light green (actually Humbrol 120, IDF/AF green) all over the white.
Stage 2: after a second coat of grass green and a third of forest green, each lighter than the one before and less extensive, you get this. Still very stark Im planning to tone it down with a wash. The heavy weathering along the gun barrel is where rain is really washing away the white.
And here are the tracks in situ. It turns out that 81 links per side is too many and the right number actually seems to 78. Which is nice, since it leaves six spares. The kits instructions clearly show 81; photos, and the AFV Club box, show 79; and 78 fit well enough with about the right amount of sag. Although the left side is tighter than the right, despite the sprockets and idlers being exactly opposite each other. All of which only goes to show something or other.
Pigstys top tip: install the sprockets after the tracks. They can be forced around the sprockets at a pinch (from the front) but youll find it much easier not to. Pigstys top tip number two: if, like me, youve assembled the tracks in long sections and are connecting them at the last stage, position the upper joint somewhere between the second and fifth road wheels. Why? because the sides of the hull poke out further there, making it easier to press the tracks against them while you search and search for the little hole to stick the little pin in without bits dropping off. And Pigstys top tip no.3: these tracks tend to flex slightly because the end-connectors, while a tight fit, have some free play; and because theres no stretch in them, you cant straighten the runs just by pulling on them. The way I did it was to wrap the tracks round the running gear and then use tweezers to turn each connector into the right alignment. Result nice even runs, mostly.
To fix the tracks I ran a little Liquid Poly over the outer end connectors, plus any that I could reach on the inner side. That was why I left the ends unpainted. Then I painted and dry-brushed the ends the same way as the rest; I decided not to add any graphite, as it seemed fine with just the dirt.
Also installed at this stage: the rear mudguards. I left them off until now to make the tracks easier to add, but at a guess, Id say you could get away without doing that. But a bit of dry-brushing with the same mix of greens and youd hardly know the difference.
Robert asked a couple of weeks ago what colour the driver's periscopes shoud be painted. (Sorry, I've been away.) I think they're armoured covers and so shouldn't have the glass showing - that's how I'm doing mine.
vanize
Joined: January 30, 2006
KitMaker: 1,954 posts
Armorama: 629 posts
Posted: Tuesday, August 26, 2008 - 04:50 AM UTC
You M109 is looking really good, Sean! And very nice work on those pesky tracks.
gamodelmaker
Joined: May 07, 2008
KitMaker: 186 posts
Armorama: 129 posts
Posted: Tuesday, August 26, 2008 - 05:24 AM UTC
now thats a fanstaic build you have thier, thanks for clering that up about the p-scopes. all i have to do to my m108 is weather it and do the indy tracks. and i will follow your suggestions on how to dthem. 

tuff13
Joined: September 04, 2006
KitMaker: 144 posts
Armorama: 104 posts

Posted: Wednesday, August 27, 2008 - 04:59 AM UTC
I was wondering if a Panzerwerfer 42 would be acceptable or Demag 7 with flak guns on it?And would it be alright to enter this campaign and the Half-track as will?

vanize
Joined: January 30, 2006
KitMaker: 1,954 posts
Armorama: 629 posts
Posted: Wednesday, August 27, 2008 - 03:56 PM UTC
Quoted Text
I was wondering if a Panzerwerfer 42 would be acceptable or Demag 7 with flak guns on it?And would it be alright to enter this campaign and the Half-track as will?
the Panzerwerfer 42 definitely qualifies and I'd love to see that build here, but the flak halftrack probably wouldn't fit into the campaign rules.
It is a general rule of campaigns that builds are campaign specific - in other words, no double taming campaigns with a single build.
However, since you have two halftracks, do the Panzerwerfer 42 for this one and the flak halftrack for the halftrack campaign!
tuff13
Joined: September 04, 2006
KitMaker: 144 posts
Armorama: 104 posts
Posted: Thursday, August 28, 2008 - 12:36 AM UTC
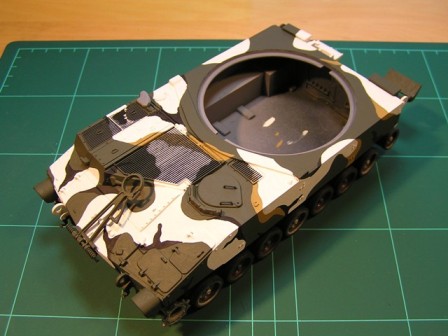
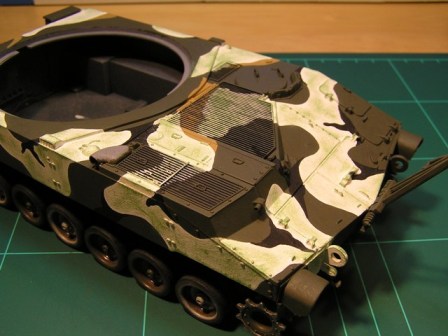
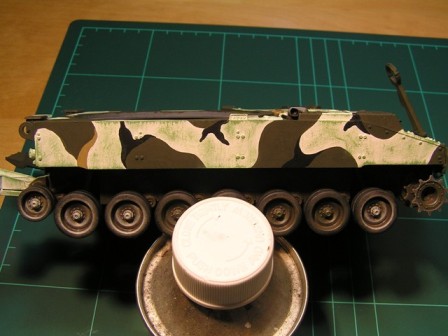
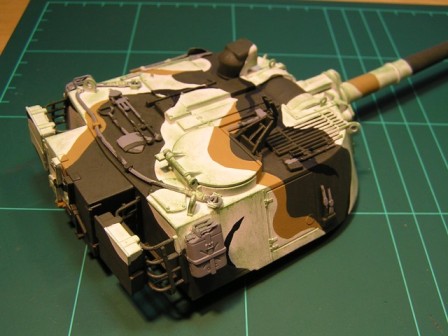
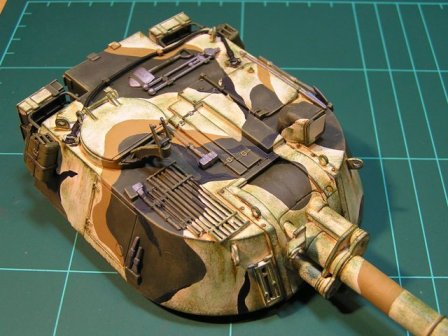
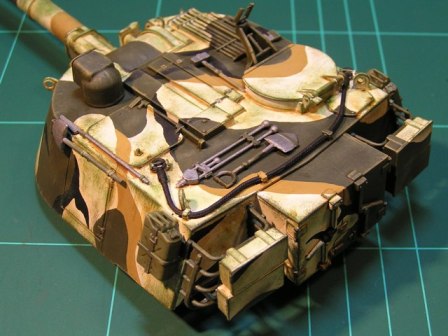
Vance,thanks for the reply. Good suggestion on the demag. This is the Panzerwerfer 42 that I have started,Ive made some modifacatios to the interior.There was a lack of detail to the rocket racks and the inner turret I added a seat and some extra detail. I still have some weathering to do.The model is painted with enamels.


pigsty
Joined: January 16, 2007
KitMaker: 1,226 posts
Armorama: 451 posts
Posted: Friday, August 29, 2008 - 07:27 PM UTC
Pigsty again with that M109A2 ...
Here we have the hull and turret with the next stage of weathering: a wash of heavily thinned Tamiya Smoke plus brown and yellow ink, my own special mix, followed by pin-washing with brown ink. All inks are Citadel. I may not use that ink mix again for this kind of colour scheme I think its too red and it makes the pin-washing look like rust, which would be quite wrong on an aluminium vehicle. Ah well, live and learn. Talking of which, this is the first weathering thats covered all the surface all that dry-brushing before was only on the white. Ive realised that was a mistake because I tended to avoid the edges of the white patches, which leaves them looking a bit dodgy. Were I to do this again, Id lay down the white and weather it before applying any other colour. Over-painting would be no problem thin dry-brush coats wouldnt get in the way of the subsequent layers.

And here it is dry-brushed with, um, light brown. Hanged if I can remember which. Still my favourite weathering method! Above the tracks its the same mix of chocolate brown and khaki drill as before. That doesnt quite match the colour from the wash but I shall bodge it again: theyve just driven home through one of those horrible patches of black mud that try to pull your boots off ...

The home straight is in sight ...
Here we have the hull and turret with the next stage of weathering: a wash of heavily thinned Tamiya Smoke plus brown and yellow ink, my own special mix, followed by pin-washing with brown ink. All inks are Citadel. I may not use that ink mix again for this kind of colour scheme I think its too red and it makes the pin-washing look like rust, which would be quite wrong on an aluminium vehicle. Ah well, live and learn. Talking of which, this is the first weathering thats covered all the surface all that dry-brushing before was only on the white. Ive realised that was a mistake because I tended to avoid the edges of the white patches, which leaves them looking a bit dodgy. Were I to do this again, Id lay down the white and weather it before applying any other colour. Over-painting would be no problem thin dry-brush coats wouldnt get in the way of the subsequent layers.
And here it is dry-brushed with, um, light brown. Hanged if I can remember which. Still my favourite weathering method! Above the tracks its the same mix of chocolate brown and khaki drill as before. That doesnt quite match the colour from the wash but I shall bodge it again: theyve just driven home through one of those horrible patches of black mud that try to pull your boots off ...
The home straight is in sight ...
SGTJKJ
#041
Joined: July 20, 2006
KitMaker: 10,069 posts
Armorama: 4,677 posts
Posted: Friday, August 29, 2008 - 10:52 PM UTC
Execellent looking M109, Sean. Really nice job on the camouflage and the weathering so far. Looking forward to see it finished.
Jeff, nice camoflage job on the Maultier panzerwerfer. The extra details really show - especially if leaving all the hatches open. Was the door open in the side stowage boxes in the kit or did you open it up yourself?
Looking forward to see more on that one.
Jeff, nice camoflage job on the Maultier panzerwerfer. The extra details really show - especially if leaving all the hatches open. Was the door open in the side stowage boxes in the kit or did you open it up yourself?
Looking forward to see more on that one.
tuff13
Joined: September 04, 2006
KitMaker: 144 posts
Armorama: 104 posts
Posted: Saturday, August 30, 2008 - 02:52 AM UTC
Jesper,thanks for the good comments.I cut open the side door.Then used some thin plastic stryene and fabricated a new door.Made a paino hinge out of small gauge wire.And cut some gooves in the wire to represent a hinge.
SGTJKJ
#041
Joined: July 20, 2006
KitMaker: 10,069 posts
Armorama: 4,677 posts
Posted: Saturday, August 30, 2008 - 11:01 AM UTC
Very cool approach. It really adds some extra interest and sets the kit aside from a "standard" vehicle. Could we get a close up of the hatch and hinge detail?
It really adds some extra interest and sets the kit aside from a "standard" vehicle. Could we get a close up of the hatch and hinge detail?  |

WEB HOSTING BY


Copyright ©2021 Armorama and Kitmaker Network, a subsidiary of Silver Star Enterprises
All Rights Reserved. Please read our Conditions of Use and Privacy Policy.
All Rights Reserved. Please read our Conditions of Use and Privacy Policy.