

Hi All,
Well, it is August 1st somewhere in the world by now, so the Self Propelled Indirect Fire campaign has officially begun! Welcome to the official Campaign thread.
(Can a moderator or admistrator give this thread a sticky status and give ut one of those lovely yellow "campaign" tags please? Pretty please???)
if you haven't signed up yet, and would like to, please go to:
http://armorama.com/modules.php?op=modload&name=Campaigns&file=index&req=showcontent&id=258
the gallery is here: http://gallery.kitmaker.net/showgallery.php/cat/22562
Campaigns
Where Armorama group builds can be discussed, organized, and updates posted.
Where Armorama group builds can be discussed, organized, and updates posted.
Hosted by Darren Baker, Richard S.
Self Propelled Indirect Fire
vanize

Joined: January 30, 2006
KitMaker: 1,954 posts
Armorama: 629 posts
Posted: Thursday, July 31, 2008 - 06:18 AM UTC
vanize
Joined: January 30, 2006
KitMaker: 1,954 posts
Armorama: 629 posts
Posted: Thursday, July 31, 2008 - 06:53 AM UTC
As your campaign leader, it is my pleasure to post the first image, which is the box top of the kit that inspired this campaign and what I will endevour to build before the end of January:

She's going to be a challenge. I may do a build blog on this once I get some inertia going on it.
She's going to be a challenge. I may do a build blog on this once I get some inertia going on it.

Nito74

Joined: March 04, 2008
KitMaker: 5,386 posts
Armorama: 4,727 posts
Posted: Thursday, July 31, 2008 - 07:28 AM UTC
Cool !!!
Will post my choices too..
Will post my choices too..
SGTJKJ

#041

Joined: July 20, 2006
KitMaker: 10,069 posts
Armorama: 4,677 posts

Posted: Thursday, July 31, 2008 - 07:30 PM UTC
Great to get started. 
Vance, you should probably write to Mark Millard to get the tread sticky. He cannot monitor all treads, so it is possible he will not see your request in your post.
I am building the Italeri/Zvezda/Revell BM-13 Katusha. I have now reserched my build quite heavily. I have also used the Armorama network. See my post HERE
The BM-13 Katusha on the Zil-151 truck was first build in the 1947, so no WWII markings/camouflage/dioramas there. (Despite Revell have several in their instructions!)
It has been difficult to find pictures of this one in service. I finally decided to do a Syrian example from the 1973 war. It would go well in a diorama with a Syrian PT-76 I have build earlier. Especially since I am also building figures in this diorama in the "Desert" campaign at Historicus forum.
I have all weekend - no parties - girlfriend out of the house - only a little bit of Soccer Sunday - just pure modelling madness
I will get started this evening - more to follow soon.

emroglan

Joined: December 16, 2004
KitMaker: 1,163 posts
Armorama: 842 posts

Posted: Thursday, July 31, 2008 - 09:31 PM UTC
I'm joining with Italeri's Paladin. My AFV Club tracks are ready and I'm waiting for the BarrelDepot barrel, the kit's barrel is not very good...
I have started assembly this morning, lots of warping problems with the body, let's see how it turns out. Pictures will follow.
I have started assembly this morning, lots of warping problems with the body, let's see how it turns out. Pictures will follow.
SGTJKJ
#041
Joined: July 20, 2006
KitMaker: 10,069 posts
Armorama: 4,677 posts
Posted: Friday, August 01, 2008 - 11:22 PM UTC
Let me be the first to post some progress in the campaign.
I have started my BM-13 Katusha. It is an excellent kit despite its age. The fit of the parts so far has been excellent and test dry fit of the main parts to the chassis indicates no problems.
The launch rails fit perfectly and "square up" with no problems giving a perfectly flat launch frame.
The chassis is very well detailed. Unfortunently most of it will be completely hidden when the truck is finished. Tempting to show the truck turned over on its side or similar in a diorama.
The only thing in the kit that is way below standard is the figures. They are bland and featureless - not even good enough for the spares box.
Construction continues - next is 16(!) rockets - more to follow later today
SGTJKJ
#041
Joined: July 20, 2006
KitMaker: 10,069 posts
Armorama: 4,677 posts
Posted: Saturday, August 02, 2008 - 07:53 AM UTC
Basic construction is now finished. This kit is really good. The only problem is the rockets which are not easy to get perfectly round. Like assembling 16 short tank barrels.  Not that easy.
The stearing wheel looks like it is sitting too high in the cabin, but it might have been that way to allow a fully equipped soldier enter and exit the cabin easily.
I can recommend it if one is on for a the special version of the BM-13 launcher, which leaves one without the possibility of making a WWII vehicle.
I plan to give it a basecoat this evening so it is ready for camouflage Sunday.


Not that easy.The stearing wheel looks like it is sitting too high in the cabin, but it might have been that way to allow a fully equipped soldier enter and exit the cabin easily.
I can recommend it if one is on for a the special version of the BM-13 launcher, which leaves one without the possibility of making a WWII vehicle.
I plan to give it a basecoat this evening so it is ready for camouflage Sunday.

pigsty

Joined: January 16, 2007
KitMaker: 1,226 posts
Armorama: 451 posts
Posted: Saturday, August 02, 2008 - 10:14 PM UTC
My first campaign ... hope I get all the photo posting right, and that ...
The old ones are the best ones mostly
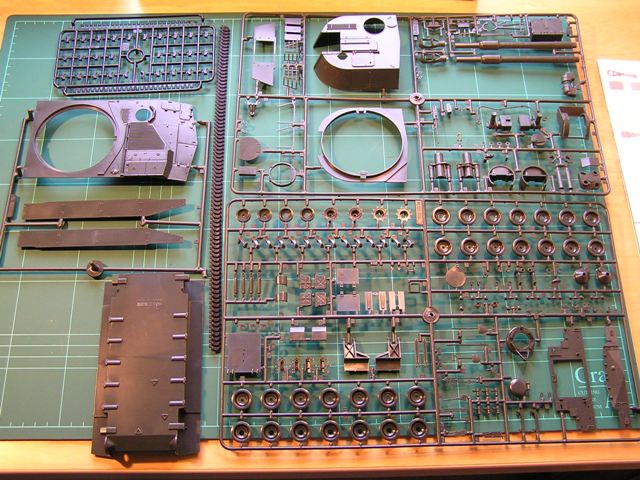
So here we have Italeris original M109A2 kit, no.239 from about twenty years ago. Lord knows whether it will ever reappear, with the M109A6 having replaced it on the shelves. This will be from the box, as far as possible, so long as you count in an AFV Club box for the tracks.
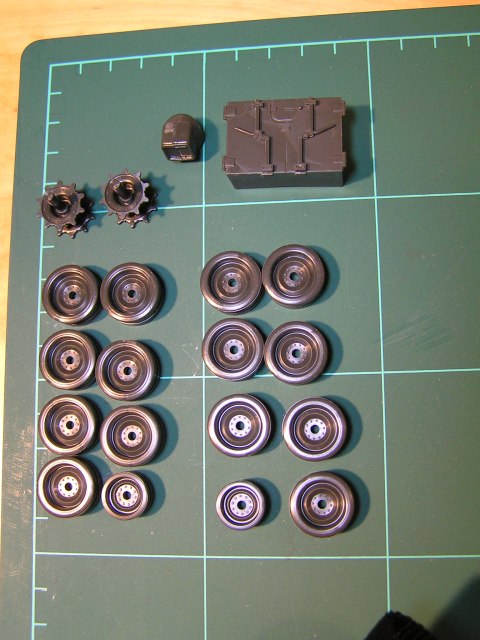
First, know your enemy: the parts laid out ready to go. A remarkably economical kit, considering how well it should look once its finished. The black sprue in the top left corner is one of the six that will eventually make up the tracks.
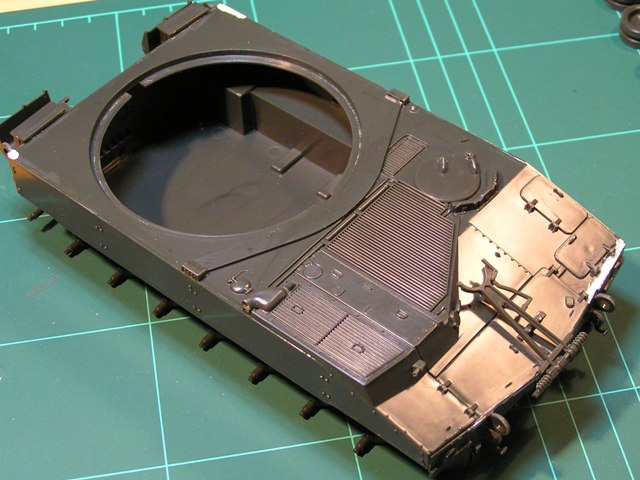
Not bad for a day and a bits work! Most of the hull is together, the wheels are paired up, and the basic turret structure is assembled. Little bit of filler here and there but its not major. I have never worked this quickly. And it wont last.
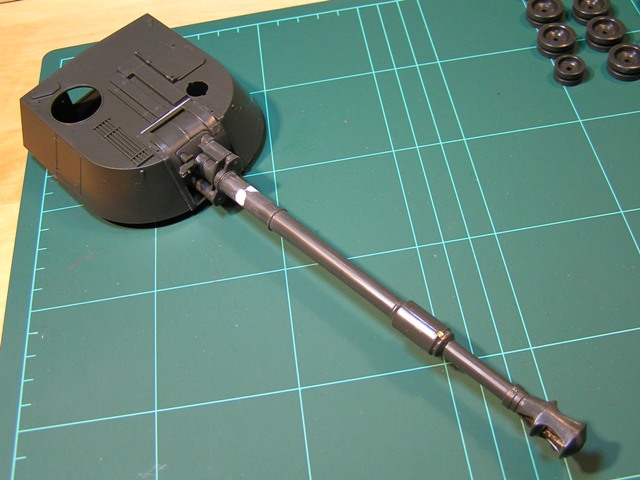
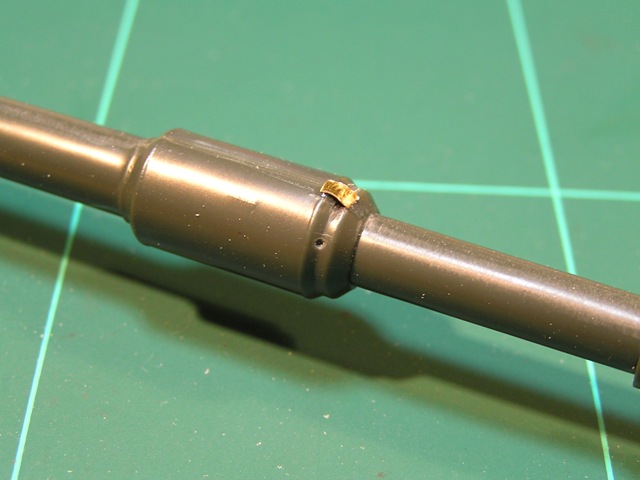
The close-up of the gun shows one of the few small alterations Ive added. The kits bore evacuator is very plain, but all the photos show prominent notches on the forward end. After a bit of head-scratching I worked out that theyre the expulsion vents for the evacuator, with a bracket over each one, making it look like two. So, a quick whizz with the edge of the file, a couple of bits of foil, et voila. Hopefully it will look a little more convincing with some paint on it. Im leaving the seams because the real thing has prominent seams.
The gun is fixed. It wasnt, but fitting it to the turret was trickier than I expected, and some of the glue strayed. Ah well, its not a toy. Honest.
More to come soon, grud willing.
The old ones are the best ones mostly
So here we have Italeris original M109A2 kit, no.239 from about twenty years ago. Lord knows whether it will ever reappear, with the M109A6 having replaced it on the shelves. This will be from the box, as far as possible, so long as you count in an AFV Club box for the tracks.
First, know your enemy: the parts laid out ready to go. A remarkably economical kit, considering how well it should look once its finished. The black sprue in the top left corner is one of the six that will eventually make up the tracks.
Not bad for a day and a bits work! Most of the hull is together, the wheels are paired up, and the basic turret structure is assembled. Little bit of filler here and there but its not major. I have never worked this quickly. And it wont last.
The close-up of the gun shows one of the few small alterations Ive added. The kits bore evacuator is very plain, but all the photos show prominent notches on the forward end. After a bit of head-scratching I worked out that theyre the expulsion vents for the evacuator, with a bracket over each one, making it look like two. So, a quick whizz with the edge of the file, a couple of bits of foil, et voila. Hopefully it will look a little more convincing with some paint on it. Im leaving the seams because the real thing has prominent seams.
The gun is fixed. It wasnt, but fitting it to the turret was trickier than I expected, and some of the glue strayed. Ah well, its not a toy. Honest.
More to come soon, grud willing.
emroglan
Joined: December 16, 2004
KitMaker: 1,163 posts
Armorama: 842 posts
Posted: Saturday, August 02, 2008 - 10:39 PM UTC
Good to see another M109 build Sean. You have progressed farther than I did.
OK, here's my kit, the upgraded M109, a.k.a the Paladin. Another economical and a little aged kit from Italeri.

Opening the box, there's a load of contents... some of which I won't need hopefully.

Knowing Italeri kits contain vinyl tracks, I already have purchased AFV Club's M109 tracks labeled T136. I do not really know if they can be used for the Paladin as well, but I don't want to use the kit tracks.
Also after testing the huge barrel, I decided a metal barrel would be a good replacement, saving me a lot of sanding and correction work. I ordered Barrel Depot's Paladin barrel (35013 I think) and currently waiting for it to arrive.
Now, onto my real progres...
The lower body went together without much fuss. A local modeller warned me about possible warping problems in the kit. There were none so far. Then I attached the suspension arms.

After everthing was assembled and dried out, I proceeded to put the top part of the body. Here's the surprise.


The entire upper hull is warped into a V shape, the worst of the problem being located on the right end. I tried forcing the part into shape, no use.
I decided to force the part onto the lower body. I started from the front, using Revell's cement and then applying lots of Tamiya's Thin Cement onto the connections and holding them together.... It took nearly 45 minutes, working inch by inch, but everything is holding together.

My only problem is here... It should be easy to fill up.

Today, if there's nothing else, I will start assembling the road wheels and possibly AFV Club tracks. Let's see how those turn out.
Unexpected problems, but after my last three kits (a Revell, an old dog Dragon and an Alanger) these are nothing. At least Italeri's plastic is nice and easy to work with.
OK, here's my kit, the upgraded M109, a.k.a the Paladin. Another economical and a little aged kit from Italeri.
Opening the box, there's a load of contents... some of which I won't need hopefully.
Knowing Italeri kits contain vinyl tracks, I already have purchased AFV Club's M109 tracks labeled T136. I do not really know if they can be used for the Paladin as well, but I don't want to use the kit tracks.
Also after testing the huge barrel, I decided a metal barrel would be a good replacement, saving me a lot of sanding and correction work. I ordered Barrel Depot's Paladin barrel (35013 I think) and currently waiting for it to arrive.
Now, onto my real progres...
The lower body went together without much fuss. A local modeller warned me about possible warping problems in the kit. There were none so far. Then I attached the suspension arms.
After everthing was assembled and dried out, I proceeded to put the top part of the body. Here's the surprise.
The entire upper hull is warped into a V shape, the worst of the problem being located on the right end. I tried forcing the part into shape, no use.
I decided to force the part onto the lower body. I started from the front, using Revell's cement and then applying lots of Tamiya's Thin Cement onto the connections and holding them together.... It took nearly 45 minutes, working inch by inch, but everything is holding together.
My only problem is here... It should be easy to fill up.
Today, if there's nothing else, I will start assembling the road wheels and possibly AFV Club tracks. Let's see how those turn out.
Unexpected problems, but after my last three kits (a Revell, an old dog Dragon and an Alanger) these are nothing. At least Italeri's plastic is nice and easy to work with.
vanize
Joined: January 30, 2006
KitMaker: 1,954 posts
Armorama: 629 posts
Posted: Sunday, August 03, 2008 - 03:17 PM UTC
wow, great to see so much progress already!
I need to get in gear I guess. I'll be finishing up a couple other builds before getting to this one though.
I need to get in gear I guess. I'll be finishing up a couple other builds before getting to this one though.

gamodelmaker
Joined: May 07, 2008
KitMaker: 186 posts
Armorama: 129 posts

Posted: Sunday, August 03, 2008 - 03:32 PM UTC
well how time sneaks up on you. i havent even started my stryker for that gb and now this one starts. but i do have my kit its the testors sp m108 105mm howitzer. i have built this many moons ago so it shouldnt be that hard of a build., the thing is i have at least 3 gb on the fine scale modeling site that i am in. one is stalled and about 60% done and one is about 50% done and one not even started but that is an m577 and that will be done in no time. so i should start on it by the end of the month i hope if all goes well.

markm
Joined: September 11, 2005
KitMaker: 1,757 posts
Armorama: 1,148 posts
Posted: Sunday, August 03, 2008 - 05:29 PM UTC
vanize
Joined: January 30, 2006
KitMaker: 1,954 posts
Armorama: 629 posts
Posted: Sunday, August 03, 2008 - 07:33 PM UTC
Quoted Text
Ok, your official gallery is here,
https://gallery.kitmaker.net/showgallery.php/cat/22562
Thank you very much for your help, Mark!
note there is a typo - one too many "http://"s, so the real link is:
http://gallery.kitmaker.net/showgallery.php/cat/22562
SGTJKJ
#041
Joined: July 20, 2006
KitMaker: 10,069 posts
Armorama: 4,677 posts
Posted: Sunday, August 03, 2008 - 08:58 PM UTC
Well, this seems to be a parade of old Italeri kits so far. 
Emre, good job on fixing that difficult fit.
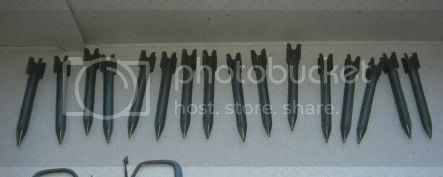
The rockets are assembled and painted. Not a great fit, but I think they will look alright in a diorama.
I have given my kit a basecoat and the overall Russian green coat. Next I will add the Syrian 1973 camouflage of grey and sand coloured pathes over the green. I think I will avoid using any markings on this one......
More to follow.....


Emre, good job on fixing that difficult fit.
The rockets are assembled and painted. Not a great fit, but I think they will look alright in a diorama.
I have given my kit a basecoat and the overall Russian green coat. Next I will add the Syrian 1973 camouflage of grey and sand coloured pathes over the green. I think I will avoid using any markings on this one......
More to follow.....

goldenpony

Joined: July 03, 2007
KitMaker: 3,529 posts
Armorama: 588 posts

Posted: Monday, August 04, 2008 - 02:43 AM UTC
Well darn it, I totally forgot this one started now. No bother, the progress on my other armor build is moving along nicely and I should have that one wrapped up in a couple of weeks. Then I can start on Karl.


muddyfields

Joined: February 04, 2006
KitMaker: 884 posts
Armorama: 622 posts
Posted: Monday, August 04, 2008 - 04:14 AM UTC
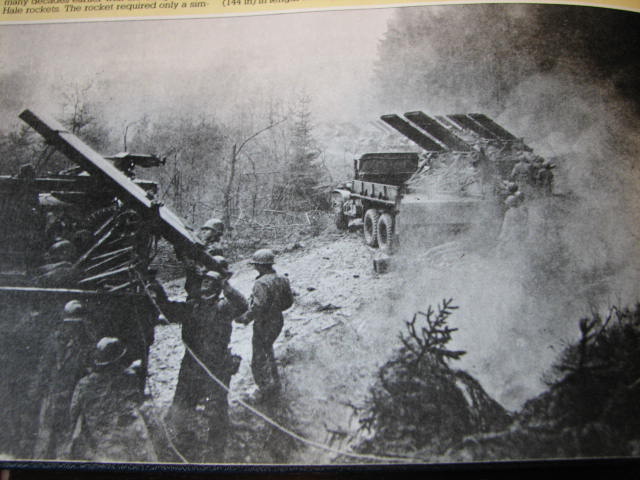
Hi I'm hoping to build The US version of the Katushia.
Have only a couple of pictures to work from so its going to be a lot of guess work. Im using the later relase that Italeri have done with the hard cab instead of the soft cab.

This is hope fully what i'll end up with.
Have build the truck cargo bed ready to work out the launching ramp frame.

Have only a couple of pictures to work from so its going to be a lot of guess work. Im using the later relase that Italeri have done with the hard cab instead of the soft cab.
This is hope fully what i'll end up with.
Have build the truck cargo bed ready to work out the launching ramp frame.
pigsty
Joined: January 16, 2007
KitMaker: 1,226 posts
Armorama: 451 posts
Posted: Monday, August 04, 2008 - 04:21 AM UTC
Quoted Text
Well, this seems to be a parade of old Italeri kits so far.
It wasn't old when I bought it ...

emroglan
Joined: December 16, 2004
KitMaker: 1,163 posts
Armorama: 842 posts
Posted: Monday, August 04, 2008 - 04:56 AM UTC
It's a parade of Italeri and Zvezda kits that I once had in my stash, then sold
Good work Jesper, I might even have to repurchase that Katyusha or the Zis 151 truck at least. You work real fast!
US rocket launcher on a truck? First time I see that, I knew about the Sherman one but this is very new.
I have made progress with my build and I am nearly done with the lower body. The turret needs my metal barrel before its assembly, so until then I might be on hold, it will take about 2 weeks for my order to arrive.
I really liked the Italeri M-109, despite its obvious problems. After this I might build a regular M-109 as a Turkish Army vehicle, who knows? Pics of my build will follow shortly.
emroglan
Joined: December 16, 2004
KitMaker: 1,163 posts
Armorama: 842 posts
Posted: Tuesday, August 05, 2008 - 03:56 AM UTC
Hi Everyone,
This is yesterday's progress. As of now, I will put this build on hold and concentrate on other builds that are nearly complete.
I had already completed assembling the hull with some fit issues. I moved onto the wheels. To my surprise, the wheels were clean of any seams and went together really easily.

While they were drying, I moved onto the hull to cover some areas with putty and/or plastic pieces. The hole in the front was covered by tucking in some plastic strips (as putty tends to lose form in these places and caves in).

Then I carefully applied putty to the rear right end. I applied putty, then gave it a good sanding. No more problems!

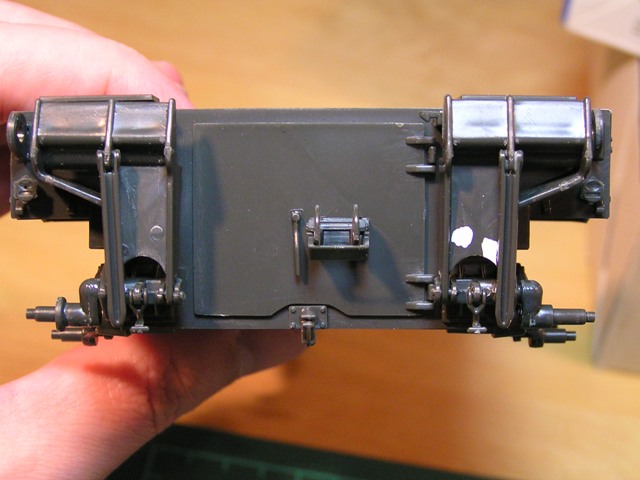
Then I began assembling the rear parts. First to go on are the movable shock absorbers(or else, what do you call them, they prevent the vehicle from bucking and moving when it fires). Some seams to clean up, some pinmarks, nothing really serious. However, take care while assembling.

Then the front. The headlights, headlight guards, minor details, driver's hatch, etc etc...

OK, here's where I went mad. The exhaust. Italeri gave it without any holes, I was confused at first. Checking to see if it was really the exhaust, I attacked it with my pinwise. It took me ten minutes to drill that properly. Bah!

With the last pieces to be assembled, the rear is also done. The hull assembly, except for the gun cradle, is done.

Also, I will discard the kit tracks and use these:

This is it for now. I assume I will have my metal barrel next week, however since I might be leaving town and I have other projects, my SPIF work will possibly be on hold till September.
Keep on working fellows
This is yesterday's progress. As of now, I will put this build on hold and concentrate on other builds that are nearly complete.
I had already completed assembling the hull with some fit issues. I moved onto the wheels. To my surprise, the wheels were clean of any seams and went together really easily.
While they were drying, I moved onto the hull to cover some areas with putty and/or plastic pieces. The hole in the front was covered by tucking in some plastic strips (as putty tends to lose form in these places and caves in).
Then I carefully applied putty to the rear right end. I applied putty, then gave it a good sanding. No more problems!
Then I began assembling the rear parts. First to go on are the movable shock absorbers(or else, what do you call them, they prevent the vehicle from bucking and moving when it fires). Some seams to clean up, some pinmarks, nothing really serious. However, take care while assembling.
Then the front. The headlights, headlight guards, minor details, driver's hatch, etc etc...
OK, here's where I went mad. The exhaust. Italeri gave it without any holes, I was confused at first. Checking to see if it was really the exhaust, I attacked it with my pinwise. It took me ten minutes to drill that properly. Bah!
With the last pieces to be assembled, the rear is also done. The hull assembly, except for the gun cradle, is done.
Also, I will discard the kit tracks and use these:
This is it for now. I assume I will have my metal barrel next week, however since I might be leaving town and I have other projects, my SPIF work will possibly be on hold till September.
Keep on working fellows
Nito74
Joined: March 04, 2008
KitMaker: 5,386 posts
Armorama: 4,727 posts
Posted: Tuesday, August 05, 2008 - 04:16 AM UTC
So far looks great !! We'll wait...
I still have to clear my workbench first, then choose what to pick for this campaign... Wespe, Bison or a Sturmtiger...so many choices...
I still have to clear my workbench first, then choose what to pick for this campaign... Wespe, Bison or a Sturmtiger...so many choices...
gamodelmaker
Joined: May 07, 2008
KitMaker: 186 posts
Armorama: 129 posts
Posted: Tuesday, August 05, 2008 - 04:52 AM UTC
great looking builds so far escipally the m109. looks like i have its cousin the m108 that i am doing for this gb. how much did those afv club tracks cost?

Bigrip74
Joined: February 22, 2008
KitMaker: 5,026 posts
Armorama: 1,604 posts

Posted: Tuesday, August 05, 2008 - 06:57 AM UTC
I will try to assemble an Areoplast BM-8-24 or an Italeri M109 A6 Paladine, which ever gives me the least amount of trouble. I see that Emre has started a good looking M109.
ROBERT
ROBERT

PantherF
Joined: June 10, 2005
KitMaker: 6,188 posts
Armorama: 5,960 posts

Posted: Tuesday, August 05, 2008 - 09:10 AM UTC
Wow, just when I was thinking of changing my mind to a recently acquired M-108 I now see a whole fleet of them!! (M-109's included)
I'll stick to the Brummbar as planned ... that'll just be too much OD.
I'll stick to the Brummbar as planned ... that'll just be too much OD.

emroglan
Joined: December 16, 2004
KitMaker: 1,163 posts
Armorama: 842 posts
Posted: Tuesday, August 05, 2008 - 10:23 AM UTC
Quoted Text
great looking builds so far escipally the m109. looks like i have its cousin the m108 that i am doing for this gb. how much did those afv club tracks cost?
Hi Robert! I bought it from Luckymodel, it was 10 USD + shipping, I paid about 12 USD.
As for the other Robert, the Italeri kit requires a little bit of work to make things proper, but after some horrid kits (Revell, Alanger, you name it) I liked it a lot. At least the plastic is good quality and easy to work with. There's a little issue of punch marks, but nothing serious.
Jeff, you can't have too many M-109s
But still, a Brummbar should be a fine addition. I won't build anything WW2 German for a while. After building two E-100s simultaneously, I had enough of Dark Yellow, so I turned my attention to Nato vehicles 
Barticus

Joined: March 28, 2008
KitMaker: 18 posts
Armorama: 12 posts

Posted: Tuesday, August 05, 2008 - 02:32 PM UTC
Boy, got me some work to do, here's where I am so far
What I'm building

Under strict supervision

Day one (I am recovering from a herniated disc in my back so the time I can spend building is rather short)

Day Two

What I'm building
Under strict supervision
Day one (I am recovering from a herniated disc in my back so the time I can spend building is rather short)
Day Two
 |

WEB HOSTING BY


Copyright ©2021 Armorama and Kitmaker Network, a subsidiary of Silver Star Enterprises
All Rights Reserved. Please read our Conditions of Use and Privacy Policy.
All Rights Reserved. Please read our Conditions of Use and Privacy Policy.