M1A2 Abrams wreck...my first modern tank
Florida, United States
Joined: May 16, 2002
KitMaker: 17,694 posts
Armorama: 13,742 posts
Posted: Friday, April 17, 2009 - 06:51 AM UTC
Quoted Text
Concerning the quality of the kit, i dont share your opinion
To each their own. In my opinion, with enough work and some scratch-building, you can make any kit look great.
Field Artillery --- The KING of BATTLE!!!
"People sleep peaceably in their beds at night only because rough men stand ready to do violence on their behalf." -- George Orwell
Showcase
Noord-Brabant, Netherlands
Joined: March 24, 2008
KitMaker: 1,247 posts
Armorama: 913 posts
Posted: Friday, April 17, 2009 - 06:57 AM UTC
Quoted Text
Concerning the quality of the kit, i dont share your opinion you should check the work from Per Olav on his M1A2 and he used the Dragon kit. The result is outstanding
I don't agree with that. Per Olav Lund is a very talented builder. When he makes a nice model that doesn't say it is because of the kit. Per's model is very nice because of the painting and weathering etc. He would get the same model with the Italeri kit.
Lars
Massachusetts, United States
Joined: November 07, 2008
KitMaker: 796 posts
Armorama: 763 posts
Posted: Friday, April 17, 2009 - 06:57 AM UTC
I agree with Gino, some of my best wrecks were made using old kits. I just bought a couple of ESCI T55's even though there old I'm looking forward to wrecking them.
Rob
Scratchmod-The Art of Destruction
Florida, United States
Joined: May 16, 2002
KitMaker: 17,694 posts
Armorama: 13,742 posts
Posted: Friday, April 17, 2009 - 07:11 AM UTC
Quoted Text
He would get the same model with the Italeri kit.
That's my point. I'm not saying his doesn't look great. His skill would make it good even if it wasn't the best kit. Therefore, why spend the extra money on the more expensive kit to destroy it?
Field Artillery --- The KING of BATTLE!!!
"People sleep peaceably in their beds at night only because rough men stand ready to do violence on their behalf." -- George Orwell
Showcase
Paris, France
Joined: August 30, 2005
KitMaker: 2,315 posts
Armorama: 2,158 posts
Posted: Friday, April 17, 2009 - 08:57 AM UTC
well to me, when you are doing a wreck tank, this doesnot automaticly mean that you need to use the cheapset one.
At the end you still have a good model whatever it is a wreck or not, but sometimes i have the impression that people want to make a wreck just destroy litterally the cheapest model.
Ok for rob it is not the case.
To my opinion this is not because it is a wreck that you can use a bad quality model.
my 2 cents
But let get back to the subject here

cheers
Seb
PS sorry Rob to pollute your thread
England - West Midlands, United Kingdom
Joined: March 21, 2009
KitMaker: 379 posts
Armorama: 299 posts
Posted: Friday, April 17, 2009 - 11:25 AM UTC
When i was building wreck of "cojone eh" i have bought the cheapest model on ebay (it was academy). I thought that i will not use most of the parts anyway, so wat is the point. I was so wrong and i have found this very quickly. When you are trying to lay this beast on his belly, you need as many parts loose as possible , not molded with main hull, it is much easier to recreate original look.
Same problem with rear part of a tank.
If i will do it again i will probably go with trumpeter.
`sorry for off topic, i cant wait to see your painting (rust and burns etc). To cover problems when building a kit with damages is easy, to build a wreck on purpose, very hard.
[url=http://photobucket.com/Ratatouille-collection?albumview=slideshow][img]http://i.imgur.com/kFPfg.jpg[/img][/url]
Bern, Switzerland
Joined: April 17, 2008
KitMaker: 264 posts
Armorama: 156 posts
Posted: Friday, April 17, 2009 - 11:55 AM UTC
Just looking forward to see another gold winning model! I'll certainly check back once in a while

North Carolina, United States
Joined: February 09, 2008
KitMaker: 67 posts
Armorama: 64 posts
Posted: Friday, April 17, 2009 - 12:25 PM UTC
I was with 2nd LAR Bn (Light Armored Recon) during OIF. I tons of pictures of LAVs, destroyed Iraqi Armor and trucks...and also other angles of that exact M1A1. Anybody interested can email me...I'd be more then happy to share.
United States
Joined: August 13, 2008
KitMaker: 15 posts
Armorama: 14 posts
Posted: Friday, April 17, 2009 - 01:18 PM UTC
According to my sources, it's not an M1A2, but a USMC M1A1 from the 2nd Tank Battalion. Page 30, Marines on the Ground, OIF 1, Concord Books. The pic from the rear shows the T/I phone on the right rear of the tank, a Marine addition. It also shows the MCD clearer than the one Rob posted. There are two views, one from the right rear, the other that Rob posted.
New Jersey, United States
Joined: November 28, 2007
KitMaker: 381 posts
Armorama: 321 posts
Posted: Friday, April 17, 2009 - 01:40 PM UTC
this is pretty neat! i kinda hav wanted to make a destroyed vehicle but i would have no clue where to begin!! i wish you luck and it looks good so far!
1 thing, are you going to inclue the no slip surface on the tank, or would it not be very noticeable with all the damage?
United States Military Academy Class of 2015
Massachusetts, United States
Joined: November 07, 2008
KitMaker: 796 posts
Armorama: 763 posts
Posted: Friday, April 17, 2009 - 04:04 PM UTC
Oh boy, what have I gotten myself into !!!! Guys I have to be honest with you, I have no clue as to what your talking about. I can barely even tell you the difference between any of the M1's,sorry.
There will definitely be some accuracy issue with this model, the next M1 I build will be better. I only want to concentrate on the painting with this one. When the time comes for the next M1 I will definitely be asking you guys for advice. Thanks for your help and tips.
@ tony... thanks anything you can give me would help a lot, especially the Iraqi tanks. I have searched for a few years now and can't seem to find any photos that i took during DS.
I'll try to post some new pics when I can. I think by Sunday I'll start the painting and the fun will begin.
Rob
Scratchmod-The Art of Destruction
Florida, United States
Joined: May 16, 2002
KitMaker: 17,694 posts
Armorama: 13,742 posts
Posted: Friday, April 17, 2009 - 05:21 PM UTC
Quoted Text
According to my sources, it's not an M1A2, but a USMC M1A1 from the 2nd Tank Battalion. Page 30, Marines on the Ground, OIF 1, Concord Books. The pic from the rear shows the T/I phone on the right rear of the tank, a Marine addition. It also shows the MCD clearer than the one Rob posted. There are two views, one from the right rear, the other that Rob posted.
Yes, Cahone Eh was a USMC tank.
Quoted Text
Oh boy, what have I gotten myself into !!!! Guys I have to be honest with you, I have no clue as to what your talking about. I can barely even tell you the difference between any of the M1's,sorry.
Don't worry about it. There have been some M1A2s destroyed as well. You never said you were building a USMC tank anyways.
If you want to read up more on the diferences, check out my
M1 Abrams Variants ArticleGood luck with it.
Field Artillery --- The KING of BATTLE!!!
"People sleep peaceably in their beds at night only because rough men stand ready to do violence on their behalf." -- George Orwell
Showcase
Massachusetts, United States
Joined: September 07, 2007
KitMaker: 212 posts
Armorama: 159 posts
Posted: Saturday, April 18, 2009 - 07:32 AM UTC
Hey Rob-
Keep on posting- I appreciate you posting these pics. I am going to soak it all up and learn a ton!
As someone pointed out - (and you have done) the hub centers should be melted away. I will be interested to see how you represent the end of the axles and the bearings because I have to do some of the same on my T-34.
A question for the gallery?? Gino?? Tony?? With the tank consumed by fire would you expect the blow out panels to go? That sure would add a neat element....
Geat Stuff Rob!
Steve
England - East Anglia, United Kingdom
Joined: October 09, 2005
KitMaker: 2,556 posts
Armorama: 2,199 posts
Posted: Saturday, April 18, 2009 - 10:00 AM UTC
Quoted Text
Quoted Text
According to my sources, it's not an M1A2, but a USMC M1A1 from the 2nd Tank Battalion. Page 30, Marines on the Ground, OIF 1, Concord Books. The pic from the rear shows the T/I phone on the right rear of the tank, a Marine addition. It also shows the MCD clearer than the one Rob posted. There are two views, one from the right rear, the other that Rob posted.
Yes, Cahone Eh was a USMC tank.
'Cajone Eh' was an army tank, not sure what tank you guys are talking about...?
Also Per Olav Lund used the old DML M1A1 kit, which in my opinion is just as bad as the Italeri one in terms of details, so as some have said you dont need the best kit on the market to produce an awesome finish. That said I do also agree with Seb in that a more detailed kit allows for easier damaging and will produce an overall more detailed model.
'As all else failed we raised our fists and weapons,
Not born as soldiers, but driven to the end'
England - West Midlands, United Kingdom
Joined: February 16, 2009
KitMaker: 86 posts
Armorama: 81 posts
Posted: Saturday, April 18, 2009 - 10:39 AM UTC
to be fair rob having seen your previous work you dont need a kit..you could pull of an outstanding wreck with a few pieces of styrene...i am of the same opinion i would definitley not spend a fortune on a kit if i intended to do a wreck..i would find something off ebay for a few dollars/pounds..and as you pointed out your paint job would more than make up for the price of the kit..lets face it they all look the same price when burnt out!!

Massachusetts, United States
Joined: November 07, 2008
KitMaker: 796 posts
Armorama: 763 posts
Posted: Saturday, April 18, 2009 - 12:04 PM UTC
Hi all
Thanks for tuning in. I didn't get much done today, did yard work instead. I'm already planning the next M1 wreck using the Dragon kit. Well I had a couple of problems with some of the kit parts and had to improvise and do a little scratchbuilding. The upper two bars on the back end of the bustle rack were flimsy, didn't fit right and eventually broke. So I make two new bars using copper wire and added some battle damage to that area. Next the kit tow cables were crap too and also broke, had to make two new ones. I always have this problem with Italeri parts, needless to say the next kit will not be an Italeri kit that's for sure.
Here is how she looks so far.


The kit supplies the APU unit that goes in the bustle rack but I'm not sure if I should install. I need some help here Gino!!!
Just a bit of topic..i ended up winning two ESCI T55's on ebay really cheap so you know I'll be starting atleast one of those soon. This is the main reason why I'm building this M1, to practice painting before I start the T55's. It has nothing to do with the price of the kit, I just happened to find this Italeri for $10, if there was a Dragon kit for that price I would have gotten it.
@ Steve... The hubs are up next buddy, I'm still studying ref pics.
I start painting as soon as I'm done with the turret and while waiting for the paint to dry, I start grinding the pads off the track links.
Rob
Scratchmod-The Art of Destruction
England - West Midlands, United Kingdom
Joined: June 23, 2008
KitMaker: 2,329 posts
Armorama: 2,110 posts
Posted: Saturday, April 18, 2009 - 12:47 PM UTC
Rob, nice work! its looking good for your first modern wreck, I hope its not your last!
Im not a fan of italeri but you've done some really nice work!
keep it up

Art isn't just pritty pictures. It's an expression of human rage.
Florida, United States
Joined: May 16, 2002
KitMaker: 17,694 posts
Armorama: 13,742 posts
Posted: Saturday, April 18, 2009 - 11:30 PM UTC
Quoted Text
'Cajone Eh' was an army tank, not sure what tank you guys are talking about...?
You're right, what was I thinking. Guess I shouldn't reply before having a couple cups of coffee in the AM. Not sure what the others are talking about.
Quoted Text
The kit supplies the APU unit that goes in the bustle rack but I'm not sure if I should install. I need some help here Gino!!!
It depends. Some tanks in OIF 1 had them, some did not. Others started out with them, but got rid of them when they broke down to make more cargo room. Either way is correct.
Quoted Text
Im not a fan of italeri but you've done some really nice work!
Actually, the Italeri Abrams are upgraded copies of the Trumpeter Abrams. They are not typical Italeri. Most italeri kits are pretty good, with lots of fine detail. I prefer Italeri over old Tamiya any day.
Field Artillery --- The KING of BATTLE!!!
"People sleep peaceably in their beds at night only because rough men stand ready to do violence on their behalf." -- George Orwell
Showcase
Massachusetts, United States
Joined: November 07, 2008
KitMaker: 796 posts
Armorama: 763 posts
Posted: Sunday, April 19, 2009 - 12:21 AM UTC
Thanks Gino, I was a bit confused about the APU's. Oh and thanks for the link to your article, atleast now I have some knowledge about the M1.
Sorry Gino, but I recall correctly the Trump kit is a runoff from the Tamiya kit . The Italeri kit is definitely on there own, ejector pin marks on everything and everywhere is typical Italeri. Back in the 90's before Tamiya redid there PZIV's, Italeri was the best PZIV you could get, besides resin conversions.
Ok back on target here... It was pointed to me from someone over on the FSM site, that the tow cables are on backwards. I have turned them around and it looks a lot better, no idea how I managed to screw that up.
Rob
Scratchmod-The Art of Destruction
Florida, United States
Joined: May 16, 2002
KitMaker: 17,694 posts
Armorama: 13,742 posts
Posted: Sunday, April 19, 2009 - 03:19 AM UTC
Quoted Text
I recall correctly the Trump kit is a runoff from the Tamiya kit . The Italeri kit is definitely on there own,
Nope, Tamiya's and Trumpeter's are not related. They don't even have a similar parts layout. The Italeri one is based on Trumpeter's. This
M1A1 Comparison Article by Pawel will lay out the Abrams kit lineage and problems with each.
From the Above link:
"The most interesting discovery I made while comparing upper hull parts, came as a real surprise! I discovered that Italeri upper hull part is a modified copy of Trumpeter part! There are many changes made to this part, but the basic mold is the same. I wonder if Italians bought molds from Trumpeter? It certainly looks like they did. Non-slip coating is more pronounced on Italeri kit, but the pattern is the same as on Trumpeter parts. The proof is on photos below:

Take a close look at the pattern of non-slip surfaces of Trumpeter and Italeri hull parts.
To make it easier, I drew circles - compare what is in corresponding circles
on left and right photos and you will see that the pattern is identical!
There is only one explanation: Italeri part was based on Trumpeter molds."
Field Artillery --- The KING of BATTLE!!!
"People sleep peaceably in their beds at night only because rough men stand ready to do violence on their behalf." -- George Orwell
Showcase
Massachusetts, United States
Joined: November 07, 2008
KitMaker: 796 posts
Armorama: 763 posts
Posted: Sunday, April 19, 2009 - 03:44 AM UTC
OOPS...sorry Gino, I guess I mixed them up. I read the review on the Perth site, it was very informative. I still have a lot to learn and I'm glad your around to help out.
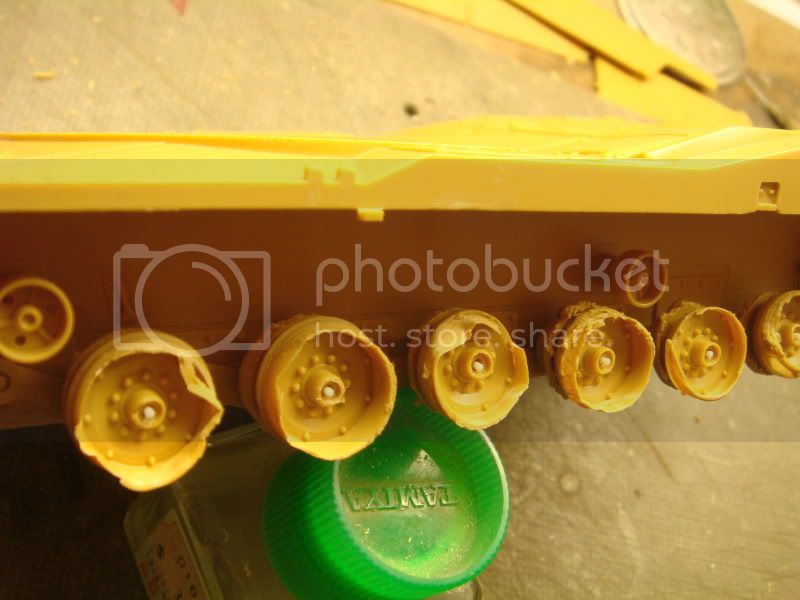
@ Steve.. I was also wondering how I would tackle the hubs, there done my friend and it was easy too. I don't know if it will work on a T34 but here is how I did mine.

The first step was to remove the hub them drill a small hole down the center of the hub. I have 6 pin vices which makes this much quicker. In this pic you can see the bits that I used.

Next I used two different Dremel bits, a flat ended and rounded bit. I first used the rounded bit to start the large hole, the smaller hole helps keep things centered.

After pre drilling with the round bit I " squared" of the bottom of the hole with the flat bit.

The next step was to glue a short piece of plastic rod in the center hole and it was done, quick and easy.Here is a shot of the completed hubs.
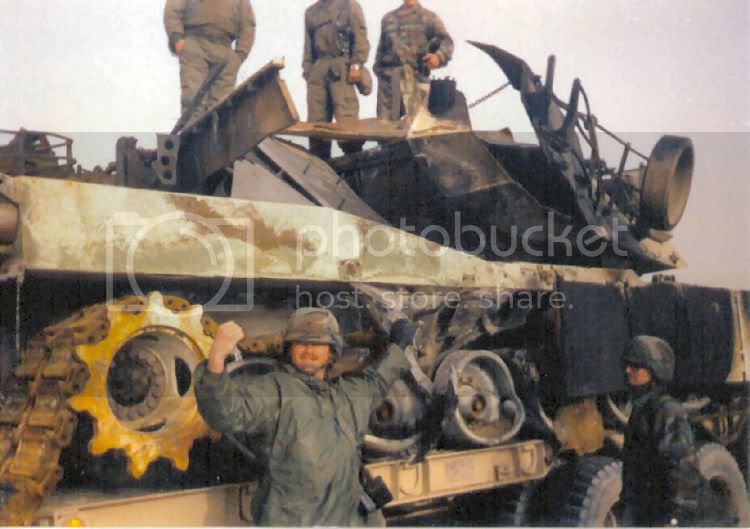
Here is a pic that I used as a reference to make the wheel hubs.I'll be starting the painting today and will post up dated pics soon.
Rob
Scratchmod-The Art of Destruction
Scotland, United Kingdom
Joined: March 09, 2003
KitMaker: 232 posts
Armorama: 149 posts
Posted: Sunday, April 19, 2009 - 04:24 AM UTC
Hi Rob,
once again you've built, building an excellent model. I love watching your wrecks coming together, as I told with the Panzer IV your work is inspiring. I have since started making some purchases for scratching and some new tools & taking loads of pictures for reference. I have the Dragonwagon & the Famo, so would like to build both & place wrecks on them. To add to rhe debate of cheap kit V's expensive kit, has it been any easier or harder for you to do the Abrams than normal?
Thanks again & keep up the outstanding work.
Kenny.
Build List :
Abrams Dio
Dragon Wagon & Panther G
Shermans & Jeeps
Massachusetts, United States
Joined: November 07, 2008
KitMaker: 796 posts
Armorama: 763 posts
Posted: Sunday, April 19, 2009 - 04:40 AM UTC
Hi Kenny and thanks. Yes this is a bit harder for me since I'm used German armor and am familiar with the tanks and what happens to them. the M1 has Aluminum material such as the wheels and that is new to me, but not a problem with a little research.
I'm looking forward to seeing your wrecks.
Rob
Scratchmod-The Art of Destruction
England - North East, United Kingdom
Joined: July 19, 2008
KitMaker: 317 posts
Armorama: 286 posts
Posted: Sunday, April 19, 2009 - 06:31 AM UTC
For the wheels to get the bent melted metal appearance you could slightly melt them then press it into shape - dont know if this would work as i have never tried it but it might work.

On the workbench:
Dragon: Flammpanzerwagen
Tamiya: Challenger 1
Revell: Shelby Cobra
Academy: TBM-3 "USS Bunker Hill"
England - West Midlands, United Kingdom
Joined: September 12, 2007
KitMaker: 1,548 posts
Armorama: 1,407 posts
Posted: Sunday, April 19, 2009 - 07:07 AM UTC
Great work Rob, I have just bought an Abrams for this treatment! Looking forward to more.