M1A2 Abrams wreck...my first modern tank
Massachusetts, United States
Joined: November 07, 2008
KitMaker: 796 posts
Armorama: 763 posts
Posted: Thursday, April 16, 2009 - 02:35 AM UTC
Hi guys, I've been absent from the forums far too long. I've completed the home renovations and am back to model building again. I was kinda getting tired of german armor wrecks so I decided to take a break and do some modern/cold war tank wrecks.
I purchased the Italeri M1A2 kit at the Valleycon show last month and thought I would start with this kit. I have the model about 80% completed, but haven't taken any pics yet. Since I have O knowledge of modern vehicles, I'm building the model OOB.
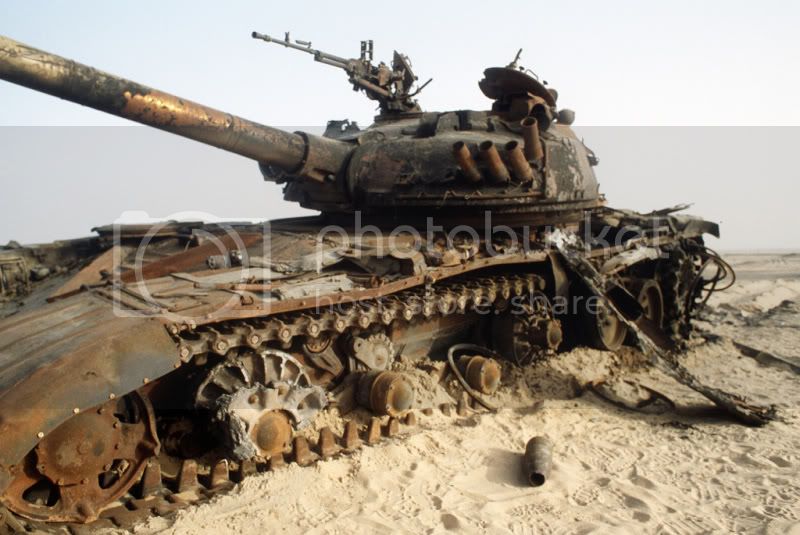
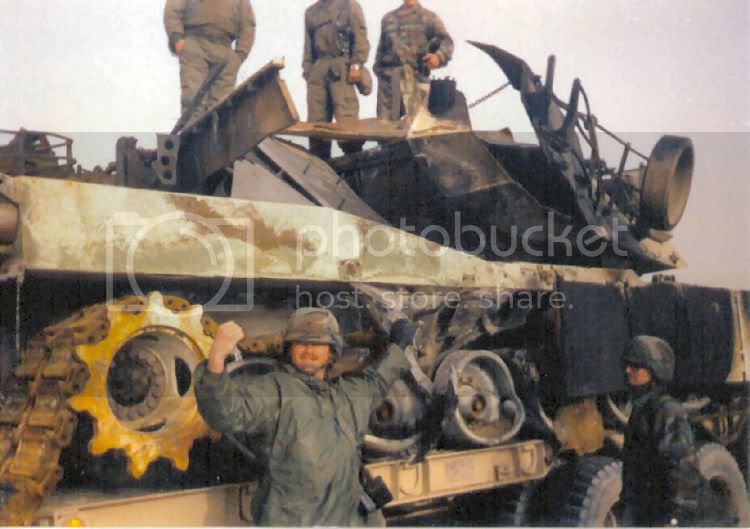
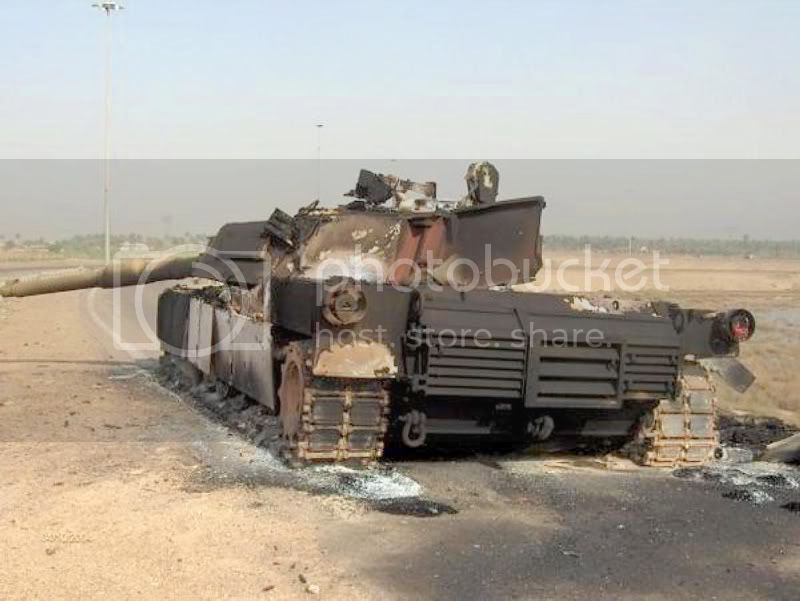
Here is a photo of how I plan on building and painting the M1.

I'll be using this photo and others as a painting guide. I'll be using and mixing different techniques on this build since I have never used the salt technique so it should be interesting. I'll post pics of the model soon.
Rob
Scratchmod-The Art of Destruction
Paris, France
Joined: August 30, 2005
KitMaker: 2,315 posts
Armorama: 2,158 posts
Posted: Thursday, April 16, 2009 - 02:50 AM UTC
Great Idea Rob
I gonna follow your work.
I have a AAVP waiting the same painting treatment, and this thread will certainly help me finishing it.
Cheers
Seb
Noord-Brabant, Netherlands
Joined: March 24, 2008
KitMaker: 1,247 posts
Armorama: 913 posts
Posted: Thursday, April 16, 2009 - 03:36 AM UTC
Nice idea and an even better idea to step to modern armour


Have you already seen Per Olavs Lund's build of the same model?
Lars
England - West Midlands, United Kingdom
Joined: June 23, 2008
KitMaker: 2,329 posts
Armorama: 2,110 posts
Posted: Thursday, April 16, 2009 - 03:58 AM UTC
Quoted Text
Nice idea and an even better idea to step to modern armour
Have you already seen Per Olavs Lund's build of the same model?
Lars
Rob its always a pleasure to see your work!, im really looking foward to this,
Lars ive seen that it looks superb!

Art isn't just pritty pictures. It's an expression of human rage.
Indiana, United States
Joined: October 16, 2002
KitMaker: 5,272 posts
Armorama: 2,844 posts
Posted: Thursday, April 16, 2009 - 04:00 AM UTC
"A government big enough to give you everything you want is a government big enough to take from you everything you have." Gerald Ford, August 12, 1974
Massachusetts, United States
Joined: November 07, 2008
KitMaker: 796 posts
Armorama: 763 posts
Posted: Thursday, April 16, 2009 - 04:33 AM UTC
I've seen his model and it is awesome. I don't plan on building the same vehicle, just using it as a guide on how the different material looks when burnt. Modern tanks have more composite material, like the Aluminum road wheels on the Abrams. German WWII armor is mainly steel, which oxidizes quickly, hence all the blackened and rusted steel. I'll come up with something for this Abrams, like I said, it's only a practice model for some Russian tanks I plan on building.
Here is a pic of what I have planned after the Abrams.
Wish me luck guys, I may have stepped over to the darkside.
Rob
Scratchmod-The Art of Destruction
England - West Midlands, United Kingdom
Joined: June 23, 2008
KitMaker: 2,329 posts
Armorama: 2,110 posts
Posted: Thursday, April 16, 2009 - 07:05 AM UTC
rob good luck!
all of the pigments must be getting to your head
Art isn't just pritty pictures. It's an expression of human rage.
Massachusetts, United States
Joined: September 07, 2007
KitMaker: 212 posts
Armorama: 159 posts
Posted: Thursday, April 16, 2009 - 07:38 AM UTC
Rob-
great to see you back at it! This is going to be fun to watch come together.
Steve
England - West Midlands, United Kingdom
Joined: March 21, 2009
KitMaker: 379 posts
Armorama: 299 posts
Posted: Thursday, April 16, 2009 - 10:15 AM UTC
Great stuff. I love burned and damaged tanks, so i can't wait to see pictures.
Have you thought about building "Cojone Eh?", plenty of pictures on the web for reference:
http://truewar.fateback.com/photos1.html at the bottom of the page.
I have tried building it once
http://i291.photobucket.com/albums/ll293/adamkijak/P1060532.jpg[url=http://photobucket.com/Ratatouille-collection?albumview=slideshow][img]http://i.imgur.com/kFPfg.jpg[/img][/url]
Massachusetts, United States
Joined: November 07, 2008
KitMaker: 796 posts
Armorama: 763 posts
Posted: Thursday, April 16, 2009 - 11:20 AM UTC
Thanks guys
@ newfish....I wish it were the pigments,I started doing these types of wrecks long before I used pigments, so it has to be the rust that has gotten to me.
@ Steve... thanks dude, it's definitely good to be back at it again.
@ Adam... thanks for the link, I had some of the pics already, but wow there's a lot photos out there. I must have saved at least 30 pics. Now I have enough photo references to build the M1 and maybe more in the future.
I have most of the model built already, so it's too late to model major damage so it will be a burn out only. It's probably a touchy subject for a lot of guys, it's upsetting for me to see all those M1 wrecks, but it is reality so we do have to deal with it some how. I hope I don't upset any one with this build. I'll wreck plenty of Russian stuff to make up for it.
Rob
Scratchmod-The Art of Destruction
England - West Midlands, United Kingdom
Joined: September 12, 2007
KitMaker: 1,548 posts
Armorama: 1,407 posts
Posted: Thursday, April 16, 2009 - 11:47 AM UTC
Great, another build/ wreck! I can't wait.
Massachusetts, United States
Joined: November 07, 2008
KitMaker: 796 posts
Armorama: 763 posts
Posted: Thursday, April 16, 2009 - 12:08 PM UTC
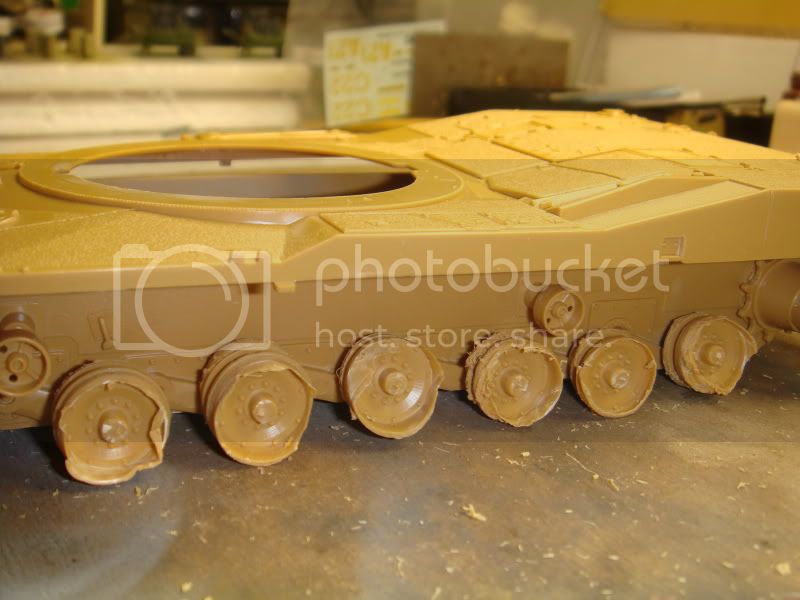
Ok I finally took some pics of the model as it stands at the moment,
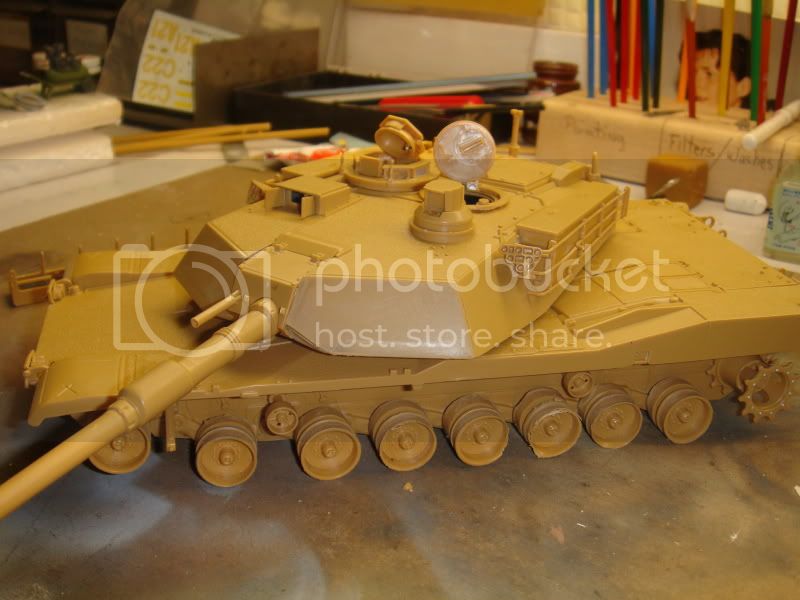
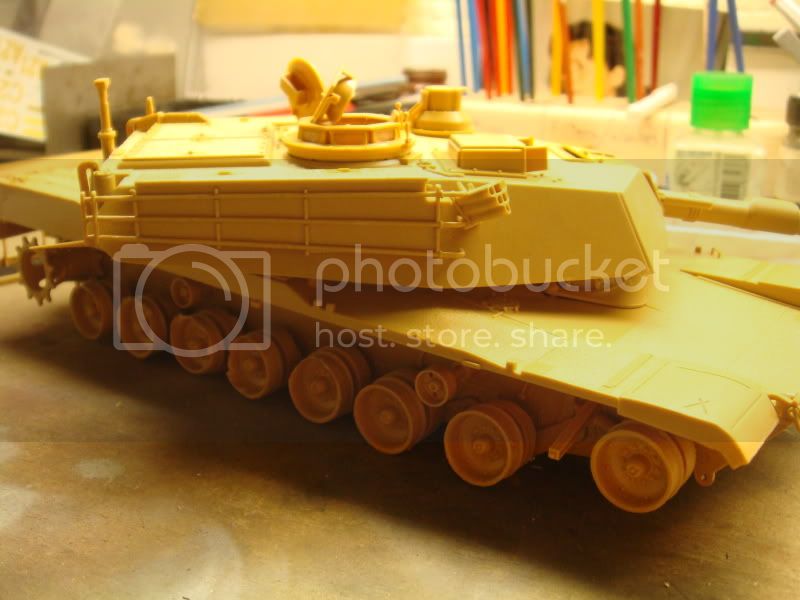
The kit is typical Italeri, LOTS of ejector pin marks everywhere,so lots of filling and sanding. Now I remember why I stopped building there kits and stuck with dragon. To lower the tank's hull, I removed the molded on wheel swing arm axles and drilled new holes above these. The new axles were made out of lenths of the kits sprue.
As you can see it's OOB and not my typical wreck with lots of scratchbuilding, I'll save that for the next wreck, right now I just want to get my feet wet.
All you modern armor guys, go easy on me about the accuracy and details, I'll make up for that with the painting.
Rob
Scratchmod-The Art of Destruction
England - West Midlands, United Kingdom
Joined: June 23, 2008
KitMaker: 2,329 posts
Armorama: 2,110 posts
Posted: Thursday, April 16, 2009 - 12:33 PM UTC
Rob why are you using ths kit?
i can see why with the price of dragon kits
never the less good start nice work on the suspention!
Art isn't just pritty pictures. It's an expression of human rage.
Massachusetts, United States
Joined: November 07, 2008
KitMaker: 796 posts
Armorama: 763 posts
Posted: Thursday, April 16, 2009 - 12:55 PM UTC
Hi Jaymes
I never planned on doing an Abrams, but I got the kit for 10USD, so I figured what the heck for ten bucks can't beat it. The next Abrams will be with a Dragon kit.
Rob
Scratchmod-The Art of Destruction
England - West Midlands, United Kingdom
Joined: June 23, 2008
KitMaker: 2,329 posts
Armorama: 2,110 posts
Posted: Thursday, April 16, 2009 - 01:18 PM UTC
Hi Rob !
nice one ! bargain i wouldn't complain!. good luck matey!.
I want to do this once ive finished a few things...

Art isn't just pritty pictures. It's an expression of human rage.
Noord-Brabant, Netherlands
Joined: March 24, 2008
KitMaker: 1,247 posts
Armorama: 913 posts
Posted: Friday, April 17, 2009 - 03:29 AM UTC
Nice work!
Don't forget to ruin the torsion bars as these totally collapsed on the original one. The tank would lay on his body.
lars
Paris, France
Joined: August 30, 2005
KitMaker: 2,315 posts
Armorama: 2,158 posts
Posted: Friday, April 17, 2009 - 03:58 AM UTC
Rob
I also notice that the plastic hubs are still present on the wheels.
I do beleive that they will melt for sure and if you remove the side panels you need to correct them.
Cheers
Seb
Massachusetts, United States
Joined: November 07, 2008
KitMaker: 796 posts
Armorama: 763 posts
Posted: Friday, April 17, 2009 - 04:04 AM UTC
Thanks guys, this is the type of feedback i was hoping for. I'll take care of those items ASAP. Thanks again.
Rob
Scratchmod-The Art of Destruction
Provincia de Pontevedra, Spain / España
Joined: October 23, 2006
KitMaker: 300 posts
Armorama: 214 posts
Posted: Friday, April 17, 2009 - 04:07 AM UTC
Rob I´ve got to admire your ambition, it´s inspiring because it´s something I always wanted to do but always chickened out .I look forward to your future posts

Competing against others there will always be better or worse. Competing against yourself you can only get better,but only, only! if you learn from your mistakes.
Massachusetts, United States
Joined: November 07, 2008
KitMaker: 796 posts
Armorama: 763 posts
Posted: Friday, April 17, 2009 - 05:03 AM UTC
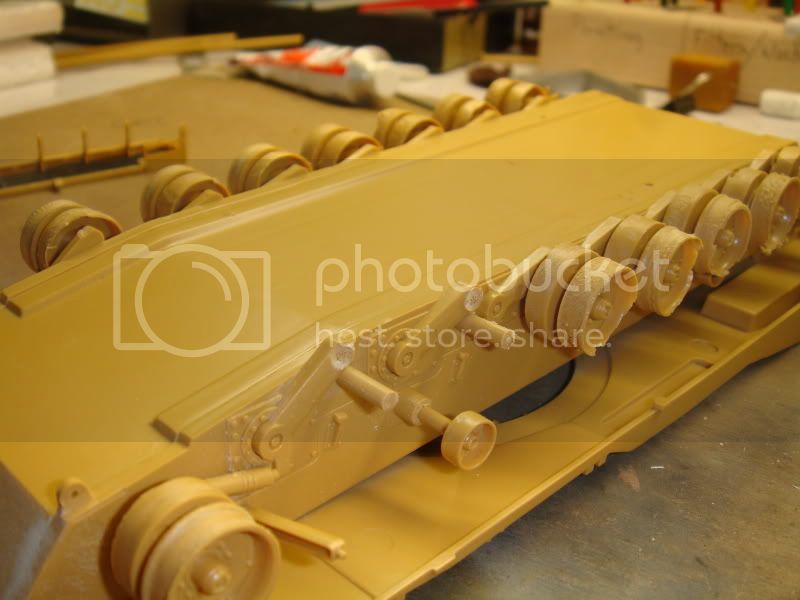
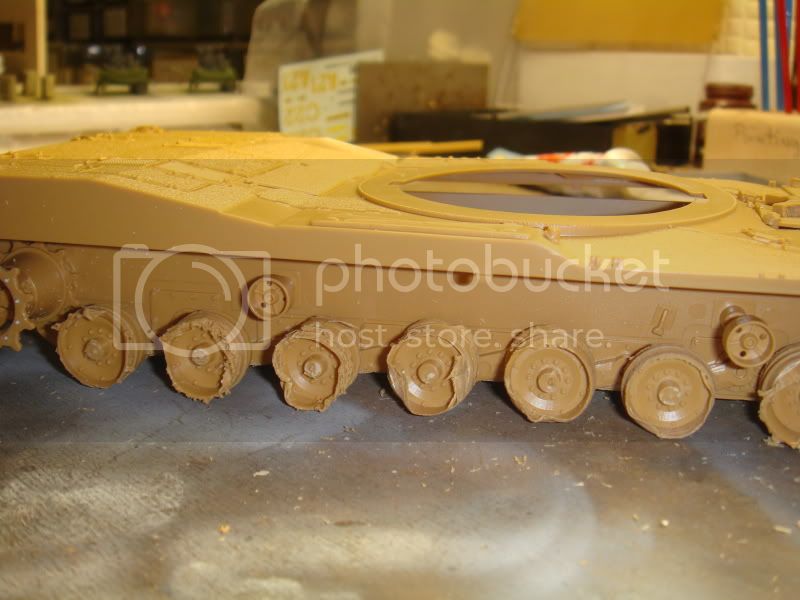
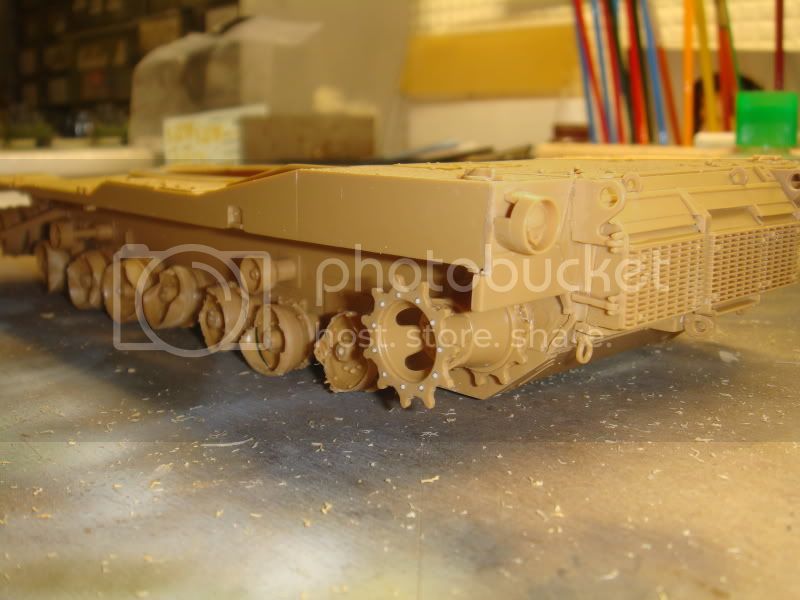
Thanks for the comments guys. I redid the wheels to try and get that melted look, I haven't studied the affects on Alum yet, I'm used to the steel tanks of WWII. I checked my photo ref. and tried to come close to what it would look like, what do you think so far? I removed more of the torsion bars to try and get this baby belly down. There will be lots of ash and melted Alum at the base of the road wheels when it's done.
I was using this pic as a ref.
Rob
Scratchmod-The Art of Destruction
Paris, France
Joined: August 30, 2005
KitMaker: 2,315 posts
Armorama: 2,158 posts
Posted: Friday, April 17, 2009 - 05:39 AM UTC
Rob
My opinion drop the kit into the bin and buy the Dragon one, the hub,wheels and overall quality is better.
Other comment from the italery kit, the rear light you need to drill the plastic cover of the light, they will melt. the dragon kit comes with transparent one so you dont need to glue it.
this is my advice but I do beleive that you are wasting your time with Italery crap kit.
However, your work is great.
Cheers
Seb
Massachusetts, United States
Joined: November 07, 2008
KitMaker: 796 posts
Armorama: 763 posts
Posted: Friday, April 17, 2009 - 05:57 AM UTC
Hi Seb
I know the Italeri kits suck, but I only paid ten bucks for the kit and am only using it to work on a more realistic paint job. I'm not very happy the way my PZIV turned out, and that's why I'm using this kit to practice.
If I do another M1, it will most definitely be a Dragon kit and scratchbuilding.
Did I forget to mention this is my first modern tank, I'm still learning. Thanks for the tips, it's appreciated for sure.
Rob
Scratchmod-The Art of Destruction
Florida, United States
Joined: May 16, 2002
KitMaker: 17,694 posts
Armorama: 13,742 posts
Posted: Friday, April 17, 2009 - 06:06 AM UTC
Quoted Text
My opinion drop the kit into the bin and buy the Dragon one,
That doesn't make much sense. Why would you pay $40+ for the Dragon AIM kit and then destroy it? It always makes more sense to use a cheaper kit for a destroyed vehicle. The Italeri kit isn't that bad either. It is an update to teh Trumpter M1A2 kit.
All the changes that the Dragon kit makes easier by being separate pieces aren't needed. You can do them yourself. Its called modeling.
By the way, the entire rear light housing is plastic, so it would all melt away if it got that hot, not just the lens.
Field Artillery --- The KING of BATTLE!!!
"People sleep peaceably in their beds at night only because rough men stand ready to do violence on their behalf." -- George Orwell
Showcase
Paris, France
Joined: August 30, 2005
KitMaker: 2,315 posts
Armorama: 2,158 posts
Posted: Friday, April 17, 2009 - 06:40 AM UTC
Quoted Text
By the way, the entire rear light housing is plastic, so it would all melt away if it got that hot, not just the lens.
DId not know that Gino. thanks
Concerning the quality of the kit, i dont share your opinion you should check the work from Per Olav on his M1A2 and he used the Dragon kit. The result is outstanding
@ Rob
welcome to Modern Era, I gonna help you and I hope that other will (like Gino and Other)
Cheers
Seb
Massachusetts, United States
Joined: November 07, 2008
KitMaker: 796 posts
Armorama: 763 posts
Posted: Friday, April 17, 2009 - 06:45 AM UTC
Thanks for the support guys. I found a pic of the rear of a tank that burned, the light housing is still in tact. After spending 8 years in the military, you'd think I would remember it's plastic, sucks getting old.
I'm working on the bustle rack right now and not enjoying it either
Rob
Scratchmod-The Art of Destruction


