

I don't know what color you have in mind, but i just want you to show the work in progress of my german friend Andre Bolten and the colors he uses
http://www.models-in-action.com/blog/17_1702/3474_07.jpg
(Hope that works)
Claude
Hosted by Darren Baker
-Landing interval- Berlin, April 1945
roudeleiw

Joined: January 19, 2004
KitMaker: 2,406 posts
Armorama: 2,224 posts

Posted: Saturday, November 14, 2009 - 01:37 AM UTC


Mars_Volta

Joined: March 28, 2005
KitMaker: 145 posts
Armorama: 124 posts

Posted: Saturday, November 14, 2009 - 05:32 AM UTC
Hi all,
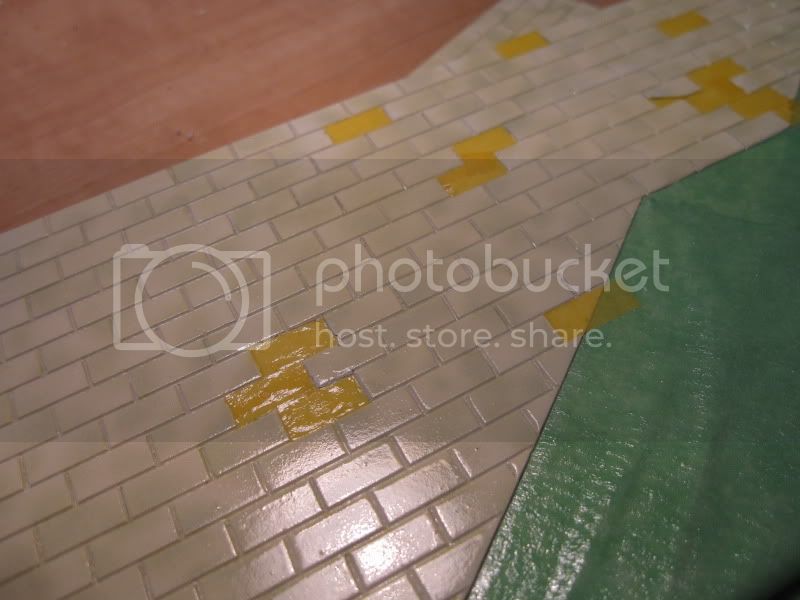
I gave a try at painting the tiles and overall I think my plan worked quite well.
What I desired was white tiles with hue of green. Beside this, I wanted to keep the look of each tiles being individual so I had to paint them kind of ">individualy.... I didnt want to free hand the green hue with my airbrush because the hue of green would have continued from one tile to another and that would have killed the look of individual tiles...installed one at a time...
So I had to go with a template
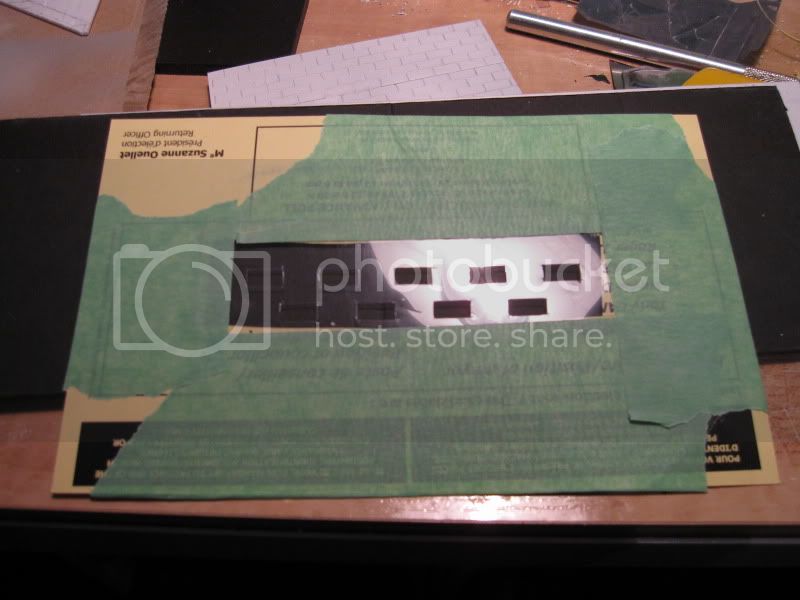
I let one tile space on the template to indeed get a break in the cloud partern
after a tedious spot painting of Tamiya J.A. green over a white layer here's the result

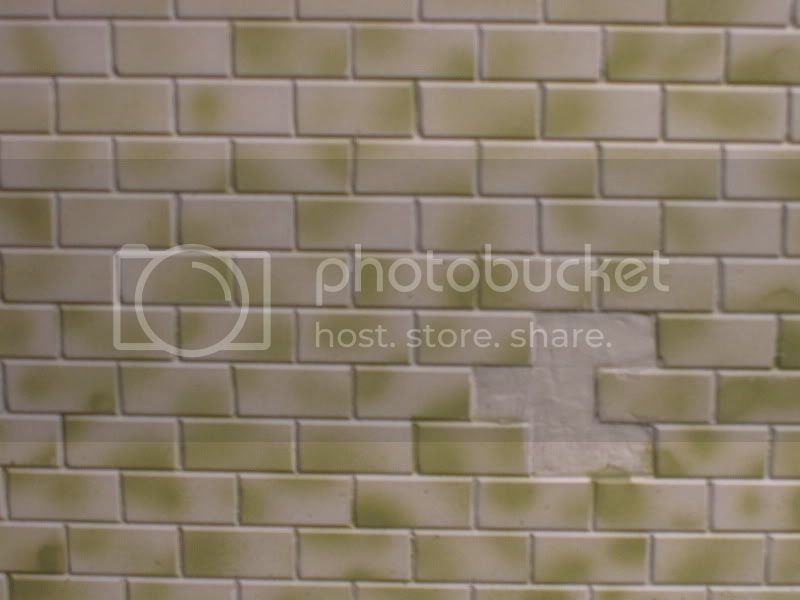
Then a small amount of white paint was sprayed to tone down the contrast, make it more subtle
next on i'll probably spray a light fume of beige because I think it looks like too clean and sharp, not oldish enough...dunno how to say it Then it's Future floor wax for the gloss look and a special treament for the mortar filled joint
Cheers
Phil
Edit:
@Claude, Frank and Garth: Ok as I understand it you'd like to see how I did?? Hopefully I took lots of progress pictures. When I'll have some time I will start a build log for that one as well because it's a project that I want to bring to its conclusion. Thank you for your interest!
@Neil: Uniforms will be weathered but I feel that the base color is just inappropriate, unfortunately. Unless someone show me a picture of deep green uniforms I'll repaint them. Anyways it's just the base color, no micro painting to redo here
@Claude: Thank you for you're picture. Something that I remarked after looking at several picture of U-Bahn stations is that they are all different! And even if I know at what time which station was build, I can't know if the finition was redone since the opening, etc. So I use my artistic license and try to replicate what I have seen on one reference picture that I feel might be right for 1945.
I apology for any historical innaccuracies. My goal is to capture the essence of the battle of Berlin and build it into a somewhat artistic diorama. I would live in Berlin or in Europe that it would be different !!!
I gave a try at painting the tiles and overall I think my plan worked quite well.
What I desired was white tiles with hue of green. Beside this, I wanted to keep the look of each tiles being individual so I had to paint them kind of
">individualy.... I didnt want to free hand the green hue with my airbrush because the hue of green would have continued from one tile to another and that would have killed the look of individual tiles...installed one at a time...So I had to go with a template
I let one tile space on the template to indeed get a break in the cloud partern
after a tedious spot painting of Tamiya J.A. green over a white layer here's the result
Then a small amount of white paint was sprayed to tone down the contrast, make it more subtle
next on i'll probably spray a light fume of beige because I think it looks like too clean and sharp, not oldish enough...dunno how to say it
Then it's Future floor wax for the gloss look and a special treament for the mortar filled jointCheers
Phil
Edit:
@Claude, Frank and Garth: Ok as I understand it you'd like to see how I did??
Hopefully I took lots of progress pictures. When I'll have some time I will start a build log for that one as well because it's a project that I want to bring to its conclusion. Thank you for your interest!@Neil: Uniforms will be weathered but I feel that the base color is just inappropriate, unfortunately. Unless someone show me a picture of deep green uniforms I'll repaint them. Anyways it's just the base color, no micro painting to redo here
@Claude: Thank you for you're picture. Something that I remarked after looking at several picture of U-Bahn stations is that they are all different! And even if I know at what time which station was build, I can't know if the finition was redone since the opening, etc. So I use my artistic license and try to replicate what I have seen on one reference picture that I feel might be right for 1945.
I apology for any historical innaccuracies. My goal is to capture the essence of the battle of Berlin and build it into a somewhat artistic diorama. I would live in Berlin or in Europe that it would be different !!!
MrMox

Joined: July 18, 2003
KitMaker: 3,377 posts
Armorama: 1,088 posts

Posted: Saturday, November 14, 2009 - 07:51 AM UTC
Nice work with the mask - i really like the effect of the green, with some washes it will give a lot of variation to the wall.
Cheers/Jan
Cheers/Jan

Mars_Volta
Joined: March 28, 2005
KitMaker: 145 posts
Armorama: 124 posts
Posted: Saturday, November 14, 2009 - 09:14 AM UTC
Small update:
A yellow ocre filter made with diluted oil paint was airbrushed in order to get more color ''intense'' walls
Personnaly I really like the look
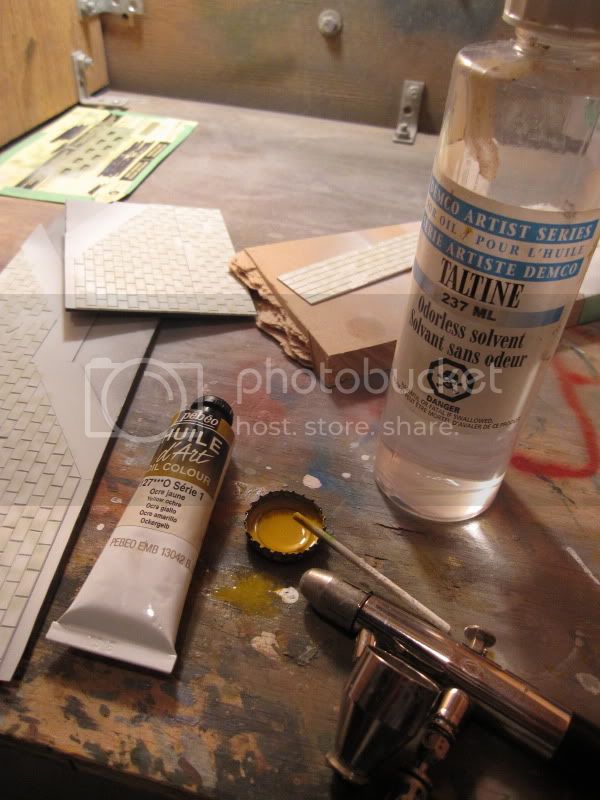
Good week end all
Phil
A yellow ocre filter made with diluted oil paint was airbrushed in order to get more color ''intense'' walls
Personnaly I really like the look
Good week end all
Phil
Mars_Volta
Joined: March 28, 2005
KitMaker: 145 posts
Armorama: 124 posts
Posted: Sunday, November 15, 2009 - 10:11 AM UTC
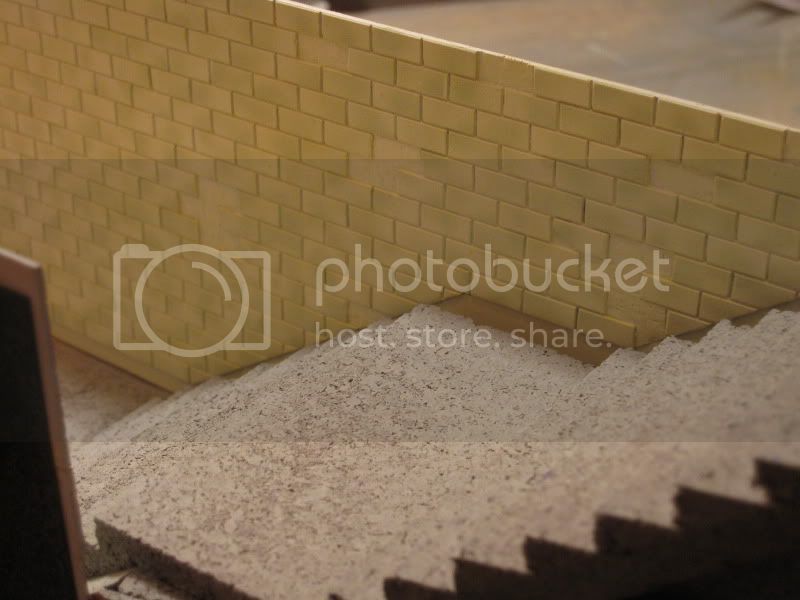
 day afternoon was productive!
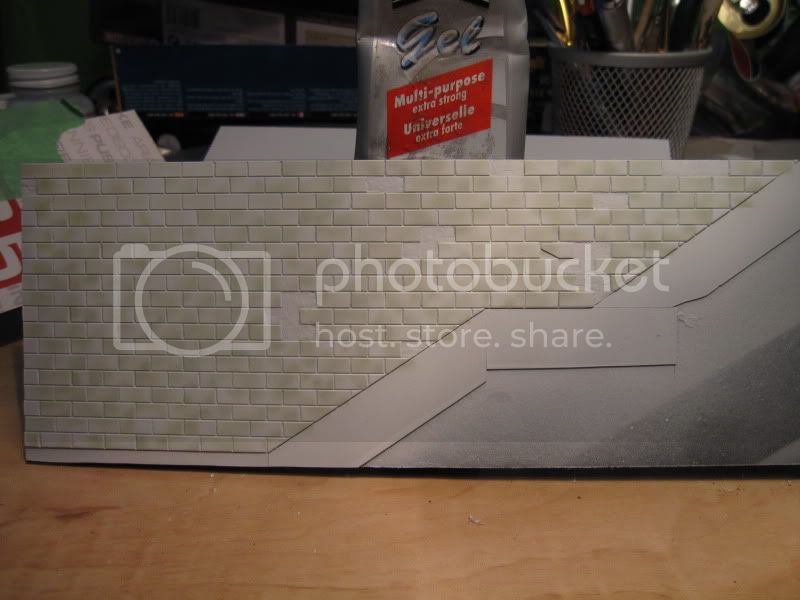
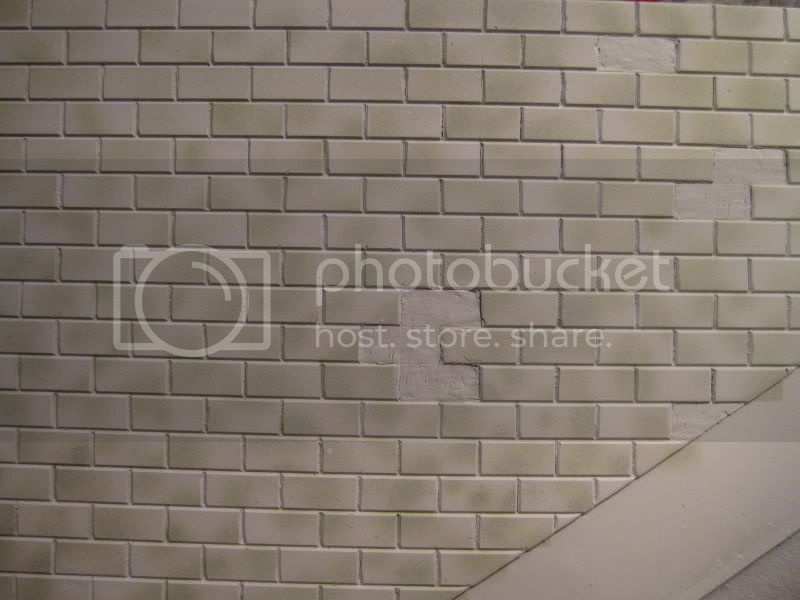
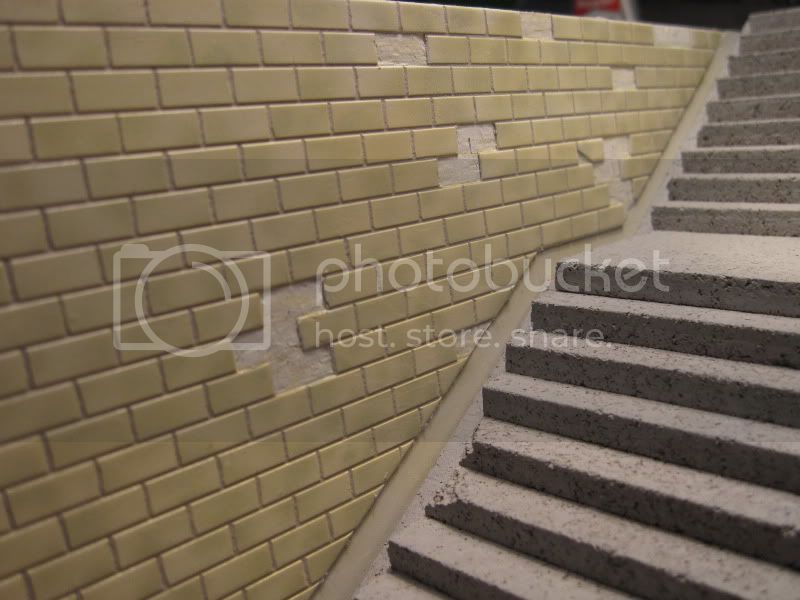
Wall after 3 application of Future floor wax. The fallen tile emplacements were covered because they'll be painted concrete color and need to remain flat.
After floor wax was dried I prepared my little mix I had in mind for a while. It's featherweight spackling mixed with a LITTLE water, just enough to turn it into a paste, and a few drop of grey acrilyc paint.
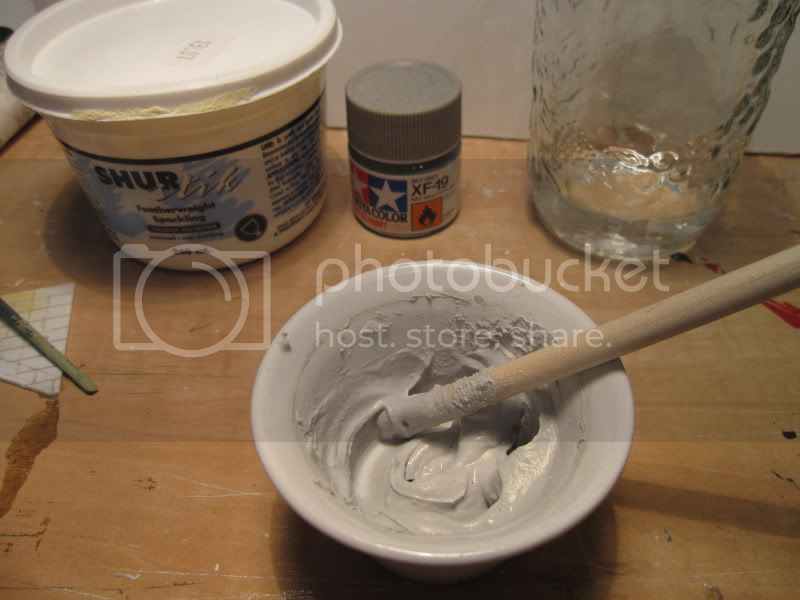
This mix is forced into the crevices and the excess wiped with a damp clothe. I made a little section at a time, maybe 2 inches square.
what scale is this? 1:1 !
nah just kidding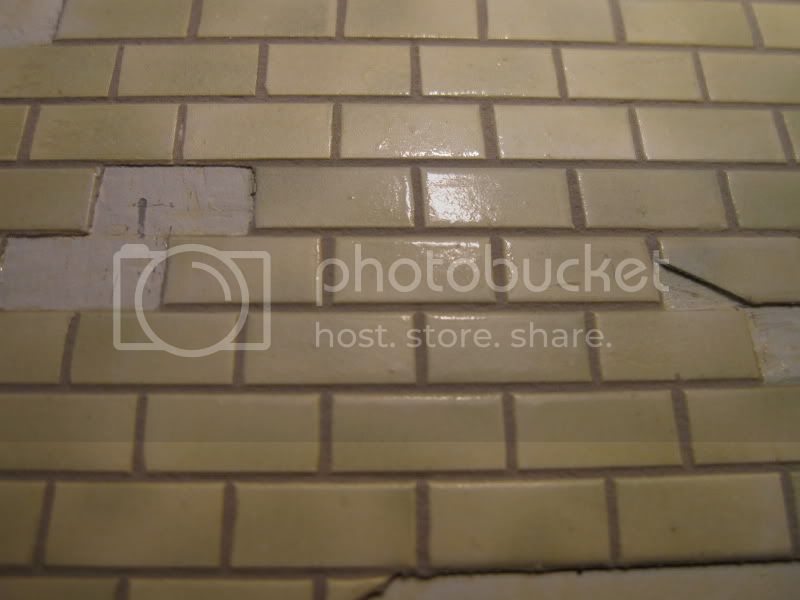
I'm really happy with the end result

Cheers
Phil

dioman13

Joined: August 19, 2007
KitMaker: 2,184 posts
Armorama: 1,468 posts
Posted: Sunday, November 15, 2009 - 01:28 PM UTC
Looks like you have been on the subway in New York a time or two. Excellent, you hit those tiles right on. And I'd like a weekend reservation at the lodge please.
MrMox
Joined: July 18, 2003
KitMaker: 3,377 posts
Armorama: 1,088 posts
Posted: Sunday, November 15, 2009 - 07:40 PM UTC
Quoted Text
I'm really happy with the end result
And you really have reason to be, they look spot on !
Cheers/Jan
Gundam-Mecha

Joined: August 05, 2009
KitMaker: 1,019 posts
Armorama: 933 posts

Posted: Thursday, November 19, 2009 - 08:04 AM UTC
This really is brilliant, the tiles are so well done and the paint is really breathing so much life into it. Very realistic and very interesting to follow!
Mars_Volta
Joined: March 28, 2005
KitMaker: 145 posts
Armorama: 124 posts
Posted: Friday, November 20, 2009 - 11:46 AM UTC
Thanks for your comments guys!
This week I decided to work on the props for my diorama just to get a relief from the stairs and stuff
So I scratchbuilt this....hmm....german soft skin?
I'll place this baby stroller on the sidewalk near the top of the stairs to put emphasis on the dramatic side of the battle, as a family, or more likely a widow flea the city by the subway, abandoning the stroller on the street
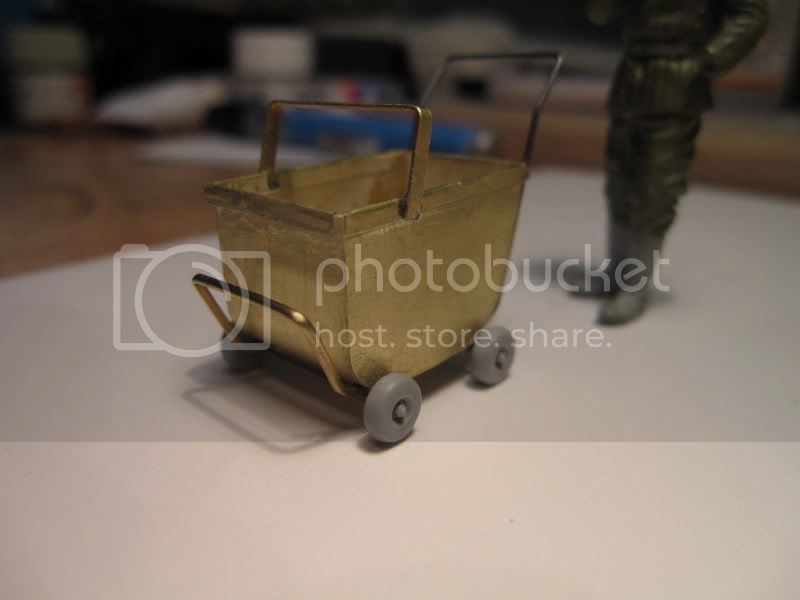
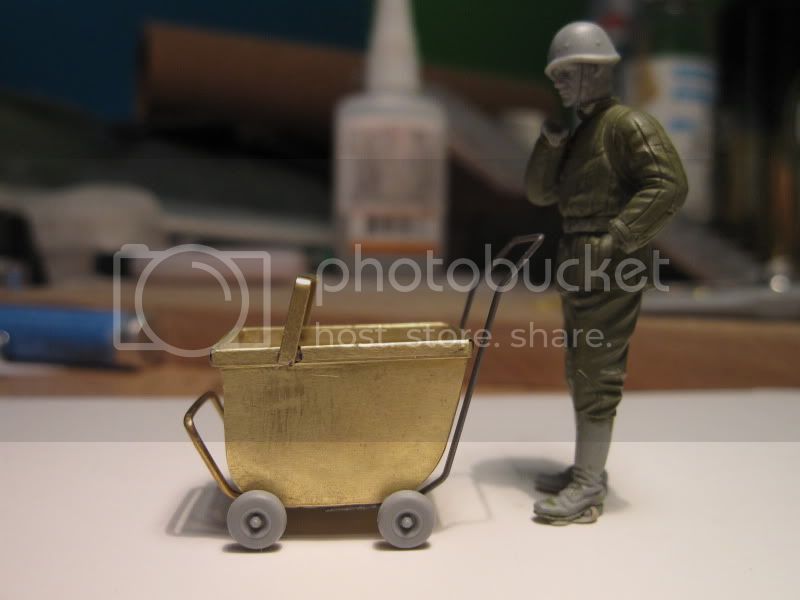
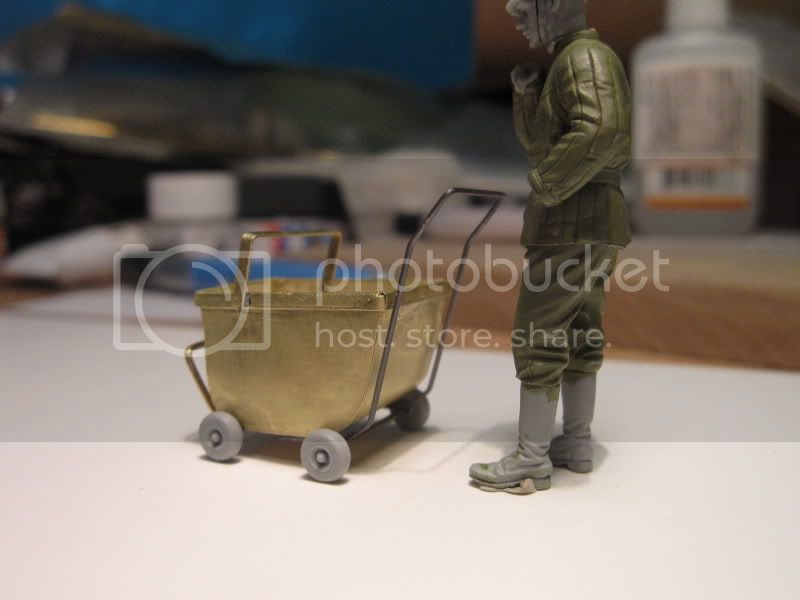
wheels are from sparebox----> Fallschirmjager's drop container
Cheers
Phil
This week I decided to work on the props for my diorama just to get a relief from the stairs and stuff
So I scratchbuilt this....hmm....german soft skin?
I'll place this baby stroller on the sidewalk near the top of the stairs to put emphasis on the dramatic side of the battle, as a family, or more likely a widow flea the city by the subway, abandoning the stroller on the street
wheels are from sparebox----> Fallschirmjager's drop container
Cheers
Phil

1969

Joined: December 16, 2005
KitMaker: 2,864 posts
Armorama: 303 posts
Posted: Sunday, November 22, 2009 - 06:41 AM UTC
Quoted Text
I'm really happy with the end result
Cheers
Phil
I am not suprised you are happy, the tile effect is stunning.
Steve


sroth88
Joined: August 13, 2007
KitMaker: 109 posts
Armorama: 63 posts
Posted: Sunday, November 22, 2009 - 07:04 AM UTC
Awsome stuff
Pavlovsdog

Joined: June 05, 2006
KitMaker: 438 posts
Armorama: 352 posts

Posted: Tuesday, November 24, 2009 - 05:14 AM UTC
Philippe ,
A wonderful job on the tiles they look fantastic , I really like the pram , also, best wishes,
Jerry
A wonderful job on the tiles they look fantastic , I really like the pram , also, best wishes,
Jerry

AlanL

Joined: August 12, 2005
KitMaker: 14,499 posts
Armorama: 11,675 posts
Posted: Tuesday, November 24, 2009 - 08:17 AM UTC
Hi Philippe,
Excellent stuff really enjoying your work.
Al
Excellent stuff really enjoying your work.
Al

Jamesite

Joined: December 05, 2006
KitMaker: 2,208 posts
Armorama: 2,152 posts

Posted: Wednesday, November 25, 2009 - 02:17 AM UTC
I was lurking on this thread but after the recent posts felt compelled to comment.
You have some seriously impressive diorama skills my friend! This is going to be a great looking diorama.
Keep up the good work,
James
You have some seriously impressive diorama skills my friend! This is going to be a great looking diorama.
Keep up the good work,
James
Mars_Volta
Joined: March 28, 2005
KitMaker: 145 posts
Armorama: 124 posts
Posted: Friday, November 27, 2009 - 01:45 PM UTC
Hi all
It's been a week since last update, time goes by so fast! So even if I haven't made much progress I owe some pictures to this build log
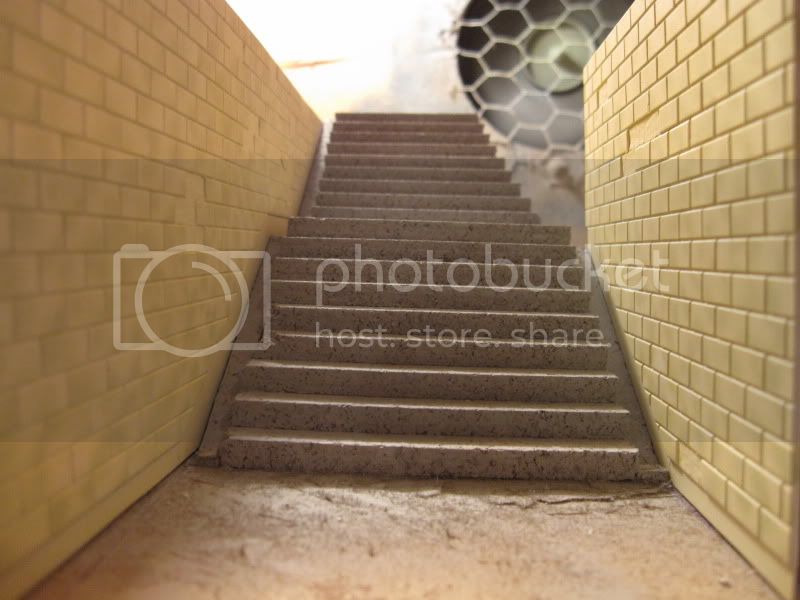
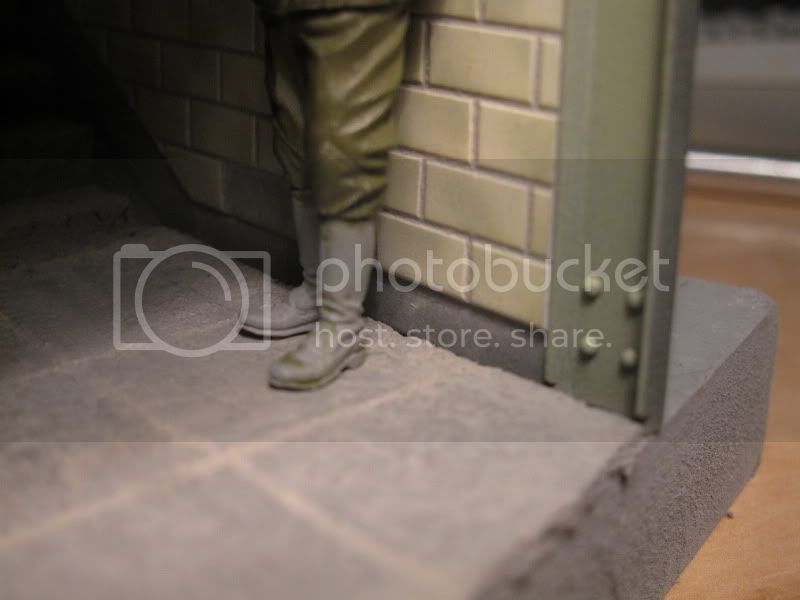
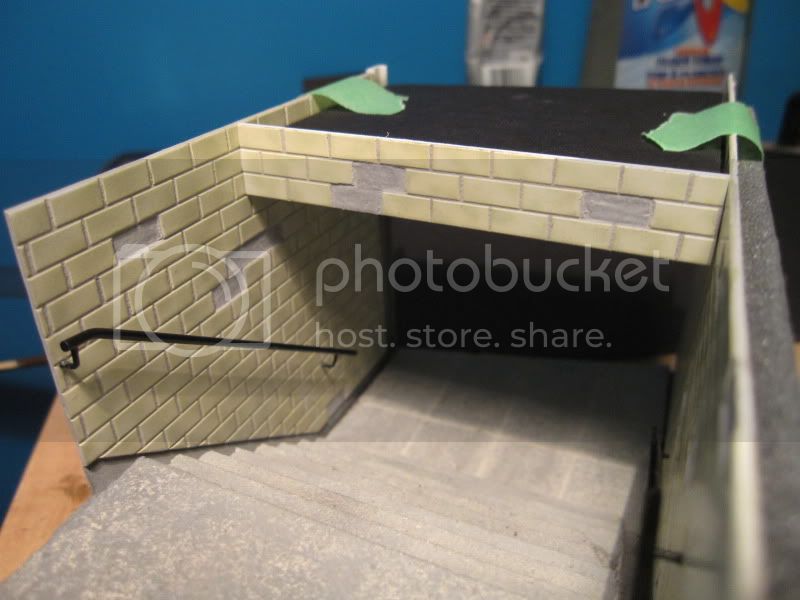
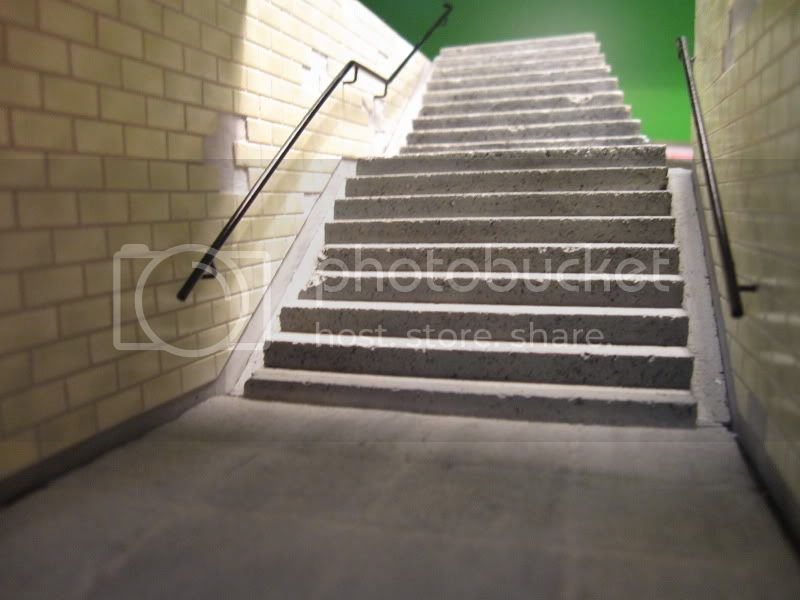
Basically what I did is paint and weather the stairs, finish the floor at the bottom of stairs, build a hand rail (not shown)
Also the 2 walls have been glued permanently and the bulkhead is done too.
I'm not going fast but I emjoy all of my build
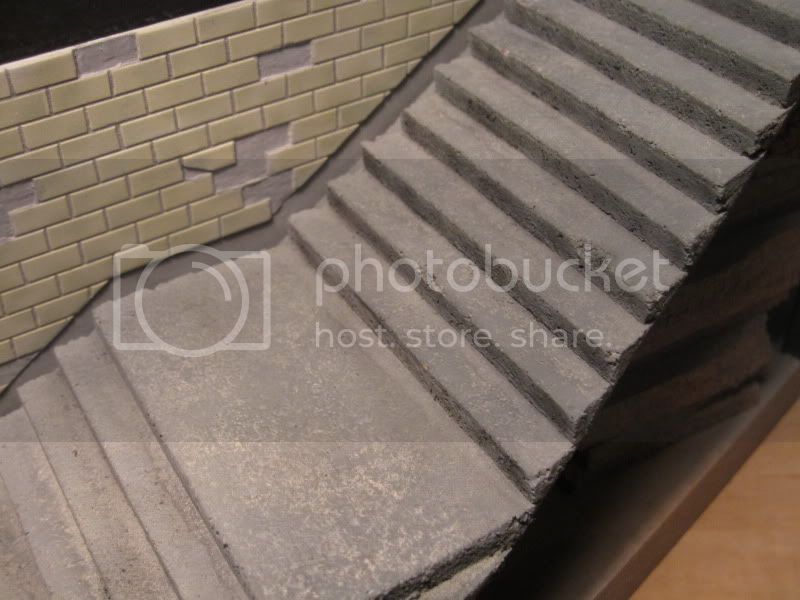
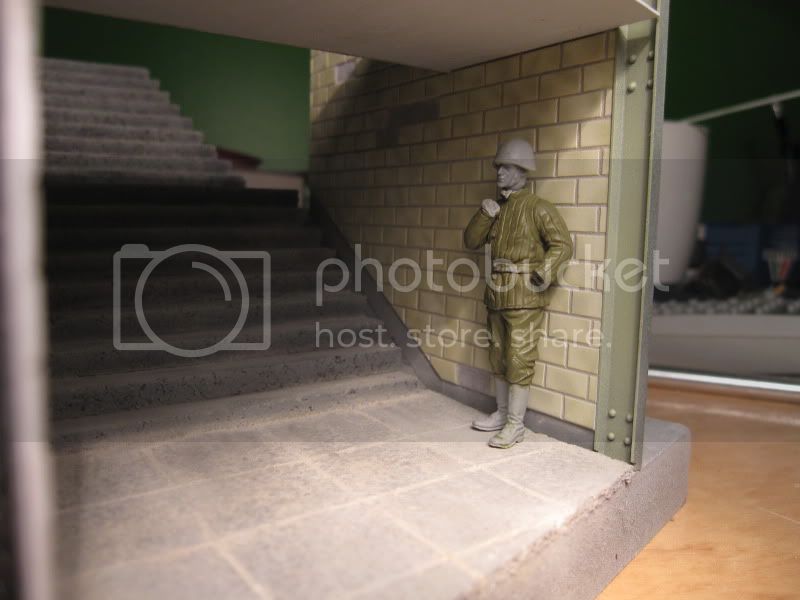
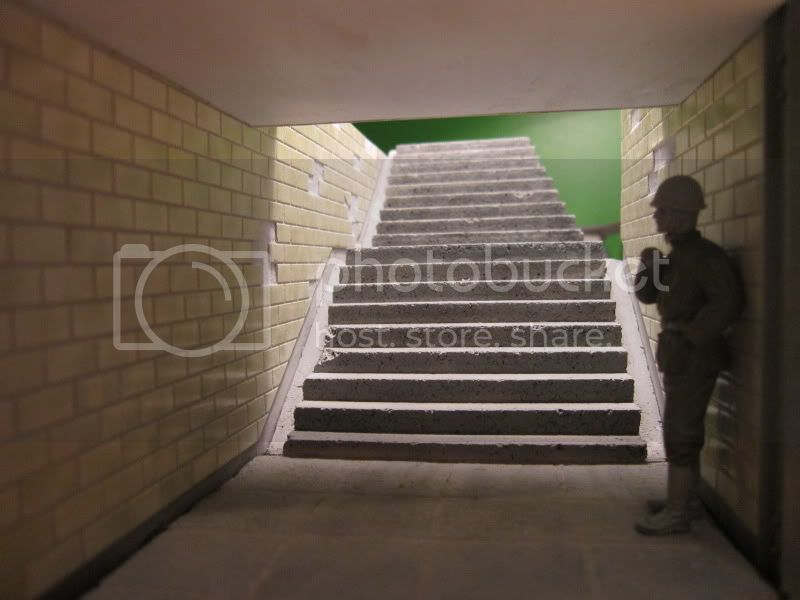
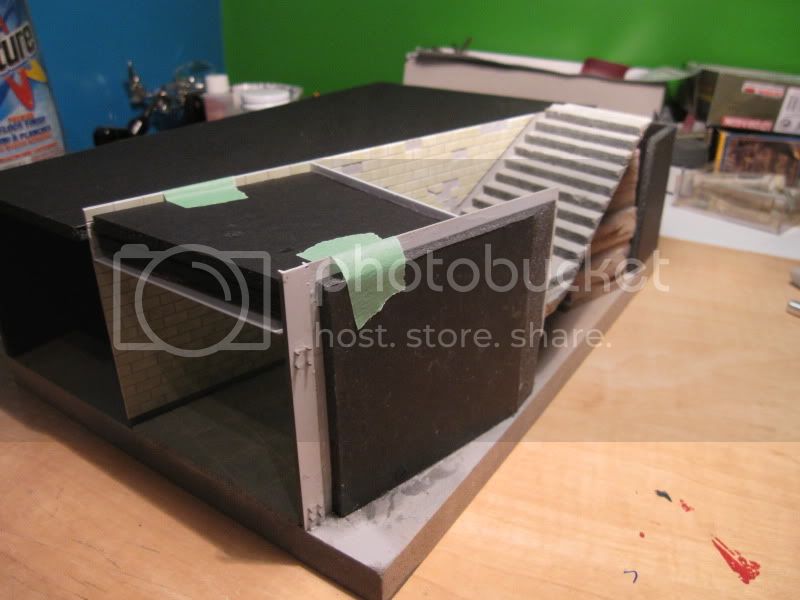
I might add the door and fence at the bottom of stairs, I'm not certain yet. On one hand it sets a nice backdrop so that when you look in the staircase you see less directly the table on which the diorama sits. And on the other hand it looks fine without the fence, leaving a long uninterrupted tile wall.

Tell what you think. Any comment is welcome.
Thanks all and Jon I wish the best of luck with your Tchechnia dio
Cheers
Phil
It's been a week since last update, time goes by so fast! So even if I haven't made much progress I owe some pictures to this build log
Basically what I did is paint and weather the stairs, finish the floor at the bottom of stairs, build a hand rail (not shown)
Also the 2 walls have been glued permanently and the bulkhead is done too.
I'm not going fast but I emjoy all of my build
I might add the door and fence at the bottom of stairs, I'm not certain yet. On one hand it sets a nice backdrop so that when you look in the staircase you see less directly the table on which the diorama sits. And on the other hand it looks fine without the fence, leaving a long uninterrupted tile wall.
Tell what you think. Any comment is welcome.
Thanks all and Jon I wish the best of luck with your Tchechnia dio
Cheers
Phil

shopkin4
Joined: March 29, 2009
KitMaker: 1,135 posts
Armorama: 1,030 posts
Posted: Friday, November 27, 2009 - 04:04 PM UTC
Simply amazing. I am really taken away by your build. I dont mind the pace at all
MrMox
Joined: July 18, 2003
KitMaker: 3,377 posts
Armorama: 1,088 posts
Posted: Friday, November 27, 2009 - 08:29 PM UTC
It shapes up nicely, I like your drainageslopes along the stairs.
I would drop the doors - they kind of breaks views into the diorama.
Cheers/Jan
I would drop the doors - they kind of breaks views into the diorama.
Cheers/Jan

slodder
Joined: February 22, 2002
KitMaker: 11,718 posts
Armorama: 7,138 posts
Posted: Friday, November 27, 2009 - 11:50 PM UTC
colors detail composition - all great.
this is a build feature contender.
this is a build feature contender.

roudeleiw
Joined: January 19, 2004
KitMaker: 2,406 posts
Armorama: 2,224 posts
Posted: Saturday, November 28, 2009 - 12:05 AM UTC
Hi Philippe,
Well done overall, like the tiles, but also the scratched stroller.
You are on the right way to do a great dio!
Cheers
Claude
Well done overall, like the tiles, but also the scratched stroller.
You are on the right way to do a great dio!
Cheers
Claude
Mars_Volta
Joined: March 28, 2005
KitMaker: 145 posts
Armorama: 124 posts
Posted: Sunday, November 29, 2009 - 06:43 AM UTC
Scott: I'd be more than pleased to make an Armorama feature out of it. Just tell me what to do and I'll take care of it.
Small update
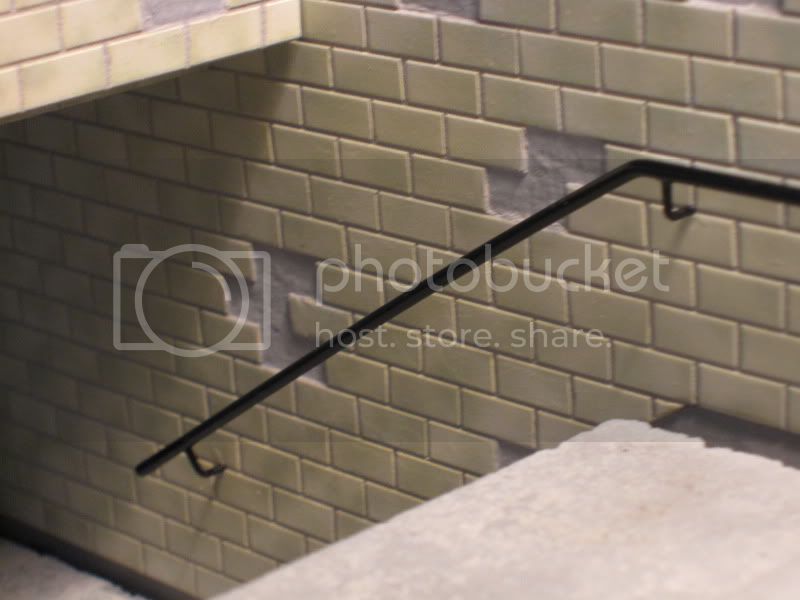
I finally found the patience to glue the handrails. Handrails are made of Evergreen styrene rod and the support is brass rod fold up to a 90o degrees angle with pliers. Everything hold in place with CA glue.
I initially gave the handrail a coat of Humbrol metal coat, sprayed some hairspray over and then airbrushed a coat of Tamiya semi-gloss black. I dunno what I did wrong but the hairspray don't come off when I scrub it. Me think my coat of semi gloss was too heavy and sealed the hairspray. I'm kinda disappointed cause I had a subtle wheathering effect in my sleeve and it failed but I'll live with it.
If anyone has a clue about what went wrong with my hairspray technique do not hesitate to write it down
Cheers
Phil
Small update
I finally found the patience to glue the handrails. Handrails are made of Evergreen styrene rod and the support is brass rod fold up to a 90o degrees angle with pliers. Everything hold in place with CA glue.
I initially gave the handrail a coat of Humbrol metal coat, sprayed some hairspray over and then airbrushed a coat of Tamiya semi-gloss black. I dunno what I did wrong but the hairspray don't come off when I scrub it. Me think my coat of semi gloss was too heavy and sealed the hairspray. I'm kinda disappointed cause I had a subtle wheathering effect in my sleeve and it failed but I'll live with it.
If anyone has a clue about what went wrong with my hairspray technique do not hesitate to write it down
Cheers
Phil
muchachos
Joined: May 21, 2008
KitMaker: 537 posts
Armorama: 439 posts

Posted: Sunday, November 29, 2009 - 07:22 AM UTC
Perhaps you waited too long to start scrubbing? I have read that you should start scrubbing about 10-15 minutes after the second coat of paint is applied. Still, if you wanted to do some damage, you could rub it a little with some sandpaper to reveal the undercoat, or scratch it carefully with an xacto blade?


martyncrowther

Joined: September 12, 2007
KitMaker: 1,548 posts
Armorama: 1,407 posts

Posted: Sunday, November 29, 2009 - 09:20 AM UTC
Great work! I love the rails.
Gundam-Mecha
Joined: August 05, 2009
KitMaker: 1,019 posts
Armorama: 933 posts
Posted: Sunday, November 29, 2009 - 09:50 AM UTC
When you scrubbed the rail did you use any water at all? I have read that using some warm water helps take the areas with hairspray off.
I agree with Jan about the doors, I really feel that the beauty of this dio is being able to look into it from any angle.
The scene really is coming together now with stunning effect! Congratulations!
I agree with Jan about the doors, I really feel that the beauty of this dio is being able to look into it from any angle.
The scene really is coming together now with stunning effect! Congratulations!
dioman13
Joined: August 19, 2007
KitMaker: 2,184 posts
Armorama: 1,468 posts
Posted: Monday, November 30, 2009 - 08:53 AM UTC
Philippe, Really coming along. I personaly like the doors. I'd leave one closed and the other open. Maybe a chain and lock on the floor. Because of it being transparent, it doesn't block the veiw yet with a suttlness, ends the base. I would add some garbage like a news paper blown in or left as the subway was a handy air raid shelter. This looks as it should, a miniture.

razorboy
Joined: October 14, 2007
KitMaker: 317 posts
Armorama: 307 posts
Posted: Monday, November 30, 2009 - 10:14 AM UTC
Outstanding work Phillipe, your tile work is a sight to behold! Excellent scene, very well executed!
rb
rb

 |

WEB HOSTING BY


Copyright ©2021 Armorama and Kitmaker Network, a subsidiary of Silver Star Enterprises
All Rights Reserved. Please read our Conditions of Use and Privacy Policy.
All Rights Reserved. Please read our Conditions of Use and Privacy Policy.