Campaigns
Where Armorama group builds can be discussed, organized, and updates posted.
Sherman Campaign
Dangeroo
#023
Visit this Community
Zurich, Switzerland
Joined: March 13, 2009
KitMaker: 2,058 posts
Armorama: 1,656 posts
Posted: Sunday, July 18, 2010 - 08:09 PM UTC

Quoted Text

Lots of action around here today!

FWIW, I'm fine with Al's build as part of the campaign as well.

Here are a couple of my in-progress shots:


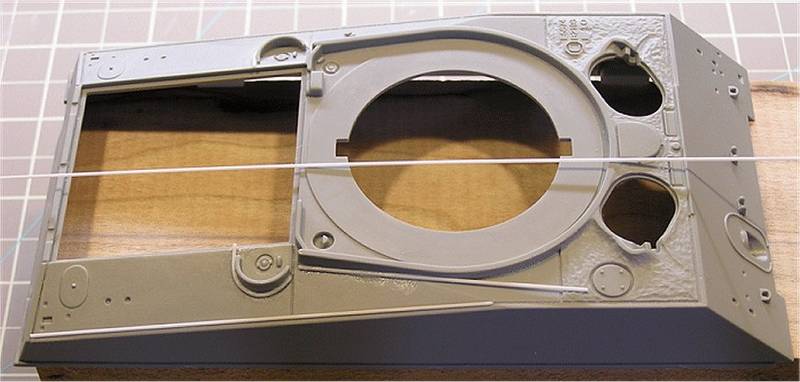
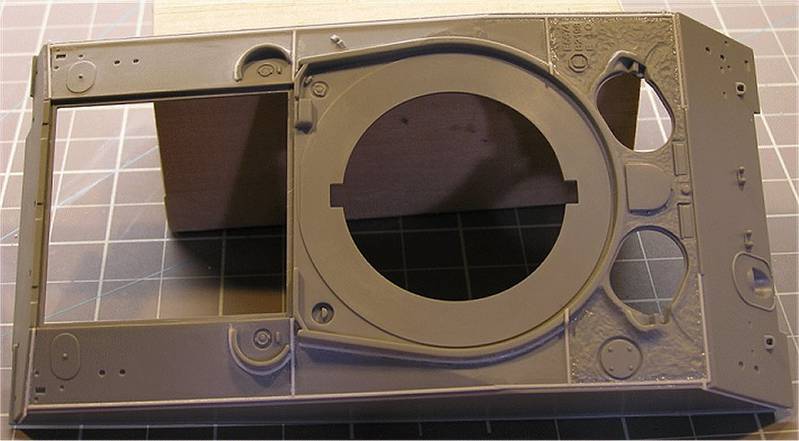
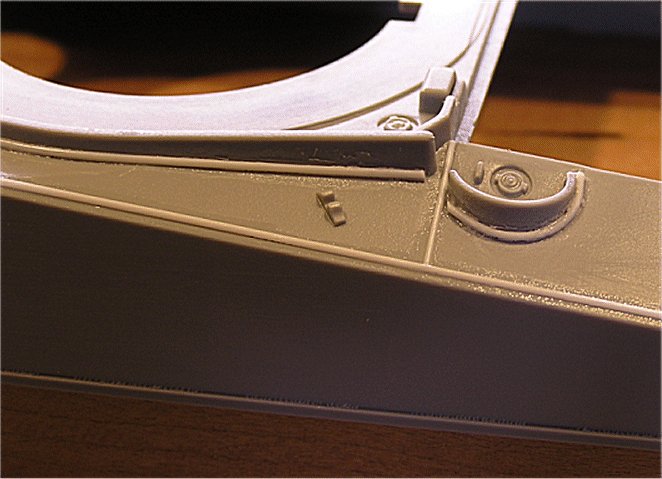
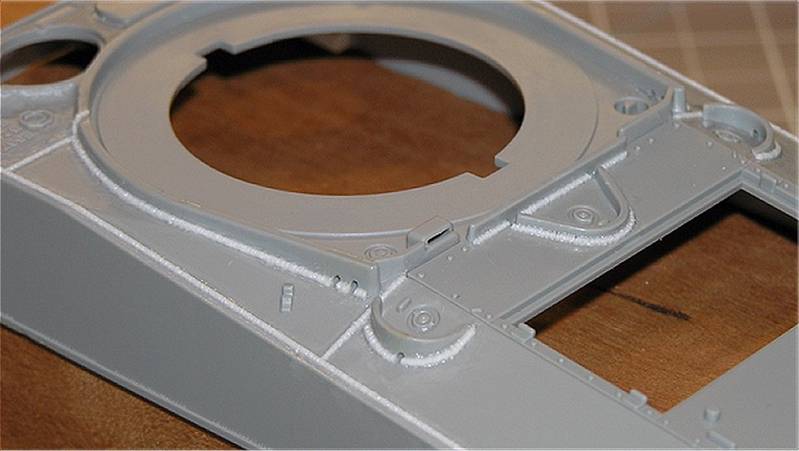
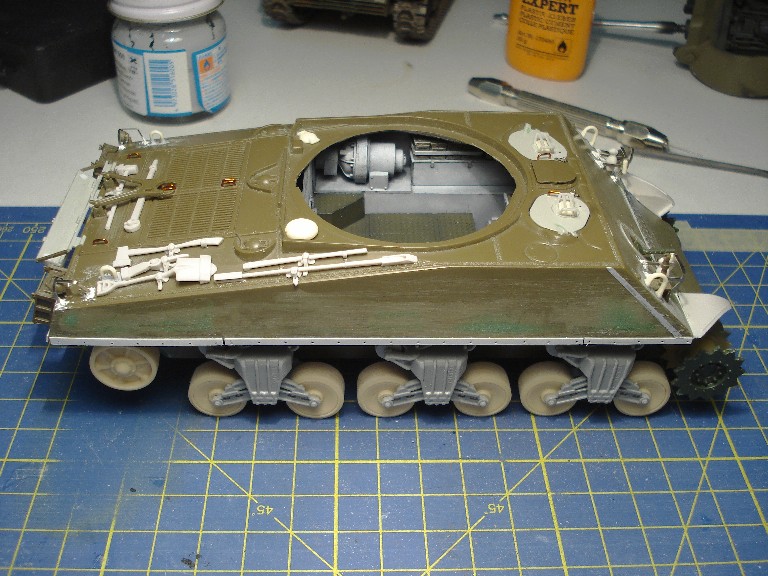
Upper hull almost completely detailed and ready for primer. Rick I've decided to just go with what I've got for right now as far as details. I want to finish this thing, and if I start adding details, I'll never finish! I'll definitely get around to the uber-detailing as I get a little more familiar with armor.


Added sponsons (that's what they are, right?) to the upper hull. Not too hard...


Road wheels done for one side, and suspension parts (sorry, not up with all the terminology yet) primered. I have to work on one side at a time, with a distraction or two between, or the monotony kills me! Also, what do you think of the color of OD? It's a little yellow, but I suspect whenever the washes/filters come into play it won't be so yellow.


Turret in primer as well.

I'll be out of town working til the later part of the week, so I'll get back on this thing when I return...


Justin, should you change your mind a little bit, there would be three simple aspects that would drastically improve the Tamiya Sherman: Replace the handles with wire (on the hatches and the engine deck), get some PE light guards and add the raised weld seams. Otherwise a nice and clean build!

Cheers!
Stefan
generalzod
Visit this Community
United States
Joined: December 01, 2001
KitMaker: 3,172 posts
Armorama: 2,495 posts
Posted: Monday, July 19, 2010 - 12:30 AM UTC
I think I shall join in. I have two 1/48 I'd like to build.
#1 New Zealand M4A2.

if possible
#2 M4A1E8 90mm that is hypothetical BTW. I won't be able to build the NZ M4A2 until Jan. If the M4A1E8 90mm is allowed,probably start that say October.
AlanL
Visit this Community
England - East Anglia, United Kingdom
Joined: August 12, 2005
KitMaker: 14,499 posts
Armorama: 11,675 posts
Posted: Monday, July 19, 2010 - 03:47 AM UTC
Hi Guys,

Thanks, I had originally planned to build the M32 as a run up to the campaign to get me in the Sherman 'zone' again, but then got involved with the Churchill Interior project so every thing came to a stop. The addition of the nuts/bolts to the boggies is as far as I've got but hopefully things will start to progress again.

Lots of outstanding work going on here.

Cheers

Al
SonOfAVet
Visit this Community
Illinois, United States
Joined: January 18, 2003
KitMaker: 547 posts
Armorama: 115 posts
Posted: Monday, July 19, 2010 - 04:34 AM UTC
Hi Guys,

I had a question regarding adding wire for the grab handles on our Shermies: What gauge wire and how big should they be? I think I want try adding them and was just wondering about the basics.

Thanks,
Sean
cdharwins
Visit this Community
New Jersey, United States
Joined: October 28, 2006
KitMaker: 491 posts
Armorama: 462 posts
Posted: Monday, July 19, 2010 - 04:57 AM UTC
Yes! My Archer Casting Symbols just arrived!! They look sooooo cool. ( Although I might go blind putting them on) As soon as the kids go to bed, I'm going to (finally) start work on my Shermie. There's been alot of good looking models posted already. I'm anxious to post some pics, too.

Chris
ppawlak1
Visit this Community
Victoria, Australia
Joined: March 14, 2006
KitMaker: 1,973 posts
Armorama: 1,843 posts
Posted: Monday, July 19, 2010 - 11:52 AM UTC

Quoted Text

I think I shall join in. I have two 1/48 I'd like to build.
#1 New Zealand M4A2.

if possible
#2 M4A1E8 90mm that is hypothetical BTW. I won't be able to build the NZ M4A2 until Jan. If the M4A1E8 90mm is allowed,probably start that say October.


Welcome Chad,

no "What if ?" builds in this Campaign as per the rules on the Sherman Campaign page.

The M4A2 sounds great though.

Cheers

Paul

generalzod
Visit this Community
United States
Joined: December 01, 2001
KitMaker: 3,172 posts
Armorama: 2,495 posts
Posted: Monday, July 19, 2010 - 12:12 PM UTC

Quoted Text


Quoted Text

I think I shall join in. I have two 1/48 I'd like to build.
#1 New Zealand M4A2.

if possible
#2 M4A1E8 90mm that is hypothetical BTW. I won't be able to build the NZ M4A2 until Jan. If the M4A1E8 90mm is allowed,probably start that say October.


Welcome Chad,

no "What if ?" builds in this Campaign as per the rules on the Sherman Campaign page.

The M4A2 sounds great though.

Cheers

Paul


OK Paul,thanks.I will go ahead and sign up then,
errains
#045
Visit this Community
South Carolina, United States
Joined: September 23, 2005
KitMaker: 362 posts
Armorama: 350 posts
Posted: Monday, July 19, 2010 - 01:25 PM UTC
Battlewagon M4A3E8 ETO: Part 4-Welding

Over the weekend, to give myself a break from all the suspension and track parts & parts & parts,
I thought I would tackle some welding. I was not planning on doing a post on just the welds but I have seen a couple members’ suggesting that welds be accomplished on their builds. So here is how I welded my Shermie.

Using liquid cement, lay down the weld using .020” evergreen styrene rod, .015” might be better for scale effect. Once the rod had softened a bit, form it around the curved areas and allow to dry about 24 hours. When bending the rod around curved areas, you may have to use a fast drying cement such as Ambroid Pro Weld.


After the styrene rod had dried, dice/chop it along the various lengths. After that tedious process, divide the weld areas into workable sections. Applying liquid cement let it sit for about 7 to 10 minutes to get it nice and soft. Then dice/chop the soft weld. The idea here is to add additional cuts to replicate weld beads and to somewhat flatten the rod.


A few suggestions, if you feel like trying this method, please practice on an old spare kit first. Also make sure you have very good lighting and if needed a good set of magnifying glasses to help see what you are doing. Always use a new sharp knife blade when doing the dicing/chopping. Not necessarily a new method, but it’s the one that gives me the best results.

I would like to finish by saying that all the Shermans posted to date are outstanding and I am looking forward to following the progress of all the builds over the next year. I have learned so much so far and things can only get better.

PS: I got my Gator Glue today and will give it a test drive here soon. I’ll post my impressions of this product soon…see you later alligator!
ppawlak1
Visit this Community
Victoria, Australia
Joined: March 14, 2006
KitMaker: 1,973 posts
Armorama: 1,843 posts
Posted: Monday, July 19, 2010 - 02:11 PM UTC
Brilliant work on those welds Eric, just awesome !!

Thanks for the run down on how you did them.

Cheers

Paul
thebear
Visit this Community
Quebec, Canada
Joined: November 15, 2002
KitMaker: 3,960 posts
Armorama: 3,579 posts
Posted: Monday, July 19, 2010 - 02:17 PM UTC
Hi Eric ...great job on the weld beads ..looks perfect...I did notice one thing you forgot to do before the welds though...Those darn gouser covers that dragon didn't remove ...You're going to have to be careful not to sand your weld beeds...

ps noticed the drain holes ...super stuff!!
Abn-modeller
Visit this Community
Stockholm, Sweden
Joined: July 05, 2009
KitMaker: 76 posts
Armorama: 75 posts
Posted: Monday, July 19, 2010 - 10:10 PM UTC
Hey guys, I guess i should've picked up on how these campaigns work already but i havn't so.. how does it work? Can i join it at this stage? I'm just going to start building a Sherman M4 DV with applique armor.. Some great models in the works in this campaign!

Thanks
ppawlak1
Visit this Community
Victoria, Australia
Joined: March 14, 2006
KitMaker: 1,973 posts
Armorama: 1,843 posts
Posted: Monday, July 19, 2010 - 10:20 PM UTC

Quoted Text

Hey guys, I guess i should've picked up on how these campaigns work already but i havn't so.. how does it work? Can i join it at this stage? I'm just going to start building a Sherman M4 DV with applique armor.. Some great models in the works in this campaign!

Thanks


Welcome Cal !

Go to the Campaign Tab and Enlist..

See the tips in the previous posts here.

You can join at anytime before the finish date of the Campaign

I hope you post some pics soon !

Cheers

Paul
GaryKato
Visit this Community
California, United States
Joined: December 06, 2004
KitMaker: 3,694 posts
Armorama: 2,693 posts
Posted: Monday, July 19, 2010 - 10:56 PM UTC

Quoted Text

Hey guys, I guess i should've picked up on how these campaigns work already but i havn't so.. how does it work? Can i join it at this stage? I'm just going to start building a Sherman M4 DV with applique armor.. Some great models in the works in this campaign!

Thanks


You might want to read through the thread. "For Those New to Armorama Campaigns"
Abn-modeller
Visit this Community
Stockholm, Sweden
Joined: July 05, 2009
KitMaker: 76 posts
Armorama: 75 posts
Posted: Tuesday, July 20, 2010 - 02:46 AM UTC
Thanks! I've read the thread now, and enlisted.. Photos will be up as soon as i get started on the build!

MrDrummy
Visit this Community
Texas, United States
Joined: October 17, 2009
KitMaker: 86 posts
Armorama: 82 posts
Posted: Tuesday, July 20, 2010 - 12:11 PM UTC
Eric, thanks for that welding tutorial. I'm definitely onethat will benefit from it.

I've decided to go ahead and purchase some pe to replace some of the not-so-subtle Tamiya kit parts, replace the grab handles, and reproduce the weld lines on the hull.

It may take a little extra time, but I agree it'll make a big difference in the end.

I'd like to add the sand guard attachments to my M4A3 if they're appropriate. Any tutorials on those floating around?
vonHengest
Visit this Community
Texas, United States
Joined: June 29, 2010
KitMaker: 5,854 posts
Armorama: 4,817 posts
Posted: Wednesday, July 21, 2010 - 06:58 AM UTC
I'm in, I'll roll with a Tasca Firefly.
MrDrummy
Visit this Community
Texas, United States
Joined: October 17, 2009
KitMaker: 86 posts
Armorama: 82 posts
Posted: Wednesday, July 21, 2010 - 07:38 AM UTC
Here's a dumb question: Where do y'all order your Aber stuff from? I've been poking around on the net and can't seem to find a good place.

Any suggestions?
vonHengest
Visit this Community
Texas, United States
Joined: June 29, 2010
KitMaker: 5,854 posts
Armorama: 4,817 posts
Posted: Wednesday, July 21, 2010 - 07:44 AM UTC
I usually order my Aber merchandise through Tankrats.

Where are you in TX? I may know some stores near you that can order Aber for you.
MrDrummy
Visit this Community
Texas, United States
Joined: October 17, 2009
KitMaker: 86 posts
Armorama: 82 posts
Posted: Wednesday, July 21, 2010 - 08:54 AM UTC
Hey, Jeremy. I'm up in Lubbock, and am gonna check with my local shop today.

Am I dreaming, or were there a lot more posts earlier?
vonHengest
Visit this Community
Texas, United States
Joined: June 29, 2010
KitMaker: 5,854 posts
Armorama: 4,817 posts
Posted: Wednesday, July 21, 2010 - 09:07 AM UTC
Ok, you're pretty far up on the North end of Texas. There is a hobby shop down in SA called Hill Country Hobby that would be more than happy to order anything for you. They are currently switching ownership this week, but both the new and old owners are swell guys and eager to help out.

I thought I noticed the same thing with the posts, but I'm pretty absorbed in work so I wouldn't be surprised if I'm seeing things
thebear
Visit this Community
Quebec, Canada
Joined: November 15, 2002
KitMaker: 3,960 posts
Armorama: 3,579 posts
Posted: Wednesday, July 21, 2010 - 10:06 AM UTC
Strange...one of my posts has gone missing!
vonHengest
Visit this Community
Texas, United States
Joined: June 29, 2010
KitMaker: 5,854 posts
Armorama: 4,817 posts
Posted: Wednesday, July 21, 2010 - 10:32 AM UTC
Ok, so we weren't going crazy then
cdharwins
Visit this Community
New Jersey, United States
Joined: October 28, 2006
KitMaker: 491 posts
Armorama: 462 posts
Posted: Wednesday, July 21, 2010 - 03:22 PM UTC
Hey guys,

I have another question for the Shermaholics

On the M4A3 engine deck, at each corner of the large intake are four rectangular parts, each with a large groove, and on the access door at the very back of the engine deck are four bosses. Anyone know what they are?


On my way to Shermaholism...

Chris
GaryKato
Visit this Community
California, United States
Joined: December 06, 2004
KitMaker: 3,694 posts
Armorama: 2,693 posts
Posted: Wednesday, July 21, 2010 - 07:10 PM UTC

Quoted Text

Ok, so we weren't going crazy then


No, it seems something happened to the server and I assume a backup was restored from so some things might be missing.
Dangeroo
#023
Visit this Community
Zurich, Switzerland
Joined: March 13, 2009
KitMaker: 2,058 posts
Armorama: 1,656 posts
Posted: Wednesday, July 21, 2010 - 07:43 PM UTC

Quoted Text

Eric, thanks for that welding tutorial. I'm definitely onethat will benefit from it.

I've decided to go ahead and purchase some pe to replace some of the not-so-subtle Tamiya kit parts, replace the grab handles, and reproduce the weld lines on the hull.

It may take a little extra time, but I agree it'll make a big difference in the end.

I'd like to add the sand guard attachments to my M4A3 if they're appropriate. Any tutorials on those floating around?


Well, so we get to re-post what we've posted before! Just kidding, stuff like that happens.

So: Eric, great tutorial, thanks for that. I will try your method on my next welded Shermie.

Justin: I use very thing plastic card strips of approximately 2.5mm width (IIRC). Then I use either a PE set or a sand skirt from an old Dragon, Italeri or Tamiya (M4) kit and use it as a template to get the correct number of holes and the lenght of the individual sections. Then I either drill or punch the holes with a punch and die set. Here's an example of my last build (an M36B1):


As ofr PE I have a few of the Finemolds sets laying around. Got them from HLJ. They have everything you may need (except the sand skirt attachments).

HTH!

Hope Ed will re-post his great progress on the M7...

Cheers!
Stefan