Campaigns
Where Armorama group builds can be discussed, organized, and updates posted.
Braille Battlefield
jaypee
Visit this Community
Scotland, United Kingdom
Joined: February 07, 2008
KitMaker: 1,699 posts
Armorama: 168 posts
Posted: Tuesday, December 07, 2010 - 10:17 AM UTC
Great stuff folks, I sadly can't continue the fun until the 6pdr arrives. I don't want to have to rebuild things if the base is too small (Measure twice cut once )

I think this'll have to be a Paddy's Pounder of the LRDG. The portee would bog down in the sand hence this half tracked special for behind the lines tank busting.

Things to worry about. No room for fuel. so racks of Jerrycans/flimsies will need to made a la Radek's autoblinda. Ammo boxes are already on. The gun will likely be in fighting trim (out the back).

Any recommendations for figures? Driver and gun crew I guess, LRDG types if possible?
Lakota
#123
Visit this Community
New Mexico, United States
Joined: November 17, 2008
KitMaker: 1,202 posts
Armorama: 635 posts
Posted: Tuesday, December 07, 2010 - 02:55 PM UTC
Howdy Jan

I like your table of who's building what. You are correct, I will be building a Dragon Wagon. Right now I have a couple of Shermans on the work bench for the "1/48" & the "Sherman" campaign. I'll start working on the M26 once I complete one of these.

Thanks for a fun campaign.
Don-"Lakota"
minas-ithil
#110
Visit this Community
Florida, United States
Joined: September 20, 2005
KitMaker: 248 posts
Armorama: 224 posts
Posted: Tuesday, December 07, 2010 - 03:06 PM UTC
To Jan and the other Braille Builders,
Greetings all. Just completed my build for the 1/48 Campaign - lotsa fun. Nice to see Stefan, the 1/48 campaign chair here. (shamless plug - there is still plenty of time to join the 1/48 campaign, as well) Back on point. I really enjoyed the Matchbox Nostalgia campaign - ably ran by Jan - so I am here for more tiny tanks. I will probably finish some partial builds, but as always, some fresh kit(s) beckon. Resist the temptation....

thanks,
Stephen
eremzet
Visit this Community
Katowice, Poland
Joined: September 10, 2010
KitMaker: 89 posts
Armorama: 87 posts
Posted: Wednesday, December 08, 2010 - 06:54 AM UTC
So... the frame with suspension and engine. So far it is only basis for further pigment work. Still tires are clean and shiny. I used Tamiya, Lifecolors, Pactra and Humbrol paints. Dust, oil stains, preliminary wash are made with Lifecolor Tensocroms (highly recommended!!!).


PanzerAlexander
Visit this Community
Attica, Greece / Ελλάδα
Joined: February 17, 2010
KitMaker: 625 posts
Armorama: 608 posts
Posted: Wednesday, December 08, 2010 - 07:18 AM UTC
Hello fellow campaigners. A quick update on my Famo build :


I 've seen some fantastic builds going on on this campaign congratulations to everyone !
naimbrain
Visit this Community
United Kingdom
Joined: March 15, 2010
KitMaker: 123 posts
Armorama: 118 posts
Posted: Wednesday, December 08, 2010 - 08:14 AM UTC
Hi Alexander,

Wow** Your Famo is just awesome** Tip to everyone else... make a pilgrimage to Alexander's photo gallery, there's loads of great photos of the Famo build, and some in-progress previews of the trailer.
They're gonna look fantastic together**

PS. If you're wondering why all the asterisks in my message? Please substitute the asterisks with exclamation marks which I can't type since my son poured orange juice into my mac keyboard.
tread_geek
Visit this Community
Ontario, Canada
Joined: March 23, 2008
KitMaker: 2,847 posts
Armorama: 2,667 posts
Posted: Wednesday, December 08, 2010 - 09:24 AM UTC
@Korpse - Neil, I think that you have an improper screw head in the one picture of the drivers visor. Shouldn't it be a standard slot and not a Philips head? Seriously though, the Panhard is coming along fantastically.

@jaypee - It's better to wait for the 6 pdr to arrive than do something that you may need to undo later. As the portee most likely is a field modification, almost anything goes. Perhaps you have a spare trailer lying around that could carry the fuel, water and other essentials. Didn't the Airfix half-track come with one? As for figures, I am only aware of the Airfix and ESCI 8th army sets.

@Lakota and minas-ithil There is still plenty of time to get started. This also applies to jaypee, I realized that there were quite a few campaigns going so I learned from the last campaign and made the duration longer. I'll be sure that I imform all when the time to panic arrives.

@eremzet - Looks like you are off to another superb start. Can't wait to see you turn the ignition key and get that engine running.

@PanzerAlexander - I have been following your build in the Braille Scale Build. The Famo looks positively first rate. Did you run into any problems with trying to fit the front tires? I've read about some problems with them.

@naimbrain - John, the link in the last comment to Alexander should take you or anyone else to the beginning of the build thread. Sorry to hear about the mishap with your Mac's keyboard. I had a similar problem happen to my Dual G4's keyboard but with rootbeer soda. All the keys left of the 'D' key either didn't function or resulted in extended (graphic) characters appearing instead of the proper ones. It took $24 and a new keyboard to resolve.

As for me, I am spending far too much time keeping up with all the activity in this campaign to get much work done. I have been working on the supports for the side skirts with minimal success. There are no discernable holes or marks to aid in aligning their attachment.

Cheers,
Jan
GaryKato
Visit this Community
California, United States
Joined: December 06, 2004
KitMaker: 3,694 posts
Armorama: 2,693 posts
Posted: Wednesday, December 08, 2010 - 02:25 PM UTC

Quoted Text


@PanzerAlexander - I have been following your build in the Braille Scale Build. The Famo looks positively first rate. Did you run into any problems with trying to fit the front tires? I've read about some problems with them.


Actually, is there a problem with PanzerAlexander having the same build in two campaigns?
tread_geek
Visit this Community
Ontario, Canada
Joined: March 23, 2008
KitMaker: 2,847 posts
Armorama: 2,667 posts
Posted: Wednesday, December 08, 2010 - 03:47 PM UTC

Quoted Text


Actually, is there a problem with PanzerAlexander having the same build in two campaigns?


Gary, PanzerAlexander started his build in the Braille Scale forum prior to knowing about and joining this campaign. He started on the trailer so I considered that a "partial build" as pertains to this campaign's rules. As the trailer and SdKfz were originally released as two separate kits, I have allowed them as two separate entries. As far as I know, these kits are only entered in this campaign.

Cheers,
Jan
GaryKato
Visit this Community
California, United States
Joined: December 06, 2004
KitMaker: 3,694 posts
Armorama: 2,693 posts
Posted: Wednesday, December 08, 2010 - 05:29 PM UTC

Quoted Text


Quoted Text


Actually, is there a problem with PanzerAlexander having the same build in two campaigns?


Gary, PanzerAlexander started his build in the Braille Scale forum prior to knowing about and joining this campaign. He started on the trailer so I considered that a "partial build" as pertains to this campaign's rules. As the trailer and SdKfz were originally released as two separate kits, I have allowed them as two separate entries. As far as I know, these kits are only entered in this campaign.

Cheers,
Jan


OK. Sounds good to me.
eremzet
Visit this Community
Katowice, Poland
Joined: September 10, 2010
KitMaker: 89 posts
Armorama: 87 posts
Posted: Wednesday, December 08, 2010 - 07:18 PM UTC
Γεια Alexander

Your Famo looks fantastic! Really great work with PE and scratched elements. Engine, gearbox and winch look really as they are made of steel Your workbench blog is really great. Can't wait for updates...


@Jan - Thanks a lot! I hope to finish it till the end of 2010. But I realized that I must add some details such as jerry cans, ammo boxes, helmets, tools... Just to make it more interesting. This is my last desert built for next few months. I start to be really sick of the sand, dust and yellowish colors on my models.
Firefly74
Visit this Community
Queensland, Australia
Joined: April 15, 2010
KitMaker: 224 posts
Armorama: 205 posts
Posted: Wednesday, December 08, 2010 - 09:18 PM UTC
Hi. Great looking builds being done by all.
Korpse: your Panhard is looking good! So much added detail on a small kit.
Eremzet: Great weathering on your build,the wood on the tray was very realistic!
Panzer Alexander: Great looking Famo,looking forward to the seeing the trailer!

Here is my finished Soviet Valentine. I really should have stripped the old paint job off before starting but i think it came out ok. I tried a number of new things and techniques with this build that I hadn't tried before.
I "shaved" down the struts/brackets above the track guards,sanded down the exhaust guard, added some periscopes and tried a new colour for them, had a go at making a 'tie down clamp' for the sledge hammer, and made some grab handles out of brass rod for the drivers hatches and rear engine "doors". I tried out some shading in the recessed areas with a wash and used a little vallejo pigments on the tracks, the first pigment i've used on a build.
I used some plastic card to make the front 'fenders',and used some to fix the gaps in the turret mantlet.The turret also required more putty than I have had to use on any other build! So all in all learnt quite few new things.
Any suggestions for improvements welcome.
Cheers,
Tim


naimbrain
Visit this Community
United Kingdom
Joined: March 15, 2010
KitMaker: 123 posts
Armorama: 118 posts
Posted: Thursday, December 09, 2010 - 05:20 AM UTC
Hi Tim,

Nice Valentine. From your description it sounds as though there was a lot more work here than meets the eye. The fact that your plastic surgery (filling, adding stock to fill gaps, etc) is completley undetectable stands as a tribute to your skills.

Congrats,

John
Sudzonic
Visit this Community
Scotland, United Kingdom
Joined: December 07, 2007
KitMaker: 2,096 posts
Armorama: 1,983 posts
Posted: Thursday, December 09, 2010 - 05:26 AM UTC
Hay all got some new stowage for the abrams in the shape of the black dog accessories set, and I must say it is very good. It is very detailed and should be very interesting to paint.


tread_geek
Visit this Community
Ontario, Canada
Joined: March 23, 2008
KitMaker: 2,847 posts
Armorama: 2,667 posts
Posted: Thursday, December 09, 2010 - 08:27 AM UTC
@eremzet - I can understand getting bored with the same old colours. I had a point when I was just plain sick of anything olive drab or a similar green. That is a particular problem with Russian WW II and even some of their modern vehicles.

@Firefly74 - Congratulations, Tim!!! You are the first to post your pictures in the official campaign gallery. I really like all the extra effort and additions that you made to the Valentine.

@Sudzonic - That's right, rub our noses in the fact that on your side of the "pond" you have easier access to such goodies.

***-------------------------Reminder----------------------***

When you complete a build please remember to post at least ONE picture of it in the "Official Gallery." When you do that I can make it noted in the official campaign charts.

Also - As I stated a few pages ago, for us to turn this campaign into a Feature, we will require three (3) pictures at as close as possible to 800 X 600 pixels resolution placed in this campaign thread. This will make preparation of a feature a whole lot easier for those involved in the process. As of this writing I have 3 pictures from each of eremzet, firstcircle, Jaypee and Firefly74 in my off-line gallery. Only Firefly74 has received a point for posting in the official gallery.

If anyone has any questions, please feel free to ask. Also note that the chart further up on this page has been amended and modified to show status.

Cheers,
Jan
eremzet
Visit this Community
Katowice, Poland
Joined: September 10, 2010
KitMaker: 89 posts
Armorama: 87 posts
Posted: Thursday, December 09, 2010 - 10:33 AM UTC
@Jan - maybe I'm dumb but... how to post the pictures into the official gallery? Only what I managed to do is to post pictures to my privat account...
GaryKato
Visit this Community
California, United States
Joined: December 06, 2004
KitMaker: 3,694 posts
Armorama: 2,693 posts
Posted: Thursday, December 09, 2010 - 01:13 PM UTC

Quoted Text

@Jan - maybe I'm dumb but... how to post the pictures into the official gallery? Only what I managed to do is to post pictures to my privat account...


The thread
For Those New to Amorama Campaigns shows how to navigate to a campaign gallery and upload a picture (which is just like uploading into your member gallery).
Sudzonic
Visit this Community
Scotland, United Kingdom
Joined: December 07, 2007
KitMaker: 2,096 posts
Armorama: 1,983 posts
Posted: Thursday, December 09, 2010 - 11:23 PM UTC
I got that set on e bay Jan i am sure it wouldn't be to hard to find on your side of the pond? Only thing now is I am very tempted to go down the PE route with the Abrams now to add a bit more detail.
minas-ithil
#110
Visit this Community
Florida, United States
Joined: September 20, 2005
KitMaker: 248 posts
Armorama: 224 posts
Posted: Friday, December 10, 2010 - 06:09 AM UTC
Here is my starting photo of my first rebuild for the campaign. It is a partially assembled matchbox 1/76 Firefly. I was trying to get a second vehicle going for the Matchbox Campaign, but life got in the way! So this will be my first kit and I will soon determine either a second rebuild - if I can find it - or a fresh build.


Thanks,
Stephen
firstcircle
Visit this Community
England - South East, United Kingdom
Joined: November 19, 2008
KitMaker: 2,249 posts
Armorama: 2,007 posts
Posted: Friday, December 10, 2010 - 01:10 PM UTC
Tim, your Valentine looks very nice and crisp; the only suggestion I would venture is to maybe try to get a bit of variation in colour, say particularly some difference between the wheels and the upper body. Maybe some pastel chalks / pigments on the wheels, or a glaze / filter.

Some of the fairly slow progress on the Maultier; two hours to get the shape of the front wheel mudguards made and in place... phew, it's quite hard work, especially with no good quality plans to work from. I'll post the article from June 1973 Airfix Magazine sometime, the plans look like they were drawn with a stick of charcoal or a marker pen. . . so I've been taking measurements from side view photos, one of which is approx 1/50 scale, the other 1/20, then scaling down to 1/76. If anyone knows of a decent 1/76 plan of a Maultier, preferably easily available, please let me know.

Fitted the lockers / track guards:

Making the front mudguards:

Then decided to widen the front axle; no idea if the Maultier axle was wider than the Blitz, but it just didn't look right, so out came the knife. The white axle sections are very handy styrene coated metal rod, so this actually seems stronger than before:


Body and suspension together, not cemented yet, just to try it out:


You know, particularly after seeing Neil's Panhard and Radek's new truck, I am having to keep in mind what I said about the early 1970s style of scratching, and trying not to get too hung up on the fact that my body work is actually a bit wonky when you view it from certain angles.

In the now outdated but "classic" How To Go Advanced Plastic Modelling, Kenneth M Jones (the just now retiring editor of Military Modelling) started his chapter on Scratch-Building Tanks with the question "Why scratchbuild?" The answer he gave is "due to the failure so far of the manufacturers to produce either our favourite vehicles or a vehicle which is readily adaptable for conversion." Well, Paul pointed out that there is a Roden Maultier, so I can't really give that reason, so it seems more as if this is an exercise in a) masochism and b) learning to accept innaccuracy. [Edit: maybe that's not a rocket launching armoured Maultier though after all - so is there a 1/76 or 72 kit of this vehicle?]
SSgtWhite
Visit this Community
Montana, United States
Joined: November 17, 2010
KitMaker: 26 posts
Armorama: 22 posts
Posted: Friday, December 10, 2010 - 02:36 PM UTC
Is it too late to join this campaign? I have a 1/72 scale Skala M1917 in a drawer that I started (cut out some of the pieces from the sprue) and I should really finish it.

Please let me know!
SSgtWhite
Visit this Community
Montana, United States
Joined: November 17, 2010
KitMaker: 26 posts
Armorama: 22 posts
Posted: Friday, December 10, 2010 - 04:02 PM UTC

Quoted Text

Is it too late to join this campaign? I have a 1/72 scale Skala M1917 in a drawer that I started (cut out some of the pieces from the sprue) and I should really finish it.

Please let me know!


Also, here is my kit as it sits. Again, I just cut some pieces off the sprue, got frustrated with how small they were and vowed to return to it "Someday." I think this campaign would give me the incentive.

woltersk
Visit this Community
Utah, United States
Joined: May 27, 2003
KitMaker: 1,026 posts
Armorama: 654 posts
Posted: Friday, December 10, 2010 - 04:09 PM UTC
Nashorn update.


I cheated and glued the gun elevation actuators to the gun frame allowing the gun to be elevated and depressed. Being buried under and behind the gun shield it shouldn't be too noticable.


"The ol' tiny drill bit in the pin-vise trick." Can't have a solid muzzle brake, now can we?
firstcircle
Visit this Community
England - South East, United Kingdom
Joined: November 19, 2008
KitMaker: 2,249 posts
Armorama: 2,007 posts
Posted: Friday, December 10, 2010 - 11:56 PM UTC

Quoted Text

Is it too late to join this campaign? I have a 1/72 scale Skala M1917 in a drawer that I started (cut out some of the pieces from the sprue) and I should really finish it.


Dillon, I don't think it's ever too late providing you have the time to complete your project, and given you have until the 1st of May, I think you'll be OK!

You need to enlist on this page: BB Enlistment and you will also be able to view the rules and regs of the Campaign.

Personally, I would love to see this kit completed, but I'm leaving it up to Jan to be the arbiter on whether this one will count as a "complete" or a "new build". Note what it says in the rules about either having to complete two unfinished projects, or start one single project from scratch (although of course that is a minimum, not a limit . . .). To me, if you haven't actually put cement to polystyrene then it is unstarted, even if some of the components have been clipped from the sprues. Maybe you can confirm which it is, but then again . . . I have little doubt that if you complete this one, you'll be strangely and irresistably drawn to do another by May 2011.

And as you can see, we like progress photos. . .
tread_geek
Visit this Community
Ontario, Canada
Joined: March 23, 2008
KitMaker: 2,847 posts
Armorama: 2,667 posts
Posted: Saturday, December 11, 2010 - 06:31 AM UTC
Well, it again seems like more action in what I feared might be a rather limited if not obscure campaign. We are now on page 15 and have one more enlistee (#45) and one potential. I'd like to thank Gary Kato for his assistance in providing the link to the "new to campaigns" thread.

@Sudzonic - Scott, I managed to find a seller of that package on a more local eBay but being the cheapskate that I am was totally shocked by the price. With shipping the price would be approaching $30!! That for a kit that originally cost under $12 with all taxes. For that money I could probably purchase the materials and supplies and start casting my own pieces.

@minas-ithil - Stephen, with the number of Matchbox kits showing up in this campaign, perhaps we should have started a "Son of Matchbox" campaign.

@firstcircle - I don't know if will be of much help but I did find an obscure drawing of a Maultier HERE. There is no way to determine its accuracy but from the front view it seems that your widened axles look more appropriate. The only other 1/72 model of a 15 cm Panzerwerfer 42 would be the MACO one but that uses a sWS track system and a slightly different body style. I also only found one rather poor picture of the 8 cm version that I am sure you must have seen.

@woltersk - Coming along nicely, Keith. I recall a Matthew Q. doing a 1/35 version where he took somewhat similar liberties with the elevation mechanism. And you are correct, you can't have a solid muzzle as where would the projectile exit! The only other option would be to cover the muzzle with a bag/tarp as they often did when on a long road march.

SSgtWhite - As Matthew (our XO) has kindly pointed out, your first objective would be to enlist. After enlarging the picture that you provided I see that the left large sprue has about thirty or so parts removed from its lower centre section. I presume that those are the tiny suspension wheels that appear to be in the plastic bag residing in the upper right.

If I really wanted to be anal and stick to the letter of the rules I would say that removing parts from a sprue was "starting" the kit. However, I believe more in the "spirit" of a rule(s). In this case, and with the photo evidence provided, I am leaning toward this being a "new" build providing that as Matthew stated, glue has not met plastic. Could you please show a picture of the parts in the plastic bag and particularly the frame parts that were parts 42 and 43 in the instructions. BTW, I have sent you a private message about enlisting, just click on the "Inbox" link at the top left of a Kitmaker page to view it.

***************************************************************************

Now as for my build. I have erroneously been referring to one of my subjects as a StuG where I should have referred to it as a StuH. The difference while subtle made quite a difference when looking for images on the Internet.

I have spent quite a bit of time just staring at the StuH wondering what if anything I could do to improve it. To be fair, it is a rather old kit and more suitable as a wargame piece than something akin to an authentic reproduction.

That being said, I will attempt to bring it up to as best a pleasing level of detail as I can without turning the build into a marathon. The tracks and lower suspension are now pretty much complete and weathered. As you might guess this was a rather tedious and time intensive affair due to the assembly being totally glued together. The running gear is currently waiting for the final "dirtying up" and the attachment to the upper hull.

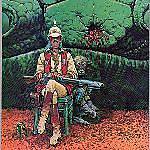
The left over track pieces have been distributed and attached to the model and the four main support arms for the Schürzen are attached. I attempted to thin them out somewhat and ended up breaking two of them. This required an inordinate amount of time to piece them back together. I am missing one rear secondary support arm and will search through my spare parts bin for it or an alternative. Only one pictures with this update.


The fuel cans on the back hull are just placed there. I'll need to find a reference that shows how they might actually be attached. Several sources suggest a light metal "rack" and I have trimmed up some narrow strips of .010" styrene for the potential. The white roll on the end is just some rolled up gauze for a potential camouflage net. The colouring on the upper hull is dark yellow in varying shades with areas having been pre-shaded with German Grey.

Cheers,
Jan