Campaigns
Where Armorama group builds can be discussed, organized, and updates posted.
Braille Battlefield
woltersk
Visit this Community
Utah, United States
Joined: May 27, 2003
KitMaker: 1,026 posts
Armorama: 654 posts
Posted: Monday, December 13, 2010 - 04:27 AM UTC
Radek—that Flakblitz is impressive. Another one that could pass for 1/35th. Wow!

Dillon—the size of a nail clipper yet you managed to put wire hand holds and other doodads on it?!

Scott—nice resin addition to an already well built kit. I too can’t wait to see it painted. All that contiguous detail to paint on one tiny continuous piece. I suppose breaking the resin up into like item sections would have been too much for the manufacturer to do!
woltersk
Visit this Community
Utah, United States
Joined: May 27, 2003
KitMaker: 1,026 posts
Armorama: 654 posts
Posted: Monday, December 13, 2010 - 04:53 AM UTC

Quoted Text

Gentleman, while not professing to be a Nashorn or Hornisse expert, I did quite a bit of research on both for my review of the Dragon kit offering. Basically, you are BOTH correct. There appears to have been three barrel variants for these beasts. One variant had a half circle upper clamp attached to the barrel. A second variant had a block type protrusion under the barrel. The third variant was as Keith's modification without anything on the barrel and a circular hinged clamp at the apex of the A-frame.


I've learned my new thing for the day, which means I can go home now.

In a nutshell(?)--I can press on with my version and possibly have a conversation, if not a contention piece? There are a few protusions on the glacis plate which prevent the A-frame from laying flat. I'm not sure what they are or what they are for, but I may have to cut them off.
SSgtWhite
Visit this Community
Montana, United States
Joined: November 17, 2010
KitMaker: 26 posts
Armorama: 22 posts
Posted: Monday, December 13, 2010 - 07:01 AM UTC
Yeah,

Here it is next to a lighter. This is exagerrated since the lens distorts the lighter's size. But, the red plastic of the lighter is the same width and length of the tank. It looks a lot smaller in the photo.

Anyway, I'm new to 1/72 so this is wild to me. My apologies if everyone here is use to this size of model and I'm being dramatic.

I had some copper wire in my fly-tying set and just bent it with some tweezers. I also wrapped a 1/35 .50 cal. barrel with wire to make springs for the suspension. This sounds great, but the spring perches don't line up very well, so it's a mixed bag. I think with the track on it will look the part.

I think with some scratch-built pieces here-and-there, the track gear would be more accurate. I think I'll find another kit and try a second round someday, it's good OOB too and definitely fun.

As for the trackset , they're like rubber-bands and they look decent. They are missing the "AMSCO" stamp on the treads, which is a prime M1917 detail that the FT didn't sport.

I'm on lunch right now, but I'll post a photo of the track links this evening.


~Dillon
tread_geek
Visit this Community
Ontario, Canada
Joined: March 23, 2008
KitMaker: 2,847 posts
Armorama: 2,667 posts
Posted: Monday, December 13, 2010 - 07:41 AM UTC
Keith,

To add more confusion to your build, there were at least two forms of the support frame. One folded upon itself while the other just laid back against the front hull.


Quoted Text

Yeah,

Here it is next to a lighter. This is exagerrated since the lens distorts the lighter's size. But, the red plastic of the lighter is the same width and length of the tank. It looks a lot smaller in the photo.

Anyway, I'm new to 1/72 so this is wild to me. My apologies if everyone here is use to this size of model and I'm being dramatic.


Dillon, no apologies necessary and you see what you have been missing. According to online sources the FT-17 was 16.4' long and 4.8' wide. Using a scale conversion program I have we are talking 2.78" X .72" or 7.07 cm X 1.83 cm. A Panzer I at this scale would be a bit shorter but a tad wider. I am sure the stamp on the treads would be obscured in no time by wear and general crud attaching to it.

Cheers,
Jan
sabredog
Visit this Community
Western Australia, Australia
Joined: July 22, 2007
KitMaker: 607 posts
Armorama: 599 posts
Posted: Monday, December 13, 2010 - 10:20 PM UTC

Quoted Text

Dry-fitted the track gear minus the drive sprockets.

It's very "Sherlock Holmes" or "League of Extraordinary Gentleman." I'm thinking a light mix of Russian armor green and maybe JA Green will get me the shade I want.

I really dig this kit.

Also, it's about the length of a fingernail clipper.


~Dillon


Now that is a different looking build!
SGTJKJ
#041
Visit this Community
Kobenhavn, Denmark
Joined: July 20, 2006
KitMaker: 10,069 posts
Armorama: 4,677 posts
Posted: Monday, December 13, 2010 - 11:08 PM UTC
Nice little tank, Dillon. Looking forward to see the tracks.

I have now finished construction of my UM Models 1/72 T-34/76. It is a beautiful kit with lots of great details when build straight from the box. The PE parts and the rubber rope is included in the kit.

As this will be build as a Beutepanzer - next is the overall dark yellow and green/brown camouflage. Then I need to find some German markings in the spares box.

More to follow


eremzet
Visit this Community
Katowice, Poland
Joined: September 10, 2010
KitMaker: 89 posts
Armorama: 87 posts
Posted: Monday, December 13, 2010 - 11:58 PM UTC
@ Keith & Jan - when I started my Revell's Nashorn (which isn't finished...) I've made a research on this vehicle and what I've get known there were two types of barrel supports. [Photos from internet for discussion purposes only]

1. type - only for early vehicles - there was a "scissiors" the same as for Hummels. It was very inconvenient because crew had to get out from the tank and disassemble it. For Hummel which usually was far away from the front line it wasn't problem but for panzerjeager which was in first contact with enemy's tanks... well, it's different a little bit.

This is example of the early support (please notice smooth barrel):


2. type is the "block" type where barrel support could be lay down from the inside of vehicle. This is the example:


Please notice that both photos show the same vehicle No. 221 which is significat proof of upgrading the older tanks to the newer standards. Honestly speaking I've never found the clue for more types of support for Nashorn panzerjeagers but I may be wrong
Sudzonic
Visit this Community
Scotland, United Kingdom
Joined: December 07, 2007
KitMaker: 2,096 posts
Armorama: 1,983 posts
Posted: Tuesday, December 14, 2010 - 03:29 AM UTC
Thanks for the feed back guys. just got the undercoat on today hope to start the base coat tomorrow.

tread_geek
Visit this Community
Ontario, Canada
Joined: March 23, 2008
KitMaker: 2,847 posts
Armorama: 2,667 posts
Posted: Tuesday, December 14, 2010 - 03:59 AM UTC

Quoted Text


Please notice that both photos show the same vehicle No. 221 which is significat proof of upgrading the older tanks to the newer standards. Honestly speaking I've never found the clue for more types of support for Nashorn panzerjeagers but I may be wrong


@Radek As with many wartime vehicles there are always exceptions to the rules. However, in looking over the Revell instructions, one can discern that the model is meant to have an arrangement as in my first photo on page 15 and your last photo. I fear that the instructions do show this to be the case.


Might I suggest a strip of PE for the circular part and a small styrene block for the lower part.

@Scott - are we to take your word that the M1 is base coated!!! Pictures, pictures, pictures... We are truly getting spoiled by all the great progress pictures in this campaign.

Cheers,
Jan
Sudzonic
Visit this Community
Scotland, United Kingdom
Joined: December 07, 2007
KitMaker: 2,096 posts
Armorama: 1,983 posts
Posted: Tuesday, December 14, 2010 - 09:15 AM UTC


majjanelson
Visit this Community
South Carolina, United States
Joined: December 14, 2006
KitMaker: 1,355 posts
Armorama: 979 posts
Posted: Tuesday, December 14, 2010 - 02:48 PM UTC
Scott,

Your M1A2 is looking good with a base coat of paint!
SSgtWhite
Visit this Community
Montana, United States
Joined: November 17, 2010
KitMaker: 26 posts
Armorama: 22 posts
Posted: Tuesday, December 14, 2010 - 06:05 PM UTC
The M1 is looking awesome! The stowage really sets it off IMO.

For the 1917, it's getting closer. The storage box and exhuast could have been mounted higher to avoid the track. I think I can live with it as is though.

I think Big Red One insignias would look nice and be somewhat accurate.

Thoughts?

Aside from that and cleaning up the paint some more on the doors -- next will be oil washes and some rusty exhaust.


~Dillon
SSgtWhite
Visit this Community
Montana, United States
Joined: November 17, 2010
KitMaker: 26 posts
Armorama: 22 posts
Posted: Tuesday, December 14, 2010 - 06:23 PM UTC
Thank you Jesper,

I'm digging the T-34 as well. the track detail is nice and it looks solid. I really like the photo etch too. Is this a Dragon kit?

They seem to have nice kits. I'm rather new to building armor -- just picked the hobby back up so I'm not too familiar with the companies.

Also, this is my first group/campaign build too. Thanks everyone for your interest and suggestions.

~Dillon

SGTJKJ
#041
Visit this Community
Kobenhavn, Denmark
Joined: July 20, 2006
KitMaker: 10,069 posts
Armorama: 4,677 posts
Posted: Tuesday, December 14, 2010 - 10:03 PM UTC

Quoted Text

I'm digging the T-34 as well. the track detail is nice and it looks solid. I really like the photo etch too. Is this a Dragon kit?


Thanks for the comments, guys. It is the UM Models kit. A very good kit and well priced. They use PE where it makes a difference and not just for the sake of it.

Nice progress on the M1, Scott. Looking forward to see it with the camouflage on.

Very nice tracks on the FT-17. They look good and seem to "bend" in the right places. Very difficult with tracks like that as the big track links will often bend themselves in vinyl tracks which they would not do in real life. It looks very good on this model.
Korpse
Visit this Community
Queensland, Australia
Joined: October 06, 2009
KitMaker: 382 posts
Armorama: 378 posts
Posted: Wednesday, December 15, 2010 - 12:21 AM UTC
Hello

great progress on the UM T-34, the M1, and the Renault FT-17.

I particularly like the FT-17, looks like it has loads of detail for such a tiny subject.


An update on the BA-64's progress.

I have if fairly advanced, with mudguards on, but have struck some problems, (other than the need to use a file and putty)... I knew Radek wouldnt have warned me for nothing... anyway here are some progress pictures, I'll detail the problems next post.

This is a tiny vehicle, literally a jeep chassis with an armoured body, seems like only room for a driver and gunner behind him. I have included a picture of it next to the Panhard to show what a little thing it was, it almost looks like another scale.

cheers
Neil


weathering_one
Visit this Community
Ontario, Canada
Joined: April 04, 2009
KitMaker: 458 posts
Armorama: 456 posts
Posted: Wednesday, December 15, 2010 - 09:28 AM UTC
Hi everyone. I think that I better make it a habit to drop by here more often. I miss a few days and there is a ton of progress to look over.

eremzet = your Opel is really looking fantastic, just like your other build. I really like the wood effect. Did you do that with a razor saw?

tread_geek = I can't believe that you are still putting up with that old kit!

woltersk = Can't think about that open interior and how you are going to paint it. Glad its not my job!

SGTJKJ = The T-34 looks good. Wish we had that brand available in my area.

Sudzonic = The storage looks really great. As with Jan, it's a little too rich for my blood. Who makes that Abrams? Is the body glued to the bottom part? If so I hate to think of how you are going to get the tracks on.

SSgtWhite = That little tank looks positively phenomenal for its size. The detailing is so superior to the Panzer I that I was thinking of finishing.

Korpse = I have to admire the strange and unique things that you manage to find and build. As with the Renault it looks positively tiny.

No pictures from me today. I have been trying my hand at creating some junk to fill the side racks on the turret with. Been playing with rolled up gauze and bits of plastic to make something that looks appropriate. Nothing has worked out so far but I won't give up after seeing all the effort being expended by others.

Regards,
AJ
vonHengest
Visit this Community
Texas, United States
Joined: June 29, 2010
KitMaker: 5,854 posts
Armorama: 4,817 posts
Posted: Wednesday, December 15, 2010 - 01:42 PM UTC
These are some really nice looking builds guys! I was just looking in my box of braille scale armour and have this horrible urge to build them all
Bigrip74
Visit this Community
Texas, United States
Joined: February 22, 2008
KitMaker: 5,026 posts
Armorama: 1,604 posts
Posted: Wednesday, December 15, 2010 - 04:02 PM UTC
I finally started my build an RPM Polish FT17 photos later.

@ Korpse: that is my favorite armored car, where did you purchase it?
@ Jesper: nice job so far.

Bob
Korpse
Visit this Community
Queensland, Australia
Joined: October 06, 2009
KitMaker: 382 posts
Armorama: 378 posts
Posted: Wednesday, December 15, 2010 - 07:34 PM UTC
Hello all

@vonHengest - thats not a 'horrible urge' - its normal and natural to build small scale !

@Biggrip74 - I guess you mean the BA-64. Or if you mean the Panhard, I buy them all online anyway. Local Hobby Stores never stock these in this country. If you search you will find these for sale online at several sites. I use two reliable online shops who have good prices. Message me if you want the website addresses I use.

@weathering_one - thanks, I generally prefer the offbeat & unusual to the more commonly seen & modelled vehicles of WW2.


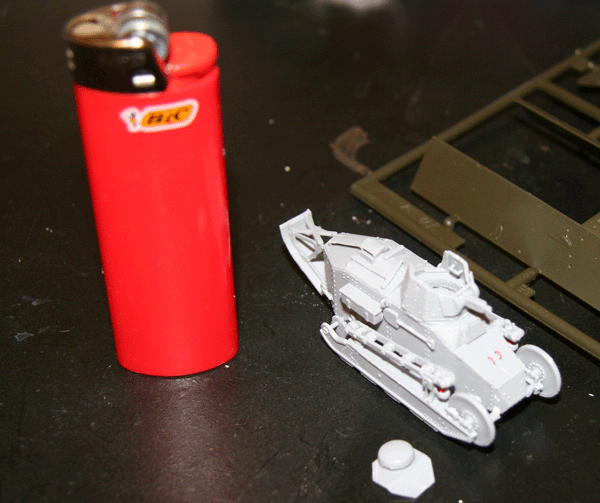
Update on the BA-64.

The kit comes with two sets of front and rear mudguards. One set is wider than the others. (for original BA-64 & more common BA-64B I guess). The kit instructions indicate to use the narrow guards, so I fitted them. Then I test fit the wheels. Here was a problem, the wheels extended outside the guards, , looked terrible, and clearly they shouldn't in all pictures I have seen, including the blue-prints. If i were to shorten the axles the wheels would be under the guards, but this would narrow the wheel base too much, the outer edge of the rubber tyres need to just extend onto the outer edge of the railhead.

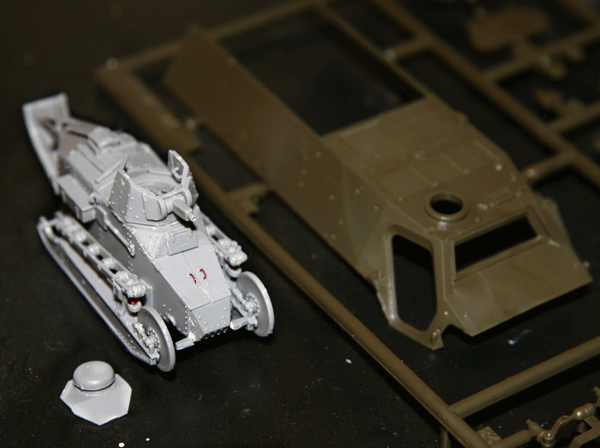
So I ripped the front guards off and applied the wider set of guards and they are near perfect. I also looked at the front on picture of this actual vehicle and I'm certain the wide guards were always the correct choice, not the narrow ones.

Then I set to the rear guards, first checking all known photos of this particular vehicle (3 that I know of). The photos indicate that there were no rear mudguards on either side of this vehicle, though the instructions indicated they should have been applied !

So off came the rear mudguards, and some file work was needed to smooth where they had been.

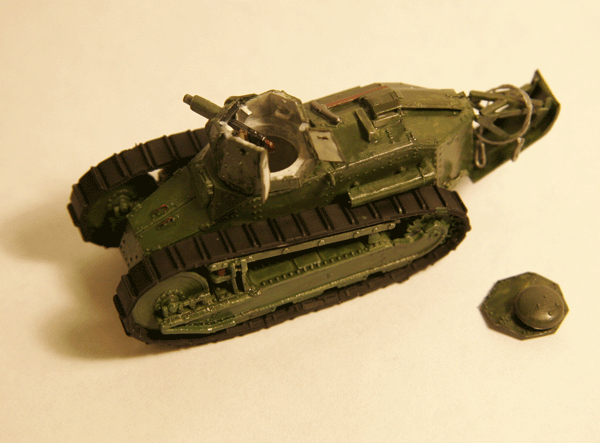
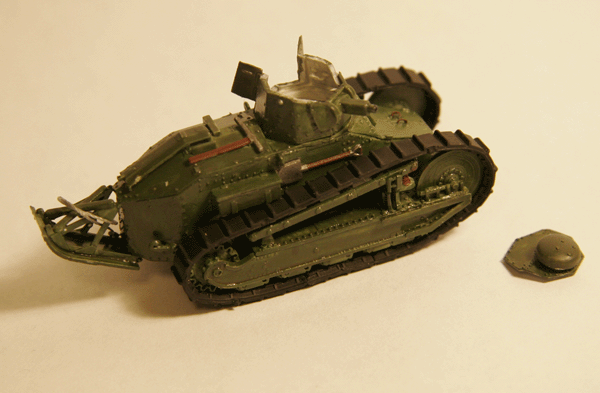
If building this kit as an ordinary wheeled version, I'd suggest the front and rear axles and springs be mounted 1 millimetre or 1.5 millimetre lower, (by using some small pieces of evergreen plastic where the axles meet the chassis rai)l. Otherwise the wheels sit a bit high up under the guards. Leave as is if you want the vehicle to look like its heavily laden. This is nit picking a bit, but I looked at many side views of this vehicle, and mostly there is a bit of space between the top of the wheels and the mudguards.

below are pictures of the real thing from Battlefield RU, and link to the blueprints at armchair general, for anyone who might be planning to build one of these. click on the blueprints to enlarge

http://rkkaww2.armchairgeneral.com/galleries/armored_cars/BA_64_bp.htm

http://www.battlefield.ru/index.php?option=com_content&task=view&id=21&Itemid=50&lang=en

anyway progress pics also below

cheers
Neil


Bigrip74
Visit this Community
Texas, United States
Joined: February 22, 2008
KitMaker: 5,026 posts
Armorama: 1,604 posts
Posted: Wednesday, December 15, 2010 - 08:12 PM UTC
@ Korpse: sorry about that I did mean the BA64 it just looks like a sports armored car.

I did a little with my build.
Photobucket
Photobucket

Bob
Dangeroo
#023
Visit this Community
Zurich, Switzerland
Joined: March 13, 2009
KitMaker: 2,058 posts
Armorama: 1,656 posts
Posted: Wednesday, December 15, 2010 - 08:22 PM UTC
Man, you go away a few days and this campaign gets two more pages... Hard to keep up. Some fantastic builds guys! That BA64 is tiny, didn't realize that. Same goes for the FT-17. Bob, is that a licence built FT-17 or a new design that looks like an FT-17?


Quoted Text

Stephan:
Quoted Text

- 'Replacing them with metal foil (from IKEA tea candles'


What a brilliant idea, my wife burns the IKEA candles for England, I now have a continuous source of soft metal for mudguards! Excellent stuff, but I have to say couldn't Matchbox have chosen some better colours for the kit.

All the best,

Paul


Haha, yes Paul, it is quite brilliant. I'm allowed to say so as it's not my idea, got it frome somewhere on this site...


Quoted Text

Stefan - I recently built the T34 kit (Revell re-release) and I'm really interested to know if your planning to use alternative tracks. I found the kit tracks looked rather heavy and were originally too long. I dunked then in boiling water to shrink them, but slightly over tighted one and managed to break a wheel when trying to stretch it into place. I've tried re-cementing or supergluing the wheel, but where it's weakened it keeps re-breaking. If you can recommend alternative tracks it would solve a problem for me, and save me the bother of having to reinforce the axle with a steel pin. Very nostalgic to see the white and blue kit again, I built at least a couple of those as a lad!


No, sorry I don't know of any alternative tracks. I'll be using the kit ones, hide the join under the tank and put some snow on them to hide the bad detail a bit.

I had some bench time yesterday, first one since the last post. Added all the fenders, wheels and am now working on the replacement gas tanks and turret.

Pics this weekend.

Cheers!
Stefan

firstcircle
Visit this Community
England - South East, United Kingdom
Joined: November 19, 2008
KitMaker: 2,249 posts
Armorama: 2,007 posts
Posted: Thursday, December 16, 2010 - 01:27 AM UTC

Quoted Text

Man, you go away a few days and this campaign gets two more pages...


Too true . . . I have somewhat lost it, and my own build activity has been attenuated by the inevitable crafty activities of December, making cards, wrapping presents, making presents etc. etc.


Quoted Text

>Stefan - I recently built the T34 kit (Revell re-release) and I'm really interested to know if your planning to use alternative tracks.

>No, sorry I don't know of any alternative tracks.


As I may have lost it, I'm assuming you are looking for alternative T34 tracks . . . I used some etched ones on my SU122, made by Ace, bought from Tracks and Troops. They were not too easy to build, largely because I made a mistake, and didn't exactly fit the Eastern Express kit. In fact the hard plastic length tracks that came with the EE SU122 were then used on Little First Circle's T34 in the Matchbox campaign, and they were quite nice, better than the original items. The etched ones used on the SU122 were extra wide. Part of the problem is that T34 two-plate style, where it can be difficult to meet up the two ends in a satisfactory way - I would suggst adjusting the idler position to make them fit. You can see more details on my thread for that here: My SU122 There is also a link to Tracks and Troops in that thread.
naimbrain
Visit this Community
United Kingdom
Joined: March 15, 2010
KitMaker: 123 posts
Armorama: 118 posts
Posted: Thursday, December 16, 2010 - 08:59 AM UTC

Quoted Text

>Stefan - No, sorry I don't know of any alternative tracks.


Quoted Text

> Firstcircle - I used some etched ones on my SU122, made by Ace, bought from Tracks and Troops.


Thanks for the info guys. That SU122 looks fantastic as do the etched tracks. I see your problem with the gap in the tracks (I bet you said 'Oh jolly dee' or something dis-similar) but I'm guessing it won't be a problem on the smaller 1/76 Matchbox kit. It's possible that the scale difference might notice but better that than the build getting scrapped because of the complete botch I've made of the (now under size) kit tracks. I also need to get to grips with PE (my only other PE attempt was the White Ensign 1/700 HMS Hood set - a disasterous choice for a beginner) so I think I'll give it a go.

But not tonight... tonight I'll continue with brush painting the Pzh 2000 camo.
SSgtWhite
Visit this Community
Montana, United States
Joined: November 17, 2010
KitMaker: 26 posts
Armorama: 22 posts
Posted: Thursday, December 16, 2010 - 01:15 PM UTC
Bob R. -- Awesome choice of kit

I had some fit issues with the upper wheel track going into the front brackets on my RPM FT-17 variant -- fair warning. The exhuast and other stowage items on the side may had clearance issues with the tracks on my build too.

If I had it to do over again I would mount stowage and exhuast after the track is installed.

I'm looking forward to seeing your progress.

~Dillon
Bigrip74
Visit this Community
Texas, United States
Joined: February 22, 2008
KitMaker: 5,026 posts
Armorama: 1,604 posts
Posted: Thursday, December 16, 2010 - 04:31 PM UTC
@ Stefan: I would say it is a license built version for the Polish Army. but I almost threw this kit into the trash and started a PST KV-8S and got stuck with that kits indie links so back to the FT 17.

@ Dillon: I just love this tank in all of its versions, thanks for the heads up on the issues. I am still having some with the kit, but in all fariness it is probably my eyesight and large fingers getting in the way. The color profile shows this version without the tail skid, so that is how I will finish it.

Bob