

Hosted by Darren Baker
LRDG

meaty_hellhound

Joined: July 23, 2010
KitMaker: 786 posts
Armorama: 753 posts

Posted: Friday, October 08, 2010 - 03:58 AM UTC
those are some great figures, really like their poses. with all the upgrades the kits will no doubt look smashing. can't wait to see this come together. thanks for sharing. cheers, bd.


AlanL

Joined: August 12, 2005
KitMaker: 14,499 posts
Armorama: 11,675 posts
Posted: Saturday, October 09, 2010 - 11:02 PM UTC
Hi Bruce,
Chris's figuers bring a whole new dimention for figure painers and dio builders. It's great to finally have some decent LRDG troops to compliment the trucks.
This is the progres so far on the driver, commander and trooper No 3

Cheers
Al
Chris's figuers bring a whole new dimention for figure painers and dio builders. It's great to finally have some decent LRDG troops to compliment the trucks.
This is the progres so far on the driver, commander and trooper No 3
Cheers
Al
AlanL
Joined: August 12, 2005
KitMaker: 14,499 posts
Armorama: 11,675 posts
Posted: Saturday, November 06, 2010 - 11:16 PM UTC
Hi Guys,
Some progress on my LRDG Trooper 2. I changes the No 4 Rifle for a SMLE and added the arms today. Final painting stange to come. I really like this figure.
 http://put.url.here


Regarding the other two NWM infantry featured at the start of the post, I finished them as RM Commandos.

Al
Some progress on my LRDG Trooper 2. I changes the No 4 Rifle for a SMLE and added the arms today. Final painting stange to come. I really like this figure.
http://put.url.here Regarding the other two NWM infantry featured at the start of the post, I finished them as RM Commandos.
Al

Brigandine

Joined: July 12, 2006
KitMaker: 553 posts
Armorama: 312 posts

Posted: Sunday, November 07, 2010 - 11:09 AM UTC
Quoted Text
Great stuff Alan, and you're way ahead of me! I only have the Eduard PE and Hussar resin wheels, still have quite a ways to go before starting my build.
I have a question regarding the LRDG Chevrolets. I too have the re-release of the Tamiya kit with the Breda gun, and it was my understanding that these guns were never towed behind the trucks (along with that I have heard it stated that the Tamiya LRDG Chevy was a cammand or communications vehicle or something like that?). What would be your guys' thoughts on this?
The Tamiya truck, as is, is the W/T vehicle, one of which was issued to each half-patrol of five or six trucks - the unit depended on this vehicle when out on an operation because this was their sole means of contact with base; none of the other trucks had W/T equipment....hmmm...do I go into lengthy explanation mode?

Why not? Okay in Feb-March 1942, when the 200 Chevy 1533X2 30 cwts ordered for the LRDG started being issued the unit was split into Patrols (eg T Patrol, which was manned mostly by New Zealanders): these were split into half-Patrols (eg T1 and T2 Patrols - Patrols is always capitalised when describing a specific unit), each comprised of five or six trucks.
There were four variations of Chevrolet issued which fulfilled specific roles:

The ordinary truck without W/T or Breda - there were no radio compartments built into the rear bodywork and the front lockers extended right across the front of the cargo bay. BTW - the "oil cans" in the rack on the running board were actually filled with water and were part of the escape kit on each truck. Two of the trucks were issued to the Commanding Officer and patrol sergeant, respectively...then came the

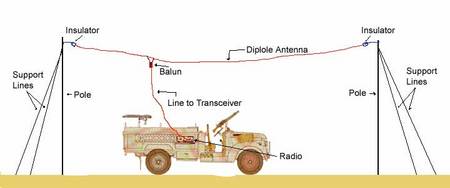
Wireless truck which had TWO compartments built into the left side of the cargo bay; the one in the kitset housed the No. 11 W/T, but Tamiya have not included the compartment for the Phillips Type 635 receiver, which was a commercial radio used by the LRDG to pick up BBC time pips or (sometimes) music. This truck was also used by the patrol's navigator. For short to medium range communications the LRDG used a 1.8 metre rod aerial with a dipole aerial array mounted on the left front of the cargo bay: for long range the Windom (or Wyndom?) dipole array was used
(from the LRDG site
Another variation was...
The Patrol fitter's truck which carried spare parts and the tools needed to carry out repairs - Te Anau II of T1 Patrol was the sole surviving 30 cwt from Operation Caravan, the Barce raid of September 1942

The extra armament was rescued from other trucks which had mostly been destroyed by ground strafing Fiat CR 42s the day after the Barce raid.
Finally there was the

Gun truck...and, as more became available,
The Jeep which replaced the 30 cwt Chevy for Patrol COs and Sergeants from about mid-1942.
AlanL
Joined: August 12, 2005
KitMaker: 14,499 posts
Armorama: 11,675 posts
Posted: Monday, November 08, 2010 - 03:56 AM UTC
Thanks for the info Jeff, I know most of it already. Strange I've never seen any drawing/plan for the various types, at least none I can remember.
Cheers
Al
Cheers
Al
AlanL
Joined: August 12, 2005
KitMaker: 14,499 posts
Armorama: 11,675 posts
Posted: Wednesday, November 10, 2010 - 04:22 AM UTC
Hi Guys,
bit more progress on the crew. Main work is done, no dust yet.
Driver and Commander

Foot soldiers

Officer types

Might need to remove the badge here and not sure about the right arm on the standing figure, there is a cup of tea to go with it but I'll wait out on that for now.
Mottley crew

Al
bit more progress on the crew. Main work is done, no dust yet.
Driver and Commander
Foot soldiers
Officer types
Might need to remove the badge here and not sure about the right arm on the standing figure, there is a cup of tea to go with it but I'll wait out on that for now.
Mottley crew
Al

mopnglo

Joined: January 07, 2006
KitMaker: 452 posts
Armorama: 271 posts

Posted: Thursday, November 11, 2010 - 02:51 AM UTC
Alan, great work on the figures! I'm itching to dig into my LRDG sets.
Where did you find the SMLEs? I can't seem to find them in 1/35 anywhere.
Where did you find the SMLEs? I can't seem to find them in 1/35 anywhere.

Brigandine
Joined: July 12, 2006
KitMaker: 553 posts
Armorama: 312 posts
Posted: Thursday, November 11, 2010 - 11:24 AM UTC
Quoted Text
Alan, great work on the figures! I'm itching to dig into my LRDG sets.
Where did you find the SMLEs? I can't seem to find them in 1/35 anywhere.
I have bought two sets of the Ultracast resin SMLEs and have used them on both of my LRDG Chevrolets. They do need a little cleaning up: the mould gates are where the butt plate should be, so this area needs some careful work - care needs to be taken because, as this photo shows it is possible to carve out too much of a curve cf. the real SMLE
There are are also some fine seam lines which need to be polished off, and very fine flash around the triggers. If you really want to be picky they lack the breech cover loop just in front of the magazine.
Once these areas are tidied up, the muzzles carefully drilled out a little and swing swivels and slings fitted they really look the part. They can be found Here

Your LRDG crew members are looking great Alan - once you've finished them would you mind sending them to me??

mopnglo
Joined: January 07, 2006
KitMaker: 452 posts
Armorama: 271 posts
Posted: Friday, November 12, 2010 - 09:29 AM UTC
Jeff - Thanks for the great info! I knew about the Ultracast set, but I can't find them anywhere in the USA. I guess ordering straight from Ultracast is the best option. I'm glad to know the steps to clean them up! I have a 1:1 scale SMLE in my collection, so I'll be sure to use it as a reference.
I've really been admiring your LRDG build! You and Al are keeping me excited about my LRDG kits.
I've really been admiring your LRDG build! You and Al are keeping me excited about my LRDG kits.
AlanL
Joined: August 12, 2005
KitMaker: 14,499 posts
Armorama: 11,675 posts
Posted: Saturday, November 13, 2010 - 06:15 AM UTC
Hi Michael,
Thanks for the comments. On th SMLE also keep an eye out for the old Italeri Accessories set no 407 that appears from time to time. There are 3 SMLE and bayonets in the kit.
Cheers
Al
Thanks for the comments. On th SMLE also keep an eye out for the old Italeri Accessories set no 407 that appears from time to time. There are 3 SMLE and bayonets in the kit.
Cheers
Al
AlanL
Joined: August 12, 2005
KitMaker: 14,499 posts
Armorama: 11,675 posts
Posted: Saturday, November 20, 2010 - 06:10 AM UTC
Hi Guys,
I see Osprey have a new LRDG book out:
Long Range Desert Group Patrolman by Tim Moreman
ISBN is 978-1-84603-924-9
 Al
Al
I see Osprey have a new LRDG book out:
Long Range Desert Group Patrolman by Tim Moreman
ISBN is 978-1-84603-924-9
AlAlanL
Joined: August 12, 2005
KitMaker: 14,499 posts
Armorama: 11,675 posts
Posted: Saturday, November 20, 2010 - 10:53 PM UTC
Hi folks,
I asked Darren to trun this thread into a blog as I'm getting close to starting on the trucks. Parts all got washed last night so almost time to make a start.
Kit parts


Breda Parts

Wheels

Also be using some of these

and some of these

and these

Some bits of the hoard I've been collecting up these last few years for the build.

It also occured to me that with the NWM figuers for inspiration a few conversions/upgrades of the old Tamiya figs might be fun.
Al
I asked Darren to trun this thread into a blog as I'm getting close to starting on the trucks. Parts all got washed last night so almost time to make a start.
Kit parts
Breda Parts
Wheels
Also be using some of these
and some of these
and these
Some bits of the hoard I've been collecting up these last few years for the build.
It also occured to me that with the NWM figuers for inspiration a few conversions/upgrades of the old Tamiya figs might be fun.
Al
AlanL
Joined: August 12, 2005
KitMaker: 14,499 posts
Armorama: 11,675 posts
Posted: Sunday, November 21, 2010 - 01:06 AM UTC
Hi folks,
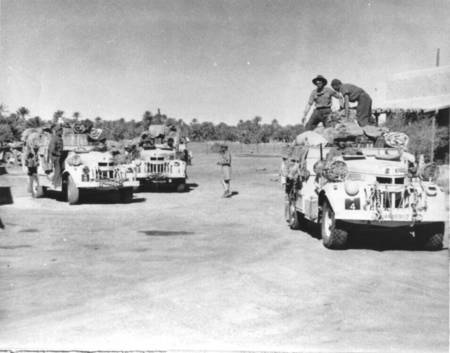
Starting to build anything new requires a bit of research. As best I can tell the Tamiya kit represents a Canadian Chevrolet 1522X2 4 x 2 30cwt. 200 of these vehicles were delivered on special order in March 1942. They came with a full width screen and the Gorferdson 4B1 steel ammunition body. These were then altered by having the windowscreens repleaced by aero screens, radiator condensers added, gun mounts and various fitting fixed. The body sides were raised with wooden planks and for the W/T trucks special compartments were built. So, if I've understood this correctly March 1942 should be my starting point.
This picture, given the full screen, I assume was taken when the vehicles first arrived. I'm no expert on the LRDG so if anyone wants to chip in feel free to do so.

The Tamiya kit seems to be a pretty decent kit and the Eduard PE and reference photographs should guide me to fixing and correcting what is necessary. The plan is to build two vehicles, one an W/T truck and the other sporting a Breda 20mm. It's a pity Tamiya never included an engine with the kit that would have open up further possibilities of finish. One reason why a new and updated version would be good.
Al
Starting to build anything new requires a bit of research. As best I can tell the Tamiya kit represents a Canadian Chevrolet 1522X2 4 x 2 30cwt. 200 of these vehicles were delivered on special order in March 1942. They came with a full width screen and the Gorferdson 4B1 steel ammunition body. These were then altered by having the windowscreens repleaced by aero screens, radiator condensers added, gun mounts and various fitting fixed. The body sides were raised with wooden planks and for the W/T trucks special compartments were built. So, if I've understood this correctly March 1942 should be my starting point.
This picture, given the full screen, I assume was taken when the vehicles first arrived. I'm no expert on the LRDG so if anyone wants to chip in feel free to do so.
The Tamiya kit seems to be a pretty decent kit and the Eduard PE and reference photographs should guide me to fixing and correcting what is necessary. The plan is to build two vehicles, one an W/T truck and the other sporting a Breda 20mm. It's a pity Tamiya never included an engine with the kit that would have open up further possibilities of finish. One reason why a new and updated version would be good.
Al

thomokiwi
Joined: January 11, 2006
KitMaker: 438 posts
Armorama: 359 posts

Posted: Sunday, November 21, 2010 - 04:37 PM UTC
Hi All
Interesting photo. Never seen or can't remember seeing this one. I presume you are right. I will pass it to people with more knowledge than me to see if they know anything about this one.
By the way, what resin tyres are you using.
Interesting photo. Never seen or can't remember seeing this one. I presume you are right. I will pass it to people with more knowledge than me to see if they know anything about this one.
By the way, what resin tyres are you using.


CMOT


Joined: May 14, 2006
KitMaker: 10,954 posts
Armorama: 8,571 posts

Posted: Sunday, November 21, 2010 - 05:08 PM UTC
Having built this kit from the box it was a joy to make Alan, and I look forward to seing what you do with yours.

airborne1

Joined: April 15, 2006
KitMaker: 915 posts
Armorama: 797 posts

Posted: Monday, November 22, 2010 - 12:11 AM UTC
Hi Alan,
Don't forget to get the eduard etch for this vehicle .
Eduards 35 251 photo etch brings this back in scale quite considerably.
From the sand channel holders on the front guards to the mud flaps on the rear .
It's well worth the money.
I too am working on the Tamiya Chev with the breda in the back.
Its a bloody nice kit for its age .
Did one back in 2000 and now I'm doing the same vehicle again.
having the Breda in the back beefs this vehicle up
I was going to use the tank workshop wheels but changed at the last minute to the Mouse House tyres .Sharper in detail and leave Tank workshop a little out on tread pattern detail.
if your interested there is a photo in the gallery of where I am up to.
I have been watching this thread and its looking good .
you have got a lot to work with .
Look forward to seeing more progress photo's.
Cheers
Michael
AlanL
Joined: August 12, 2005
KitMaker: 14,499 posts
Armorama: 11,675 posts
Posted: Monday, November 22, 2010 - 03:56 AM UTC
Hi Thomo,
The wheels were from Tank workshop, got them a few years ago at a model show. Let me knoiw wat tthe experts say about the pic, I should really go back and check the IWM caption.
Hi Darren,
Have to wait and see
Hi Michael,
Thanks, I have the Eduard sets already. Can't say about the wheels, I got these a few years ago. I'll check out you gallery, have you got a blog going? I have been collectinmg up stuff for these for a few years now lol, lol.
Right last nights progress.


Al
The wheels were from Tank workshop, got them a few years ago at a model show. Let me knoiw wat tthe experts say about the pic, I should really go back and check the IWM caption.
Hi Darren,
Have to wait and see
Hi Michael,
Thanks, I have the Eduard sets already. Can't say about the wheels, I got these a few years ago. I'll check out you gallery, have you got a blog going? I have been collectinmg up stuff for these for a few years now lol, lol.
Right last nights progress.
Al
AlanL
Joined: August 12, 2005
KitMaker: 14,499 posts
Armorama: 11,675 posts
Posted: Monday, November 22, 2010 - 04:06 AM UTC
Hi Guys,
I didn't submit these as a walkaround as I only have 12 pics of the old truck from IWM London. If I get back down some time I'll do a proper one.
In the meantime enjoy. I believe this might be the Chevrolet WB 30cwt 4 x 2 but can't say for sure.
Al


Al
I didn't submit these as a walkaround as I only have 12 pics of the old truck from IWM London. If I get back down some time I'll do a proper one.
In the meantime enjoy. I believe this might be the Chevrolet WB 30cwt 4 x 2 but can't say for sure.
Al
Al
mopnglo
Joined: January 07, 2006
KitMaker: 452 posts
Armorama: 271 posts
Posted: Monday, November 22, 2010 - 04:19 AM UTC
Nice photos, Al. Thanks for sharing them!
airborne1
Joined: April 15, 2006
KitMaker: 915 posts
Armorama: 797 posts
Posted: Monday, November 22, 2010 - 07:12 AM UTC
Hi Alan,
Sorry ,I do not have a blog going for this vehicle at present.
They are excellent photo's on the IWM vehicle .
very nice
Michael
Sorry ,I do not have a blog going for this vehicle at present.
They are excellent photo's on the IWM vehicle .
very nice
Michael

Galwitz
Joined: June 12, 2007
KitMaker: 498 posts
Armorama: 406 posts
Posted: Wednesday, November 24, 2010 - 04:06 AM UTC
Quoted Text
...but Tamiya have not included the compartment for the Phillips Type 635 receiver...
I apologize for hijacking the topic a bit. A note about Philips 635 compartment missing in the kit caught my attention though. Where was this compartment located? Next panel on the left from the No.11 would be a logical place. But I have read (and Tamiya apparently follows this notion) that the top section of the No.11 set compartment had a cover panel sliding left towards the rear of the vehicle. That would effectively block the panel on the left and as result it would not be possible to access 635 and No.11 without sliding the cover back and forth. It sounds a bit inefficient for otherwise rather ingenious LRDG. That puzzles me. Since No.11 compartment was split horizontally, wouldnt the 635 radio fit into the bottom part of it?
Thanks,
~Ales
Galwitz
Joined: June 12, 2007
KitMaker: 498 posts
Armorama: 406 posts
Posted: Wednesday, November 24, 2010 - 04:13 AM UTC
Quoted Text
I believe this might be the Chevrolet WB 30cwt 4 x 2 but can't say for sure.
Yes, it's Chevy WB 30CWT 4x2 truck W8 "Waikaha". Wikipedia has yet another picture with the name visible on the bonnet:
http://www.mediawiki.org/wiki/File:LRDG_W8_Waikaha_IWM_2007_01.JPG
AlanL
Joined: August 12, 2005
KitMaker: 14,499 posts
Armorama: 11,675 posts
Posted: Wednesday, November 24, 2010 - 05:42 PM UTC
Hi Ales,
Thanks for the confirmation. Sorry can't help on the transmitter, but I'll see what I can find out.
Al
Thanks for the confirmation. Sorry can't help on the transmitter, but I'll see what I can find out.
Al
AlanL
Joined: August 12, 2005
KitMaker: 14,499 posts
Armorama: 11,675 posts
Posted: Friday, November 26, 2010 - 03:51 AM UTC
Hi guys,
a bit of filling requitred on this one:

On the Breda truck you'll need to cut out the recessed small panel and make two new panels for the RHS.

Also make some planking for around the top end, running from about the centre fixing forward, so you can remove the rear section of the boarding.

You may decide to remove it all and just su[pport the planking by L angles.
Al
a bit of filling requitred on this one:
On the Breda truck you'll need to cut out the recessed small panel and make two new panels for the RHS.
Also make some planking for around the top end, running from about the centre fixing forward, so you can remove the rear section of the boarding.
You may decide to remove it all and just su[pport the planking by L angles.
Al
AlanL
Joined: August 12, 2005
KitMaker: 14,499 posts
Armorama: 11,675 posts
Posted: Saturday, November 27, 2010 - 02:59 AM UTC
Hi folks,
Well after a really frustrating morning with my PC som updates.
added soem PE to the dash board:

Installed the radiator and PE Grill and did a bit of painting uon the underside.

Scored some wood on the plank and I'll use 1mm x 4.8mm to add the missing planks on the bread vehicle

The other optiion here would be to remove the kit plank and replace both with PE?
Bit of a wasted day thanks to PC problems.
Al
Well after a really frustrating morning with my PC som updates.
added soem PE to the dash board:
Installed the radiator and PE Grill and did a bit of painting uon the underside.
Scored some wood on the plank and I'll use 1mm x 4.8mm to add the missing planks on the bread vehicle
The other optiion here would be to remove the kit plank and replace both with PE?
Bit of a wasted day thanks to PC problems.
Al
 |

WEB HOSTING BY


Copyright ©2021 Armorama and Kitmaker Network, a subsidiary of Silver Star Enterprises
All Rights Reserved. Please read our Conditions of Use and Privacy Policy.
All Rights Reserved. Please read our Conditions of Use and Privacy Policy.