

Campaigns
Where Armorama group builds can be discussed, organized, and updates posted.
Where Armorama group builds can be discussed, organized, and updates posted.
Hosted by Darren Baker, Richard S.
What if Campaign?

vonHengest

Joined: June 29, 2010
KitMaker: 5,854 posts
Armorama: 4,817 posts

Posted: Tuesday, May 31, 2011 - 06:56 AM UTC
Scott, there is a little tab on your memory card that locks it from being formatted, etc. Making sure that tab is not in the lock position is a good place to start if you haven't done so already.

AndyMcHun

Joined: November 27, 2010
KitMaker: 47 posts
Armorama: 39 posts

Posted: Tuesday, May 31, 2011 - 08:49 AM UTC
Hi Guys!
Scott: great weathering on that cat!
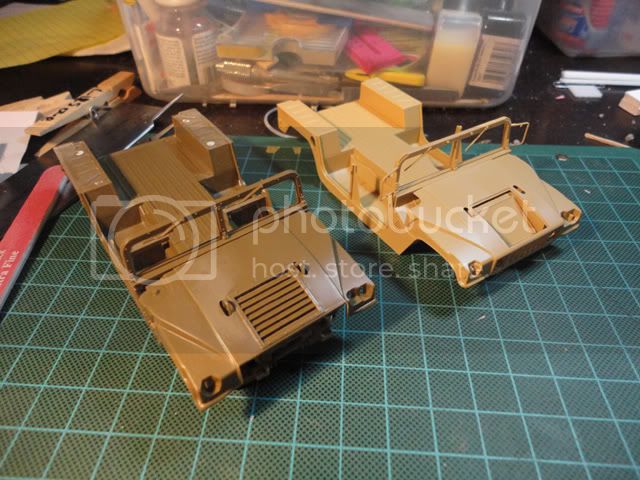
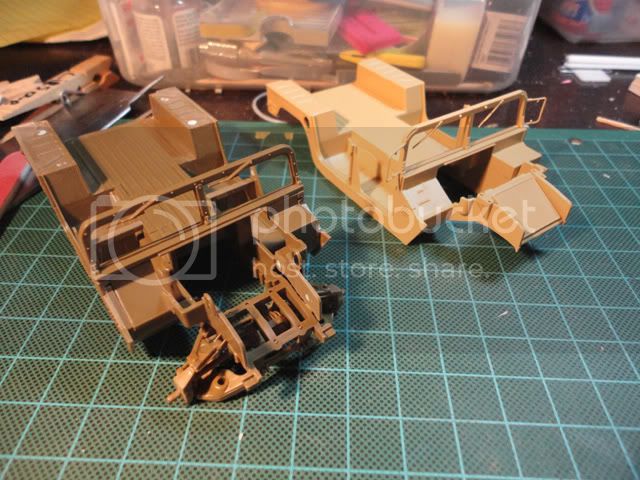
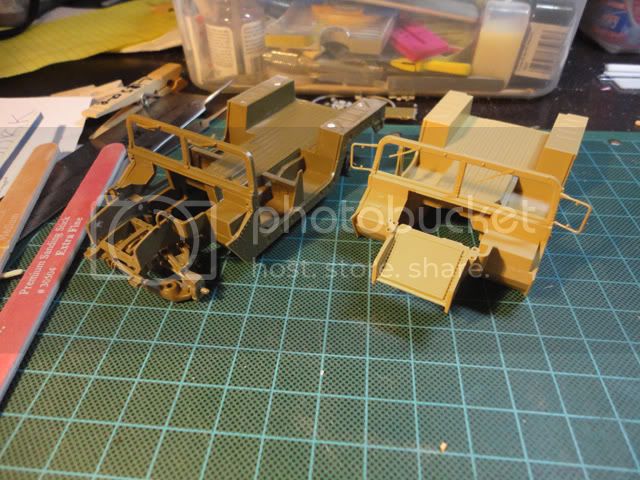
Duncan: I upload some pictures about the progress of detailing the drive wheel housing.
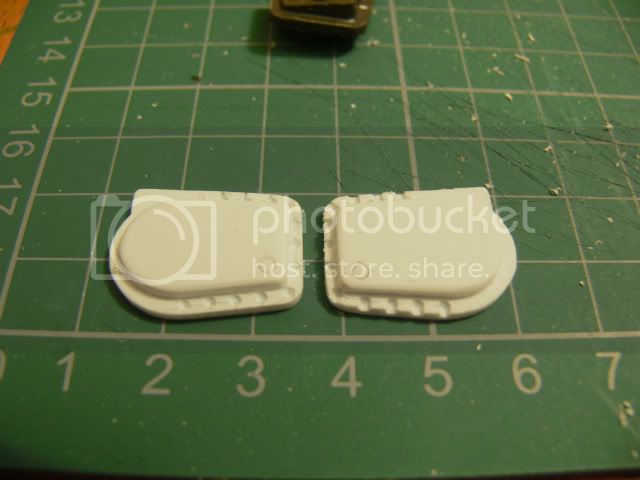

For the hexabolts I simply used hexagon shaped rod from Plastruct.
Thanks for watching.
Andy
Scott: great weathering on that cat!
Duncan: I upload some pictures about the progress of detailing the drive wheel housing.
For the hexabolts I simply used hexagon shaped rod from Plastruct.
Thanks for watching.
Andy

Sudzonic
Joined: December 07, 2007
KitMaker: 2,096 posts
Armorama: 1,983 posts

Posted: Tuesday, May 31, 2011 - 09:21 AM UTC
Quoted Text
Scott, there is a little tab on your memory card that locks it from being formatted, etc. Making sure that tab is not in the lock position is a good place to start if you haven't done so already.
Thanks Jeramy I have tryed that, it works sometimes and not others I think I need to get a new card?
Thanks for the feed back Andy, your build is looking good aswell.
vonHengest
Joined: June 29, 2010
KitMaker: 5,854 posts
Armorama: 4,817 posts
Posted: Tuesday, May 31, 2011 - 09:43 AM UTC
Andy: Thanks for the photos, I was wondering about that as well. Keep up the great work!
Scott: I would say you are probably right then. I've had memory sticks corrupt on me like that before. I love digital capabilities, but the old school reliability just isn't there yet.
Scott: I would say you are probably right then. I've had memory sticks corrupt on me like that before. I love digital capabilities, but the old school reliability just isn't there yet.

windysean
Joined: September 11, 2009
KitMaker: 1,917 posts
Armorama: 735 posts
Posted: Tuesday, May 31, 2011 - 09:57 AM UTC
Scott, at least when those cards go bad, the new ones are always bigger and cheaper.
As for my build, I've built the engine enclosure ("doghouse") and most of the hood ("bonnet" to those across the pond).
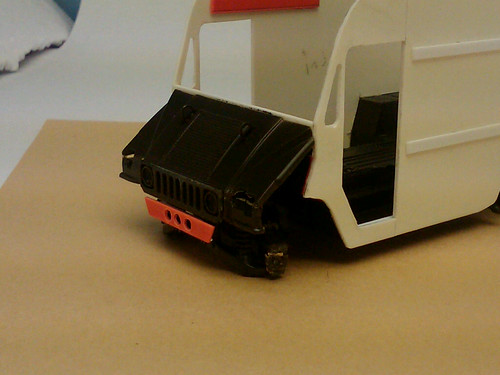
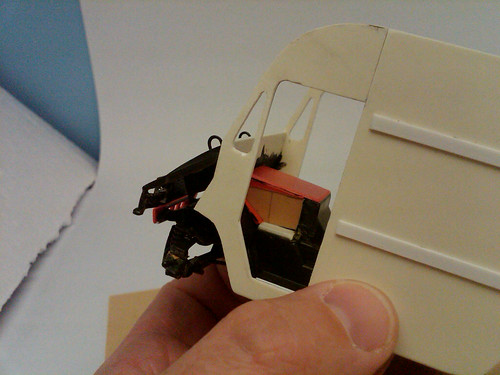
Apologies for the dark photo. It doesn't look like much now-- a hodgepodge of scrap plastic. Next I have to finagle a drivers position.
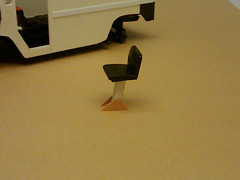
Still deciding if this truck needs battle damage. I've never mudded up a build yet-- this one should get muddy.
thanks for looking!
-Sean.
As for my build, I've built the engine enclosure ("doghouse") and most of the hood ("bonnet" to those across the pond).
Apologies for the dark photo. It doesn't look like much now-- a hodgepodge of scrap plastic. Next I have to finagle a drivers position.
Still deciding if this truck needs battle damage. I've never mudded up a build yet-- this one should get muddy.
thanks for looking!
-Sean.
Sudzonic
Joined: December 07, 2007
KitMaker: 2,096 posts
Armorama: 1,983 posts
Posted: Tuesday, May 31, 2011 - 10:11 AM UTC
Sean, Yeah I can get new 4GB card for about £5 ($8-$9ish I think?) on ebay so it not so bad.
your build is brilliant great concept I like it.
your build is brilliant great concept I like it.

AgentG
Joined: December 21, 2008
KitMaker: 1,109 posts
Armorama: 1,095 posts

Posted: Tuesday, May 31, 2011 - 11:45 AM UTC
Ok I started on the Lav's interior today. Lotsa ejection pin marks on the floor that will be seen with open hatches. I fibbed and used liquid cement and a short bristled brush to add a "non slip" surface to the floor.
Batteries are charging so pics to come.
G
Batteries are charging so pics to come.
G

russamotto

Joined: December 14, 2007
KitMaker: 3,389 posts
Armorama: 2,054 posts

Posted: Tuesday, May 31, 2011 - 01:39 PM UTC
Everything is looking good. Lots of ideas. We saw sunshine for almost three hours today so I started painting today on a ZSL-92B to go with the ZTZ-96 for the occupation forces. I'm trying to work up a sort of urban digital sceme. I really want to do a captured Leopard, too. I was looking at the paint selection over at the home improvement store. Red/maroon, terra cotta, dark brown and sage green maybe. I have six nearly complete builds on the desk right now, just waiting for paint. I'll be jumping on the ZTZ pretty soon. I'll have to look through the P-47 decals to find a nice set of "UN" decals. I have white, but I was hoping to find some in red.
AgentG
Joined: December 21, 2008
KitMaker: 1,109 posts
Armorama: 1,095 posts
Posted: Tuesday, May 31, 2011 - 02:42 PM UTC
Russ I briefly contemplated a digital pattern but heard MM Acrly doesn't mask well. The Tamiya rack at the LHS is nearly empty so I bought the MM Acryl.
I'm curious if anyone else has experience with this paint. I've been a Tamiya fan for a long while.
G
I'm curious if anyone else has experience with this paint. I've been a Tamiya fan for a long while.
G
vonHengest
Joined: June 29, 2010
KitMaker: 5,854 posts
Armorama: 4,817 posts
Posted: Tuesday, May 31, 2011 - 03:20 PM UTC
Glad everyone is enjoying this campaign, time for a round
Sean: The tilted Humvee hood looks killer on that mail van
Scott and G: Looking forward to seeing more pics of your excellent work guys Scott, good luck with the new card
If there is concern of the MM while masking the digital camo, it may be a good idea to seal each layer with a coat of clear. Also frogtape may be a good idea if you are worried about bleadthrough. I haven't tried the stuff on models myself yet, so I can't vouch for it but it does work well on automotive and house paint.
Sean: The tilted Humvee hood looks killer on that mail van
Scott and G: Looking forward to seeing more pics of your excellent work guys
Scott, good luck with the new card If there is concern of the MM while masking the digital camo, it may be a good idea to seal each layer with a coat of clear. Also frogtape may be a good idea if you are worried about bleadthrough. I haven't tried the stuff on models myself yet, so I can't vouch for it but it does work well on automotive and house paint.

Klinker

Joined: December 26, 2009
KitMaker: 369 posts
Armorama: 352 posts

Posted: Tuesday, May 31, 2011 - 09:46 PM UTC
Andy ......... Many thanks,....this is my first model with major mods so these tips are spot-on thanks again.
Klinker
Joined: December 26, 2009
KitMaker: 369 posts
Armorama: 352 posts
Posted: Tuesday, May 31, 2011 - 10:53 PM UTC
Scot... Your Panthers coming along, good to see a few Panthers in this Campaign 
Sean... The 'UPSVEE' is great/mad = great stuff! our Post-Lady down here, had a Subaru Impreza, now she swapped for a Typre 'R' Honda thingy.. but I reckon she'd go for this!
Sean... The 'UPSVEE' is great/mad = great stuff! our Post-Lady down here, had a Subaru Impreza, now she swapped for a Typre 'R' Honda thingy..
but I reckon she'd go for this!
VLADPANZER

Joined: December 20, 2010
KitMaker: 568 posts
Armorama: 549 posts
Posted: Thursday, June 02, 2011 - 09:52 AM UTC
Hi all,
@ Duncan: Thank you very much!! I Hope that you get some work done on your panther soon and that you will upload some pictures for us!!!!
@ Wayne: Thanx!! Looking forward to seeing the merdec camouflage!!
@ Andy: Thank you Andy, your scratch building is stunning!
@ Jeremy: Thanx, and thank you for this campaign!!!
@ Hakan: Thank you very much!!
@ Sean: Thanx a lot!!! I love your truck, beautiful work!!
@ Sal: thank you, personally I prefer WWII armor to this is only my third or fourth modern vehicle!! (but recently I have enjoyed building modern vehicles) 
@ Scott: Nice work on the tank!!
I am really glad you guys liked the digital camo!!
I have had little progress in the last two days, managed to start painting one of the figures hope I have picked a good camouflage scheme! And I also added few bits and pieces to the model!! Need to find some more insects, try to find a decal sheet, and start working on the base!!
Regards,
@ Duncan: Thank you very much!! I Hope that you get some work done on your panther soon and that you will upload some pictures for us!!!!
@ Wayne: Thanx!! Looking forward to seeing the merdec camouflage!!
@ Andy: Thank you Andy, your scratch building is stunning!
@ Jeremy: Thanx, and thank you for this campaign!!!
@ Hakan: Thank you very much!!
@ Sean: Thanx a lot!!! I love your truck, beautiful work!!
@ Sal: thank you, personally I prefer WWII armor to this is only my third or fourth modern vehicle!! (but recently I have enjoyed building modern vehicles)
@ Scott: Nice work on the tank!!
I am really glad you guys liked the digital camo!!
I have had little progress in the last two days, managed to start painting one of the figures hope I have picked a good camouflage scheme! And I also added few bits and pieces to the model!! Need to find some more insects, try to find a decal sheet, and start working on the base!!
Regards,

zontar
Joined: August 27, 2006
KitMaker: 1,646 posts
Armorama: 1,557 posts
Posted: Thursday, June 02, 2011 - 10:12 AM UTC
Scott: I like the worn out look. Should be good with paint.
Andy: nice bolts!
Sean: the delivery van is looking really good. I echo Jeremy's comment on the hood. It really lends to the UPS character.
Jeremy: Thanks for the encouragement and I've thought a lot about scratching the fixes to the Italeri kit, but after comparing it to the Tamiya, I think using the Tamiya will be better for my sanity. Mostly I'm annoyed at how much fix I would need just to get the base vehicle "correct" (I'm no rivet counter...), before I even get to muck it up with my mods. My scratching is most likely sub-par, so I'd like to save as much of that for my hill-billie mods. The good thing is that the Italeri is passable with the hood down and the doors closed, so I will probably just put the left over Tamiya 1025 stuff on it later.

Happy Modelling, - zon
Andy: nice bolts!
Sean: the delivery van is looking really good. I echo Jeremy's comment on the hood. It really lends to the UPS character.
Jeremy: Thanks for the encouragement and I've thought a lot about scratching the fixes to the Italeri kit, but after comparing it to the Tamiya, I think using the Tamiya will be better for my sanity. Mostly I'm annoyed at how much fix I would need just to get the base vehicle "correct" (I'm no rivet counter...), before I even get to muck it up with my mods. My scratching is most likely sub-par, so I'd like to save as much of that for my hill-billie mods. The good thing is that the Italeri is passable with the hood down and the doors closed, so I will probably just put the left over Tamiya 1025 stuff on it later.
Happy Modelling, - zon
BigSmitty
Joined: October 01, 2008
KitMaker: 597 posts
Armorama: 439 posts

Posted: Thursday, June 02, 2011 - 10:49 AM UTC
I enlisted and am pretty certain of the rules. Jeremy, you mentioned war walkers in your initial post, so something along the lines of a "PanzerLaufstuhl" (Pz.Lfs.) would be OK? Literally it's a "Tank Walker". Think of the venerable AT-ST 2 legged Star Wars walker with a Tiger 1 turret on it, late war ambush camo is what's in my head now. Scratchbuilding everything from the "waist" down... Just have to figure out how the Germans could come up with something like that. A lot like the "Dust" series of "what ifs" is what I'm thinking of.
Let me know if a walker like that is acceptable. I'm currently building for the End of Days campaign. It's an armed Ferrari F430 zombie recon car with a scratchbuilt 1/25 scale M61A1 Vulcan mounted on the hood among other things. These are the types of builds I really enjoy.
Let me know if a walker like that is acceptable. I'm currently building for the End of Days campaign. It's an armed Ferrari F430 zombie recon car with a scratchbuilt 1/25 scale M61A1 Vulcan mounted on the hood among other things. These are the types of builds I really enjoy.

Shift911
Joined: December 17, 2007
KitMaker: 192 posts
Armorama: 185 posts

Posted: Thursday, June 02, 2011 - 11:22 AM UTC
Was a nice day out today so I played around with the base a little. Just a piece of plywood lightly spackled, Rustoleum textured paint for the pavement, and sifted backyard dirt for the sand. Figured I could work some knots in the wood into potholes, which kinda works.

After I searched around for pictures of Libyan roads I noticed I got the yellow/white backwards, so that's being fixed and I'm adding more lines to the road on the left side.
Nice progress on the other builds, that UPS Humvee's looking more interesting every post!
After I searched around for pictures of Libyan roads I noticed I got the yellow/white backwards, so that's being fixed and I'm adding more lines to the road on the left side.
Nice progress on the other builds, that UPS Humvee's looking more interesting every post!
vonHengest
Joined: June 29, 2010
KitMaker: 5,854 posts
Armorama: 4,817 posts
Posted: Thursday, June 02, 2011 - 12:30 PM UTC
Vladimir: You bet! I'm really glad that you guys jumped on this when I agreed to give it an earlier start date
Zon: Whatever works, it's going to be pretty sweet when you're done for sure
Matt: You bet! When can we expect to see you start? I love seeing projects like that
Lucas: Nice job "fixing" the knots, I hate working with those things because they are so dense
Zon: Whatever works, it's going to be pretty sweet when you're done for sure
Matt: You bet! When can we expect to see you start? I love seeing projects like that
Lucas: Nice job "fixing" the knots, I hate working with those things because they are so dense

Nito74

Joined: March 04, 2008
KitMaker: 5,386 posts
Armorama: 4,727 posts
Posted: Thursday, June 02, 2011 - 02:35 PM UTC
Hi guys !!
It's great to see these projects hitting the workbench... so I started mine last night !
it's 2a.m and I'm trying to get something done for the weekend pics !
It's going to be a E-25 with a bunch of new stuff (armour, slat, remote MG's , new gun, etc..)
So far 1st step of construction is about the suspension:
- 2 arms with parts B19/B14
- 3 arms with B19/B15
-2 arms with B16/B13
-3 arms with B16/B12
But on 2nd step of construction they don't tell you which suspension arms are used on each side... so at step 4 I noticed that among the B19 suspension arms 2 of them have the wheel attachment 5mm shorter.
Same thing for the B16 suspension arms..
So if you are building a E-25 take notice that the right way to attach them is:
B19's are on the left side (tank facing forward) or right side (upside down-facing forward), B19-B15 / B19-B14 / B19-B15 / B19-B14 / B19-B15
More to come this weekend ! Stay tuned...that's all Folks !!!
BigSmitty
Joined: October 01, 2008
KitMaker: 597 posts
Armorama: 439 posts
Posted: Thursday, June 02, 2011 - 02:54 PM UTC
Jeremy:
Since the kit was originally started for the Tiger Campaign here and subsequently unrecoverable after my move in April, I've got the major parts started.


I will use the lower hull but chop about 70% of the middle, so I have just enough of the lower hull to keep the turret from being too top heavy. I have a spare MG 42 that I will probably mount on the cupola. The resin Zimmerit will be sanded down as it's CA'd in place.
I plan on using the road wheels and drive covers / sprockets as the drive joints, knee joints and lower leg joints in some fashion. Haven't thought that much through.
Here is the inspiration (and reference) for some of the scratch stuff I need to do.
FOR REFERENCE ONLY

Should be a fun project. I plan on putting it on some sort of base in a testing facility facility (three wall building or something like that).
Still working on the story for this beast though.
Since the kit was originally started for the Tiger Campaign here and subsequently unrecoverable after my move in April, I've got the major parts started.
I will use the lower hull but chop about 70% of the middle, so I have just enough of the lower hull to keep the turret from being too top heavy. I have a spare MG 42 that I will probably mount on the cupola. The resin Zimmerit will be sanded down as it's CA'd in place.
I plan on using the road wheels and drive covers / sprockets as the drive joints, knee joints and lower leg joints in some fashion. Haven't thought that much through.
Here is the inspiration (and reference) for some of the scratch stuff I need to do.
FOR REFERENCE ONLY
Should be a fun project. I plan on putting it on some sort of base in a testing facility facility (three wall building or something like that).
Still working on the story for this beast though.
zontar
Joined: August 27, 2006
KitMaker: 1,646 posts
Armorama: 1,557 posts
Posted: Thursday, June 02, 2011 - 03:29 PM UTC
Lucas: very nice road. Which "texture" from Rustoleum did you use? Also, I like the incorporation of the knots.
Matt: cool concept. Look forward to seeing that come together.
Happy Modelling, -zon
Matt: cool concept. Look forward to seeing that come together.
Happy Modelling, -zon
Shift911
Joined: December 17, 2007
KitMaker: 192 posts
Armorama: 185 posts
Posted: Thursday, June 02, 2011 - 04:46 PM UTC
Thanks Jeremy, and Zon, the can says Rustoleum Textured, Fine Textured Finish, with the tan cap. I'd imagine this means they have other kinds of textured finishes, but this one did the job nicely. Its not really speckled but there is definitely variation that I would imagine is enhanced by the sanded spackle underneath. I've since gone over it with some Mig pigments to bring out dust and tread marks and I couldn't have hoped for a better result.
Maybe when it's all said and done I'll break out the Canon and get some decent close ups.
Maybe when it's all said and done I'll break out the Canon and get some decent close ups.
BigSmitty
Joined: October 01, 2008
KitMaker: 597 posts
Armorama: 439 posts
Posted: Friday, June 03, 2011 - 07:49 AM UTC
Well, after a couple of hours of surgery last night:


The patient is resting comfortably while I'm at work:


I stopped by the LHS today during lunch and picked up some more Evergreen for the legs and feet. I couldn't find any textured sheets that I liked, so I picked up some small half rounds for the treads on the foot pads.
My plan (key word PLAN) is to have the legs articulated at the drive joint on the hull, at the hip joint (upper pivot), knee joint (lower pivot) and at the foot joint (limited). My thinking is that this would have been done (the real thing) using hydraulics (servos were a bit ahead in the future) so I am going to use styrene tubing as the hydraulic cylinder and piston. The legs won't ever be completely straight vertical, so I think if I glue each end to the leg and let the cylinder and piston travel freely (but with a tight friction fit) I can achieve the movement I want.
Also found out that most of the hull is useless and the turret is wider than the hull, so I have to do some scratching on a turret housing that fits in side the hull with a little clearance for the turret. I'm basically boxing in the remaining hull with styrene on the sides, once I have all the surgery issues sanded down smooth.
The rear of the hull will be raised (think the back end of an M1 or Challenger MBT) and I'll try to salvage the PE engine grill covers. That will allow for entry through the rear of the hull (I'm clearing out the Tiger I's exhausts and such) with a spare M113 rear door I found in my spares box. At least that's the goal.
Guess that's about it so far. Really having fun building something with no directions and no real necessity for historical accuracy.
The patient is resting comfortably while I'm at work:
I stopped by the LHS today during lunch and picked up some more Evergreen for the legs and feet. I couldn't find any textured sheets that I liked, so I picked up some small half rounds for the treads on the foot pads.
My plan (key word PLAN) is to have the legs articulated at the drive joint on the hull, at the hip joint (upper pivot), knee joint (lower pivot) and at the foot joint (limited). My thinking is that this would have been done (the real thing) using hydraulics (servos were a bit ahead in the future) so I am going to use styrene tubing as the hydraulic cylinder and piston. The legs won't ever be completely straight vertical, so I think if I glue each end to the leg and let the cylinder and piston travel freely (but with a tight friction fit) I can achieve the movement I want.
Also found out that most of the hull is useless and the turret is wider than the hull, so I have to do some scratching on a turret housing that fits in side the hull with a little clearance for the turret. I'm basically boxing in the remaining hull with styrene on the sides, once I have all the surgery issues sanded down smooth.
The rear of the hull will be raised (think the back end of an M1 or Challenger MBT) and I'll try to salvage the PE engine grill covers. That will allow for entry through the rear of the hull (I'm clearing out the Tiger I's exhausts and such) with a spare M113 rear door I found in my spares box. At least that's the goal.
Guess that's about it so far. Really having fun building something with no directions and no real necessity for historical accuracy.
windysean
Joined: September 11, 2009
KitMaker: 1,917 posts
Armorama: 735 posts
Posted: Friday, June 03, 2011 - 08:39 AM UTC
Whoa, Matt! That's some bold surgery! No saw or knife, just nippers. There's debris everywhere. I like it! Sounds like you've got a good grasp on your plan too.
Nice all around.
Thanks, everyone else for the encouragement too. I'll make more strides this weekend!
Cheers!
-Sean.
Nice all around.
Thanks, everyone else for the encouragement too. I'll make more strides this weekend!
Cheers!
-Sean.
BigSmitty
Joined: October 01, 2008
KitMaker: 597 posts
Armorama: 439 posts
Posted: Friday, June 03, 2011 - 08:45 AM UTC
Sean,
Most of the surgery was completed using the Dremel out of sight of the photo. It's the smaller one that runs on a charged battery with a pistol grip. Don't really like it that much, but it was a present. And it has 10 speeds, so I don't melt everything together. The hull itself was cut apart using the deep (3") XActo razor saw. I actually cut it pretty straight, although both cuts were angled.
Work begins in earnest tonight with some "footwork".
vonHengest
Joined: June 29, 2010
KitMaker: 5,854 posts
Armorama: 4,817 posts
Posted: Friday, June 03, 2011 - 09:12 AM UTC
John: Thanks for the heads up, it's always nice to be able to get those "lost in translation" instruction steps sorted out Looking forward to those photos!
Lucas: Wow, that's slick! Please do get some closeups for us if you get a chance
Matt: Mmm, I can just smell the half melted plastic, nice surgery! I find the multi speed dremel tools a lot easier to use on plastic too. I'm very curious to see what you work out for legs.
Sean: Keep going man! Every time I see one of those big UPS vans now I imagine it painted in USPS colors with off road tires and a Humvee hood

Looking forward to those photos!Lucas: Wow, that's slick! Please do get some closeups for us if you get a chance
Matt: Mmm, I can just smell the half melted plastic, nice surgery! I find the multi speed dremel tools a lot easier to use on plastic too. I'm very curious to see what you work out for legs.
Sean: Keep going man! Every time I see one of those big UPS vans now I imagine it painted in USPS colors with off road tires and a Humvee hood
 |

WEB HOSTING BY


Copyright ©2021 Armorama and Kitmaker Network, a subsidiary of Silver Star Enterprises
All Rights Reserved. Please read our Conditions of Use and Privacy Policy.
All Rights Reserved. Please read our Conditions of Use and Privacy Policy.