


Campaigns
Where Armorama group builds can be discussed, organized, and updates posted.
Where Armorama group builds can be discussed, organized, and updates posted.
Hosted by Darren Baker, Richard S.
What if Campaign?

vonHengest

Joined: June 29, 2010
KitMaker: 5,854 posts
Armorama: 4,817 posts

Posted: Tuesday, June 21, 2011 - 04:14 PM UTC
Rockin G! That's going to look sweet with some weathering

BigSmitty
Joined: October 01, 2008
KitMaker: 597 posts
Armorama: 439 posts

Posted: Tuesday, June 21, 2011 - 04:45 PM UTC
Everything is looking really good over here with the builds. Wayne, that little mover is looking sharp, as is everyone else's... Over on that "other" campaign I'm trying to finish, I'm running into a problem. I'm trying to use some K&S aluminum tubing for some framework, and it is NOT taking well to my ZAP CA gel (medium viscosity). I can't even glue the aluminum tubing to the aluminum mesh I'm using for...well, for part of the vehicle.
Any ideas? Is aluminum a pain in the butt? Could my glue be old? I have had it for a while, and even though it doesn't get very humid up here in Minnesota between October and June, could there be an issue with moisture inside the glue bottle? Cap was on, finger tight, but not so tight I couldn't get it off easily.
Any ideas? Is aluminum a pain in the butt? Could my glue be old? I have had it for a while, and even though it doesn't get very humid up here in Minnesota between October and June, could there be an issue with moisture inside the glue bottle? Cap was on, finger tight, but not so tight I couldn't get it off easily.

AgentG
Joined: December 21, 2008
KitMaker: 1,109 posts
Armorama: 1,095 posts

Posted: Tuesday, June 21, 2011 - 05:32 PM UTC
I have had serious issues with CA and aluminum. I scratched a jerry can rack recently and about lost my mind. Aluminum to aluminum, aluminum to plastic, aluminum to my fingers, NOTHING worked. I finally gave up and used Gator Grip glue.
Folks had all sorts of advice, so I bought new CA, used a kicker, had a cocktail, said an incantation, asked for devine intervention, and still zilch.
Brass, no worries, aluminum, ah fugetaboudit...............
G
Folks had all sorts of advice, so I bought new CA, used a kicker, had a cocktail, said an incantation, asked for devine intervention, and still zilch.
Brass, no worries, aluminum, ah fugetaboudit...............
G
BigSmitty
Joined: October 01, 2008
KitMaker: 597 posts
Armorama: 439 posts
Posted: Tuesday, June 21, 2011 - 06:30 PM UTC
G,
Yeah, I should have known my CA was still good, as it had NO problems bonding my two fingers together. I ended up using Tenax to melt the plastic to the aluminum mesh for the windows, headlights and windshield area.
I ended up with a "fuggedaboutit" for the rod, and just used two sizes of styrene rod and tube for the passenger door frame.
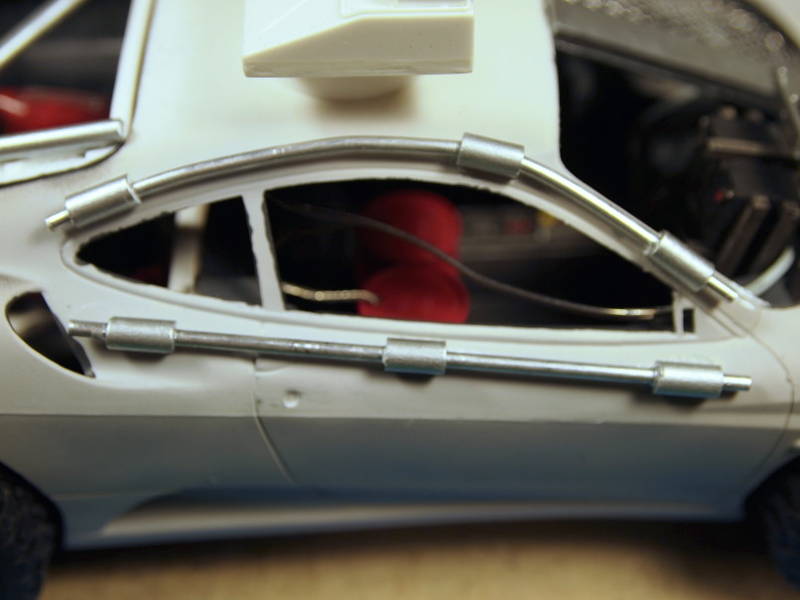
Painted it up with some Vallejo Model Air Aluminum with a brush, and it looked just fine.
Yeah, I should have known my CA was still good, as it had NO problems bonding my two fingers together. I ended up using Tenax to melt the plastic to the aluminum mesh for the windows, headlights and windshield area.
I ended up with a "fuggedaboutit" for the rod, and just used two sizes of styrene rod and tube for the passenger door frame.
Painted it up with some Vallejo Model Air Aluminum with a brush, and it looked just fine.
Removed by original poster on 06/22/11 - 08:52:24 (GMT).

WARDUKWNZ

Joined: June 01, 2011
KitMaker: 1,716 posts
Armorama: 1,638 posts

Posted: Tuesday, June 21, 2011 - 10:01 PM UTC
So far with the what if "Nightwraith" ,,process is being made at last ,,had time at last to do all the things that were skipping around in my head ,,
The new rear end

The new engine deck starting to take shape

New engine deck nearly complete

The new front end and side armour slowly getting there

The rear engine out let ports ,,now to sort the panel out between out let ports and cooling fins ..

More up dates soon
Phill
The new rear end
The new engine deck starting to take shape
New engine deck nearly complete
The new front end and side armour slowly getting there
The rear engine out let ports ,,now to sort the panel out between out let ports and cooling fins ..
More up dates soon
Phill


windysean
Joined: September 11, 2009
KitMaker: 1,917 posts
Armorama: 735 posts
Posted: Wednesday, June 22, 2011 - 02:03 AM UTC
Quoted Text
Everything is looking really good over here with the builds. Wayne, that little mover is looking sharp, as is everyone else's... Over on that "other" campaign I'm trying to finish, I'm running into a problem. I'm trying to use some K&S aluminum tubing for some framework, and it is NOT taking well to my ZAP CA gel (medium viscosity). I can't even glue the aluminum tubing to the aluminum mesh I'm using for...well, for part of the vehicle.
Any ideas? Is aluminum a pain in the butt? Could my glue be old? I have had it for a while, and even though it doesn't get very humid up here in Minnesota between October and June, could there be an issue with moisture inside the glue bottle? Cap was on, finger tight, but not so tight I couldn't get it off easily.
There was a discussion somewhere else a month or two ago (vague, right?), but to hold your mesh behind the body like that, I would have used tacky craft glue (I have Aleene's brand). It dries clear too. The only thing I don't know is the long term-- if it cracks or anything years later. It's water-based, so there's no threat of gluing your fingers together with it.
G, the camo really ties it all together and makes it awesome.
Phill, your is really coming together well too! Some good ideas there.
cheers,
Sean.
windysean
Joined: September 11, 2009
KitMaker: 1,917 posts
Armorama: 735 posts
Posted: Wednesday, June 22, 2011 - 11:39 PM UTC
Disregard that last post, the tacky glue doesn't work either. I tried to form curved handrails out of strips cut from an aluminum can, to no avail. 
Going back to styrene solved all my problems. I hope you've got yours resolved for good.
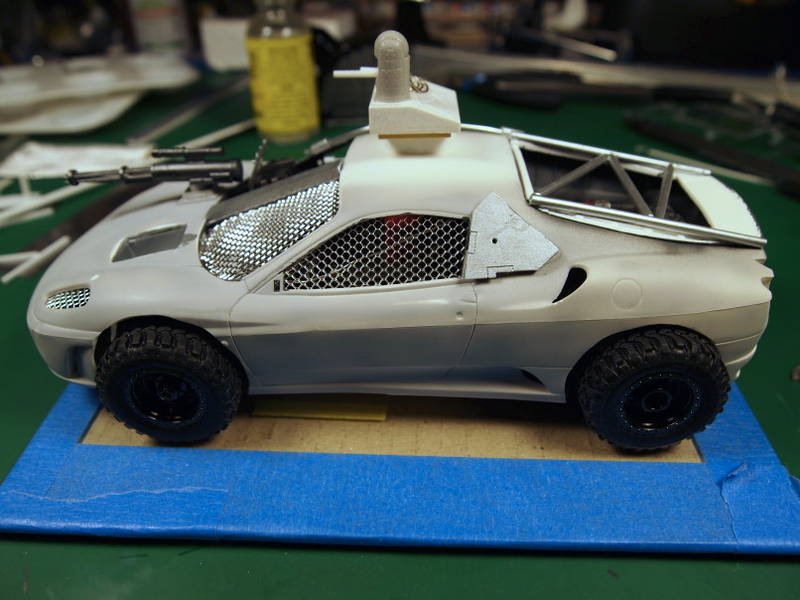
Here is my progress as of last night. Some final detail to the rear:

and closed up the cab for painting (before making it inaccessible with the roof). I figure removing tape will be easy enough, but applying it would have been insane from only that open driver's door:

cheers!
-Sean.
edit: thinking more, by the same logic, I could have installed all the windows first, and masked them from the outside. Ah, either way there would be trouble.
Going back to styrene solved all my problems. I hope you've got yours resolved for good.
Here is my progress as of last night. Some final detail to the rear:
and closed up the cab for painting (before making it inaccessible with the roof). I figure removing tape will be easy enough, but applying it would have been insane from only that open driver's door:
cheers!
-Sean.
edit: thinking more, by the same logic, I could have installed all the windows first, and masked them from the outside. Ah, either way there would be trouble.
vonHengest
Joined: June 29, 2010
KitMaker: 5,854 posts
Armorama: 4,817 posts
Posted: Thursday, June 23, 2011 - 06:00 AM UTC
Phill: The new deck looks much better, it helps balance out the quad AA 
Sean: The shape is almost fully formed, looking good! So when are you going to be taking advanced orders for the first production run?

Sean: The shape is almost fully formed, looking good! So when are you going to be taking advanced orders for the first production run?

jmontey
Joined: May 30, 2011
KitMaker: 26 posts
Armorama: 24 posts
Posted: Friday, June 24, 2011 - 09:55 AM UTC
hey im having issues uploading photos. im new to the site and this is the first time i have done this. does anyone mind telling me how i can upload pics of my progress to the campaign
BigSmitty
Joined: October 01, 2008
KitMaker: 597 posts
Armorama: 439 posts
Posted: Friday, June 24, 2011 - 10:10 AM UTC
Jordan,
I hate to be a guy that says "Follow this link", but...
http://armorama.com/forums/120940&page=1
It is a step by step on uploading to your KitMaker gallery into posts. Much faster than I could explain it, and it has pretty pictures too!
I hate to be a guy that says "Follow this link", but...
http://armorama.com/forums/120940&page=1
It is a step by step on uploading to your KitMaker gallery into posts. Much faster than I could explain it, and it has pretty pictures too!
windysean
Joined: September 11, 2009
KitMaker: 1,917 posts
Armorama: 735 posts
Posted: Friday, June 24, 2011 - 10:19 AM UTC
Quoted Text
hey im having issues uploading photos. im new to the site and this is the first time i have done this. does anyone mind telling me how i can upload pics of my progress to the campaign
JMontey- there is a helpful thread written by Gary the campaigns administrator under Forums/Campaigns. The trick is to figure out a way for yourself to get the bb code for your photo and paste them in your post. For Kitmaker gallery photos, there's an icon next to the picture name, and it'll put the correctly-worded address in the box for you to copy. Speaking for myself, I use Flickr and there's a "Share" tab and "grab the bb code" box to copy the address from.
Hope that helps!
Jeremy- I grant anyone full intellectual rights to my idea to base a UPS truck on a Humvee chassis. Actually, you should probably be talking to United Parcel Service, since they'd have a bigger claim in this.


-Sean.
edit: see? In the time it took me to explain myself, Big Smitty got it in.
BigSmitty
Joined: October 01, 2008
KitMaker: 597 posts
Armorama: 439 posts
Posted: Friday, June 24, 2011 - 10:25 AM UTC
That's because I'm called me the "King of Cut and Paste". I knew I'd seen the question asked before; I just had to find the original post.
jmontey
Joined: May 30, 2011
KitMaker: 26 posts
Armorama: 24 posts
Posted: Friday, June 24, 2011 - 10:41 AM UTC
thanks for you help guys. pictures asap
jmontey
Joined: May 30, 2011
KitMaker: 26 posts
Armorama: 24 posts
Posted: Friday, June 24, 2011 - 10:58 AM UTC
jmontey
Joined: May 30, 2011
KitMaker: 26 posts
Armorama: 24 posts
Posted: Friday, June 24, 2011 - 10:59 AM UTC
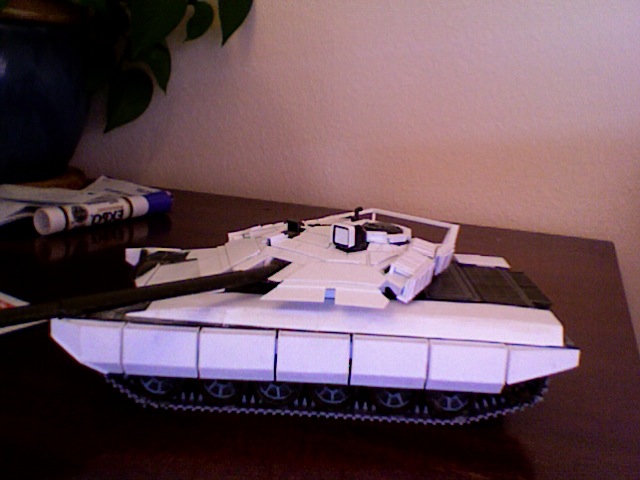
im gonna need a better camera

17741907

Joined: December 05, 2007
KitMaker: 953 posts
Armorama: 705 posts

Posted: Friday, June 24, 2011 - 11:26 AM UTC
Looking very interesting Jordan....Good luck and please keep posting mate.....

WARDUKWNZ
Joined: June 01, 2011
KitMaker: 1,716 posts
Armorama: 1,638 posts
Posted: Friday, June 24, 2011 - 12:31 PM UTC
Jordan thats looking seriously cool mate .. being a total tread head i love tanks and this one of yours is a real beauty ..can't wait to see it finished
WARDUKWNZ
Joined: June 01, 2011
KitMaker: 1,716 posts
Armorama: 1,638 posts
Posted: Friday, June 24, 2011 - 12:37 PM UTC
Sean i found a utterly simple way to get pics on here and it was by mistake ... mate of mine told me about Photobucket .. i was with imageshack ..annoying so i tryed photobucket ... once the pic is uploaded you just pass your mouse over the pic and it comes up with a list of codes ..the last one is IMG and just passing your mouse onto IMG it will copy that code automatically anf then you right click your mouse in here and bingo ..the pic is here ..so simple i even got it to work now i'm like the rest of you chaps and have nice big flashy pics and not the little ones i was stuck with before .
Thats my 2 cents
Phill
now i'm like the rest of you chaps and have nice big flashy pics and not the little ones i was stuck with before .Thats my 2 cents
Phill
WARDUKWNZ
Joined: June 01, 2011
KitMaker: 1,716 posts
Armorama: 1,638 posts
Posted: Friday, June 24, 2011 - 01:40 PM UTC
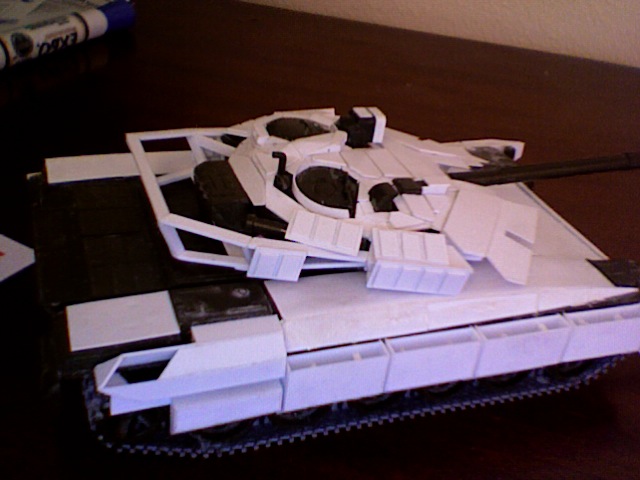
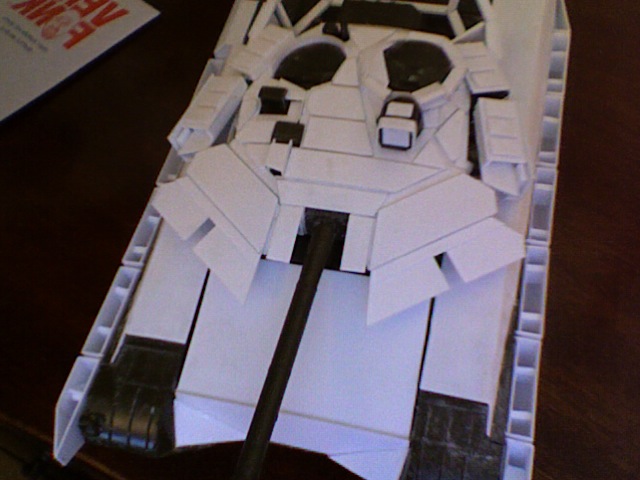
While i think about it heres some more update pics ..
The drivers position ..just don't look right to me
So it got axed

The new part i had in mind looks heaps better ,,comes from the turn table from the Trumpeter K5 rail gun

Needed to cut out the centers to make them look more like windows

Now it looks much better and more in line with the rest of the vehicle

From the front

The engine deck nearing its completion

Cheers
Phill
The drivers position ..just don't look right to me
So it got axed
The new part i had in mind looks heaps better ,,comes from the turn table from the Trumpeter K5 rail gun
Needed to cut out the centers to make them look more like windows
Now it looks much better and more in line with the rest of the vehicle
From the front
The engine deck nearing its completion
Cheers
Phill
BigSmitty
Joined: October 01, 2008
KitMaker: 597 posts
Armorama: 439 posts
Posted: Friday, June 24, 2011 - 02:57 PM UTC
2 thumbs way up on the rebuilt driver's position. Looks so much more the part than the first one. Really diggin' it!
WARDUKWNZ
Joined: June 01, 2011
KitMaker: 1,716 posts
Armorama: 1,638 posts
Posted: Friday, June 24, 2011 - 03:03 PM UTC
Cheers for they Matt ,, it just never worked ya know ? ,,the rest looks like super modern but this part looked like it was from the 70's ..its times like this i am glad i keep all my bits ..drives the girl friend nuts lol
,, it just never worked ya know ? ,,the rest looks like super modern but this part looked like it was from the 70's ..its times like this i am glad i keep all my bits ..drives the girl friend nuts lol BigSmitty
Joined: October 01, 2008
KitMaker: 597 posts
Armorama: 439 posts
Posted: Friday, June 24, 2011 - 03:09 PM UTC
Totally agree. You definitely needed something angular up top, and the old hatch just didn't do the rest justice. Looking really good.
WARDUKWNZ
Joined: June 01, 2011
KitMaker: 1,716 posts
Armorama: 1,638 posts
Posted: Friday, June 24, 2011 - 03:26 PM UTC
Thanks mate ... means alot to me that does ,,, but i just had another evil idea for this model lol .. yes it will be finished ,,i am putting my foot down ,,going to make some shields for the wheel rims ..i think they need them but the front will remain the same ,,the new front just seems to make this thing look more "in your face" .
Hell mate this i think this might end up looking pretty damn cool lol
Hell mate this i think this might end up looking pretty damn cool lol
windysean
Joined: September 11, 2009
KitMaker: 1,917 posts
Armorama: 735 posts
Posted: Friday, June 24, 2011 - 03:58 PM UTC
Yeah, Phill and Jordan, you've made some cool stuff. They barely look like their parents! Again, really well thought-out.
thanks for posting,
-Sean.
edit: Ha! I almost forgot my own update photos...


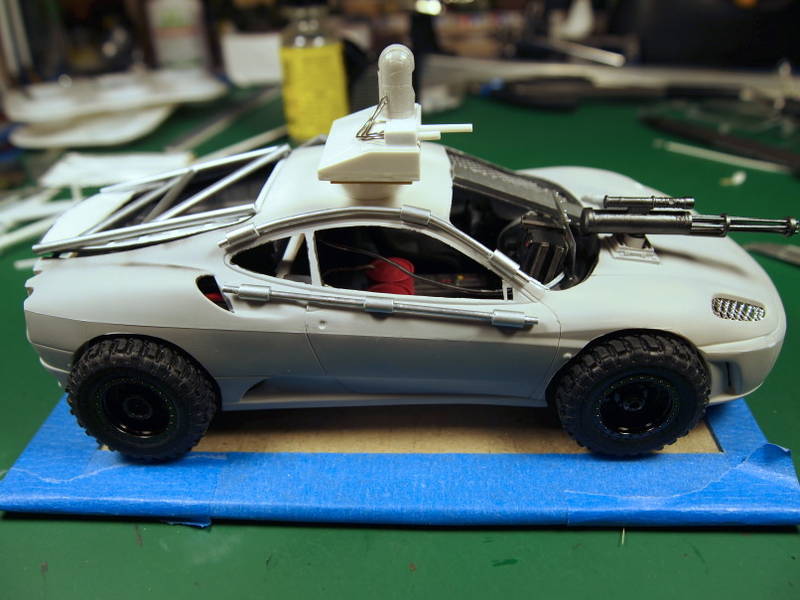
Glued on the roof-- let the front seam dry before bending it over the top and attaching the rest. When I rounded off the roof edges, I sanded some gaps into it, so I filled those with CA. Until a week or two ago, I would have struggled with green putty, but since my putty got old, I tried CA as a gap filler, and I realized what I've been missing-- especially in a situation like this, where I needed strength out of my filler material.
thanks again!
Again, really well thought-out.thanks for posting,
-Sean.
edit: Ha! I almost forgot my own update photos...
Glued on the roof-- let the front seam dry before bending it over the top and attaching the rest. When I rounded off the roof edges, I sanded some gaps into it, so I filled those with CA. Until a week or two ago, I would have struggled with green putty, but since my putty got old, I tried CA as a gap filler, and I realized what I've been missing-- especially in a situation like this, where I needed strength out of my filler material.
thanks again!
 |

WEB HOSTING BY


Copyright ©2021 Armorama and Kitmaker Network, a subsidiary of Silver Star Enterprises
All Rights Reserved. Please read our Conditions of Use and Privacy Policy.
All Rights Reserved. Please read our Conditions of Use and Privacy Policy.