Campaigns
Where Armorama group builds can be discussed, organized, and updates posted.
The Great War 11-11-11 (official thread)
Buckeye198
Visit this Community
Ohio, United States
Joined: May 02, 2010
KitMaker: 596 posts
Armorama: 265 posts
Posted: Sunday, June 10, 2012 - 02:09 PM UTC
Stephen, thanks for pointing that out! I don't know if you've built Roden's N.28 before but the landing gear was pretty tricky to fit at all...at least for an amateur like me Always great to receive your modeling wisdom though, and everyone's builds are looking fantastic
geogeezer
Visit this Community
Arizona, United States
Joined: February 17, 2011
KitMaker: 263 posts
Armorama: 258 posts
Posted: Sunday, June 10, 2012 - 03:58 PM UTC
Steph - thanks for the kind words. Your bus is coming along nicely. It looks ideal for a holiday trip to the mountains, without the pigeons of course.
Cheers,
Dick
RedDuster
Visit this Community
England - South East, United Kingdom
Joined: March 01, 2010
KitMaker: 7,078 posts
Armorama: 248 posts
Posted: Sunday, June 10, 2012 - 09:38 PM UTC
Great work on the trench Al, looks very real.

Bus is looking good too Steph.

The spiders have been busy, Signal Halyards finished on the foremast, and started on the mainmast.


Si
edoardo
Visit this Community
Milano, Italy
Joined: November 30, 2007
KitMaker: 642 posts
Armorama: 234 posts
Posted: Sunday, June 10, 2012 - 11:06 PM UTC
Hi folks!
time for an update!
Yes, I know, I have been a bit lazy... but I followed your great progress and learned a trick or two in the meantime...
now it is time to show some progress of mine...
First I want to show you the unweathered model. Pics where taken at night ime in my 'cave' so not the best quality...


As you can see, I started a little weathering here, but when I decided to apply the decals... disaster struck!

The Kit's decal film is thickest I have ever seen... and it is very difficult to make it adhere to the rivets... In frustration I decided to remove it, but then it peeled as a tape... leaving also the decal's paint underside on the model, but taking away my base coat...
fortunately I had some spares plane decals which I think can be used... so here is the final result:


Than I applied some weathering...


Hope you'll like it!


That's all for now!
all the best!
ciao
Edo
geogeezer
Visit this Community
Arizona, United States
Joined: February 17, 2011
KitMaker: 263 posts
Armorama: 258 posts
Posted: Monday, June 11, 2012 - 07:33 AM UTC

Quoted Text

Great work on the trench Al, looks very real.

Bus is looking good too Steph.

The spiders have been busy, Signal Halyards finished on the foremast, and started on the mainmast.


Si


Si, your ship looks fantastic. Discounting the stuff in the background, it looks like the real thing come back to life.

Edo, to my eyes, your tank is perfect. Terrific job on the weathering, and the mud and rust look exactly right.
Cheers

Dick
vonHengest
Visit this Community
Texas, United States
Joined: June 29, 2010
KitMaker: 5,854 posts
Armorama: 4,817 posts
Posted: Monday, June 11, 2012 - 11:37 AM UTC
Si: More rigging? Make sure you give those spiders a raise

Edo: That is one of several reasons that I've been avoiding those kits. You've done well with the challenge you've been presented with, of course knowing you that isn't a surprise

I don't think that I've seen so much diversity in a campaign before, and the amount of modifications and scratch building going on here is just incredible. I'm loving the dedication and I'm so pleased that every one of you has been trying something challenging to your skill levels. We have one stellar crew here for sure
RedDuster
Visit this Community
England - South East, United Kingdom
Joined: March 01, 2010
KitMaker: 7,078 posts
Armorama: 248 posts
Posted: Tuesday, June 12, 2012 - 07:37 PM UTC
Edo, The tank is looking superb, the weathering is great, very effective.

Jeremy, The spiders are aleady on four flies a day, any more and I won't be able to afford to complete the model.

Seriously, I agee the variety & quality of this campaign is stunning.

Si
edoardo
Visit this Community
Milano, Italy
Joined: November 30, 2007
KitMaker: 642 posts
Armorama: 234 posts
Posted: Tuesday, June 12, 2012 - 09:59 PM UTC
Hey, Si, Jeremy and all!
Thank you for the kind replies!

How would you link the unditching beam to the rail? I know there is a chain, but how you link that chain to the rail?
thank you guys!

ciao
Edo
vonHengest
Visit this Community
Texas, United States
Joined: June 29, 2010
KitMaker: 5,854 posts
Armorama: 4,817 posts
Posted: Thursday, June 14, 2012 - 03:22 PM UTC
Edo: It appears to be a chain operated system driven by an additional axle, I'll post a photo as soon as I have a chance to scan it.
AlanL
Visit this Community
England - East Anglia, United Kingdom
Joined: August 12, 2005
KitMaker: 14,499 posts
Armorama: 11,675 posts
Posted: Thursday, June 14, 2012 - 04:05 PM UTC
Hi Ed,

Terrific work on the tank, it looks superb. Well done Sir.

Al
geogeezer
Visit this Community
Arizona, United States
Joined: February 17, 2011
KitMaker: 263 posts
Armorama: 258 posts
Posted: Sunday, June 17, 2012 - 03:07 PM UTC
Hi All,
Slowly and somewhat unsurely we're getting there, having been passed by the tortoise, the hare, and several snails. Captain Williams' Model T is mostly painted, and it's all coming together after a good many wrong turns and pitfalls.


Right side view showing the side tank (Evergreen styrene tube with ends punched from thin styrene sheet with a paper punch) and the spare tire mount. The black cable (.45 mm beading wire) attached to the right front hub goes to the speedometer on the dashboard in front of the driver. Curiously, most Model T speedometer/odometers were mounted on the right, even on left hand drive cars. My guess is that the passenger was expected to do the navigating using the odometer, given the lack of reliable road maps and signage. The hanging cable must have been terribly vulnerable to getting snagged on the wretched roads of the time. The hubs were left unpainted because the fit on the axles is terrible and the wheels will have to be cemented in place.
Left side view, showing the condenser made from a 2 gallon "flimsy" (cut from styrene rectangular tubing) installed in the cowling. I chose to paint it green because that is the color Shell used for their "flimsies" at the time. The military hadn't yet established standards for such containers, so they came in the supplier's colors.
The hose from the radiator to the condenser is insulation stripped from the same wire used to make the radiator and condenser fittings. The hose connecting the left side of the engine block to the radiator is a piece of solder.
/>
View from above, showing the general layout. A lot of guesswork regarding the colors. It's very hard to interpret colors from a blank and white photo, but in the photo, the Captain's uniform looks very light, like faded khaki, and I based everything on that, some shades lighter, others darker and more towards olive drab. If anyone has other ideas, I'd be glad to hear them.

Right front quarter view, showing the mount (copper wire) for the right side tank. I am still uncertain about what color it should be. In the photo, it is much lighter than everything else, and I was wondering if it might have been unpainted galvanized steel. I haven't a clue as to what it contained. Could be either fuel or water. I can't see any sign of a cap or a tap in the photo, and it is mounted lower than the carburetor on the engine. Model T Fords don't have a fuel pump. The fuel tank is under the seat, and fuel flows by gravity to the carburetor. Since the side tank is secured by a strap, it could be lifted off and the contents poured into the main tank. My guess is that Captain Williams was an experienced desert hand and the tank may have been for water, both for drinking and for the radiator. According to the Australian Light Car Patrols, their condensers only recovered about 75% of the water which boiled over. It's quite possible that there was a similar tank on the left side, but I had only the one right side photo to go on and only built the one tank.

The wheels will be installed next after I do some work on the tires. I'm still working on the figure of Captain Williams. Once he's done, and after adding some straps to the side tank and spare tire mount, plus retouching the paintwork, the flivver will be finished. Hooray!
Cheers
Dick
RedDuster
Visit this Community
England - South East, United Kingdom
Joined: March 01, 2010
KitMaker: 7,078 posts
Armorama: 248 posts
Posted: Sunday, June 17, 2012 - 09:43 PM UTC
Looking very good indeed Dick, bags of character.

Finally the rigging on the Kent is done. This shows almost complete, the last pieces connecting the upper yards have been added , and just awaiting final triming.

,

The final peices have been trimmed and coloured, weathering has been finished off, Citedal Babak black wash has been applied around the funnel tops and the rigging and masts above the hieght of the funnel tops, heavier aft of the funnels.

I have decided, Kent being a coal burner and under way that I am going to have a bash at funnel smoke, I have drilled holes in the solid resin under the funnel caps, and fitted brass rod armatures to the 2nd and third funnels (the ship is slowing to enter port, so the fwd boilers are being drawn) The smoke will be formed from cotton wool sprayed with good old chaos black from a rattle can.


Si
Murdo
Visit this Community
Scotland, United Kingdom
Joined: May 25, 2005
KitMaker: 2,218 posts
Armorama: 1,050 posts
Posted: Monday, June 18, 2012 - 10:54 AM UTC
Smoke???

You're a brave man Si!

vonHengest
Visit this Community
Texas, United States
Joined: June 29, 2010
KitMaker: 5,854 posts
Armorama: 4,817 posts
Posted: Monday, June 18, 2012 - 11:54 AM UTC
Edo: Bare with me here, our modem went out and I can't connect to the printer or anything for that matter. I have limited time on the net thanks to alternate sources.

Dick: Aluminum shows up lighter, almost white, in photos than galvanized steel. Galvanized steel tends to show up as a darker gray, but it often depends on the lighting and what other tones are in close proximity. Both metals were readily available and affordable at the time. I can't imagine that the tank would be used for fuel, especially considering that it appears to be constructed in a way that it can easily be removed as you pointed out.

Si: You're just having all kinds of fun aren't you?
vonHengest
Visit this Community
Texas, United States
Joined: June 29, 2010
KitMaker: 5,854 posts
Armorama: 4,817 posts
Posted: Monday, June 18, 2012 - 11:59 AM UTC
Here is the unditching beam from the front,


This was a simple field mod. The way it was activated was by having crewmen climb on top of the tank and to attach the chains the the tracks, and the tracks would pull the beam down.


There is a more sophisticated system that I am trying to get a picture of for you Edo.
vonHengest
Visit this Community
Texas, United States
Joined: June 29, 2010
KitMaker: 5,854 posts
Armorama: 4,817 posts
Posted: Monday, June 18, 2012 - 12:50 PM UTC
Mark IV


Mark V


I'm not sure exactly what this is here, but the unditching beam is a common setup. Note the hole just above and towards the inside of the towing pintle? I believe this is where the drive axle for the automated unditching mechanism is attached.


edoardo
Visit this Community
Milano, Italy
Joined: November 30, 2007
KitMaker: 642 posts
Armorama: 234 posts
Posted: Monday, June 18, 2012 - 10:48 PM UTC
Thank you Jeremy!
those are really useful pics!
ciao
edo
AlanL
Visit this Community
England - East Anglia, United Kingdom
Joined: August 12, 2005
KitMaker: 14,499 posts
Armorama: 11,675 posts
Posted: Monday, June 18, 2012 - 11:07 PM UTC
Hi Richard,

Excellent looking build so far.

Hi Si,

Ship is looking better all the time, a super build.

Al
RedDuster
Visit this Community
England - South East, United Kingdom
Joined: March 01, 2010
KitMaker: 7,078 posts
Armorama: 248 posts
Posted: Tuesday, June 19, 2012 - 07:46 PM UTC
Murdo, Mad rather than brave I think
Jermey, I am having fun with this one
Al, Many thanks for you comments

On to the insanity, the smoke I am on a learning curve with this, One attempt before, which was ok, but could have been better. I have opened out some cotton wool balls and sprayed some citedal chaos black from a rattle can on to them.


these will then be sculpted on to the armatures sticking out of the funnels.

Si
Barbarossa
Visit this Community
United Kingdom
Joined: August 25, 2005
KitMaker: 216 posts
Armorama: 215 posts
Posted: Wednesday, June 20, 2012 - 01:00 AM UTC
Hey guys..

Excellent work on all the projects so far in this campaign, that tank Edoardo looks awesome..!!
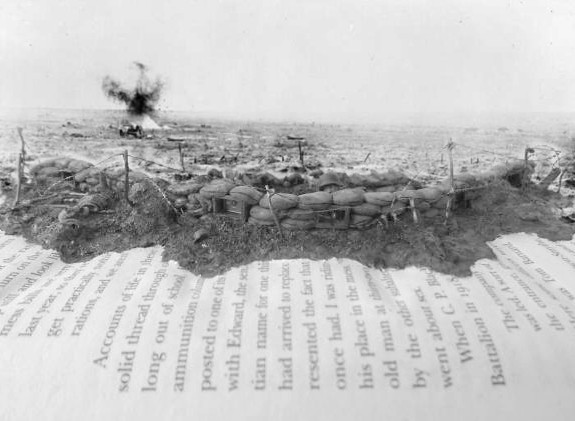
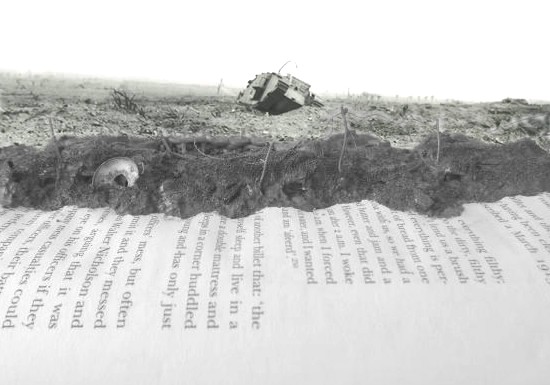
Well after all these months have finally finished my project. Deriving of the 2 opposing trenches on the 2 opposing sides of a book on World War 1, this was a fun & interesting challenge to do
Hope you like.....


The figure sets were from ICM, the other pieces from Verlinden & Plus Models. The rest of the trench system was built from scratch using plastic 7 paper card, twigs, milliput & plaster.
Thanks for looking..

SIMON.
cdharwins
Visit this Community
New Jersey, United States
Joined: October 28, 2006
KitMaker: 491 posts
Armorama: 462 posts
Posted: Wednesday, June 20, 2012 - 01:28 AM UTC
Simon,

WOW!! The trenches would be amazing on their own, but you presented them such a cool way. BRAVO!! I also like the B&W pics witht the contemporary pictures behind them. Truly incredible.

Chris
Tailor
Visit this Community
Nordrhein-Westfalen, Germany
Joined: May 26, 2008
KitMaker: 1,168 posts
Armorama: 256 posts
Posted: Wednesday, June 20, 2012 - 02:07 AM UTC
Most excellent work!
Bravo Zulu!
Guido
vonHengest
Visit this Community
Texas, United States
Joined: June 29, 2010
KitMaker: 5,854 posts
Armorama: 4,817 posts
Posted: Wednesday, June 20, 2012 - 02:54 AM UTC
Edo: Glad to be of help. I'm still looking if you need more photo references

Simon!!! You've finished!!! That is one amazing piece of work, congrats on a job very well done!
geogeezer
Visit this Community
Arizona, United States
Joined: February 17, 2011
KitMaker: 263 posts
Armorama: 258 posts
Posted: Wednesday, June 20, 2012 - 04:50 AM UTC

Quoted Text

Murdo, Mad rather than brave I think
Jermey, I am having fun with this one
Al, Many thanks for you comments

On to the insanity, the smoke I am on a learning curve with this, One attempt before, which was ok, but could have been better. I have opened out some cotton wool balls and sprayed some citedal chaos black from a rattle can on to them.


these will then be sculpted on to the armatures sticking out of the funnels.

Si


Hi Si,
I have to agree with Murdo. Brave and crazy too. Some model railroaders used to have smoke generators in their steam locomotives, so you might consider going that route. You'd probably need one for each funnel, and as I recall, the smoke was gray rather than the sooty black typical of coal burners.
Cheers
Dick
JackG
Visit this Community
Ontario, Canada
Joined: May 28, 2006
KitMaker: 172 posts
Armorama: 122 posts
Posted: Wednesday, June 20, 2012 - 05:49 AM UTC
The dio-book, what a great idea and awesome execution - love it!

Si, your ship is amazing with all those minute details. Funnel smoke created from cotton balls - now that brings back memories. I did this about 30 yrs ago with the Iron Duke. I shaped the cotton to the wires first. Then applied some black paint, going heavier at the end where the stacks were.

regards,
Jack