The Great War 11-11-11 (official thread)
Washington, United States
Joined: September 02, 2009
KitMaker: 227 posts
Armorama: 141 posts
Posted: Wednesday, June 20, 2012 - 07:00 AM UTC
Top photo is a MALE MKIV,
Center is a MALE MK V* (these were about 6ft longer than the Mk V)
Bottom photo is a FEMALE MKIV, the only external difference being the Machine Sponson in place of the Gun Sponson.
The unditiching beam and rails are identical between the Male and Female MK IVs. The unditching beam was attached to the tracks from an access hatch on the roof and rode the rails along the top, off the front then back on the rear. They were fitted to the MK IVs , MKVs, MKV*s and MKV** as part of the improvements from leasons learned from the MKI, The MKV added an armored hatch that gave some protection to the crew while the beam was been attached, which suggests that the unditching beam was effective in trench warfare, however most were removed after the war.
I am not aware of an automatic system.
Ian
Quoted Text
Mark IV
Mark V
I'm not sure exactly what this is here, but the unditching beam is a common setup. Note the hole just above and towards the inside of the towing pintle? I believe this is where the drive axle for the automated unditching mechanism is attached.
Arizona, United States
Joined: February 17, 2011
KitMaker: 263 posts
Armorama: 258 posts
Posted: Wednesday, June 20, 2012 - 09:09 AM UTC
Hi Simon,
A unique approach to a diorama and extremely well done.
Congratulations,


Dick
Quem não tem cão, caça com gato.
Texas, United States
Joined: June 29, 2010
KitMaker: 5,854 posts
Armorama: 4,817 posts
Posted: Wednesday, June 20, 2012 - 11:12 AM UTC
Quoted Text
Top photo is a MALE MKIV,
Center is a MALE MK V* (these were about 6ft longer than the Mk V)
Bottom photo is a FEMALE MKIV, the only external difference being the Machine Sponson in place of the Gun Sponson.
The unditiching beam and rails are identical between the Male and Female MK IVs. The unditching beam was attached to the tracks from an access hatch on the roof and rode the rails along the top, off the front then back on the rear. They were fitted to the MK IVs , MKVs, MKV*s and MKV** as part of the improvements from leasons learned from the MKI, The MKV added an armored hatch that gave some protection to the crew while the beam was been attached, which suggests that the unditching beam was effective in trench warfare, however most were removed after the war.
I am not aware of an automatic system.
Ian
Quoted Text
Mark IV
Mark V
I'm not sure exactly what this is here, but the unditching beam is a common setup. Note the hole just above and towards the inside of the towing pintle? I believe this is where the drive axle for the automated unditching mechanism is attached.
: This is for you.
Ian: Good info! The female Mk IV was listed as something odd such as a water tank, and I'm not sure what was meant by that.
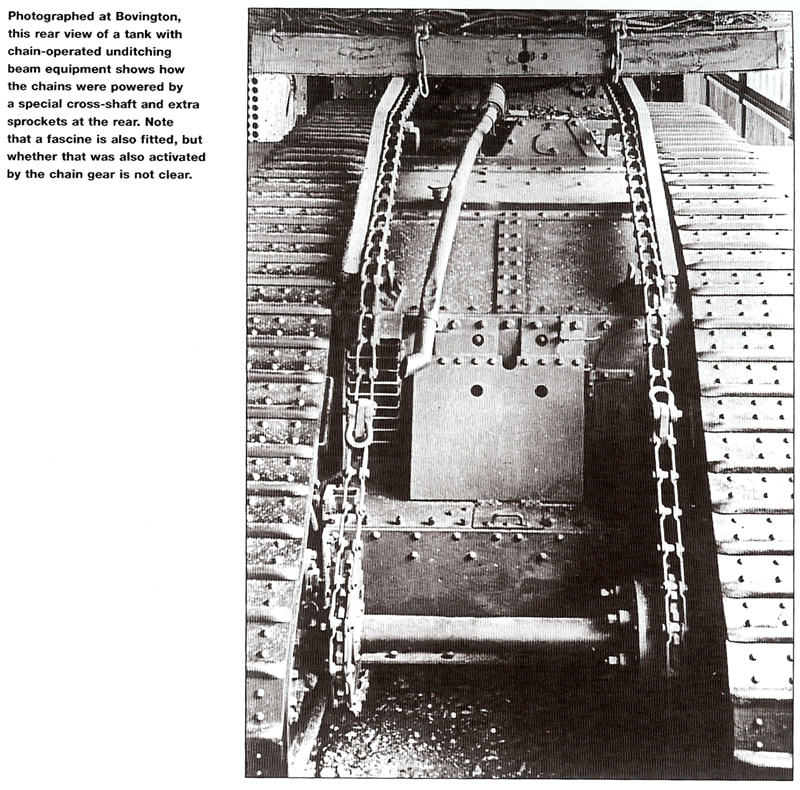
Regarding the automated system, here is the photo that I wanted to share, for discussion purposes only of course

England - South East, United Kingdom
Joined: March 04, 2007
KitMaker: 1,330 posts
Armorama: 1,017 posts
Posted: Wednesday, June 20, 2012 - 10:39 PM UTC
Hi all,
Today I am starting my entry for this campain. A Ford Model T, for The M.M.G.S It is a kit from RPM and I have to say the amount of flash on this kit is astounding. I think my best plan of attack is to remove the whole kit from the sprue before embarking on cleaning uo each piece individually. Anyway a few oics on here before I continue it as a build log....


Cheers all,
Paul
Colorado, United States
Joined: January 25, 2004
KitMaker: 11,669 posts
Armorama: 256 posts
Posted: Thursday, June 21, 2012 - 02:38 AM UTC
Wheels for the Roden 1/35 Rolls Royce armoured car. Kit #803


". . .The most important thing is to know why you build and then get the most that you can out of building." via D.D.
Milano, Italy
Joined: November 30, 2007
KitMaker: 642 posts
Armorama: 234 posts
Posted: Thursday, June 21, 2012 - 07:39 PM UTC
Hi Jeremy!
Thank you, my friend!
This is a very good picture indeed!
Now it is a lot clearer how it worked!
Problem is the additional chain and sprocket wheel will be very difficult to build...
Ian, thank you for the very useful info!
I'll let you know how it goes!
ciao
Edo
England - East Anglia, United Kingdom
Joined: August 12, 2005
KitMaker: 14,499 posts
Armorama: 11,675 posts
Posted: Thursday, June 21, 2012 - 10:32 PM UTC
Hi Simon,
Excennt work on the book dio, an very neat idea. Can I ask you which skeleton you used?
I though this was a terrific concept and it's turned out a treat.
Cheers
Al


'Action this Day'
Winston Spencer Churchill
United Kingdom
Joined: August 25, 2005
KitMaker: 216 posts
Armorama: 215 posts
Posted: Thursday, June 21, 2012 - 11:44 PM UTC
Hello guys....

Thanks for all the positive feedback on the book dio....very much appreciated!!
The skeleton Alan is from Verlinden, item #2019. It comes in a pack of two, one in a German uniform, the other is the one I used. I've included a link here :-
http://www.historexagents.com/shop/hxproductdetail.php?ProductCode=2019+&x=3&y=6Anyway, thanks again....
SIMON.

England - South East, United Kingdom
Joined: March 01, 2010
KitMaker: 7,078 posts
Armorama: 248 posts
Posted: Sunday, June 24, 2012 - 09:14 PM UTC
Finally got there.
The initial "sculpting" for forming of the smoke plumes looks messy.

sprayed black they look better.

finally fitted to the two after funnels.


Before anyone asks the reason for no smoke from the forward funnel, as the ship is approaching port, fires were drawn in boilers not required for manouvering powere
so they would be cooling for any maintainance.
Overall I am not unhappy with the effect, I know it could be better, but I think a coal burner depicted under way looks better with some nod to great plumes of black stuff coming out of the funnels.
She is done!
Will take some better pics & post them in the gallery soonest.
Si
Texas, United States
Joined: June 29, 2010
KitMaker: 5,854 posts
Armorama: 4,817 posts
Posted: Monday, June 25, 2012 - 12:42 PM UTC
Great work Si! I know that smoke is hard to replicate, but as you said it really helps add a little something extra to a steam powered ship. We're looking forward to those photos, and congrats on finishing!
Paul: Great choice!
Stephen: It looks like a little sanding really helped out on your wheels, it's always a bit scary to see stress marks showing up on parts because the fit is too tight.
Edo: My pleasure

I can't find any additional information on that chain operated system but I'll keep looking as time allows.
Simon: Thanks for the link, skeletons are always a welcome addition to any trench dio or vignette

Colorado, United States
Joined: January 25, 2004
KitMaker: 11,669 posts
Armorama: 256 posts
Posted: Tuesday, June 26, 2012 - 06:33 PM UTC
Basics and framework. You are right on the stress marks. tight fitting styrene parts can fail in the wrong places at the wrong times and then you prettymuch have to start from scratch.


". . .The most important thing is to know why you build and then get the most that you can out of building." via D.D.
Arizona, United States
Joined: February 17, 2011
KitMaker: 263 posts
Armorama: 258 posts
Posted: Wednesday, June 27, 2012 - 05:08 AM UTC
Nice job, Si,
The smoke looks much better than I imagined.
Congratulations ,


Dick
Quem não tem cão, caça com gato.
Milano, Italy
Joined: November 30, 2007
KitMaker: 642 posts
Armorama: 234 posts
Posted: Wednesday, June 27, 2012 - 04:57 PM UTC
Hi Si!
Your smoke is great!
Maybe is the pictures, but to me it is a little too "solid" if I may.... A little too heavy.... Why don't you highlight it with some gray or even white?
Ciao
Edo
England - East Anglia, United Kingdom
Joined: August 12, 2005
KitMaker: 14,499 posts
Armorama: 11,675 posts
Posted: Wednesday, June 27, 2012 - 06:00 PM UTC
Hi Simon.
You could try and fluff the smoke out a bit and try a contrast of greys/black/off white. The idea seems sound enough though.
Cheers
Al


'Action this Day'
Winston Spencer Churchill
England - South East, United Kingdom
Joined: March 01, 2010
KitMaker: 7,078 posts
Armorama: 248 posts
Posted: Wednesday, June 27, 2012 - 08:54 PM UTC
Nice work Stephen the Rolls Royce is coming on well.
Guys, thanks for the comments, in retrospect I think, Edo & Al you are right, the overall effect has come out somewhat too monocromatic, and could do with some grey from the middle going towards the ends of the plumes.
Next time I will stop with the spraying when i think it is not quite black enough. (I hope)
To be honest having had the fit of bravery in doing the smoke, I am now going to have a fit of at least temporary cowardice and leave alone for the time being.
Si
Milano, Italy
Joined: November 30, 2007
KitMaker: 642 posts
Armorama: 234 posts
Posted: Thursday, June 28, 2012 - 05:07 AM UTC
Hey Si!

I see your point... no need to touch up an exquisite model as yours!
The overall effect is great all the same! Keep the idea for the next time...
ciao
Edo
England - South East, United Kingdom
Joined: March 01, 2010
KitMaker: 7,078 posts
Armorama: 248 posts
Posted: Thursday, June 28, 2012 - 08:07 PM UTC
Thanks Edo,
Much appreciate your advise.
Si
New York, United States
Joined: November 07, 2010
KitMaker: 247 posts
Armorama: 208 posts
Posted: Saturday, June 30, 2012 - 10:56 AM UTC
Quoted Text
Well after all these months have finally finished my project. Deriving of the 2 opposing trenches on the 2 opposing sides of a book on World War 1, this was a fun & interesting challenge to do
Hope you like.....
Grest work, Simon. Your use of the book is excellent and inspiring.
Colorado, United States
Joined: January 25, 2004
KitMaker: 11,669 posts
Armorama: 256 posts
Posted: Tuesday, July 03, 2012 - 07:05 PM UTC

More of the chassis underside and the turret top with 4 contacts that need to be cleaned up.

". . .The most important thing is to know why you build and then get the most that you can out of building." via D.D.
Colorado, United States
Joined: January 25, 2004
KitMaker: 11,669 posts
Armorama: 256 posts
Posted: Tuesday, July 03, 2012 - 07:05 PM UTC

Once cleaned up the top fits well enough but still needs to have some light sanding to blend the seams.

". . .The most important thing is to know why you build and then get the most that you can out of building." via D.D.
Colorado, United States
Joined: January 25, 2004
KitMaker: 11,669 posts
Armorama: 256 posts
Posted: Tuesday, July 03, 2012 - 07:06 PM UTC
Note my earlier 1920 pattern armoured car kit.

Major components being finished and almost ready to unite. Since this will be an RNAS machine the instructions call out for a blue grey for a top coat. But! The new Osprey book by D. Fletcher says it was brown khaki. The first cars like this with turrets started showing up around Nov. 1914.

". . .The most important thing is to know why you build and then get the most that you can out of building." via D.D.
Texas, United States
Joined: June 29, 2010
KitMaker: 5,854 posts
Armorama: 4,817 posts
Posted: Tuesday, July 03, 2012 - 07:28 PM UTC
That Rolls Royce is looking good! I prefer the later pattern steel wheels, but the earlier wire wheels look really nice.
England - South East, United Kingdom
Joined: March 01, 2010
KitMaker: 7,078 posts
Armorama: 248 posts
Posted: Wednesday, July 04, 2012 - 10:34 PM UTC
Looking good Stephen, the wheels have come out really well.
Si
Izmir, Turkey / Türkçe
Joined: June 11, 2004
KitMaker: 1,426 posts
Armorama: 464 posts
Posted: Sunday, July 08, 2012 - 07:45 AM UTC
Hello dear friends,
I watched with pleasure the Campaign pages. Excellent work. Congratulations to everyone.
I also agree with a Whippet. Emhar 1/72 scale Whippet MKA, WWI medium tank.


All of them Braille Scale...
Ohio, United States
Joined: May 02, 2010
KitMaker: 596 posts
Armorama: 265 posts
Posted: Sunday, July 08, 2012 - 08:12 AM UTC
Simon, that is such an impressive build! It is absolutely inspiring me to build more ships, but without having a firm grasp on weathering (not to mention working with cotton, "water," etc.), I think I'm going to have to wait a bit. Very glad to see the end result here!


