Campaigns
Where Armorama group builds can be discussed, organized, and updates posted.
The Great War 11-11-11 (official thread)
AlanL
Visit this Community
England - East Anglia, United Kingdom
Joined: August 12, 2005
KitMaker: 14,499 posts
Armorama: 11,675 posts
Posted: Saturday, July 14, 2012 - 08:06 PM UTC
Hi Erhan,

Nice work so far on the Whippet,

Hi Stephen,

RR's look grand. Question, why the grey tyres on the second version?

Dick,

Excellent work and a great presentation.

Cheers

Al
JackFlash
Visit this Community
Colorado, United States
Joined: January 25, 2004
KitMaker: 11,669 posts
Armorama: 256 posts
Posted: Sunday, July 15, 2012 - 03:59 AM UTC

Quoted Text

". . .Hi Stephen,

RR's look grand. Question, why the grey tyres on the second version?

Dick,

Excellent work and a great presentation.

Cheers

Al"


Greetings!

Thank you for all of the kind words. Yes, the tires (tyres) tended to be lighter back during WWI. it was a matter of how much carbon black was added. There is a fine book by Osprey on the subject of Rolls Royce armoured cars by D. Fletcher that came out this year and tells a detailed story on these buckets. Great photo images there. I highly recommend it. Mine looks like it just left the factory at this time. It seems the white designation letters & numbers were used at home during training operations and overpainted soon after arrival on the European continent. The Naval insigne was of course in reference to the Royal Naval Air Service to which this car belonged.

barkingdigger
Staff MemberAssociate Editor
ARMORAMA
#013
Visit this Community
England - East Anglia, United Kingdom
Joined: June 20, 2008
KitMaker: 3,981 posts
Armorama: 3,403 posts
Posted: Monday, July 16, 2012 - 10:36 AM UTC
Hi all,

There's some great work going on here - but sadly not by me! My A7V has remained resolutely in the box, and suddenly it is July. Since there isn't enough time to do it justice before 11 September, I figured I'd join the party anyway with a cheeky little number - the Airfix 1:76 Mark I Heavy. I'm aware of all its issues and shortcomings, but am faced with a dilema - do I try to build it as Mother, as a serving Mk I, or as a Mk II converted to a supply tank?

Options 1 & 2 require hacking off the trapezoidal roof hatch, while all three require replacement of the exhaust muffler with baffles. The rivets are correct only for Mother, so I'd be shaving them for the other two. Oh, and Mother had a series of holes in the rear of the roof for air intake or something. If I go with Mother I can paint it silver-grey, while option 2 would be in Solomon J Solomon's funky hippy camo. Option 3 would be a drab khaki.

Decisions, decisions...

Tom
geogeezer
Visit this Community
Arizona, United States
Joined: February 17, 2011
KitMaker: 263 posts
Armorama: 258 posts
Posted: Monday, July 16, 2012 - 03:39 PM UTC
Hi All,
Thanks for the kind words.While waiting for the server problem to be resolved, I got started on the third and last of my Lindberg Model T kits, the worst by far in terms of warped parts. This one will be based on the following photo from the Australian War Memorial collection.
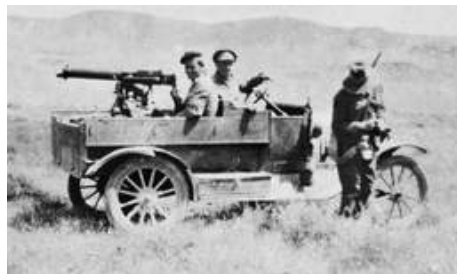
The Vickers gunner appears to be wearing a Scottish bonnet, and the car may belong to the group in the next photo, also from the AWM collection.

Can anyone identify the unit to which these troopers belong? I'm guessing Scots cavalry/yeomanry.
Cheers,
Dick
vonHengest
Visit this Community
Texas, United States
Joined: June 29, 2010
KitMaker: 5,854 posts
Armorama: 4,817 posts
Posted: Monday, July 16, 2012 - 03:58 PM UTC
Alan: To further Stephen's explanation, the natural color for rubber is basically white. It is what was originally used on motor vehicles, but it was found that they discolored too easily and the black that Stephen was mentioning was added to resolve this around the time that Rolls Royce was being used.
When you see a tire on a modern vehicle with raised white letters or a whitewall showing through, what you are seeing is the color of the rubber before it was coated. These areas are basically shaved after coating with the black skin to reveal the white underneath on the raised surface(s). You can scrape more of this off on an old tire if you are ever curious, or you can see it if you've rubbed a curb and revealed the white underneath.

Tom: I would have loved to have built my A7V for this campaign as well, but sadly won't be able to either. I am actually considering a Landships campaign for some time next year if you would like to save that beast for it. As for your build I think that building it as Mother would be very interesting, but I will make no effort to hide the fact that I favor the Solomon J Solomon camo scheme

Dick: I don't know enough to speak to your question. Once Bruce finishes recovering from his surgery I'm sure he can find you a good answer and possibly some additional information to go with it.

Anyone else have some insight into the photos Dick posted?
AlanL
Visit this Community
England - East Anglia, United Kingdom
Joined: August 12, 2005
KitMaker: 14,499 posts
Armorama: 11,675 posts
Posted: Monday, July 16, 2012 - 11:15 PM UTC
Hi Stephen, and Jeremy,

Thanks for the explanation.

Al
hofpig
Visit this Community
England - South East, United Kingdom
Joined: March 04, 2007
KitMaker: 1,330 posts
Armorama: 1,017 posts
Posted: Monday, July 16, 2012 - 11:29 PM UTC

Quoted Text

Hi All,
Thanks for the kind words.While waiting for the server problem to be resolved, I got started on the third and last of my Lindberg Model T kits, the worst by far in terms of warped parts. This one will be based on the following photo from the Australian War Memorial collection.

The Vickers gunner appears to be wearing a Scottish bonnet, and the car may belong to the group in the next photo, also from the AWM collection.
Can anyone identify the unit to which these troopers belong? I'm guessing Scots cavalry/yeomanry.
Cheers,
Dick


Hi Dick,

I have no real answers for you but try checking the list on this page.

http://www.1914-1918.net/mmg.htm

If you look at the detail under '10' battery it's listed as scotch battery so maybe its this one?

I found it quite useful trying to do the same as you.

Paul
geogeezer
Visit this Community
Arizona, United States
Joined: February 17, 2011
KitMaker: 263 posts
Armorama: 258 posts
Posted: Tuesday, July 17, 2012 - 06:55 AM UTC
Hi Paul,
Many thanks for the link. Unfortunately, it rather broadens the list of possibilities. One bit of evidence which helps date photos of Light Car Patrols is that Model T Fords built in 1916 and earlier have angular brass radiators. Ford changed to the rounded radiator in 1917. That narrows the window of time to be searched.
Thanks again,
Dick
geogeezer
Visit this Community
Arizona, United States
Joined: February 17, 2011
KitMaker: 263 posts
Armorama: 258 posts
Posted: Thursday, July 19, 2012 - 07:27 AM UTC
Hi All,
This is the start of my third Model T Ford light patrol car beginning with a Lindberg 1/32 scale kit with a badly warped chassis .

Photo of the kit, partly assembled with some parts primed.

Partly assembled. Sratch-built tray on the left. Hand brake and pedals on the floorboard relocated for right hand drive.

Front end view showing engine. Tires cut from plastic pipe are still unfinished.

Close up of Vickers machine gun and accessories after priming. The gun is from Airfix - WWII British Infantry Support Group. The gun itself is nicely detailed, but unfortunately the spade grip was molded with the gunner's hands wrapped around it. Fortunately, the spade grips for a 1/35 scale .50 Browning from an Academy US Machine Gun set fit perfectly. The Airfix Vickers gun came with a post WWI muzzle recoil booster which was way over scale and looked like a turnip stuck on the end of the barrel. I cut that off, drilled a small hole to take a short length of straight sewing pin, then glued a short piece of brass tubing over the pin with CA glue. The brass tube still needs filing to proper shape for a WWI recoil booster. The positioning of the condenser/water can was happenstance. It isn't attached there. The pedestal mount was scratch built.
Cheers
Dick
vonHengest
Visit this Community
Texas, United States
Joined: June 29, 2010
KitMaker: 5,854 posts
Armorama: 4,817 posts
Posted: Thursday, July 19, 2012 - 04:28 PM UTC
Speaking of Fords with angled brass radiators... glad to see you bringing one to the show Dick!
erhntly
Visit this Community
Izmir, Turkey / Türkçe
Joined: June 11, 2004
KitMaker: 1,426 posts
Armorama: 464 posts
Posted: Thursday, July 26, 2012 - 07:44 AM UTC
Hello everyone,
Some update for my Whippet

painting time ..


vonHengest
Visit this Community
Texas, United States
Joined: June 29, 2010
KitMaker: 5,854 posts
Armorama: 4,817 posts
Posted: Thursday, July 26, 2012 - 07:00 PM UTC
Thumbs up on the Whippet
cdharwins
Visit this Community
New Jersey, United States
Joined: October 28, 2006
KitMaker: 491 posts
Armorama: 462 posts
Posted: Friday, July 27, 2012 - 10:58 AM UTC

Quoted Text

Hello everyone,
Some update for my Whippet


Great job...you've inspired me to buckle down and finish my Whippet too!!
captnenglish
Visit this Community
California, United States
Joined: May 20, 2008
KitMaker: 1,184 posts
Armorama: 770 posts
Posted: Friday, July 27, 2012 - 11:44 AM UTC
Question, unreleted to the campaign, but releted to the Great War, would these figures be appropriate for the Easter Rising? I am sure I will have to change the heads on the Private and the Sergeant, if for no other reason than to make them the same regiment.
http://www.redlancers.com/displaypic.asp?item=26514&hot=
http://www.redlancers.com/displaypic.asp?item=26516&hot=
http://www.redlancers.com/displaypic.asp?item=26664&hot=
barkingdigger
Staff MemberAssociate Editor
ARMORAMA
#013
Visit this Community
England - East Anglia, United Kingdom
Joined: June 20, 2008
KitMaker: 3,981 posts
Armorama: 3,403 posts
Posted: Saturday, July 28, 2012 - 12:05 AM UTC
Some great stuff here - Erhan, that Whippet is looking very nice!

My own effort is the Airfix Mk1, a bit of a mixed bag of Mother, Mk2, and later parts. I decided to backdate it to a Mk1 in service, so off came some rivets, the roof hatches, and muffler. I then added about a million new rivets from shavings of 0.010" rod , as well as the other details. I didn't widen the cab, but will live with it.

I'm not happy with the stiff (and short!) vinyl tracks, but cannot see an easy way to replace them without disproportinate cost. I thought about using 0.100"-spaced V-groove siding with rods laid in the grooves to make new tracks, but there are way too many rivets that would be needed. So I slipped on the Airfix tracks just to see, and found I can't get 'em off again! Guess I'll use them after all...


There's a gap in the lower track run, but if I bed it into some mud nobody will see it. And although you can't see it in these pics I did add the lower plate to the front towing eye. There are lots of other things that could be fixed, but if I really wanted an accurate model I wouldn't start from here!

Tom
geogeezer
Visit this Community
Arizona, United States
Joined: February 17, 2011
KitMaker: 263 posts
Armorama: 258 posts
Posted: Sunday, July 29, 2012 - 04:01 PM UTC
Erhan, your Whippet is looking great.

Tom, the Mk I is an interesting project. I don't think I'd have the patience to stick on thousands of individual rivets.
cheers,
Dick
edoardo
Visit this Community
Milano, Italy
Joined: November 30, 2007
KitMaker: 642 posts
Armorama: 234 posts
Posted: Monday, July 30, 2012 - 12:20 AM UTC
Hi guys!
It has been a while since my last update, but here I am with a fiew new pics!
The tank and diorama are almost complete... problem is: I don't think the figures will fit it...
In fact, not only the story will not look convincing (as someone of you has already pointed out) but also their poses will be completely inappropriate. It will be much better to have an infantryman run for cover than lay down into a 2 mt high trench and try to hit a tank passing over...
anyway, here are some pictures...


I hope you'll enjoy them...
As usual: any comment is highly welcome!

ciao
Edo
erhntly
Visit this Community
Izmir, Turkey / Türkçe
Joined: June 11, 2004
KitMaker: 1,426 posts
Armorama: 464 posts
Posted: Monday, July 30, 2012 - 07:32 AM UTC
Hello everyone, Thank you all.
All of them very nice job ..
I have a very good power this campaign. whippet" is my first WW1 model. I can do one more.
cheers...
AlanL
Visit this Community
England - East Anglia, United Kingdom
Joined: August 12, 2005
KitMaker: 14,499 posts
Armorama: 11,675 posts
Posted: Monday, July 30, 2012 - 08:50 AM UTC
Hi Eran,

The Whippet is looking good, nice work.

Tom,

Off to a good start. The Airfix kits take me back a few years.

Edoardo,

Great work and looking very good. Maybe a bit more dusty looking around the fron lower hull. Nice trench.

Al
geogeezer
Visit this Community
Arizona, United States
Joined: February 17, 2011
KitMaker: 263 posts
Armorama: 258 posts
Posted: Monday, July 30, 2012 - 03:37 PM UTC
Hi Edu,
Nice work on the tank and trench. You have a nice touch with mud and rust. You might smear a little mud on the planks and posts in the trench, perhaps seeping between the boards.
Cheers,
Dick
halfriday
Visit this Community
Vermont, United States
Joined: January 19, 2012
KitMaker: 18 posts
Armorama: 10 posts
Posted: Tuesday, July 31, 2012 - 12:35 AM UTC
Looking really good, all. Edo - I like the mix of the stagnation of the trench and dynamism of the tank handily going over those 1914 defenses - tells an important story of WWI tech advancements in one dio.

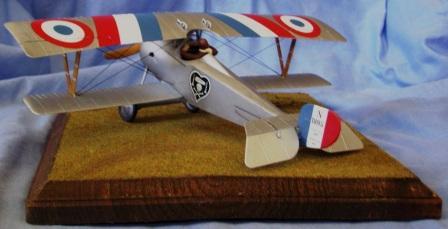
I'm still fighting the rigging on a Nieuport - my first rigging job. Photos pending.

Hal
halfriday
Visit this Community
Vermont, United States
Joined: January 19, 2012
KitMaker: 18 posts
Armorama: 10 posts
Posted: Tuesday, July 31, 2012 - 01:53 AM UTC
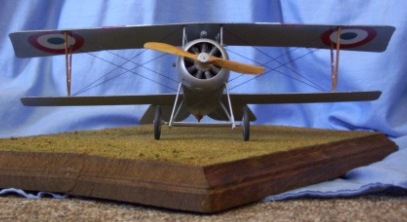
Here it is: the Academy Nieuport 17 in 1:32 scale. Mostly stock, though I made the pilot out of an Academy ROK tanker's head and a DML door gunner's torso, sculpted to a flying uniform of the time. Rigging my first plane was a challenge, and the Academy decals were every bit as persnickety as I'd heard. Still, I'm pretty happy to add the Nungesser Nieuport to my collection.


JackFlash
Visit this Community
Colorado, United States
Joined: January 25, 2004
KitMaker: 11,669 posts
Armorama: 256 posts
Posted: Tuesday, July 31, 2012 - 02:31 AM UTC
Here you go.


Tailor
Visit this Community
Nordrhein-Westfalen, Germany
Joined: May 26, 2008
KitMaker: 1,168 posts
Armorama: 256 posts
Posted: Tuesday, July 31, 2012 - 02:33 AM UTC
Excellent work and super photos, Edo!
Cheers,
Guido
edoardo
Visit this Community
Milano, Italy
Joined: November 30, 2007
KitMaker: 642 posts
Armorama: 234 posts
Posted: Tuesday, July 31, 2012 - 03:03 AM UTC
Guido, Hal and all:
Thank you guys!!!
ciao
Edo