Jasta 7 commander at left. Jasta 29 commander at right.
Campaigns
Where Armorama group builds can be discussed, organized, and updates posted.
Where Armorama group builds can be discussed, organized, and updates posted.
Hosted by Darren Baker, Richard S.
The Great War 11-11-11 (official thread)

JackFlash

Joined: January 25, 2004
KitMaker: 11,669 posts
Armorama: 256 posts

Posted: Monday, August 13, 2012 - 08:21 AM UTC
Here are a couple of 1:48 Fokker D.VII kits I am building. Touch ups, rigging & propellers.
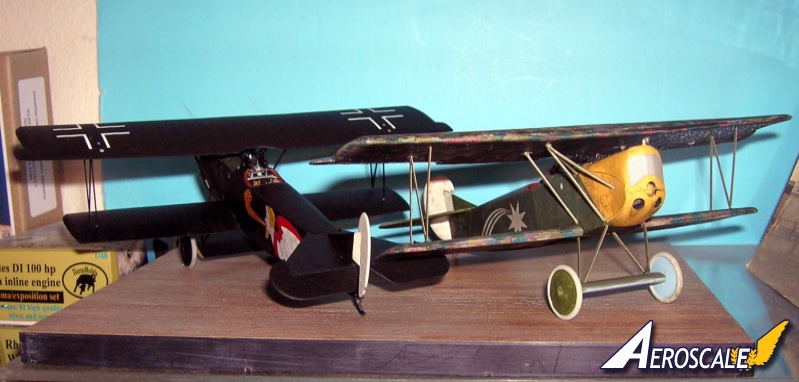
Jasta 7 commander at left. Jasta 29 commander at right.
Jasta 7 commander at left. Jasta 29 commander at right.

Buckeye198

Joined: May 02, 2010
KitMaker: 596 posts
Armorama: 265 posts

Posted: Monday, August 13, 2012 - 09:18 AM UTC
Stephen, we can always count on you for impressive WWI birds! Are these the Roden kits that I myself struggled with over a year ago with the KotS group build? 

BigSmitty

Joined: October 01, 2008
KitMaker: 597 posts
Armorama: 439 posts

Posted: Monday, August 13, 2012 - 03:33 PM UTC
Monday night and another update is due. Hans Franz and Gunther (the dead guy) all got some updated paint. Painting figures is one thing. Painting a skeleton in partial clothing buried in dirt is a whole 'nother beast. I gave it my best shot for the base colors. I also laid down a brushed on coat of Future on the wine bottle for a glassy look. It turned out OK. Keep in mind that most of the base elements will be misted with dust and I'll be cleaning up paint goof ups after I get a good feel for the colors.
I also redid the walls, using a slightly darker color and wiping most off (like a drybrush treatment) but then worked the paint into the cracks, blending in as I could. I think it looks fine, but I'm not an art major...far from it.
Anyways, here are some photos from tonight's efforts:


I also redid the walls, using a slightly darker color and wiping most off (like a drybrush treatment) but then worked the paint into the cracks, blending in as I could. I think it looks fine, but I'm not an art major...far from it.
Anyways, here are some photos from tonight's efforts:

JackFlash

Joined: January 25, 2004
KitMaker: 11,669 posts
Armorama: 256 posts

Posted: Monday, August 13, 2012 - 05:10 PM UTC
Quoted Text
Here are a couple of 1:48 Fokker D.VII kits I am building. Touch ups, rigging & propellers. Jasta 7 commander at left. Jasta 29 commander at right.
Quoted Text
Stephen, we can always count on you for impressive WWI birds! Are these the Roden kits that I myself struggled with over a year ago with the KotS group build?
Greetings Robby, Not these two. They are highly modified DML / Dragon kits. I am doing a diorama that will include many of the decals I have in the D.VII 3 ring binder of mine.
The Bitter End
Here is the kit review I posted on these kits

windysean

Joined: September 11, 2009
KitMaker: 1,917 posts
Armorama: 735 posts

Posted: Tuesday, August 14, 2012 - 12:38 AM UTC
Smitty, Gunther and all the other painting is looking good. I'd say Gunther in particular would have stained his clothing, but I'm sure you've got some weathering ideas to bring him along. Excited to see that scene develop!
Here's my progress photo. I've gotten near the end of the kit parts I'll use (except the wheels), and I'll scratchbuild most other parts from here on out...

If you really squint, you can see that I closed up the space in the firewall where the steering shaft used to pass for left-hand-drive, and I sanded off the pedals and filled the location for the shifter. (Of course the pedals were molded to the floor, and any modeler worth his salt would replace them with scratch pedals anyway, right? )
)
Anyway, moving along!
cheers,
Sean H.
Here's my progress photo. I've gotten near the end of the kit parts I'll use (except the wheels), and I'll scratchbuild most other parts from here on out...

If you really squint, you can see that I closed up the space in the firewall where the steering shaft used to pass for left-hand-drive, and I sanded off the pedals and filled the location for the shifter. (Of course the pedals were molded to the floor, and any modeler worth his salt would replace them with scratch pedals anyway, right?
 )
)Anyway, moving along!
cheers,
Sean H.

RedDuster

Joined: March 01, 2010
KitMaker: 7,078 posts
Armorama: 248 posts

Posted: Tuesday, August 14, 2012 - 07:07 AM UTC
Looking really good guys, some great builds going on.
Si
Si

Buckeye198

Joined: May 02, 2010
KitMaker: 596 posts
Armorama: 265 posts

Posted: Tuesday, August 14, 2012 - 07:44 AM UTC
Stephen, you are a biplane beast!! The DML kits look nice...nicer than the Roden, to say the least, and the spare parts are really making a good impact on the overall look of the birds. I highly recommend that everyone in this campaign take a look at Stephen's diorama-in-progress. Truly amazing work!!
cdharwins

Joined: October 28, 2006
KitMaker: 491 posts
Armorama: 462 posts

Posted: Tuesday, August 14, 2012 - 11:02 AM UTC
More work on my Whippet. I decided to go with the same markings as the one on display at CFB Borden in Canada. I used Tamiya khaki drab as the overall color, and I painted the white/red/white recognition stripes (also Tamiya). It was the first time I've done that kind of masking. It needs a little touch-up in spots, but I'm very happy with the results:


Thanks for looking!! Keep on modeling!!
Chris
Thanks for looking!! Keep on modeling!!

Chris
Tailor

Joined: May 26, 2008
KitMaker: 1,168 posts
Armorama: 256 posts

Posted: Tuesday, August 14, 2012 - 05:22 PM UTC
Great looking Whippet!
Looking forward to seing it worn and torn!
Cheers,
Guido
Looking forward to seing it worn and torn!
Cheers,
Guido
Posted: Thursday, August 16, 2012 - 01:24 AM UTC
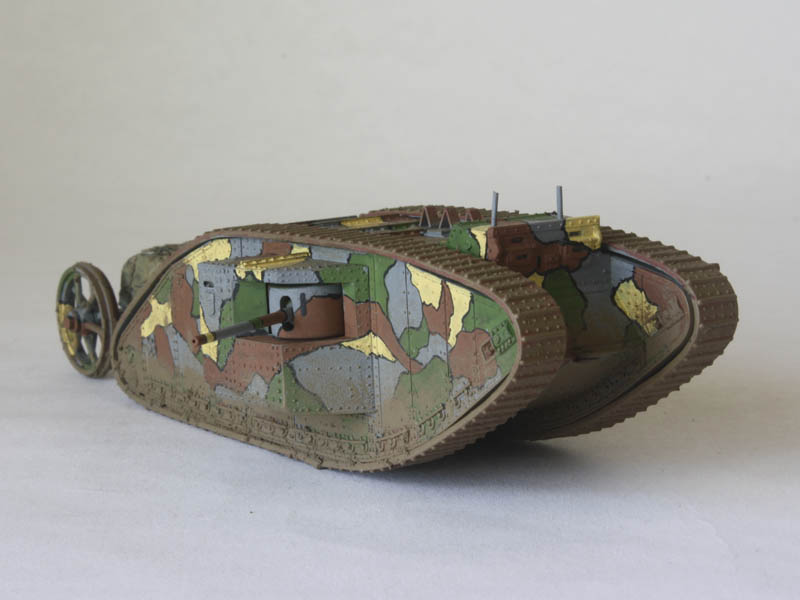
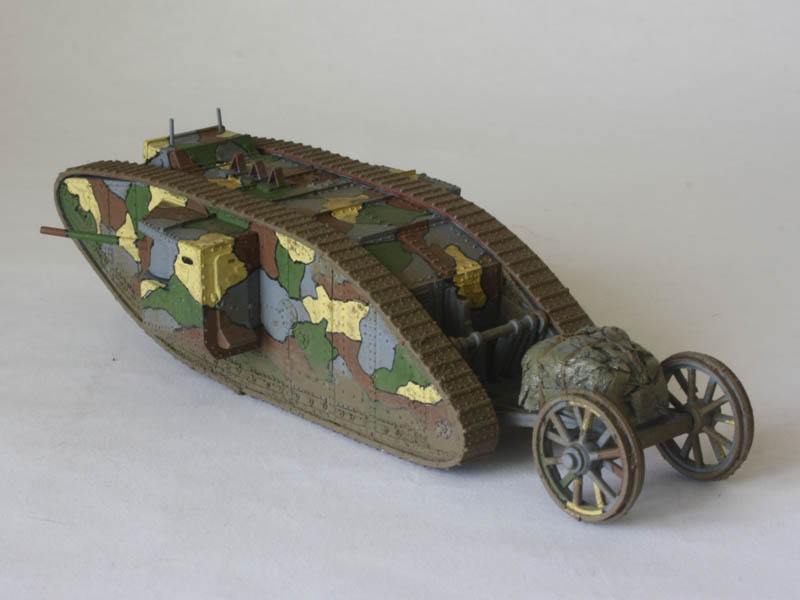
Brief update on my Mk1 - I've been playing in the mud! I went Old Skool and mixed some plaster dust into paint to create a clumpy mess that matched what I'd already used. It ruins the paintbrush, so I used an old one that only comes out for agressive drybrushing etc, and mixed the stuff in a flexible plastic cap (from tractor radiators, I believe - a guy in the club brings em in by the bag-ful) so I can preserve the bulk of the paint tin. (Humbrol 29, dark earth...) Best of all, it helps fill the gaps around the hull!


More work to come.
Tom


More work to come.
Tom

Buckeye198

Joined: May 02, 2010
KitMaker: 596 posts
Armorama: 265 posts

Posted: Thursday, August 16, 2012 - 02:13 AM UTC
Color is muddy, texture seems muddy, clumps up like mud...must be mud!  Good job, Tom! Looking forward to your next update
 Good job, Tom! Looking forward to your next update
JackFlash

Joined: January 25, 2004
KitMaker: 11,669 posts
Armorama: 256 posts

Posted: Friday, August 17, 2012 - 02:02 AM UTC
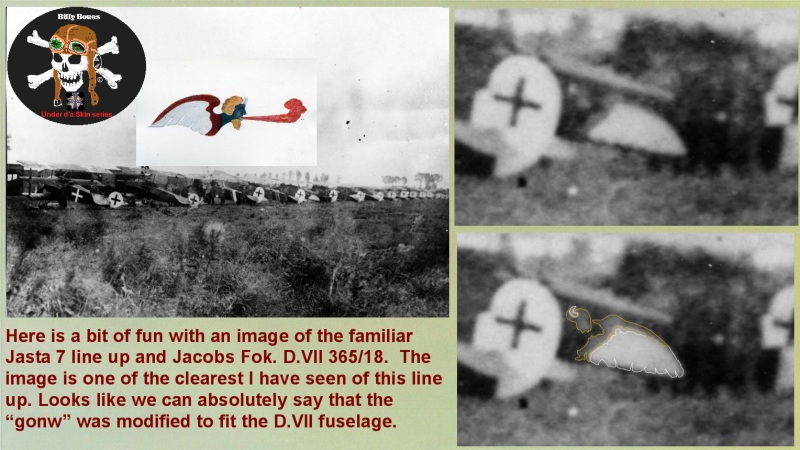
Jasta 7 line up about mid June 1918.


JackFlash

Joined: January 25, 2004
KitMaker: 11,669 posts
Armorama: 256 posts

Posted: Friday, August 17, 2012 - 02:03 AM UTC
Here is the highly modified DML / Dragon 1:48 Fokker D.VII in the markings of D.365/18 flown by Ltn. Josef Jacobs Cmdr of Jasta 7. He was actually in Berlin at the 3rd type testing competition and his machines were flown to Nivelles by other Jasta 7 pilots. The personal markings are from the old Eagle Strike sheet.

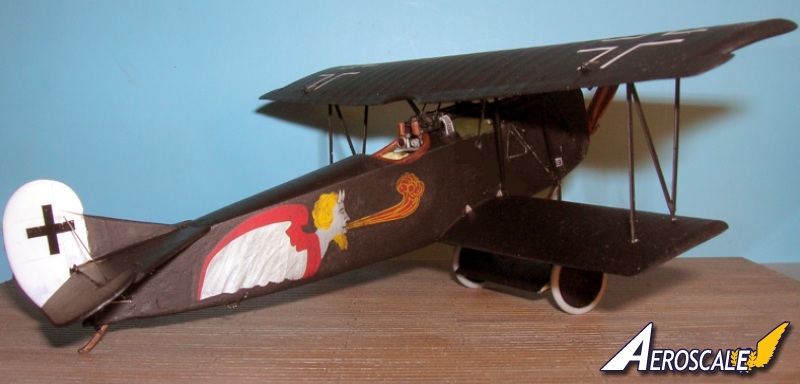
I have portrayed it with a BMW motor, Heine propeller with a Rupp quick release prop hub.


I have portrayed it with a BMW motor, Heine propeller with a Rupp quick release prop hub.

vonHengest

Joined: June 29, 2010
KitMaker: 5,854 posts
Armorama: 4,817 posts

Posted: Saturday, August 18, 2012 - 08:07 AM UTC
I just wanted to take a moment to let all of you know that I am keeping an eye on all the wonderful work going on here. I am currently working on getting everything from my Vietnam campaign wrapped up which is taking up a fair amount of time. I want to take some time and leave my comments for the outstanding progress that's being made here as soon as I have that opportunity.
Keep up the spectacular work gentlemen!

Keep up the spectacular work gentlemen!


JackFlash

Joined: January 25, 2004
KitMaker: 11,669 posts
Armorama: 256 posts

Posted: Wednesday, August 22, 2012 - 08:40 PM UTC
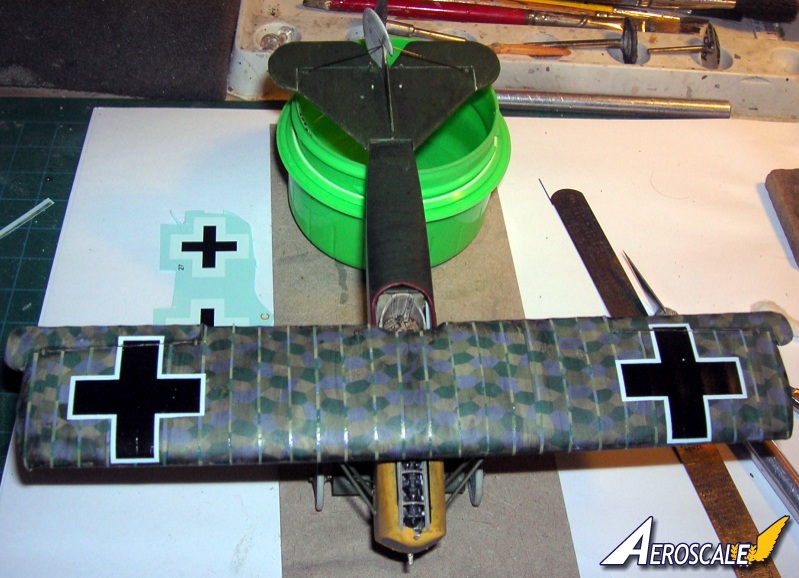
Fokker D.VII 387/18 from the top.

erhntly

Joined: June 11, 2004
KitMaker: 1,426 posts
Armorama: 464 posts

Posted: Friday, August 24, 2012 - 07:39 PM UTC
Hello everyone,
Super production in this campaign, everything is very nice...
My little Whippet pictures coming. I've uploaded to the gallery.
Cheers..


Super production in this campaign, everything is very nice...

My little Whippet pictures coming. I've uploaded to the gallery.
Cheers..


Posted: Sunday, August 26, 2012 - 08:36 AM UTC
Well done Erhan & Stephen! I too have finished - photos are in the gallery! I do plan to put it on a base, but I'm not sure it'll happen before the campaign ends.
Jeremy, thanks for a fun & informative campaign! We need another next year, so I can finally tackle that A7V...
Tom


Jeremy, thanks for a fun & informative campaign! We need another next year, so I can finally tackle that A7V...

Tom

windysean

Joined: September 11, 2009
KitMaker: 1,917 posts
Armorama: 735 posts

Posted: Sunday, August 26, 2012 - 02:22 PM UTC
Chris, Erhan, Stephen, and Tom, those are some beauties there.
...but I'll post my updates anyway!

Here I've completed the floorboard details and switched to right-hand drive. Then...

I thought I was smart, got a photo of a model T engine and copied the distributor-- cut away insulation on a stranded wire, cyano-acrylate on the ends to keep the wires from falling out...

Rechecked internet photos of Model T engines, because my WW I photo engines didn't look right-- discovered that I was using someone's worked-over Model T as my example (top photo) and cut out my new distributor to model the bottom photo, which better matches the WW I ones.
...and slightly more progress:

The house seems to be falling in around me. The washing machine, a ceiling fan, and the kids' school registration are among all the things conspiring against my build, but it's coming along!
Cheers!
-Sean H.
...but I'll post my updates anyway!


Here I've completed the floorboard details and switched to right-hand drive. Then...

I thought I was smart, got a photo of a model T engine and copied the distributor-- cut away insulation on a stranded wire, cyano-acrylate on the ends to keep the wires from falling out...

Rechecked internet photos of Model T engines, because my WW I photo engines didn't look right-- discovered that I was using someone's worked-over Model T as my example (top photo) and cut out my new distributor to model the bottom photo, which better matches the WW I ones.
...and slightly more progress:

The house seems to be falling in around me. The washing machine, a ceiling fan, and the kids' school registration are among all the things conspiring against my build, but it's coming along!

Cheers!
-Sean H.

BigSmitty

Joined: October 01, 2008
KitMaker: 597 posts
Armorama: 439 posts

Posted: Sunday, August 26, 2012 - 03:03 PM UTC
Sean,
I'll see you your school registration, ceiling fan, and washing machine, and raise you one air conditioning unit and two closet gutting/remodels this weekend (my wife and daughter).
I still managed to get a ladder built on my vignette, and make our dead guy a little more... well... dead looking. Also finally got some color on most of the accessories (just have the two packs/tents left). It's coming along. I think I'll be able to pull this one out of the bootay just in time, lest Jeremy release his hounds on me!
Dead guy looking much more "dead":


Gear looking a bit more usable than before:


The ladder rungs in place:

As I said, it's getting there, and I'm learning quite a bit on figure painting. Still have the bulk of the painting left on both the centerpiece figures on this one, including hair AND a mustache... what the hell was I thinking?
Lots of good stuff here in the final couple of weeks... Better get that target...err Model T finished up Sean
I'll see you your school registration, ceiling fan, and washing machine, and raise you one air conditioning unit and two closet gutting/remodels this weekend (my wife and daughter).
I still managed to get a ladder built on my vignette, and make our dead guy a little more... well... dead looking. Also finally got some color on most of the accessories (just have the two packs/tents left). It's coming along. I think I'll be able to pull this one out of the bootay just in time, lest Jeremy release his hounds on me!
Dead guy looking much more "dead":
Gear looking a bit more usable than before:
The ladder rungs in place:
As I said, it's getting there, and I'm learning quite a bit on figure painting. Still have the bulk of the painting left on both the centerpiece figures on this one, including hair AND a mustache... what the hell was I thinking?
Lots of good stuff here in the final couple of weeks... Better get that target...err Model T finished up Sean

RedDuster

Joined: March 01, 2010
KitMaker: 7,078 posts
Armorama: 248 posts

Posted: Sunday, August 26, 2012 - 10:18 PM UTC
Great Looking Dio Matt, figures and skeleton are impressive.
Si
Si
geogeezer

Joined: February 17, 2011
KitMaker: 263 posts
Armorama: 258 posts

Posted: Monday, August 27, 2012 - 04:30 AM UTC
Hi Sean,
Your flivver is coming along nicely. Glad you caught the lack of a distributor in time. All the ignition wiring goes to terminals on the firewall. Hope your kit's tires fit better than the ones I got did.
Cheers

Dick
Your flivver is coming along nicely. Glad you caught the lack of a distributor in time. All the ignition wiring goes to terminals on the firewall. Hope your kit's tires fit better than the ones I got did.
Cheers


Dick

windysean

Joined: September 11, 2009
KitMaker: 1,917 posts
Armorama: 735 posts

Posted: Monday, August 27, 2012 - 05:39 AM UTC
Matt, you're really knocking it out! That's some very effective painting and effects. (is that redundant?)
Dick, thanks for the comments and well-wishes. I hope mine fits as well or better than the kit you had. Test-fitting seemed alright, but I'll slather on some tacky craft glue around the rims and hopefully fill the slop in the tires that way. We'll see. I glued on the wheels without tires for now, waiting until after painting.
-Sean H.


BigSmitty

Joined: October 01, 2008
KitMaker: 597 posts
Armorama: 439 posts

Posted: Monday, August 27, 2012 - 03:40 PM UTC
Thanks, Sean! Spent more time tonight reworking some pigments (first time) and they came out OK, but I'm no expert, I'll defer to you guys. I was trying for the "wet, drying mud underneath, with drier mud on top" look, if there is one:

Oh, and while searching my Osprey book on German Stormtroopers in WWI, I came across this gem:
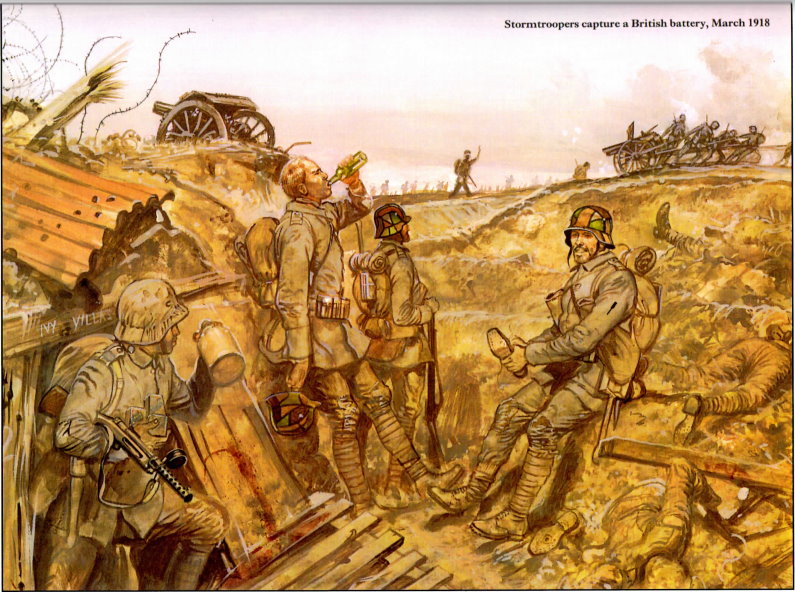
See the guy knocking back a brew? That's Hans. And Franz is taking the laces out of a dead Tommy. It's what Verlinden used as the basis for this vignette. Of course the dead Tommy would be nice, as I kept trying to figure out why the seated trooper was pouring something out of his shoe, when he was WEARING both of his boots. Mystery solved.
SPEAKING of the seated trooper, whoever designed that crazy camo scheme for the helmet must have been the father (uncle, second cousin twice removed) of the dude who designed the Wehrmacht splinter camo for WWII. I did my best to replicate it, but holy cripes, it's tough:


I also had some fun with Future, or Pledge Floor Shine or whatever they call it now. In the kit there is a pail and a milk jug included. Now, milk would have spoiled, but I figure they were too lazy to dump it out, so I took some Tamiya Smoke (X-19 for those playing at home) and filled it up, layer by layer. For the pail I painted the top with Vallejo Sepia wash (which dries flat) then built up successive layer of Future. Yeah, it was a slow night, like watching...
FUTURE DRY!
Anyways, here are my results. I think I'll stage the jug tipped over and spilling some green slimy water out or something:


Oh, yeah the dead guy got some more treatment tonight, including some nice Verlinden Barbed Wire tangled about him, and up on the fence posts. That stuff, while it looks real, is a PAIN to install. The fact that it is so old it was rusted in the bag probably didn't help. Either way, it's up and rusted and looking really, well, barbed, I guess.

Well, that's about all for tonight. Tomorrow I might actually try to get Hans' hair done. Wait, that sounded all wrong. Bah, you guys know what I mean...
Oh, and while searching my Osprey book on German Stormtroopers in WWI, I came across this gem:

See the guy knocking back a brew? That's Hans. And Franz is taking the laces out of a dead Tommy. It's what Verlinden used as the basis for this vignette. Of course the dead Tommy would be nice, as I kept trying to figure out why the seated trooper was pouring something out of his shoe, when he was WEARING both of his boots. Mystery solved.
SPEAKING of the seated trooper, whoever designed that crazy camo scheme for the helmet must have been the father (uncle, second cousin twice removed) of the dude who designed the Wehrmacht splinter camo for WWII. I did my best to replicate it, but holy cripes, it's tough:
I also had some fun with Future, or Pledge Floor Shine or whatever they call it now. In the kit there is a pail and a milk jug included. Now, milk would have spoiled, but I figure they were too lazy to dump it out, so I took some Tamiya Smoke (X-19 for those playing at home) and filled it up, layer by layer. For the pail I painted the top with Vallejo Sepia wash (which dries flat) then built up successive layer of Future. Yeah, it was a slow night, like watching...
FUTURE DRY!

Anyways, here are my results. I think I'll stage the jug tipped over and spilling some green slimy water out or something:
Oh, yeah the dead guy got some more treatment tonight, including some nice Verlinden Barbed Wire tangled about him, and up on the fence posts. That stuff, while it looks real, is a PAIN to install. The fact that it is so old it was rusted in the bag probably didn't help. Either way, it's up and rusted and looking really, well, barbed, I guess.
Well, that's about all for tonight. Tomorrow I might actually try to get Hans' hair done. Wait, that sounded all wrong. Bah, you guys know what I mean...

BigSmitty

Joined: October 01, 2008
KitMaker: 597 posts
Armorama: 439 posts

Posted: Tuesday, August 28, 2012 - 03:29 PM UTC
Well, I guess I'll throw this update out for tonight.
I will preface this by saying no matter how hard I try, my figures' faces look...rough. Even my wife said, "Hey that one drinking looks like Barney Fife!". Great...I've turned Don Knotts into a World War I stormtrooper. Anyways, here are a couple of photos of the close in stuff. Figures are probably 80% done, still need grenades and some gear attached. Most of the items on the vignette base are in position. I decided to tip over the pail, and have some nasty rusty water pour out. Yes, I'm going Future crazy again.


Here are some overall shots, in no particular order. I think this is coming along quite nicely, considering what I started with earlier this month.


I'm looking at about six hours in the dentist's chair tomorrow starting at 9AM Central Daylight Time. Anybody in the upper Midwest hears screaming in the AM, that's probably me...
I will preface this by saying no matter how hard I try, my figures' faces look...rough. Even my wife said, "Hey that one drinking looks like Barney Fife!". Great...I've turned Don Knotts into a World War I stormtrooper. Anyways, here are a couple of photos of the close in stuff. Figures are probably 80% done, still need grenades and some gear attached. Most of the items on the vignette base are in position. I decided to tip over the pail, and have some nasty rusty water pour out. Yes, I'm going Future crazy again.
Here are some overall shots, in no particular order. I think this is coming along quite nicely, considering what I started with earlier this month.
I'm looking at about six hours in the dentist's chair tomorrow starting at 9AM Central Daylight Time. Anybody in the upper Midwest hears screaming in the AM, that's probably me...

Buckeye198

Joined: May 02, 2010
KitMaker: 596 posts
Armorama: 265 posts

Posted: Tuesday, August 28, 2012 - 03:53 PM UTC
Matt, you've got some sick progress here! I must admit, I always skim the pictures before reading, and seeing the page out of the Osprey book, I had the same epiphany you did, especially about that boot...I meant to say something much earlier about how he could have his boots on while cleaning his boot, but it's solved now! No shame in your helmet camo, the faces, or the Future. A very commendable representation of the helmet (I'm sure Stephen could identify which government paint swatches you should've used, but to my eye, it's fantastic  ), and the faces are still miles above the ones I paint. I don't know if you're gonna touch them up at all, but I have a few suggestions. 1, if it's possible to get the bottle actually into Hans' mouth, it might take away from some of the comical Fifeness he's displaying. 2, the whites of the eyes may be a bit large or a bit too white. I think you could either scale in just a hair around the whites with the skin tone, or add some darker shades to your eye-white, which could lessen the intensity of his drinking gaze. And 3, if Hans has a helmet, make sure he's holding it (though I bet you were going to include it before this suggestion was made)! His right hand is turned at kind of an awkward angle to be resting position, but it makes sense when he's holding the helmet in the Osprey picture. Oh, and the Future work looks great! I'm just unsure of the puddle on the clean wood planking...where's all the dirt, mud, and mess that comes along with storming/defending and taking/abandoning a WWI trench?? Haha, if you couldn't tell by now, I REALLY like the mud-caked look of WWI weathering!
  You've done some remarkable work thus far...looking forward to its completion!!
 ), and the faces are still miles above the ones I paint. I don't know if you're gonna touch them up at all, but I have a few suggestions. 1, if it's possible to get the bottle actually into Hans' mouth, it might take away from some of the comical Fifeness he's displaying. 2, the whites of the eyes may be a bit large or a bit too white. I think you could either scale in just a hair around the whites with the skin tone, or add some darker shades to your eye-white, which could lessen the intensity of his drinking gaze. And 3, if Hans has a helmet, make sure he's holding it (though I bet you were going to include it before this suggestion was made)! His right hand is turned at kind of an awkward angle to be resting position, but it makes sense when he's holding the helmet in the Osprey picture. Oh, and the Future work looks great! I'm just unsure of the puddle on the clean wood planking...where's all the dirt, mud, and mess that comes along with storming/defending and taking/abandoning a WWI trench?? Haha, if you couldn't tell by now, I REALLY like the mud-caked look of WWI weathering!
  You've done some remarkable work thus far...looking forward to its completion!!
 |


