Campaigns
Where Armorama group builds can be discussed, organized, and updates posted.
Get 'er Done Mk3
FAUST
#130
Visit this Community
Noord-Holland, Netherlands
Joined: June 07, 2002
KitMaker: 8,797 posts
Armorama: 4,190 posts
Posted: Tuesday, August 07, 2012 - 10:23 PM UTC
@ MUhammad
That is a very good result. Not knowing anything about arty pits I have to say it is a very clean arty pit but it could very well be that was doctrine. You probably don't want to fall over a spent round or an Ammo tube with a live shell in your hands. But it definately look the part. Figures give it a lot of life as well.

@ Jeff T
Nice work on the new shoes of the sheridan. I also like how you weathered the road wheels.

@ Mike
That is a sweet kit. Good painting as well. Looking forward to the rest of the progress.

@ Naseby
Nice work on the 7. Pretty good weathering for such a small scale.
As for the pole it is the pole that came in Tamiya's roadsign set and I think it is still one of the best on the market as it is irregular in shape and not commpletely straight as other offerings which makes sense since these poles were made usually of pinestems and they never are completely straight. Only thing I did was enhancing the woodgrain and added to it were the metal footsteps and the rest was a matter of paint and pigments.

Again I have a 1 photo update of some paint on figures


More to come soon

Greetz

Robert Blokker
MLD
Visit this Community
Vermont, United States
Joined: July 21, 2002
KitMaker: 3,569 posts
Armorama: 2,070 posts
Posted: Wednesday, August 08, 2012 - 02:36 PM UTC
some chips and fading,

Not done yet, probably not too realistic, but fun.
Using Vallejo 822 (922?) Cammo Black Brown and a sponge/srub brush to dapple onto what I hope are realistic locations.
Lifting points, latches, trod-upon edges.


imatanker
Visit this Community
Maine, United States
Joined: February 11, 2011
KitMaker: 1,654 posts
Armorama: 1,565 posts
Posted: Wednesday, August 08, 2012 - 09:33 PM UTC
Mike...Looks good to Me. When I try to do that it just looks like blobs of paint Jeff T.
MLD
Visit this Community
Vermont, United States
Joined: July 21, 2002
KitMaker: 3,569 posts
Armorama: 2,070 posts
Posted: Thursday, August 09, 2012 - 12:38 AM UTC

Quoted Text

Mike...Looks good to Me. When I try to do that it just looks like blobs of paint Jeff T.


Thanks for the kind words. I've really got to get a better camera/light set up.

This is only about the second time I've managed to do this and avoid the 'blobs of paint' effect.
Two things have really helped me this summer, the AK weathering DVD, seeing it 'live' really helps and secondly the first issue of the new Weathering Magazine.
Ok, that and about $75 worth of new paints and supplies.

I would have thought the black grey from Vallejo would have been a better color, but the Vallejo 822 (922?) cammo black brown is PERFECT for chips.

I've got a cut off #2 brush with about 1/8in of bristles left and I load it, then stab the worktop until it's almost dry, then test fire on the BOTTOM of the model until the effect is about right. This makes for a LOT of reloads, but avoids too much paint

Same with a bit of closed cell foam/computer packing foam. Tear off an irregularly edged bit, generally wedge shaped and do the same thing.

Part of the effectiveness of the chips on the base leg edges was accidental due to the fact that I had dry brushed the edges waaayyy back when that was in vogue. The irregular chips over the light paint really sells the two tone chip effect.


THe first successful test of all of the filter, wash (with stumping..) , fading, chipping, streaking, and pigments was on the old 981 launcher/sensor head. It will probably end up in a sic-fi dio later.

Oriented exactly like this, as the other edges are not nearly so evenly finished. -grin-
MLD
Visit this Community
Vermont, United States
Joined: July 21, 2002
KitMaker: 3,569 posts
Armorama: 2,070 posts
Posted: Saturday, August 11, 2012 - 09:15 AM UTC
Calling the gun done


the limbers almost so, STILL not done with the cable reels, but they're drying in the background.


have to paint and weather that seat pad too, huh?

If it will ever stop raining up here in Vt, I can get some natural light pics and not these fluo-lit man dungeon shots..
Petro
Visit this Community
Connecticut, United States
Joined: November 02, 2003
KitMaker: 984 posts
Armorama: 846 posts
Posted: Saturday, August 11, 2012 - 12:54 PM UTC
Lookign really good Mike.

imatanker
Visit this Community
Maine, United States
Joined: February 11, 2011
KitMaker: 1,654 posts
Armorama: 1,565 posts
Posted: Saturday, August 11, 2012 - 01:01 PM UTC
Mike,nice work Dude.Looks sweet.I know what you're saying about the rain.We got the same thing here in Maine,all the moisture makes it hard to get things painted Jeff T.
Charlie-66
#186
Visit this Community
Texas, United States
Joined: May 24, 2006
KitMaker: 771 posts
Armorama: 750 posts
Posted: Saturday, August 11, 2012 - 02:04 PM UTC
Finally got the tracks on. Cammo goes on this weekend!


MLD
Visit this Community
Vermont, United States
Joined: July 21, 2002
KitMaker: 3,569 posts
Armorama: 2,070 posts
Posted: Sunday, August 12, 2012 - 04:29 AM UTC
nice clean build, gotta love those big cats.
this one is the premium kit, right? metal barrel, etc?

Which cammo are you going to do?

Mike
PantherF
Visit this Community
Indiana, United States
Joined: June 10, 2005
KitMaker: 6,188 posts
Armorama: 5,960 posts
Posted: Sunday, August 12, 2012 - 04:35 AM UTC
Monster tank there Guy! I'm certain the camo is going to be a show stopper!


~ Jeff
Dragon164
#226
Visit this Community
British Columbia, Canada
Joined: February 20, 2012
KitMaker: 1,909 posts
Armorama: 1,066 posts
Posted: Monday, August 13, 2012 - 10:10 AM UTC
Guys,
I have been struggling with the guns for this since I first started the kit.


I just did not want to install gun barrels that were just round rods. I picked up the Italeri kit hoping to use those barrels and if I had not lost one I may have done that.

So I started to look for AM barrels but could not find them for the 163, I did find 135 barrels for a Cobra heli so ordered 2 and upon arrival those would not work found some other Cobra barrels and those too I was not happy with.


Then I found pics of some that looked to be the right size, ordered those and when they arrived Today I was happy to find they will work you will notice that the barrels that work are 132. I now have the barrels that have been holding up this project for so long and I have 4 sets of barrels for a Cobra heli and only one kit.
imatanker
Visit this Community
Maine, United States
Joined: February 11, 2011
KitMaker: 1,654 posts
Armorama: 1,565 posts
Posted: Monday, August 13, 2012 - 09:06 PM UTC
Nice work by every one.
Here's a quick update on the Sheridan.Messing with stowage 
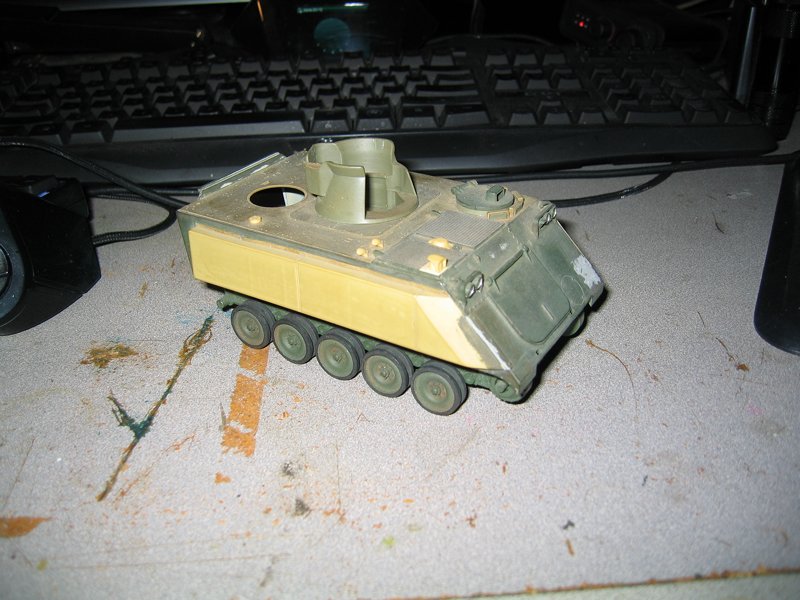
Still haven't figured out what color to paint them
Also got some spare track mounted and some grab handles
That's all for now.Jeff T.
paratrooper
Visit this Community
Utrecht, Netherlands
Joined: July 31, 2003
KitMaker: 995 posts
Armorama: 64 posts
Posted: Tuesday, August 14, 2012 - 08:28 AM UTC
hi guys,

I'll hook up with this campaign with the panzer 1 from Italeri. I bought it on the internet for only 3 euro! So here is the panzer with the first paint job! enjoy!


greets Peter
GaryKato
Visit this Community
California, United States
Joined: December 06, 2004
KitMaker: 3,694 posts
Armorama: 2,693 posts
Posted: Thursday, August 16, 2012 - 07:33 AM UTC
I'm trying to saddle up once more. Not much but it's a start.


I am painting the insides. The front and right side of the hull are not glued yet.
imatanker
Visit this Community
Maine, United States
Joined: February 11, 2011
KitMaker: 1,654 posts
Armorama: 1,565 posts
Posted: Thursday, August 16, 2012 - 09:52 AM UTC
Way to go Gary!You can do it.
Still plugging away on the Sheridan.Sorry for the quality of the pics,camera needs new batteries

Almost ready for paint.Jeff T.
PantherF
Visit this Community
Indiana, United States
Joined: June 10, 2005
KitMaker: 6,188 posts
Armorama: 5,960 posts
Posted: Thursday, August 16, 2012 - 10:06 AM UTC
Whaaat? Gary K builds too?

When does he find the time why with all his devotion to this Forum?


~ Jeff
Dragon164
#226
Visit this Community
British Columbia, Canada
Joined: February 20, 2012
KitMaker: 1,909 posts
Armorama: 1,066 posts
Posted: Thursday, August 16, 2012 - 06:48 PM UTC
I put the gun together for the M163 and now have a gun I am happy with.

Cheers Rob.

paratrooper
Visit this Community
Utrecht, Netherlands
Joined: July 31, 2003
KitMaker: 995 posts
Armorama: 64 posts
Posted: Saturday, August 18, 2012 - 01:58 AM UTC
hi guy's

here is my panzer 1 again , this time with several blue filters and a pinwash. Next step for me is some dry brushing on the detail. And some painting on the wheels and tools.

enjoy!


see ya later!
Naseby
Visit this Community
Slovakia
Joined: October 15, 2010
KitMaker: 825 posts
Armorama: 246 posts
Posted: Tuesday, August 21, 2012 - 06:40 AM UTC
@Mike: The FLAK is great, it seems to be a very accurate and detailed kit.

@Jeff: Looking forward for more pictures of the Sheridan, the more luggage, the better !

@Peter: Thats a very nice job with the shades of the Panzergrau on the Pz.I I like the overall impression of it. Looking forward to the weathering.
AlanL
Visit this Community
England - East Anglia, United Kingdom
Joined: August 12, 2005
KitMaker: 14,499 posts
Armorama: 11,675 posts
Posted: Thursday, August 23, 2012 - 10:52 PM UTC
Hi Guys,

Haven't looked in for a wee while Way To Go - mucho progress.

Irvine, on the Churchill the Engine is the Resicast one that Chris now markets under licence, only a small amount of scratch work here and there.

Your build looks really well organised, excellent progress.


Robert, on the Churchill, the British used a silver type finish on their tanks up until the middle of the war when paint got scarce and they they used a white/cream coloured type finish. After the war they went back to silver/metalic look. Interesting thought about the mirror.

BTW your figures look terrific.

The 4 x Jeff's - terrific progress guys.

Muhammad, Your diorama is looking excellent, lots of lovely detail.

Peter, nice

The 2 x John's again lovely progress.

Naseby, nice work so far, looking good.

To the others I might have missed - terrific stuff guys.

No progress on the Churchill at the moment but I have been working on a couple of CDL tanks that I can include here too.

Progress so far


Inspiring work guys, thanks.

Al
PantherF
Visit this Community
Indiana, United States
Joined: June 10, 2005
KitMaker: 6,188 posts
Armorama: 5,960 posts
Posted: Thursday, August 23, 2012 - 11:26 PM UTC
Peter, your wash looks really good!

Have really enjoyed this Campaign idea so much that here's hoping that it re-occurs soon as a Mk IV! There are sooo many that need to be finished, even a Heller Leopard that was all forgotten.

But will soon find out if Heller is a difficult brand to build with.


~ Jeff
markchis
Visit this Community
Kuwait / لعربية
Joined: February 09, 2009
KitMaker: 467 posts
Armorama: 392 posts
Posted: Saturday, August 25, 2012 - 07:44 PM UTC
great campaign ! a lot to catch up on ! I really like the figures Robert - superb painting. The 88 from Mike, Charlies Jagd, Robs M113, Jeffs Sheridan, Peter and Alan ! all looking great - what a motivator.

this is my entry first a pic from Jan 2011 when I started the kit


and again 18 months later not a lot has happened


ok here are the bits lets get them stuck together -


I can remember at the time - getting hung up on painting the interior and how it would go together and how to do the etch fenders. AND in the end just deciding to let it "rest" in the box.
Something refreshing about coming back to half builts is that often I have a lot more enthusiasm after a break.
So I just decided to get the detail stuck on the sidewalls and to deal with painting later.


soldered (badly) the fenders together


decided not to use all the etch from the eduard set - reason the plastic parts are better detailed.


cheers
Mark
Dragon164
#226
Visit this Community
British Columbia, Canada
Joined: February 20, 2012
KitMaker: 1,909 posts
Armorama: 1,066 posts
Posted: Sunday, August 26, 2012 - 10:57 PM UTC
Got some work done on the Cannon, first was organizing the pieces and figuring out where I left off.
Then I started on the mount as I want this to actually work.
The long rods are just to make it easier to handle till I get all the pieces done. Oh, the pic with the file shows that the etching didn't always work right. had to file some fold lines.

Cheers Rob.


max_meeki
Visit this Community
Tasmania, Australia
Joined: December 19, 2011
KitMaker: 92 posts
Armorama: 88 posts
Posted: Sunday, August 26, 2012 - 11:05 PM UTC
Jumping on board with these.


Will get at least one finished and might even get both done.
Cheers
markchis
Visit this Community
Kuwait / لعربية
Joined: February 09, 2009
KitMaker: 467 posts
Armorama: 392 posts
Posted: Tuesday, August 28, 2012 - 10:13 AM UTC
Max - you cant go wrong with Tamiya kits - I have never built the M20 - but it looks great.

just dry fits -


and fixed the tools and Pe clamps


decided to fit other light not the notec one


I got a base coat of the interior done on weekend - so should get it painted up shortly.

cheers
Mark