First Diorama Step by Step
Texas, United States
Joined: March 08, 2010
KitMaker: 2,465 posts
Armorama: 2,383 posts
Posted: Saturday, April 21, 2012 - 11:57 AM UTC
Hi Shaun,
Its been a blast following you SBS, so thank YOU for putting it together for us! The Information you have shared has been most valuable to me aswell as others.

Thanks for the advise on correcting the warp on the base. It has been corrected about 80%, Ill take it!
Gary

Quebec, Canada
Joined: April 13, 2012
KitMaker: 20 posts
Armorama: 18 posts
Posted: Saturday, April 21, 2012 - 01:00 PM UTC
Quoted Text
Its been a blast following you SBS, so thank YOU for putting it together for us! The Information you have shared has been most valuable to me aswell as others. 
Exactly my thoughts!
Shaun, you gave me courage to embark into the "unknown".
I'm using your SBS thread to build my own first diorama.
Your work is amazing with just a few simple steps.
Keep up the updates!

Baptised in fire, 40 to 1
Spirit of Spartans, Death and glory!
Soldiers of Poland, Second to none
Wrath of the Wehrmacht brought to a halt!
Texas, United States
Joined: March 08, 2010
KitMaker: 2,465 posts
Armorama: 2,383 posts
Posted: Saturday, April 21, 2012 - 04:16 PM UTC
Hi Shaun, I would like to ask your permission to post pics of what ive done with my first real base useing your SBS and a lttle bit of trying my hand at building a wall. Im not trying to high jack your thread. And i understand if its a problem. but i wanted to share with you your direct influance on me to give this a try. Thanks for everything man!

Gary
Indiana, United States
Joined: October 16, 2002
KitMaker: 5,272 posts
Armorama: 2,844 posts
Posted: Sunday, April 22, 2012 - 12:35 AM UTC
Have at it Gary. The more the merrier.
Shaun
"A government big enough to give you everything you want is a government big enough to take from you everything you have." Gerald Ford, August 12, 1974
Colorado, United States
Joined: December 24, 2005
KitMaker: 1,624 posts
Armorama: 994 posts
Posted: Sunday, April 22, 2012 - 05:26 AM UTC
Hey Shaun,
Just ran into this SBS. I'm curious has to why you went with the real moss? Aren't you afraid of it "browning" on you after a few weeks or is there a way you can keep it from do this?
See ya in the funnies.............


Everyday is a gift, not a given.
......and all we know is he's called the Stig.
Texas, United States
Joined: March 08, 2010
KitMaker: 2,465 posts
Armorama: 2,383 posts
Posted: Sunday, April 22, 2012 - 12:23 PM UTC
Michigan, United States
Joined: April 01, 2012
KitMaker: 90 posts
Armorama: 87 posts
Posted: Monday, April 23, 2012 - 12:06 AM UTC
Great post, I'm pleased how easy you made it all look. I can tell you have fun with this also, which is the what for and why we build. I'm building a large diorama and always view and look for new techniques and ideas.Carry On . Arbs
Quebec, Canada
Joined: November 19, 2011
KitMaker: 1,389 posts
Armorama: 1,388 posts
Posted: Monday, April 23, 2012 - 01:30 AM UTC
Seems like shaun is a great professor, Gary, you really nailed it!
Phil.

Modeling...
I rest my case.
Indiana, United States
Joined: October 16, 2002
KitMaker: 5,272 posts
Armorama: 2,844 posts
Posted: Tuesday, April 24, 2012 - 07:30 AM UTC
"A government big enough to give you everything you want is a government big enough to take from you everything you have." Gerald Ford, August 12, 1974
South Carolina, United States
Joined: August 09, 2010
KitMaker: 53 posts
Armorama: 36 posts
Posted: Tuesday, April 24, 2012 - 09:00 AM UTC
Gary, did you have a mold you used to create the wall? Looks great.
Indiana, United States
Joined: October 16, 2002
KitMaker: 5,272 posts
Armorama: 2,844 posts
Posted: Tuesday, April 24, 2012 - 09:28 AM UTC
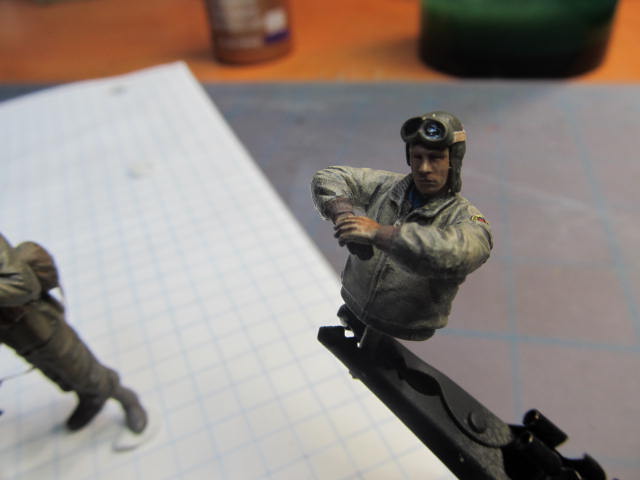
Quick and dirty straps:
Grab a piece of heavy paper and paint one edge with some brown craft paint and let it dry. Take a steel rule and cut off a thin strip.
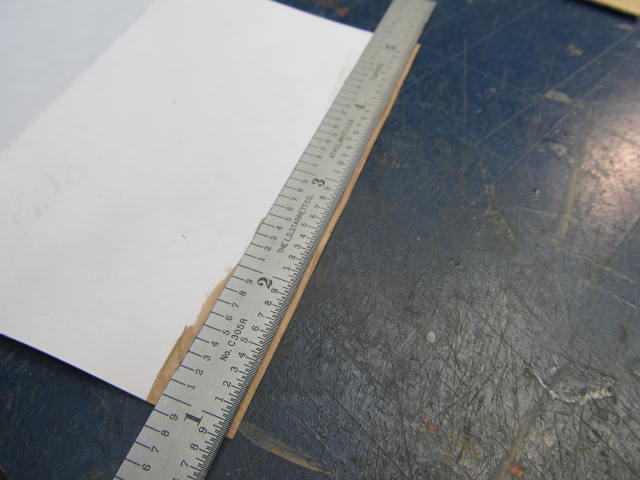
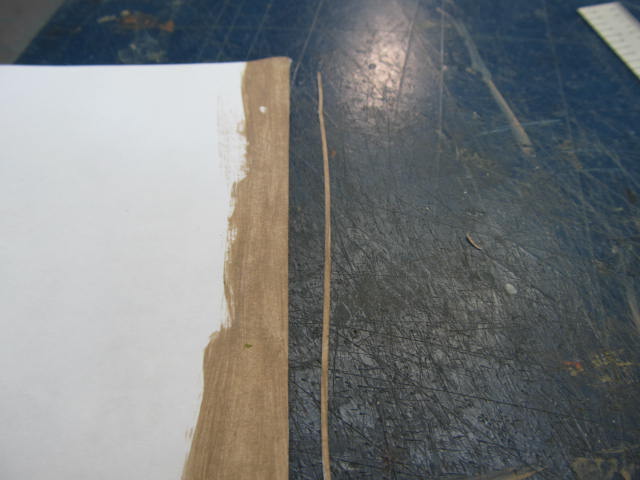
Cut a length and using white glue and water, wrap it around the helmet.
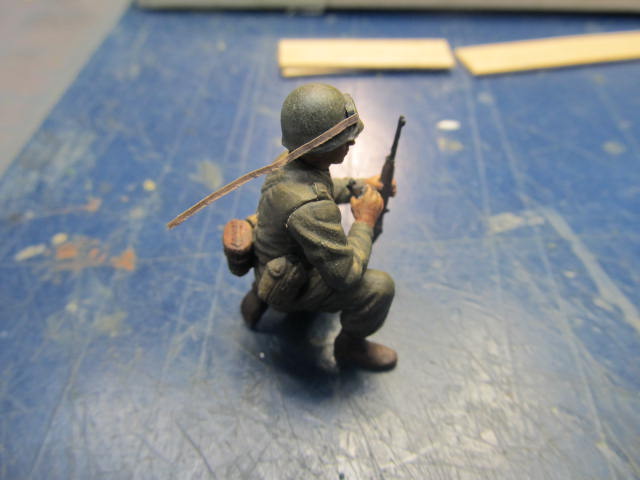
Wait for the glue to dry and trim off the excess.
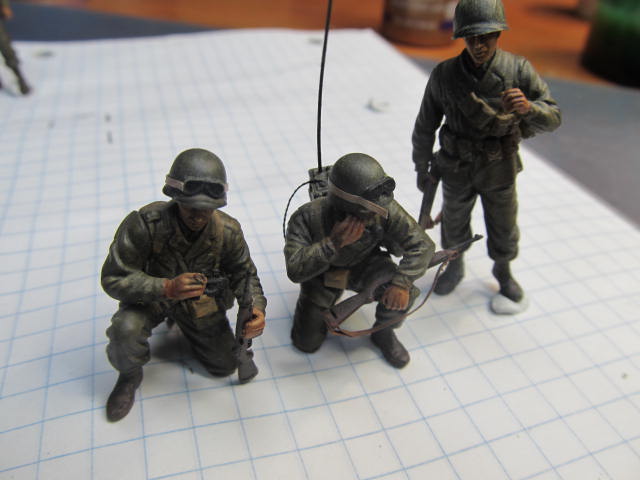
Looking at the pictures the goggle straps may be a little too wide. I may start over.
TC ready:
"A government big enough to give you everything you want is a government big enough to take from you everything you have." Gerald Ford, August 12, 1974
Texas, United States
Joined: March 08, 2010
KitMaker: 2,465 posts
Armorama: 2,383 posts
Posted: Tuesday, April 24, 2012 - 12:25 PM UTC
Hi Shaun,
Sweet tip with the paper and paint. Im gonna put that in my bag of tricks now. thanks man! Keep it comeing!!!

Gary
Massachusetts, United States
Joined: February 08, 2012
KitMaker: 1,271 posts
Armorama: 1,253 posts
Posted: Tuesday, April 24, 2012 - 01:59 PM UTC
I've got something like that I want to do with a figure. I saw a clip of a Fallschirmjager with zeltbahn or some sort of camouflage cloth tied over his helmet with a belt. Just wondering, would it be easier to replicate that with a PE belt or with your technique?
-Conor
This is the clip btw:
http://www.youtube.com/watch?v=JTkfioq6zDQThe soldier I'm talking about comes on at 1:53
I'm doin' stuff. Lotta stuff.
Indiana, United States
Joined: October 16, 2002
KitMaker: 5,272 posts
Armorama: 2,844 posts
Posted: Wednesday, April 25, 2012 - 10:05 AM UTC
Conor, I don't think PE is ever going to look like cloth straps.
I used tissue paper for the helmet covers and copper wire for the retaining strap:
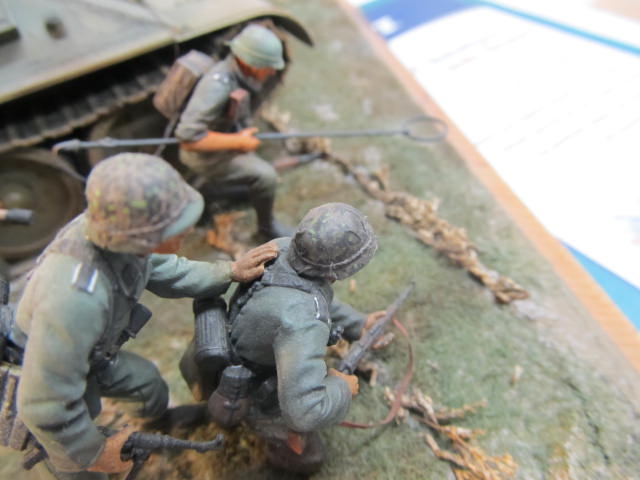
Another head shot from the same dio, used strips of masking tape and long cut rail road grass for the cammo.
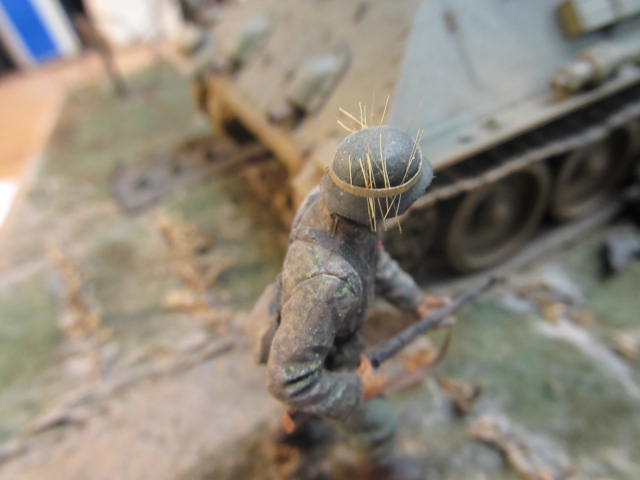
Remember I have been screwing up for 30 years and that is the only way I got any better at any of this.
Hoped this helped Conor,
Shaun
"A government big enough to give you everything you want is a government big enough to take from you everything you have." Gerald Ford, August 12, 1974
Indiana, United States
Joined: October 16, 2002
KitMaker: 5,272 posts
Armorama: 2,844 posts
Posted: Saturday, April 28, 2012 - 09:24 AM UTC
Had an issue with my photo sharing site. Trying a new one.
Okay, that was a pain.
So, I decided to leave the goggle straps alone. After I added a flat black wash they look okay.

"A government big enough to give you everything you want is a government big enough to take from you everything you have." Gerald Ford, August 12, 1974
Texas, United States
Joined: March 08, 2010
KitMaker: 2,465 posts
Armorama: 2,383 posts
Posted: Saturday, April 28, 2012 - 01:24 PM UTC
Hi Shaun,
Everything looks great man! Is the radio man a kit fig or you covert it? i like the pose and the radio.

Gary

Indiana, United States
Joined: October 16, 2002
KitMaker: 5,272 posts
Armorama: 2,844 posts
Posted: Sunday, April 29, 2012 - 12:22 AM UTC
Gary,
Stock. From this kit: 1:35 Dragon Advance to the Rhine US 1st Army at Remagen #6271
I really liked the set.
Shaun
"A government big enough to give you everything you want is a government big enough to take from you everything you have." Gerald Ford, August 12, 1974
Indiana, United States
Joined: October 16, 2002
KitMaker: 5,272 posts
Armorama: 2,844 posts
Posted: Sunday, April 29, 2012 - 12:37 AM UTC
Okay, let's get on with this...
Glued the driver in place. I usually use white glue for this so if I decide to move them later it doesn't bark up the paint on the vehicle. I used a bit of sticky tack to hold him in place until the glued dried.

Working on the placement of the dismounts. This is critical so I use sticky tack until I am happy. You want the veiwer's eye to travel around the scene and not get "stuck" anywhere. This diorama is pretty much broken up into three separate points of interest: The three standing figures, the Sherman and crew, and the kneeling NCO and radio operator.


I usually ask my extremely tolerant wife to lot at a diorama before I glue the figures in place and ask her what she looked at first, second, etc.
Some of the figures still need final details, cigarettes, couple of straps etc. so they are not ready to glue down yet anyway.
"A government big enough to give you everything you want is a government big enough to take from you everything you have." Gerald Ford, August 12, 1974
Indiana, United States
Joined: October 16, 2002
KitMaker: 5,272 posts
Armorama: 2,844 posts
Posted: Sunday, April 29, 2012 - 01:11 AM UTC
Back to composition for a post, the whole who, what, where, and when thing. Who and what are a givens, when has to be spring of 1945 because of the model of the Sherman and the faded winter white wash on it. Where is not established yet.
To take care of that I am going to make some German signage.
I rough cut some strips of balsa wood and whipped on a black wash:


Also cut and broke a section of square stock to use as a post. Not sure it I am going to use that or not.

I have to wait for all that to dry before I dry brush it.
One last detail issue: I have the 30 cal painted flat black. How I finish weapons to follow.

Questions? Ask away!
Shaun
"A government big enough to give you everything you want is a government big enough to take from you everything you have." Gerald Ford, August 12, 1974
Alberta, Canada
Joined: July 23, 2010
KitMaker: 786 posts
Armorama: 753 posts
Posted: Sunday, April 29, 2012 - 03:22 AM UTC
fun blog Shaun, lots of well documented steps for everyone to understand and enjoy. i've been following it and wanted to just add a thank you for the efforts you have been putting in. keep up the great job.
cheers, bd
the opposite of courage in our society is not cowardice, it is conformity.
Scotland, United Kingdom
Joined: May 25, 2005
KitMaker: 2,218 posts
Armorama: 1,050 posts
Posted: Monday, April 30, 2012 - 09:07 AM UTC
Indiana, United States
Joined: October 16, 2002
KitMaker: 5,272 posts
Armorama: 2,844 posts
Posted: Tuesday, May 01, 2012 - 10:40 AM UTC
Finishing the .30cal...
Grab a pencil and an emery board. Shave the end off the pencil until you have a straight piece of graphite sticking out of the end of the pencil and grind a small pile on the emery board:


Put some of the graphite powder on your fingertip and rub it liberally on the gun. Hit the high points like the cooling jacket on the barrel. This helps the raised details stand out.

Get a couple of really small drill bits to drill out the barrel. I have no idea what size I used.
I slept since then and the size varies but what size barrel you are drilling. In any case, use the smaller of the two and drill a small pilot hole in the center of the barrel. I hold the drill with my between my thumb and forefinger and twist back and forth,lightly. Then take the bigger drill and enlarge the hole. The hole does not have to be deep at all. You are just trying to give the
impression of depth.

Picture is not the best but you can see the hollowed out end of the flash hider here:

This takes quite a bit of practice. I cannot tell you how many weapons I trashed learning how to do this. Go slow.
Best picture I have of the completed MG here. Better picture tomorrow.

Last one for today, captioned "Man this is taking forever. Is he ever going to get done?" LOL


"A government big enough to give you everything you want is a government big enough to take from you everything you have." Gerald Ford, August 12, 1974
Quebec, Canada
Joined: April 13, 2012
KitMaker: 20 posts
Armorama: 18 posts
Posted: Tuesday, May 01, 2012 - 11:36 AM UTC
Nice tutorial on the .30cal.
Instead of using graphite, I dry brush gunmetal on a flat black weapon.
I find that the graphite is too messy... but that's just me

Really love your thread. Doing my first diorama right now by using your techniques.
Cheers!

Baptised in fire, 40 to 1
Spirit of Spartans, Death and glory!
Soldiers of Poland, Second to none
Wrath of the Wehrmacht brought to a halt!
Indiana, United States
Joined: October 16, 2002
KitMaker: 5,272 posts
Armorama: 2,844 posts
Posted: Sunday, May 06, 2012 - 11:34 AM UTC
Sorry for the delay. I had some 1:1 scale yard work to do.

Moving along now the TC and the guys on the ground in front of the Sherman are going to need some maps. Here is a quick and dirty 1/35 scale cartography lesson:
Do a Google Image Search for "world war 2 maps." You will get an amazing amount of results. Copy the maps you want and paste them into a doc and print them out...


Cut them apart and you have maps. You can buy 1/35th scale maps but printed ones suit me, and I am fussy.
"A government big enough to give you everything you want is a government big enough to take from you everything you have." Gerald Ford, August 12, 1974
Indiana, United States
Joined: October 16, 2002
KitMaker: 5,272 posts
Armorama: 2,844 posts
Posted: Sunday, May 06, 2012 - 11:44 AM UTC
The radio guys in front of the Sherman have their maps:

The TC has his map:

And, by golly, I actually have some spring flowers going on:


Getting ready to wrap this up. Have signs to paint and the post to put them on:

Overall pics this week. Again, sorry for the delay. Real life got in the way.
Once again, questions, please ask.
Shaun
"A government big enough to give you everything you want is a government big enough to take from you everything you have." Gerald Ford, August 12, 1974


