Utah, United States
Joined: May 27, 2003
KitMaker: 1,026 posts
Armorama: 654 posts
Posted: Tuesday, April 23, 2013 - 01:56 PM UTC
Got the rest of the green done.


I painted both styles of gun mantlet which came with the kit. As snug as the gun fits they won't need glue and can be swapped out.
Next up is the brown. I wonder if that will take two sessions?
Keith
Build 'em better than the box art!

#275
Alberta, Canada
Joined: March 01, 2006
KitMaker: 174 posts
Armorama: 141 posts
Posted: Wednesday, April 24, 2013 - 10:19 AM UTC
Finished getting the decals on and added a small amount of chipping. My pics show that these tanks were pretty clean at this stage of their lives. I see from the pictures that one of my roadwheels turned when I was putting on the tracks.


Next add the convoy light, antenna and MG mount splash on a light coat of pigment and it should be done.
Nice job on your KT Keith, a single colour scheme is definitely easier that a multicolour one.
#275
Alberta, Canada
Joined: March 01, 2006
KitMaker: 174 posts
Armorama: 141 posts
Posted: Wednesday, April 24, 2013 - 10:20 AM UTC
Missed the pic showing the turned road wheel.

Utah, United States
Joined: May 27, 2003
KitMaker: 1,026 posts
Armorama: 654 posts
Posted: Wednesday, April 24, 2013 - 03:33 PM UTC
@Cam--lookin' good! The decals came out well. The knight looks like real paint. Will you be able to roll that misbehaving wheel back? Or do you have to touch it up with paint?
Thanks for the kind words. My KT will have the three color ambush camo scheme, I just haven't gotten to the brown yet.
Keith
Build 'em better than the box art!
#275
Alberta, Canada
Joined: March 01, 2006
KitMaker: 174 posts
Armorama: 141 posts
Posted: Wednesday, April 24, 2013 - 04:31 PM UTC
Already rolled back into place. I usually paint the road wheels off the tank but with no rubber and those extended hubs I got lazy.
CMOT
 Editor-in-Chief
England - South West, United Kingdom
Joined: May 14, 2006
KitMaker: 10,954 posts
Armorama: 8,571 posts
Posted: Thursday, April 25, 2013 - 06:32 AM UTC
Keep the updates coming guys as they look to be coming on great.
Lisboa, Portugal
Joined: March 04, 2008
KitMaker: 5,386 posts
Armorama: 4,727 posts
Posted: Thursday, April 25, 2013 - 06:45 AM UTC
Active Builds: 0
Active Campaigns: 0
Utah, United States
Joined: May 27, 2003
KitMaker: 1,026 posts
Armorama: 654 posts
Posted: Thursday, April 25, 2013 - 01:45 PM UTC
Started airbrushing the brown and managed to get the turret done. Again, the chassis will have to wait.

And while that was going on I got the rust base coat on the track runs.

These multiple airbrush sessions are making this build take forever. How long is this campaign?

Keith
Build 'em better than the box art!
Ontario, Canada
Joined: March 25, 2010
KitMaker: 514 posts
Armorama: 261 posts
Posted: Saturday, April 27, 2013 - 04:19 AM UTC
CMOT
Editor-in-Chief England - South West, United Kingdom
Joined: May 14, 2006
KitMaker: 10,954 posts
Armorama: 8,571 posts
Posted: Saturday, April 27, 2013 - 04:27 AM UTC
That is a very realistic looking Jagdtiger Trevor
Keith I really like the camouflage you are putting on your build.
Utah, United States
Joined: May 27, 2003
KitMaker: 1,026 posts
Armorama: 654 posts
Posted: Tuesday, April 30, 2013 - 01:50 PM UTC
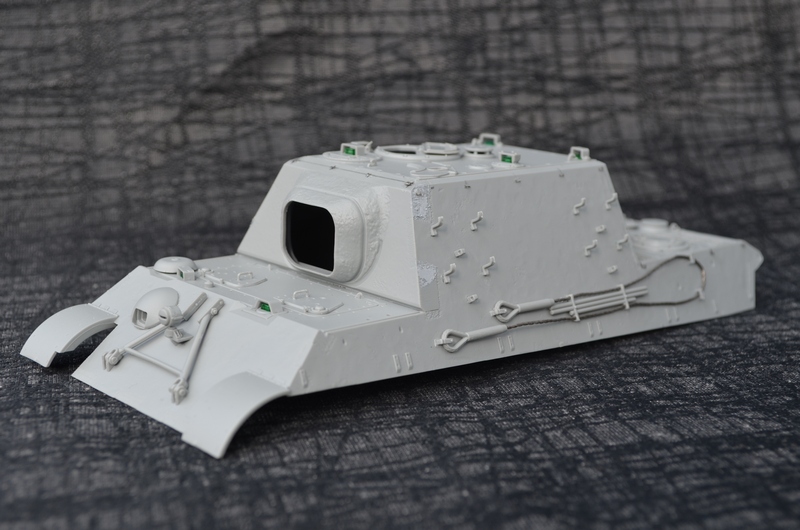
@Trevor--yes, very nice Jagd. Paint job, wash, decals, weathering, all excellent. And that is one of the most realistic tarps I have ever seen! How'd you do that/what material did you use?
I finished the camo on the chassis. I've decided that the pattern is too small and 'stripy' for the ambush scheme 'dots'. Well, the small pattern andmy laziness.


All comments and criticisms welcome.
Keith
Build 'em better than the box art!
Ontario, Canada
Joined: March 25, 2010
KitMaker: 514 posts
Armorama: 261 posts
Posted: Wednesday, May 01, 2013 - 01:48 AM UTC
Keith, thanks for the kind words. I really adore your camouflage scheme even though you feel differently. It is not that busy. Which at times can over complicate, and distract the viewer from the tank it's self. As for the tarpaulin it is just several layers of tissue paper, sealed, dark wash then high lighted. Used German grey which has a touch of green in it. Been saving that tissue paper for a while now. Used it to cover the missing lifting hooks and hatch cover. With non existing interior it will not win any prize. With what I had to start with it turned out quite well and sits on my shelf with pride. As for the other projekts displayed here, they look wonderful and a great inspiration for me to start future projeks.
#275
Alberta, Canada
Joined: March 01, 2006
KitMaker: 174 posts
Armorama: 141 posts
Posted: Wednesday, May 01, 2013 - 01:27 PM UTC
Utah, United States
Joined: May 27, 2003
KitMaker: 1,026 posts
Armorama: 654 posts
Posted: Friday, May 10, 2013 - 05:16 AM UTC
It looks like some of our KTs have 'stalled'.

I'm gonna be busy for the next few weeks, but will hit it hard after that.
Keith
Build 'em better than the box art!
CMOT
Editor-in-Chief England - South West, United Kingdom
Joined: May 14, 2006
KitMaker: 10,954 posts
Armorama: 8,571 posts
Posted: Friday, May 10, 2013 - 06:25 AM UTC
All understood Keith.
Don't forget to upload a finished picture to the campaign gallery.
New Jersey, United States
Joined: June 02, 2006
KitMaker: 1,212 posts
Armorama: 674 posts
Posted: Monday, May 13, 2013 - 10:27 AM UTC
Still some fine works being done in here. Keith I really dig that camo. Trevor, Nice work on the JT. Cam. A fine additional to the completed list.
And speaking of completing...While I did complete my KT but didn't really finish the campaign. I finally added some pics to the campaign gallery.
Tasmania, Australia
Joined: December 19, 2011
KitMaker: 92 posts
Armorama: 88 posts
Posted: Tuesday, May 14, 2013 - 04:29 PM UTC
Getting back into it after a bit of a break.
Tracks done... I'm thinking I should have made it sit a little lower. But its too late now so this is how it stays.
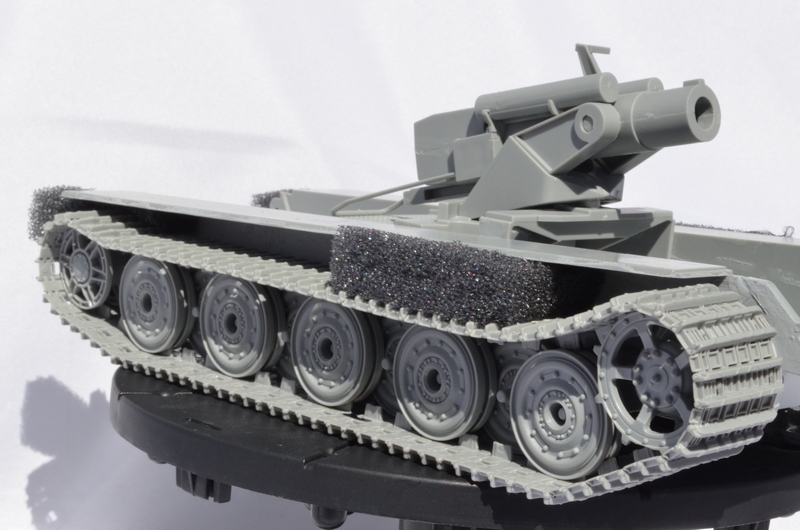
For a big kit it does have a fair few small pieces.
Instructions have no mention of the hatch cover handle, I think its part D12. After a bit of a balls up I forgot to glue it it on, if I can rectify it without damaging anything I will, otherwise it will stay as is.
Next: painting tracks and joining the two halves.
Some excellent builds being displayed here.
Cheers.
Utah, United States
Joined: May 27, 2003
KitMaker: 1,026 posts
Armorama: 654 posts
Posted: Sunday, May 19, 2013 - 04:59 PM UTC
I added some subtle color modulation. It's so subtle it's difficult to discern in these pics:

Keith
Build 'em better than the box art!
CMOT
Editor-in-Chief England - South West, United Kingdom
Joined: May 14, 2006
KitMaker: 10,954 posts
Armorama: 8,571 posts
Posted: Monday, May 20, 2013 - 06:12 AM UTC
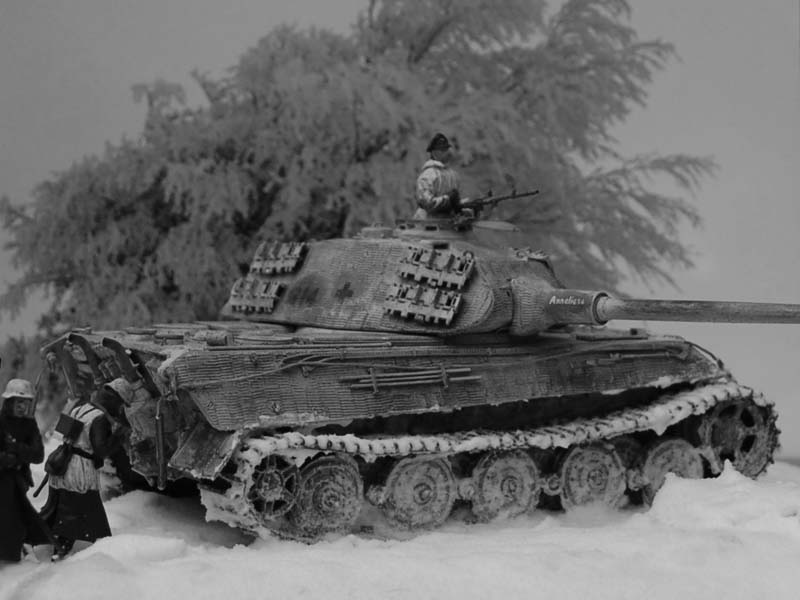
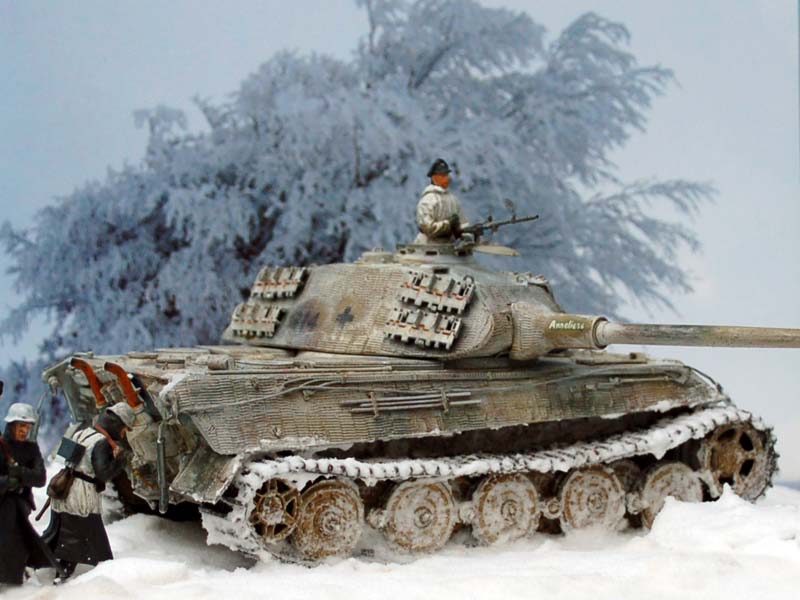
Unbelieveably I have not only managed to complete my build but also managed a simple diorama for it to sit within.
Utah, United States
Joined: May 27, 2003
KitMaker: 1,026 posts
Armorama: 654 posts
Posted: Friday, May 24, 2013 - 01:58 AM UTC
@Darren--your dio is very convincing. And your execution of the snow is some of the best I've seen. The large, wintry tree backdrop tops it off. Is that a real poster or was it photoshopped in?
I don't know how you did it, whitish-frosty weathering or the lighting, but your tank just looks cold!
Keith
Build 'em better than the box art!
CMOT
Editor-in-Chief England - South West, United Kingdom
Joined: May 14, 2006
KitMaker: 10,954 posts
Armorama: 8,571 posts
Posted: Friday, May 24, 2013 - 03:51 AM UTC
Keith; It is a picture of a picture supported behind the diorama and has not been manipulated by me. The frosty weathering you refer to is I believe the heavily worn white wash finish I used on the tank using the hairspray method. I am glad you approve.
Tasmania, Australia
Joined: December 19, 2011
KitMaker: 92 posts
Armorama: 88 posts
Posted: Friday, May 31, 2013 - 02:46 PM UTC
Painting started

Not particularly happy with this effort, may touch it up a bit or I'm thinking weathering will hide the "I've really got to learn how to use a airbrush" mistakes.

Cheers.
CMOT
Editor-in-Chief England - South West, United Kingdom
Joined: May 14, 2006
KitMaker: 10,954 posts
Armorama: 8,571 posts
Posted: Friday, May 31, 2013 - 05:49 PM UTC
Good to see the finishing line in sight Max.
Tasmania, Australia
Joined: December 19, 2011
KitMaker: 92 posts
Armorama: 88 posts
Posted: Saturday, June 01, 2013 - 01:48 PM UTC
Quoted Text
Good to see the finishing line in sight Max.
Yes, but think of me as the tortoise

Cheers.
Lisboa, Portugal
Joined: March 04, 2008
KitMaker: 5,386 posts
Armorama: 4,727 posts
Posted: Saturday, June 01, 2013 - 02:25 PM UTC
@Max
I like the camo colours & pattern, good job !
@Darren
Terrific job on the dio, the photos are great, it captures the icy cold Central European Winter !
Superb work on the figures, weathering.. everything !

Active Builds: 0
Active Campaigns: 0