

Hi Romain and Per - thanks for having a look - again, Per, really appreciate the helpful photos. Romain, interesting idea - I really hadn't thought of doing so...maybe I'll eventually follow your advice and get in touch with Claude and learn his thoughts about this -
The MaxxPro is currently on the workbench, getting the "new" independent suspension scratchbuilt. I'll post a pic or two once it's further along -
Thanks for taking a look
Cheers
Nick
Hosted by Darren Baker
1/35 Truck Fabrication shop

Stickframe

#362

Joined: December 01, 2013
KitMaker: 1,661 posts
Armorama: 1,202 posts

Posted: Tuesday, January 07, 2014 - 05:00 AM UTC
jrutman
Joined: April 10, 2011
KitMaker: 7,941 posts
Armorama: 7,934 posts
Posted: Tuesday, January 07, 2014 - 06:19 AM UTC
The combination of your awesome work with the buildings,vehicles and shop details when captured by your photos using outdoor natural light result in me,for one,usually not being able to determine the weather I am seeing a pic of a real thing or a model. So,in other words,you can't get any better. After all,the object of modeling is to ultimately portray a real object in miniature.
J
J
Stickframe
#362
Joined: December 01, 2013
KitMaker: 1,661 posts
Armorama: 1,202 posts
Posted: Saturday, January 11, 2014 - 02:07 PM UTC
Hi Jerry - - thanks for the positive words - your points are both the challenge and the fun of this hobby - it can drive you nuts! - and certainly entertain some discussion - like your recent stone work "seminar" - pretty interesting stuff....
As for this post, as my dio doesn't have much scenery per se (like trees groundcover etc) vehicles and shop parts become the scenery...so, I'm in the process of building another truck.
This time is the Navistar Maxx Pro, but, I'm trying to build the Dash variant, which has independent rather than live or solid axles. It will also be placed on a lift of some sort - please have a look:
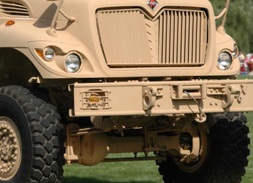
As you can see above, the early Maxx Pro has solid front and rear axles -
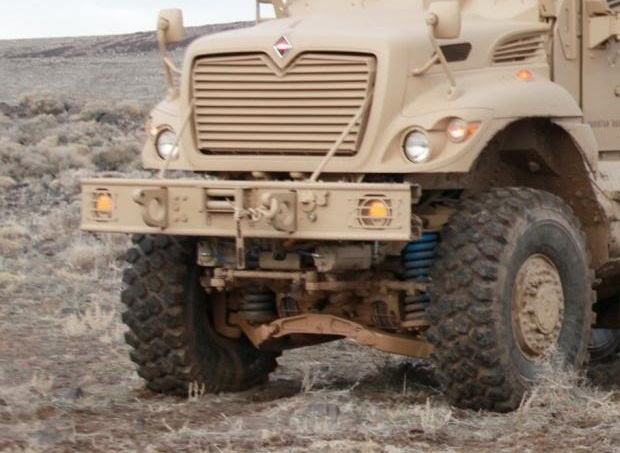
And, as you can see above that in addition to other changes, the Maxx Pro Dash has independent coil spring suspension front and rear. It also has horizontal, rather than vervical louvers in the grill.
I'm trying to make a representation of the Dash version (using the Legend kit as a base kit). I found out that at least one replacement suspension for this truck is made by Axletech International, the 5000 series - which is conceptually similar to the version seen on the Oshkosh MATV, but not the same thing - among several differences is that the 5000 has dual coil springs.
I did find some info on these axles, but more promotional than technical - so, my representation is just that - a representaiton - it involves a fair amount of guess work anbd plenty of scratch building, and head scratching!!!!
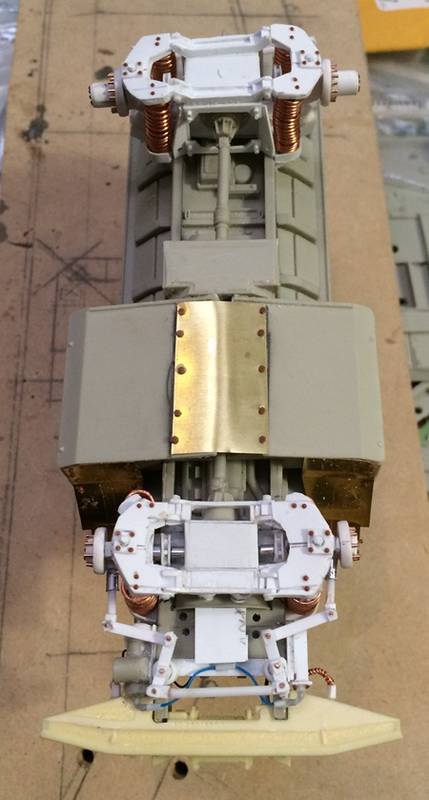
Above you can see most of it - essentially two module suspension nodes, self contained and no leaf springs - basically: a subframe, carrier, dual coil springs, planetary wheel ends, lower A frames, a single strut frame above...and, the steering was more than a bit tricky!
The fornt diff is smaller than the rear; good and bad - a bit easier to make fit, but no fun getting everything to fit in a small space!!!
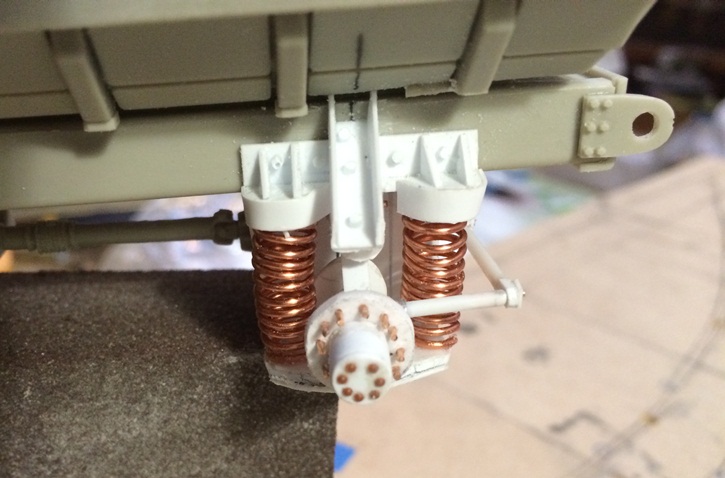
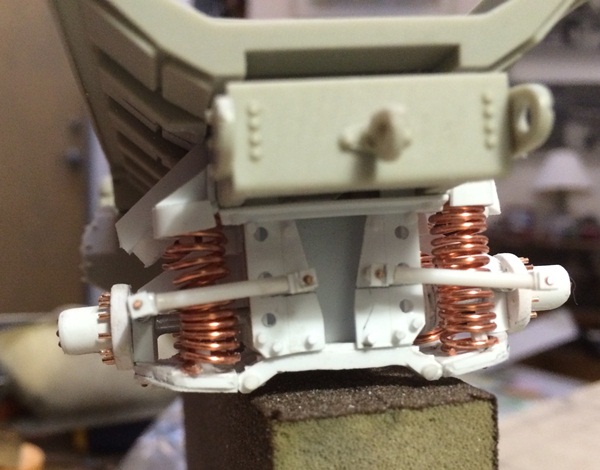
The rear end has more room to work with - but I have very little in terms of useful info about what it actually looks like...I do tho know it's conceptually similar to the front, and it's rated at about one ton more than the front, so the diff housing is noticably bigger -
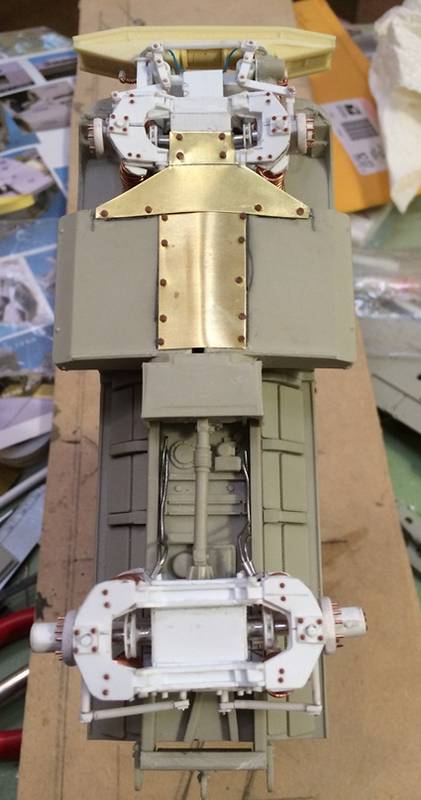
Above you can see a bit more of the skid/explosive protection (I dont know exactly what all this is called) plate from sheet brass - and some lines to the rear end.
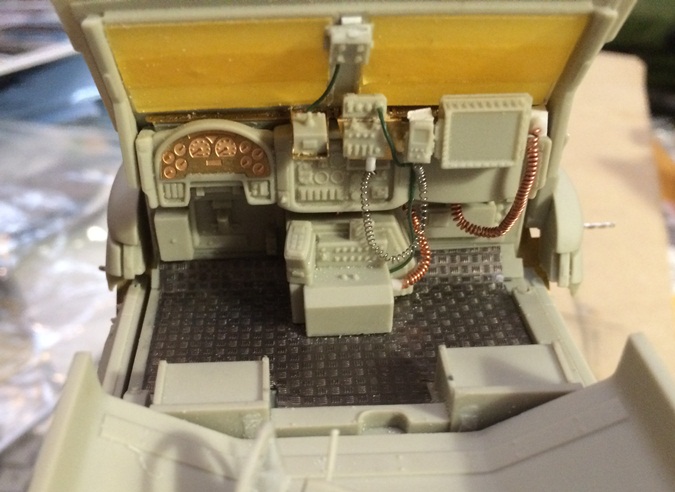
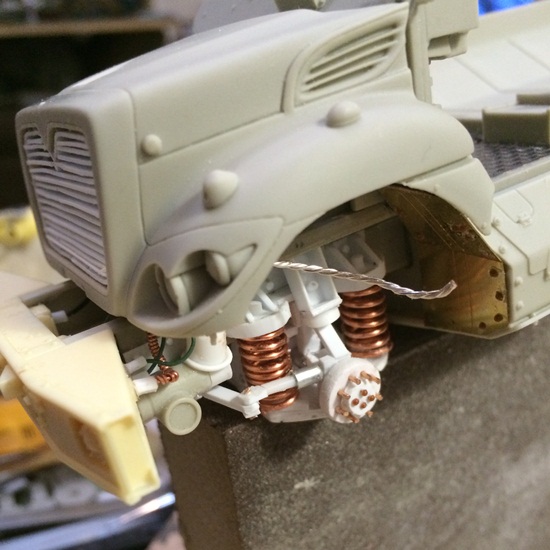
I didn't plan on getting inside yet, but the dashboard, firewall etc are tied cloesly to the hood/fenders and other parts of the front suspension, so, it's now closer to being built...
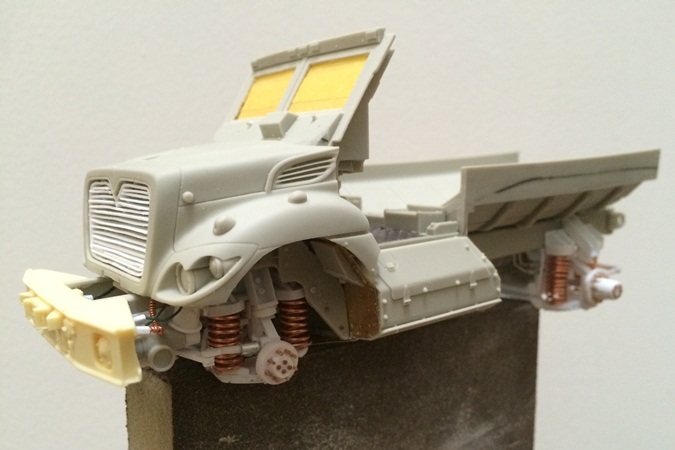
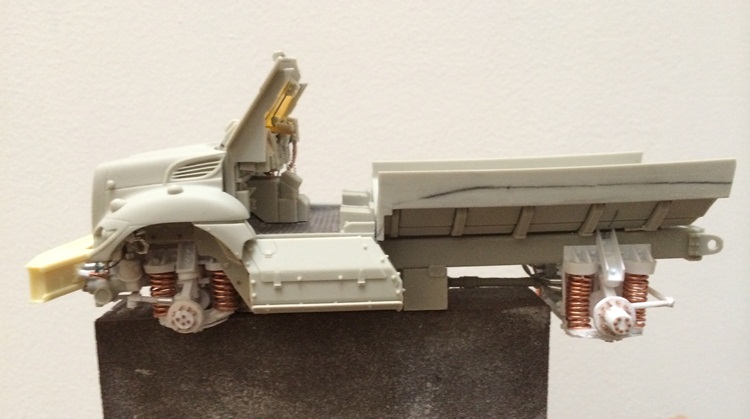
The two above show where the build sits now - clearly quite a way to go, but I think I'm now done with most scratchbuilding on this kit - you can also see i took a shot at getting the horizontal louvers in the grill - that was actually quite a bit more tedious than it might look!!!
OK - that's the update for today - thanks for taking a look and your comments!
Cheers
NIck
As for this post, as my dio doesn't have much scenery per se (like trees groundcover etc) vehicles and shop parts become the scenery...so, I'm in the process of building another truck.
This time is the Navistar Maxx Pro, but, I'm trying to build the Dash variant, which has independent rather than live or solid axles. It will also be placed on a lift of some sort - please have a look:
As you can see above, the early Maxx Pro has solid front and rear axles -
And, as you can see above that in addition to other changes, the Maxx Pro Dash has independent coil spring suspension front and rear. It also has horizontal, rather than vervical louvers in the grill.
I'm trying to make a representation of the Dash version (using the Legend kit as a base kit). I found out that at least one replacement suspension for this truck is made by Axletech International, the 5000 series - which is conceptually similar to the version seen on the Oshkosh MATV, but not the same thing - among several differences is that the 5000 has dual coil springs.
I did find some info on these axles, but more promotional than technical - so, my representation is just that - a representaiton - it involves a fair amount of guess work anbd plenty of scratch building, and head scratching!!!!
Above you can see most of it - essentially two module suspension nodes, self contained and no leaf springs - basically: a subframe, carrier, dual coil springs, planetary wheel ends, lower A frames, a single strut frame above...and, the steering was more than a bit tricky!
The fornt diff is smaller than the rear; good and bad - a bit easier to make fit, but no fun getting everything to fit in a small space!!!
The rear end has more room to work with - but I have very little in terms of useful info about what it actually looks like...I do tho know it's conceptually similar to the front, and it's rated at about one ton more than the front, so the diff housing is noticably bigger -
Above you can see a bit more of the skid/explosive protection (I dont know exactly what all this is called) plate from sheet brass - and some lines to the rear end.
I didn't plan on getting inside yet, but the dashboard, firewall etc are tied cloesly to the hood/fenders and other parts of the front suspension, so, it's now closer to being built...
The two above show where the build sits now - clearly quite a way to go, but I think I'm now done with most scratchbuilding on this kit - you can also see i took a shot at getting the horizontal louvers in the grill - that was actually quite a bit more tedious than it might look!!!
OK - that's the update for today - thanks for taking a look and your comments!
Cheers
NIck
jrutman
Joined: April 10, 2011
KitMaker: 7,941 posts
Armorama: 7,934 posts
Posted: Saturday, January 11, 2014 - 04:53 PM UTC
Ya know Nick I am confident that if you keep going like this you may get this model building thing down one day!!
Freekin' ree-dik-oo-lass brutha,
J
Freekin' ree-dik-oo-lass brutha,
J
PolishBrigade12
Joined: January 31, 2009
KitMaker: 380 posts
Armorama: 366 posts

Posted: Saturday, January 11, 2014 - 06:25 PM UTC
Nick, you really pounded this one out of the park buddy. Those daylight photos are just incredible and from the looks of it, you didn't miss a single detail, awesome work!
Cheers, Ski.
Cheers, Ski.
Stickframe
#362
Joined: December 01, 2013
KitMaker: 1,661 posts
Armorama: 1,202 posts
Posted: Sunday, January 12, 2014 - 06:16 AM UTC
Hi Jerry - ha ha! Yes, I'll stick with it a while longer(!) after this truck, I'll be able to get back to the building itself.
I haven't built a complete resin kit in a while...they really do take some work! Plus the scratch built stuff...ugh! A fair amount of cutting, drilling, carving, sanding, scraping etc on this one! I am remaining optimistic that the paint will tie it all together!
Hi Ski - thanks for dropping by and your comment! For this dio, it's the toolboxes, clutter, spare parts and variations in colors (new vs old) concrete etc take the place of trees, shrubs, and landscape usually seen in dios, and the camera - it can be pretty harsh when you do it wrong, or just don't have enough...so for now, I'll keep adding stuff!
Thanks for checking it out
Nick

matt
Joined: February 28, 2002
KitMaker: 5,957 posts
Armorama: 2,956 posts
Posted: Wednesday, January 15, 2014 - 11:28 PM UTC
Nick,
It keeps looking better & better!!!!
I finally started some machinery for the dio I've been designing in my head for some time. Granted all I did was laminate some sheet stock, and glue some plastruct tubing together to turn the column from.

I figure milling machines & Lathes will be good as well.
I probably outta take a walk thru the shop here again & look at the building framing... I think a lot of it is the "old" riveted type columns:

pacing off the spacing might be a good idea too, as making them will be time consuming.
It keeps looking better & better!!!!
I finally started some machinery for the dio I've been designing in my head for some time. Granted all I did was laminate some sheet stock, and glue some plastruct tubing together to turn the column from.
I figure milling machines & Lathes will be good as well.
I probably outta take a walk thru the shop here again & look at the building framing... I think a lot of it is the "old" riveted type columns:
pacing off the spacing might be a good idea too, as making them will be time consuming.
jrutman
Joined: April 10, 2011
KitMaker: 7,941 posts
Armorama: 7,934 posts
Posted: Thursday, January 16, 2014 - 02:43 AM UTC
Ah yes,things were complicated before our Bethlehem Steel invented the I-beam.
J
J
Stickframe
#362
Joined: December 01, 2013
KitMaker: 1,661 posts
Armorama: 1,202 posts
Posted: Thursday, January 16, 2014 - 09:28 AM UTC
Hi Matt - your project(s) really have me interested - the modern machines and the cool dio both. I'm pleased to follow up with you on either as you move along, in fact, im interested in seeing more pics of the bldg's interior - Like those Per sent a while back, although, he seems to be in a newer bldg -
Anyway, when i did the phase 1 project of this dio, i visited a nearby shop that does restorations on high end cars - the owner let me take some pics:
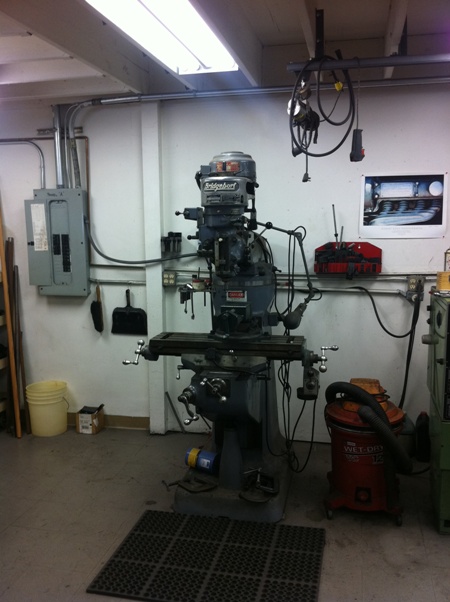
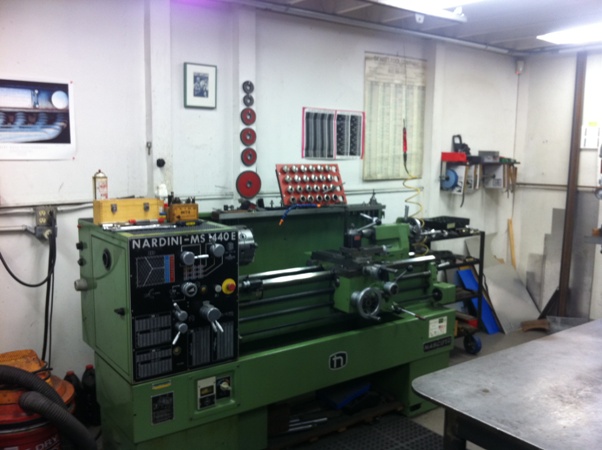
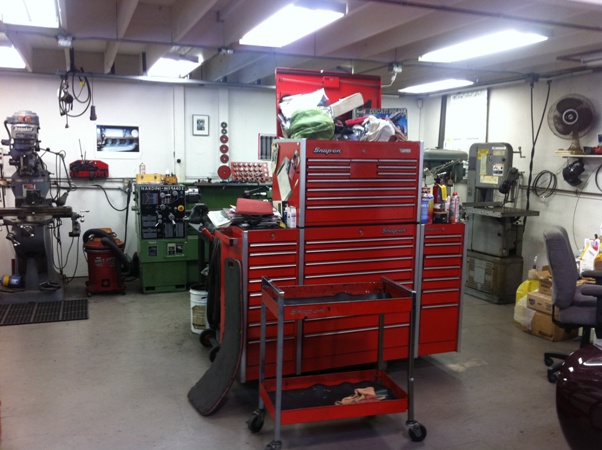
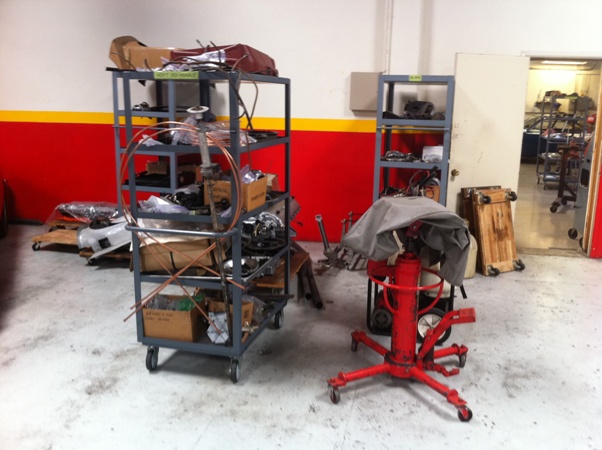
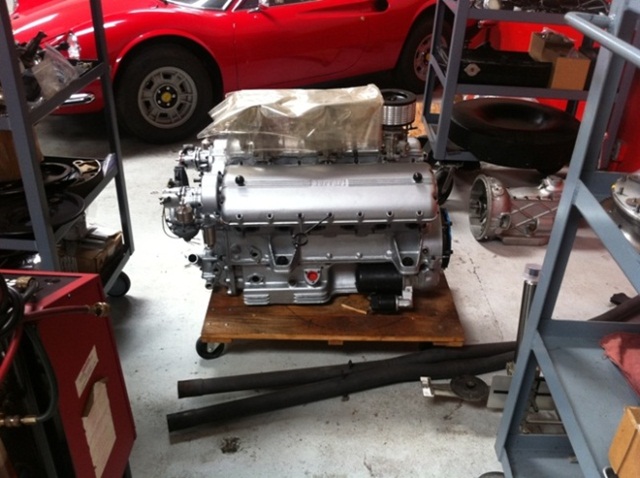
The owner was nice enough to let me walk around the shop and get some pictures - but you can see, this shop is using some older tools....like the Verlinden models shown below:

As you can see in my build, the Verlinden equipment is fairly close to the real thing - there's a lathe too but out of view. However, these tools must be at least 60 yrs old - some newer versions would be great - I'll be following your scratch build - and, heck might try one or two myself..
Jerry - Bethlehem steel - accelerating industry in America! I wonder how old Matt's building is? - riveted or rolled steel? I guess we'll wait an see -
As to the rest of the truck shop dio - I shot the following pics as i ran out the door for work this AM - progress on the Maxx Pro, my conversion of the Legend version to the Dash version -
BTW - I've seen expressions here on Armorama about some kits as being "shake and bake" "fall togehter right out of the box" - this is not one of them (in addition to the headaches caused by my scratch bilding). While the parts have gone together, it has been a challenging build and the instructions could be better(!)
Anyway, here we go some progress pics:
So, there you have it so far - plenty to go though, but i can at least see the finsh line now for that truck!
Here's a question for you though - if you look at the sideview of the truck you'll see a narrow green colored strip - in real life this is made of some sort of nylon(?) material - like a strap with velcro which has black fasteners every few feet, and appears to cover/enclose wiring. I've seen these in most of the pictures of this truck I have - can anyone tell me what it is or does?
Ok - thanks for taking a look
cheers
NIck
Anyway, when i did the phase 1 project of this dio, i visited a nearby shop that does restorations on high end cars - the owner let me take some pics:
The owner was nice enough to let me walk around the shop and get some pictures - but you can see, this shop is using some older tools....like the Verlinden models shown below:
As you can see in my build, the Verlinden equipment is fairly close to the real thing - there's a lathe too but out of view. However, these tools must be at least 60 yrs old - some newer versions would be great - I'll be following your scratch build - and, heck might try one or two myself..
Jerry - Bethlehem steel - accelerating industry in America! I wonder how old Matt's building is? - riveted or rolled steel? I guess we'll wait an see -
As to the rest of the truck shop dio - I shot the following pics as i ran out the door for work this AM - progress on the Maxx Pro, my conversion of the Legend version to the Dash version -
BTW - I've seen expressions here on Armorama about some kits as being "shake and bake" "fall togehter right out of the box" - this is not one of them (in addition to the headaches caused by my scratch bilding). While the parts have gone together, it has been a challenging build and the instructions could be better(!)
Anyway, here we go some progress pics:
So, there you have it so far - plenty to go though, but i can at least see the finsh line now for that truck!
Here's a question for you though - if you look at the sideview of the truck you'll see a narrow green colored strip - in real life this is made of some sort of nylon(?) material - like a strap with velcro which has black fasteners every few feet, and appears to cover/enclose wiring. I've seen these in most of the pictures of this truck I have - can anyone tell me what it is or does?
Ok - thanks for taking a look
cheers
NIck
jrutman
Joined: April 10, 2011
KitMaker: 7,941 posts
Armorama: 7,934 posts
Posted: Thursday, January 16, 2014 - 10:50 AM UTC
You may have had problems with it but they don't show at all. Bloody brilliant.
J
J
matt
Joined: February 28, 2002
KitMaker: 5,957 posts
Armorama: 2,956 posts
Posted: Thursday, January 16, 2014 - 01:02 PM UTC
Nick,
I'm going to try to get out in the shop tomorrow. Hopefully I'll be able to sneak some pics
I'm going to try to get out in the shop tomorrow. Hopefully I'll be able to sneak some pics
Stickframe
#362
Joined: December 01, 2013
KitMaker: 1,661 posts
Armorama: 1,202 posts
Posted: Thursday, January 16, 2014 - 04:36 PM UTC
Thanks Jerry - yeah, that kit....lots of cutting, carving and drilling...but, it does turn out pretty well! I closed it in tonight, and worked more on the roof - antennas, cables etc - right now, attaching the doors. Next, figure out how to make the hydraulic assembly for the back ramp....I'm predicting a third hand will be useful for that task!!! I think I'll use brass rods and aluminum tubing - we'll see...then, on to weathering - non stop fun on this bad boy!
Matt - cool - I looked at the site on google earth and it looks like the site has buildings from new to old. Curious to see which you'll build. Maybe a hybrid? Your favorite parts of a few of them? They look big, so maybe a smaller specialty shop featuring whatever stuff you like the most?
While my model/dio seems huge, in real life it would be pretty small. I didn't want to force perspective because I want to be able to look at it from each side, but to do a bigger building....come on! That would just get ridiculously big, and I don't want to go to a smaller scale.
Thanks for having a look and your comments
Nick
1stjaeger

Joined: May 20, 2011
KitMaker: 1,744 posts
Armorama: 1,727 posts

Posted: Thursday, January 16, 2014 - 08:28 PM UTC
Nick, this is just fabulous!!
Not only do you have the highest skills in building these things, you have the talent to make them look 1/1 scale!!
Truly amazing!! Bravo!!!!
Cheers
Romain
matt
Joined: February 28, 2002
KitMaker: 5,957 posts
Armorama: 2,956 posts
Posted: Thursday, January 16, 2014 - 11:10 PM UTC
Quoted Text
Matt - cool - I looked at the site on google earth and it looks like the site has buildings from new to old. Curious to see which you'll build. Maybe a hybrid? Your favorite parts of a few of them? They look big, so maybe a smaller specialty shop featuring whatever stuff you like the most?
Yeah, the older buildings were built around 1916, newer ones and additions being done along the way. The last major shop buildings were done in the early 1990's. The Tech. Center (Office Bldg.) was finished in 2010.
I added four more pics I found to the album:
http://s60.photobucket.com/user/mdlbldrmatt135/library/Misc%20more%20modern%20Factory%20pics
I'm going for a mid-sized machine/fab shop feel, put into a older building (possibly a "revitalized" type facility. Maybe even have train tracks headed inside like we do here. (May not make it out to the shop again today AAARRRGGGHHH )
Stickframe
#362
Joined: December 01, 2013
KitMaker: 1,661 posts
Armorama: 1,202 posts
Posted: Friday, January 17, 2014 - 04:41 PM UTC
Hi Romain - thanks so much! You know, I'm eventually going to get to the rest of the "ground" this building is sitting on. So far it's mostly concrete, but I want other parts to be gravel, soil with scattered small vegetation and weeds, and decomposing leaves in the corners - as I recall, with this I'll be stepping into your " terrain" (haha - I couldn't resist) - then, another test - can I blend, glue and keep it "in scale" - I "fear" your "comments" once I struggle through this !!! (Haha) thanks again.
Matt - i looked at and saved a few of your new photos - thanks! Regarding your build, I did notice a small diesel yard switcher outside of the buildings - which might even be narrow gauge! I see another scratchbuild in your machine shop dio!!! That would be a cool touch! ( yes, I'm an almost x-model railroader!)
Thanks for the follow up - and hopefully you'll find some time to start at least planning the build -
For me, I thought I'd be able to keep going on my MaxxPro Dash - specifically finishing my floor jacks and getting to painting them and weathering the truck. No such luck - my trusty badger clogged almost as soon as I loaded it with primer! So, brush cleaning here I come - painting and weathering later...
Thanks for taking a look and your comments
Cheer
Nick
matt
Joined: February 28, 2002
KitMaker: 5,957 posts
Armorama: 2,956 posts
Posted: Saturday, January 18, 2014 - 04:59 AM UTC
Quoted Text
Matt - i looked at and saved a few of your new photos - thanks! Regarding your build, I did notice a small diesel yard switcher outside of the buildings - which might even be narrow gauge! I see another scratchbuild in your machine shop dio!!! That would be a cool touch! ( yes, I'm an almost x-model railroader!)
Nope not narrow guage..... We do occasionally ship via rail. the rails do connect with the main N-S line running thru town.
I've had the idea to have the shop refitting some rail cars for a more modern armored train....... LOL kinda fitting into the whole twilight 2000 / post apocalyptic world idea as well.... We'll see where it goes.
Stickframe
#362
Joined: December 01, 2013
KitMaker: 1,661 posts
Armorama: 1,202 posts
Posted: Sunday, January 19, 2014 - 09:41 AM UTC
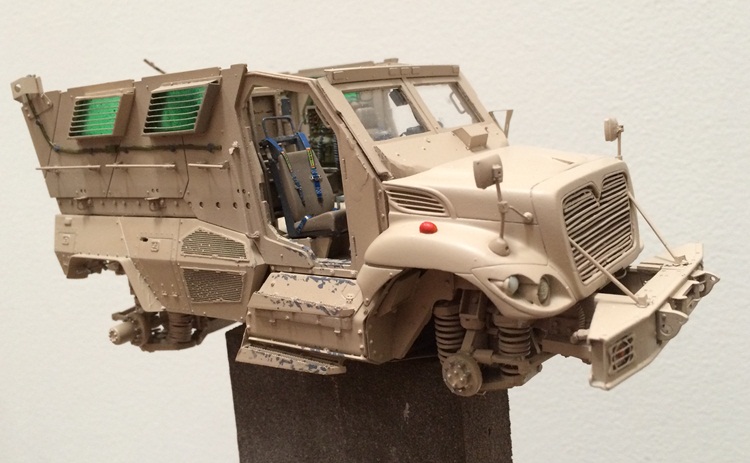
Hello - finally! something that's ready to show. This has been a slow build (the MAXXPRO Dash conversion) - lots of time consuming tsaks, but i think its been worth it - the finshed Maxx Pro and the dio (not nearly finished!)
Please take a look:
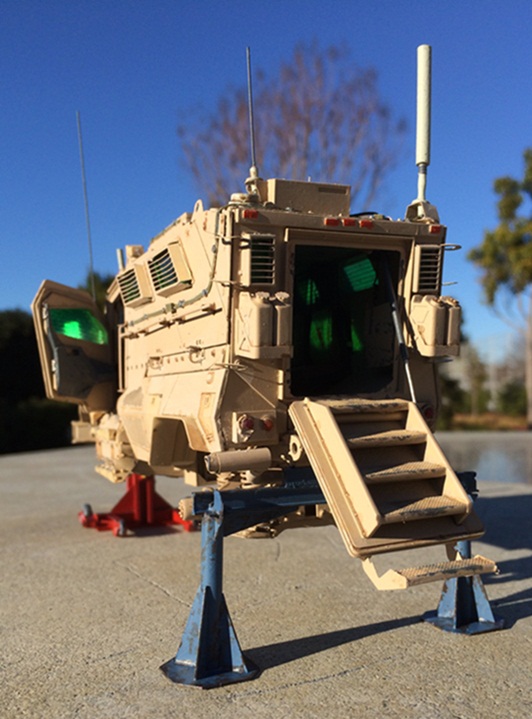
Above is the finished truck - its on jacks because it will be in the shop for a service. You might take note of the independent suspension. As shown in previous posts, the plan was to convert the Legend model with solid axles to the Dash model with independent suspension
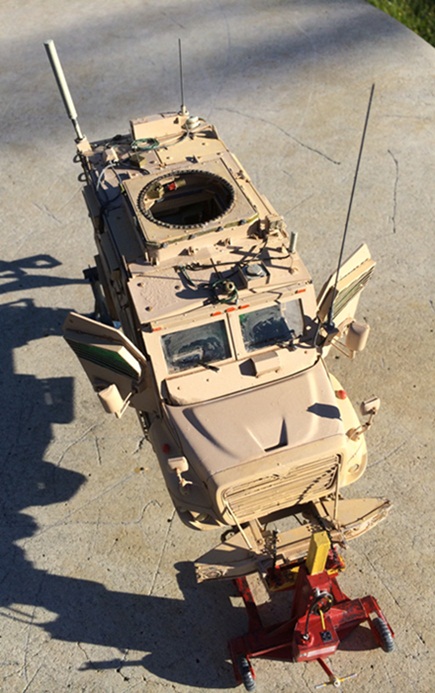
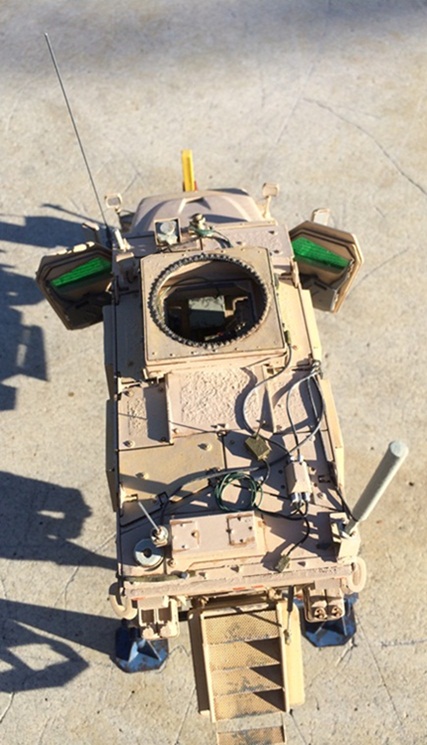
The roof of this truck has plenty going on - so it was fun to do - I took a pass at the non-slip surface - just OK...

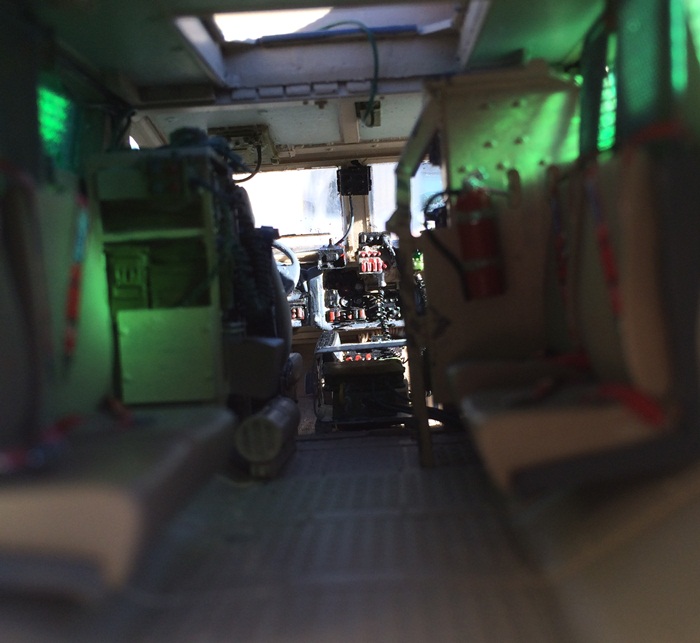
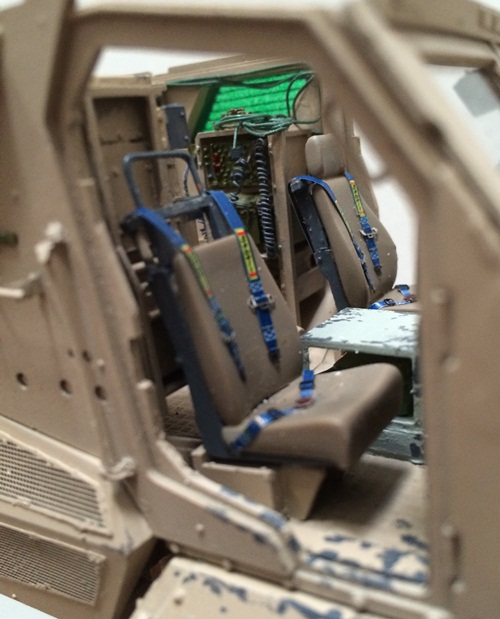
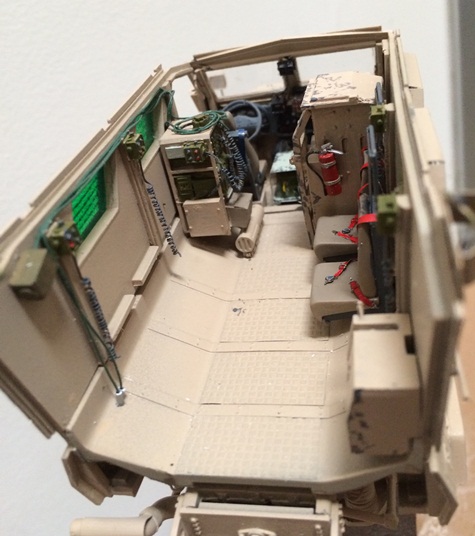
the interior of this truck is also interesting, but will only be seen here! - If you look back the roof pics, you'll see i detailed the cupola area, but left the turret off - so you can see in. I rationalized this as just being another aspect of the service going on to the truck -
OK - back to the actual dio:
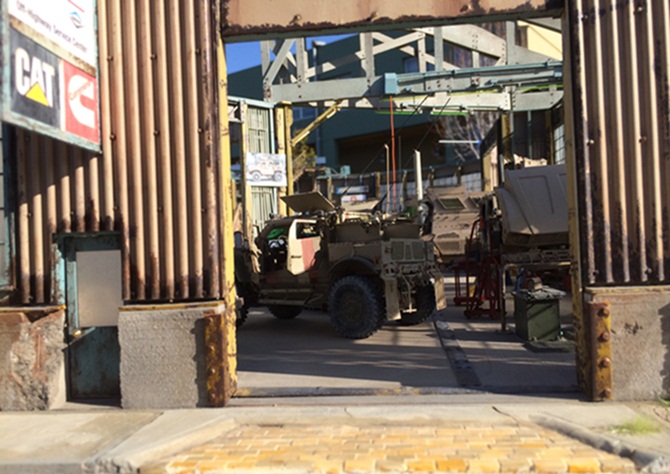

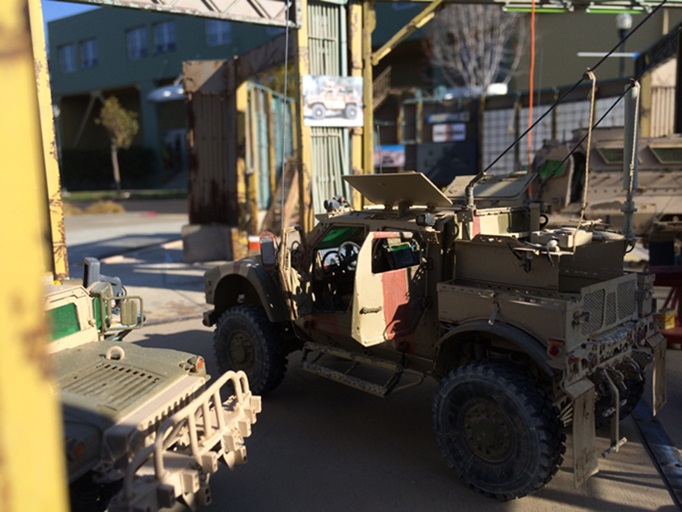
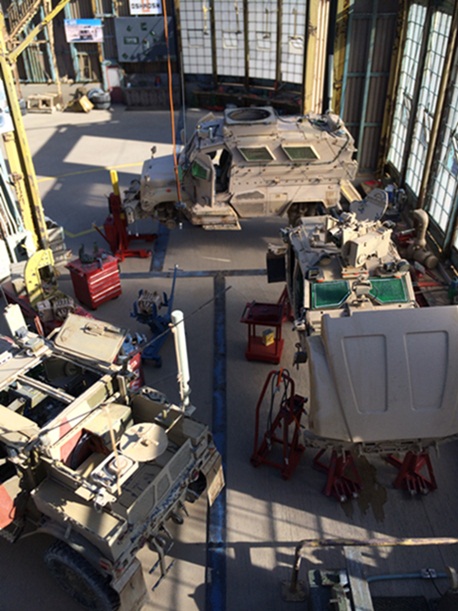
OK - there we are - As many of you know much more about these trucks than me, you might have noticed the M1151 is sitting a bit higher than ususal - I fit it with a TAK 4 suspension (scratched that is...) - it was done as a prototype (in real life), but not sure if ever implemented, but i like it!...
OK - not too much text today - I want to get back to football on TV!
Cheers
NIck
Please take a look:
Above is the finished truck - its on jacks because it will be in the shop for a service. You might take note of the independent suspension. As shown in previous posts, the plan was to convert the Legend model with solid axles to the Dash model with independent suspension
The roof of this truck has plenty going on - so it was fun to do - I took a pass at the non-slip surface - just OK...
the interior of this truck is also interesting, but will only be seen here! - If you look back the roof pics, you'll see i detailed the cupola area, but left the turret off - so you can see in. I rationalized this as just being another aspect of the service going on to the truck -
OK - back to the actual dio:
OK - there we are - As many of you know much more about these trucks than me, you might have noticed the M1151 is sitting a bit higher than ususal - I fit it with a TAK 4 suspension (scratched that is...) - it was done as a prototype (in real life), but not sure if ever implemented, but i like it!...
OK - not too much text today - I want to get back to football on TV!
Cheers
NIck
jrutman
Joined: April 10, 2011
KitMaker: 7,941 posts
Armorama: 7,934 posts
Posted: Sunday, January 19, 2014 - 11:46 AM UTC
OK,that is sick. But... a good sick.
J
J
1stjaeger
Joined: May 20, 2011
KitMaker: 1,744 posts
Armorama: 1,727 posts
Posted: Sunday, January 19, 2014 - 11:51 AM UTC
Hi Nick,
you've done it again m8!! These pics look so real, so you are not only an expert dio builder, but you are also an excellent photographer!!
Don't worry about the terrain bit! There are so many great dio builders here...you'll get plenty of help should you actually need it (which I doubt
 ).
).Just ask whenever you feel like it!! This project is so awesome, it must continue that way...and you'll see to that!!
Deep bow from me for a splendid show!!
Cheers
Romain
matt
Joined: February 28, 2002
KitMaker: 5,957 posts
Armorama: 2,956 posts
Posted: Sunday, January 19, 2014 - 10:59 PM UTC
Nick,
Looking outstanding!!!
Here's a little preview of what I managed to get done yesterday (only had a couple hours free & had to do some tuning on the milling machine)
Start of radial drill press
Looking outstanding!!!
Here's a little preview of what I managed to get done yesterday (only had a couple hours free & had to do some tuning on the milling machine)
Start of radial drill press
Stickframe
#362
Joined: December 01, 2013
KitMaker: 1,661 posts
Armorama: 1,202 posts
Posted: Monday, January 20, 2014 - 11:57 AM UTC
thanks for having a look and your comments!
Jerry -- yeah - I know what you mean! thanks! although...this week's project is to do some building and painting of figures....uhh...yeah....,this could really turn out to be sick!
I'm using a few figures from MK 35 and Industria Mechanika -neither of which is really just right....the MK 35 perfectly reflect life in a european village 50 or 60 years ago, and the industria mechanika reflect a future time living aboard an airship - so, yes, the knife is out and those poor little guys are getting a special mix of cutting and putty! we'll see how this works out - I am fairly confident they won't ever be mistaken for having been built and painted by you!
Romain - thanks! the natural light helps alot - especially with the tones of the desert colors - the shadows, seams, and details "pop" more than with indoor lighting (i dont have special photo booth or tools anyway). I live near a park with a large concrete bench/sculpture, which, it turns out, is perfect for setting models on for pictures! Also, as its a public park, lots of people stop by to have a look, which is actually pretty fun to discuss -
As to the terrain - I've got to think carefully about this -I'm really in the mood to put some grass, shrubs, dirt and trees in somewhere....but, i don't want to start another build for that....maybe along the wall with the red and white checkerboard? - that is too narrow to park a vehicle on, but not too narrow for some really nice, neglected and overgrown debris, parts etc....hmmmm...
Matt - thanks for checking in - keep it up! I know you don't have much time, so those tools will happen at 20 minute incrementts!
Also, as I know you're a tool guy in general, I recently came across a company called Otto Frei (maybe old news around here?) - they sell professional grade tools for jewelry makers - many could be great for model building too, including some very unusual tools that might be perfect for what we do - especically for scratchbuilding.
Thnaks for having a look -
Cheers
NIck
matt
Joined: February 28, 2002
KitMaker: 5,957 posts
Armorama: 2,956 posts
Posted: Monday, January 20, 2014 - 11:36 PM UTC
Quoted Text
Matt - thanks for checking in - keep it up! I know you don't have much time, so those tools will happen at 20 minute incrementts!
Also, as I know you're a tool guy in general, I recently came across a company called Otto Frei (maybe old news around here?) - they sell professional grade tools for jewelry makers - many could be great for model building too, including some very unusual tools that might be perfect for what we do - especically for scratchbuilding.
Nick,
they have a ton of cool stuff!!!
The longest part of what I got done so far was all the different setups on the milling machine, but then again it's the same in the shop here.... an hour worth of work can sometimes take 7 to setup.
matt
Joined: February 28, 2002
KitMaker: 5,957 posts
Armorama: 2,956 posts
Posted: Wednesday, January 22, 2014 - 12:52 AM UTC
Quoted Text
OK - there we are - As many of you know much more about these trucks than me, you might have noticed the M1151 is sitting a bit higher than ususal - I fit it with a TAK 4 suspension (scratched that is...) - it was done as a prototype (in real life), but not sure if ever implemented, but i like it!...
Nick,
I'm guessing you just used the google images you could find to scratch it??
Stickframe
#362
Joined: December 01, 2013
KitMaker: 1,661 posts
Armorama: 1,202 posts
Posted: Wednesday, January 22, 2014 - 04:12 AM UTC
Yes - if you search "tak 4 hmmwv" you'll see some clear images inuding one with a side by side of stock and modified. Like the suspension on the Dash, this is a modular unit
Cheers
Nick
Cheers
Nick
Stickframe
#362
Joined: December 01, 2013
KitMaker: 1,661 posts
Armorama: 1,202 posts
Posted: Wednesday, January 22, 2014 - 06:56 AM UTC
Hi Matt -
I'm sorry I can't immediately find the source of this photo, but have a look - you can clearly see the difference between the stock version and the TAK 4 - the photo is good enough that it was fairly easy to generally figure out how to scratch build it -
take a look:
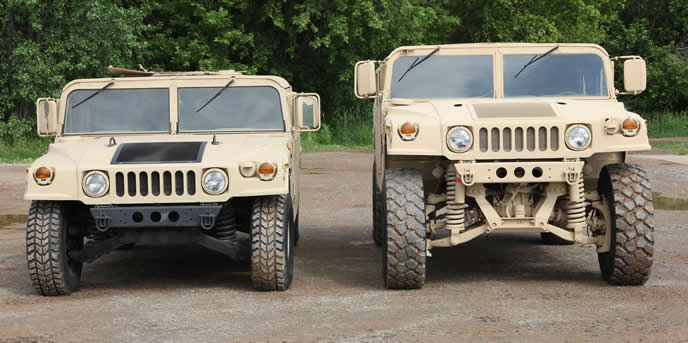
I like the look!
Nick
I'm sorry I can't immediately find the source of this photo, but have a look - you can clearly see the difference between the stock version and the TAK 4 - the photo is good enough that it was fairly easy to generally figure out how to scratch build it -
take a look:
I like the look!
Nick
 |

WEB HOSTING BY


Copyright ©2021 Armorama and Kitmaker Network, a subsidiary of Silver Star Enterprises
All Rights Reserved. Please read our Conditions of Use and Privacy Policy.
All Rights Reserved. Please read our Conditions of Use and Privacy Policy.