Campaigns: Completed Campaigns
Campaigns that are completed should be grouped here.
Hosted by Richard S.
World of Tanks Campaign II
MikeyBugs95
Visit this Community
New York, United States
Joined: May 27, 2013
KitMaker: 2,210 posts
Armorama: 1,712 posts
Posted: Tuesday, December 16, 2014 - 01:26 AM UTC
I finally finished my E8...

Now I just have to figure out how to upload the pictures... Again...


Pytagoras
Visit this Community
Møre og Romsdal, Norway
Joined: December 03, 2012
KitMaker: 300 posts
Armorama: 285 posts
Posted: Wednesday, December 17, 2014 - 10:04 PM UTC
Very nice E8, Michael!

That one deserves a diorama in the future.
MikeyBugs95
Visit this Community
New York, United States
Joined: May 27, 2013
KitMaker: 2,210 posts
Armorama: 1,712 posts
Posted: Wednesday, December 17, 2014 - 10:14 PM UTC
I actually do plan on it. I have a M3A1 halftrack and will be getting a 75mm Pack Howitzer so I'll plan on doing a dio of a western German town. But first I need to make a small one to practice on. I also need to reapply some pigments as these were taken off when I shot a flat coat and I need to apply another flat coat as the one on it right now is still a bit glossy.
MikeyBugs95
Visit this Community
New York, United States
Joined: May 27, 2013
KitMaker: 2,210 posts
Armorama: 1,712 posts
Posted: Thursday, December 18, 2014 - 12:31 PM UTC
I forgot to do one thing with my kit... I forgot to put on the headlight lenses!!
MikeyBugs95
Visit this Community
New York, United States
Joined: May 27, 2013
KitMaker: 2,210 posts
Armorama: 1,712 posts
Posted: Tuesday, December 23, 2014 - 12:57 AM UTC
Well what with the new update, anyone can do an Archer or a Firefly now.
ComradeMP
#0
Visit this Community
United States
Joined: July 31, 2011
KitMaker: 472 posts
Armorama: 453 posts
Posted: Tuesday, December 23, 2014 - 07:23 AM UTC
Working my way there. Want to work up to and through the archer and firefly. Really hate going back down to the lower tier games, the quality of the players down there......

Well I at least got a good laugh here:


I think I'd go Tasca. Found a Tasca JGSDF Easy 8 for $40 bucks at the LHS, going there for a after Christmas special and look around for the Tasca firefly kits I've seen in there.
WARDUKWNZ
Visit this Community
Auckland, New Zealand
Joined: June 01, 2011
KitMaker: 1,716 posts
Armorama: 1,638 posts
Posted: Tuesday, December 23, 2014 - 03:39 PM UTC
Well i can happily say i just had the best game i have ever had and heres the results


Now to just repeat that in every single game i have

Yeah right

Phill
djohannsen
Visit this Community
Virginia, United States
Joined: June 24, 2005
KitMaker: 364 posts
Armorama: 355 posts
Posted: Friday, January 02, 2015 - 01:06 AM UTC
Sorry for the long absence, but work and the holidays have kept me from having much time to build. Anyway, I'm back in the saddle. After more cutting, scraping, and drilling than I ever bargained for, I will soon be mounting the suspension. I grabbed the AFV Club VVSS suspension to replace the early units that came with the Dragon kit. I did, however, use the Dragon "open spoke" road wheels (which took some drilling out to make fit) to match the set-up on my WoT Sherman.

Not a shake and bake replacement, I had to cut-off the bogie mountings from the hull in order to install the AFV Club bogies. I also have to say that the AFV Club units do not have the detail and finesse of the Dragon bogies. You can see that quite a bit of green putty was also needed to hide the seam. The AFV Club units, though, are fully workable, which might be a plus for those considering a diorama.

Now, I just need to replace some rivet detail on the hull(inadvertently scraped off during the removal of the bogie units) and then I can make some better progress...


djohannsen
Visit this Community
Virginia, United States
Joined: June 24, 2005
KitMaker: 364 posts
Armorama: 355 posts
Posted: Saturday, January 03, 2015 - 05:29 PM UTC
Before tackling the rivets (need to think about that for a bit), I've started on the turret. As this is my first use of a large resin update, I'm finding it interesting... Though it's only a turret, it's still not all that easy to know where to stop cutting/sanding (removing the casting blocks) and deciding where things should be glued. King of fun, actually.

As for WoT, I've almost got my 3.5'ish million tokens (or whatever they are) for my tier 9 M46! I've not loved the M26 (haven't quite figured out how to play it that well), and am looking forward to taking the next step up the medium tech tree.
AnalogKid
Visit this Community
Texas, United States
Joined: December 20, 2014
KitMaker: 46 posts
Armorama: 42 posts
Posted: Sunday, January 18, 2015 - 11:33 PM UTC
Greetings all. I recently joined Kitmaker with a focus here in Armorama after getting back into the hobby in early 2014. I just discovered these campaigns and think they are a pretty cool idea. I was even more intrigued to see this one focused on WoT. I had been on a prolonged break from the hobby and in a multi-year online video game kick when a buddy of mine turned me onto WoT. Playing this game an excessive amount of times made me come to the realization it would be fun building models of the virtual tanks I’ve enjoyed playing. This game is the fuel behind the resurgence in my interest in scale model building...to the point where I now pass up playing WoT to work on my model armor. Since getting back into things I've finished a StuG III, Panzer IV, Panther, and a Tiger II (pictures in my gallery). I just finished a Tiger I and now have a clear and open workbench to start another project.

I play only German tanks in the game and have focused my efforts on a German heavy, medium, and TD line. The first Tier 10 I unlocked was an E-100. I chose this over the Maus due to the firepower of the 15cm available as an upgrade on the E-100 over the 12.8cm of the Maus...although the latter can take more of a punishing. When I got back into my WoT-fueled modeling rush last year I set a goal of building all the armor that I play (or had played) in the game. I added to my stash both the Trumpeter and (old) Dragon versions of the E-100 and found on the Bay the cast-resin Rhino version of the E-100 Krupp turret. I have decided to build the Dragon version of the E-100 and after looking more closely at the kit this one is indeed showing its age. According to the instruction sheet it was produced in 1994 and kits have come a long way in 21 years. But, when finished, it should look respectable. Along the way I will be looking for more aftermarket parts and add-ons for this kit in an effort to give it more detail. A plus is that it is a paper panzer so imagination can play a larger role in this kind of build. Any suggestions that anyone may have regarding this kit please let me know...I would love to hear from you.

As of today it looks like there are 133 days left in the campaign. As I can usually knock-out a kit in about a month’s time I think I should be fine with meeting the deadline. (I am fortunate to have plenty of free time during the week and especially on weekends.) I will be posting updates and pics along the way, and especially as I build and mate the turret as I am sure there will be interest in this part of the build. Posted with today are pics of the un-built kit and turret as well as a screen shot of my E-100 from some time earlier in 2014. Today will be spent cutting and sanding road-wheels...my usual start to every armor kit.

-Len


spongya
Staff MemberAssociate Editor
MODELGEEK
Visit this Community
Budapest, Hungary
Joined: February 01, 2005
KitMaker: 2,365 posts
Armorama: 1,709 posts
Posted: Thursday, January 22, 2015 - 06:35 PM UTC
Super Pershing is done.

I wrote a review about the Modeltrans conversion; not a bad effort, but it has its problems. The most annoying two issues: no hatch provided for the commander's hatch (I used a very unhistorical tiger from the spares box, which does not look remotely like the original), and no spare links are provided for the turret -and I was unable to locate any 1/72 tracks for the Pershing. Some casting imperfections were there, too, but most of them were fixed.


And an extra (not really in this campaign, as I did this for the pnzIV one; nevertheless it deserves a mention


djohannsen
Visit this Community
Virginia, United States
Joined: June 24, 2005
KitMaker: 364 posts
Armorama: 355 posts
Posted: Sunday, January 25, 2015 - 03:41 AM UTC

Quoted Text

Greetings all.


Welcome aboard, Len. Pre-WoT, I would have said that I had absolutely no interest in the proto-types/paper panzers of any nation. Now, I find it an interesting aspect of AFVs (I may even build the Takom Object 279). Anyway, I'm looking forward to watching your build and hope to maybe even use it as a spark to learn something about the E100.


Dave
AnalogKid
Visit this Community
Texas, United States
Joined: December 20, 2014
KitMaker: 46 posts
Armorama: 42 posts
Posted: Sunday, January 25, 2015 - 07:20 AM UTC
Greetings all and here with my first update on the E-100 build and wanted to get an update out before the end of the weekend. This past week has been spent primarily on the lower hull. As I mentioned in my first post in the campaign this is an old kit (DML # 6011). I picked it up second hand last year and everything was still wrapped in plastic. When I opened the plastic and really got into this kit the difference between newer dragon kits and this older one is very evident. But, it has been a fun build so far. Some issues I’ve discovered along the way are fit issues (documented in the attached pics) that you do not see in new Dragon kits. The front head-lamp was very flimsy coming off the sprue as there is a very thin “neck” that holds the lamp to its base. As I feared it snapped so I just rebuilt it with a brass neck instead. I also replaced its photo-etched base with a styrene one. While CA does a somewhat good job of holding PE to styrene a styrene-to-styrene bond with liquid cement is even better…and protruding parts like this need all the help they can get from future accidental handlings.


I also added grab irons/handles to the front. While playing this tank in WoT I would sometimes wonder how crews would climb up into the entry hatches on this beast. Yes, I know all experienced crews have their secrets and they would eventually find a way but this is a Paper Panzer and therefore artistic license has more of an influence than historic record. So, I decided to add the handles. I will do the same for the turret as well.


This weekend’s work is centered on the turret which is cast-resin Rhino kit. It is designed for use with both the Dragon and Trumpeter kits. So far it has been an easy build and it is a pretty nice kit. I will finish up this update with a discussion on barrels for the E-100. In the game you get a choice of two guns: a 12,8cm and a 15cm. The 12,8cm actually delivers slightly better penetration with standard ammo than the 15cm but if you can pen with 15cm you get the added benefit of greater destructive force…and thus greater damage to the enemy. I have always played with the 15cm and so I want my model to look as close to this as possible. Plus, I love the look of the 15cm over the 12,8cm.
The Rhino kit comes with a nicely cast 12,8cm barrel (with piano wire cast in the center to keep it from warping) but upon closer inspection the barrel that comes with the Dragon kit looks a lot like the 15cm gun in the game. There is no identification of the gun in the instructions except that the front page description of the E-100 states that it was armed with a 12,8cm gun. But, its diameter is definitely larger than that of the Rhino barrel. In addition, the muzzle brake on the Dragon barrel is exactly like that of the 15cm gun in the game. Upon closer inspection the diameter of the resin barrel that comes with the Rhino kit is approximately 3mm (internal diameter) while the Dragon kit barrel is approximately 4mm (internal diameter). In 1/35 scale 12,8cm is 3.66mm and 15cm is 4.29mm. Close enough…I’ve decided to mate the Dragon barrel to the Rhino turret.


suikmoto
Visit this Community
Tartu, Estonia
Joined: June 30, 2014
KitMaker: 152 posts
Armorama: 92 posts
Posted: Monday, January 26, 2015 - 04:17 PM UTC
Hi ive been watching this campaign and now decided to join.
Ill build dragon 1/72 e100 when i recieve it but i only have it on wot blitz because my laptop can barely handle wot. I also will use self made aluminium krupp turret with 150 or 128 mm gun.
spongya
Staff MemberAssociate Editor
MODELGEEK
Visit this Community
Budapest, Hungary
Joined: February 01, 2005
KitMaker: 2,365 posts
Armorama: 1,709 posts
Posted: Tuesday, January 27, 2015 - 02:57 PM UTC
Welcome
suikmoto
Visit this Community
Tartu, Estonia
Joined: June 30, 2014
KitMaker: 152 posts
Armorama: 92 posts
Posted: Wednesday, January 28, 2015 - 05:10 PM UTC
Is it ok if i had e100? As i sold it about week ago to buy e75 as i did and do alot better in it though i still like e100.
ComradeMP
#0
Visit this Community
United States
Joined: July 31, 2011
KitMaker: 472 posts
Armorama: 453 posts
Posted: Thursday, January 29, 2015 - 07:38 AM UTC
Go for it. I don't see why not.

Got enough credits for my JpzE-100. It's nice, reload time long, and I've noticed it seems to miss quite a bit when you trying to hit a moving target. Has a noticeable delay when firing, just like the howitzers in the lower tiers. But man when it hits....
suikmoto
Visit this Community
Tartu, Estonia
Joined: June 30, 2014
KitMaker: 152 posts
Armorama: 92 posts
Posted: Thursday, January 29, 2015 - 10:58 AM UTC
Now all to hope for is that dragond turret ring matches my turrets as its pretty much comlete after last night i worked on it.
suikmoto
Visit this Community
Tartu, Estonia
Joined: June 30, 2014
KitMaker: 152 posts
Armorama: 92 posts
Posted: Friday, January 30, 2015 - 01:39 AM UTC
I have turret done but as it was done before i entered tje campaign i might have to use kits turret although after campaign i would still mount it on the chassi. I hope pic shows up.
AnalogKid
Visit this Community
Texas, United States
Joined: December 20, 2014
KitMaker: 46 posts
Armorama: 42 posts
Posted: Sunday, February 01, 2015 - 07:49 AM UTC
Hello everyone…here with a weekly update on my E-100 progress. This past week found me working on the lower part of this piece: primarily the wheels and the track. I started with a coat of the overall basecoat of the tank (RAL 6011). When I get to the painting of the overall tank I’ll get into my philosophy for colors and some of the sources for my decisions. In addition to RAL 6011 I’m adding RAL 8012 and RAL 7028. These are evident in the road wheel colors as you see in the pics below. The actual colors that I am using are Tamiya’s XF-9, XF-59, and XF-67. I know that the standard German tri-tone in Tamiya colors is XF-60, 61, and 64 but I wanted to try something different. Plus, RAL 6011 is a bit lighter in shade than the older standard of RAL 6003 and my eyeball determined that XF-67 (NATO Green) was a pretty close match. Again, I’ll get into more of my painting approach in a future post. Once the wheels were painted I went over the rims with a graphite stick to simulate wearing of the paint down to bare metal. These will be sealed with Vallejo satin varnish here soon in order to seal in the graphite and set up for weathering.

Additional work centered on the track links. As this is an older kit the individual track links were molded onto the trees and not provided in separate bags like newer Dragon kits provide. Plus, clean-up of these links took quite a bit longer newer track links. But, in the end, I like the way they are coming out. I have put a coat of primer on the tracks and tomorrow I’ll be putting down a coat of Vallejo acrylic steel followed by a coat of satin varnish and then some weathering with enamel washes.

My approach to finishing the underside first is that this tank has quite the large and heavy side skirts. So much so that trying to add the wheels and tracks after the skirts are on would be pretty daunting. With this approach I am going to finish the wheels and track, tape them off, and add the side skirts. This way, when I paint the upper parts of the tank I can integrate the painting of the side skirts at the same time and make uniform paint job a bit easier.
That’s it for this week…I’ll be posting more next weekend.
Take care and happy modeling.

-Len


suikmoto
Visit this Community
Tartu, Estonia
Joined: June 30, 2014
KitMaker: 152 posts
Armorama: 92 posts
Posted: Sunday, February 01, 2015 - 02:53 PM UTC
Looks great, hope to get mine soon so i can get building little fellow in 72 for your 35 one.
ComradeMP
#0
Visit this Community
United States
Joined: July 31, 2011
KitMaker: 472 posts
Armorama: 453 posts
Posted: Saturday, February 07, 2015 - 12:38 PM UTC
Alright time to focus. Let's get'r done.

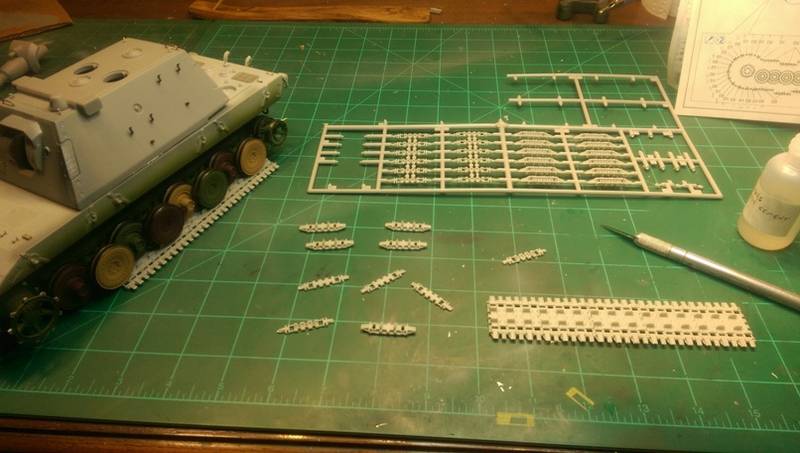
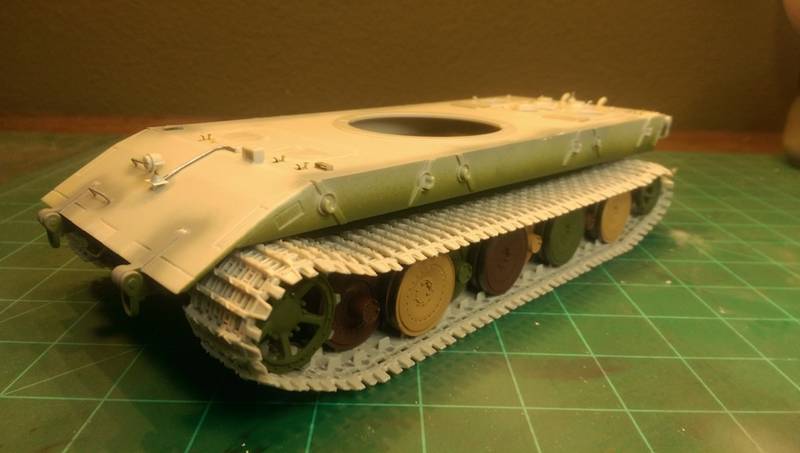
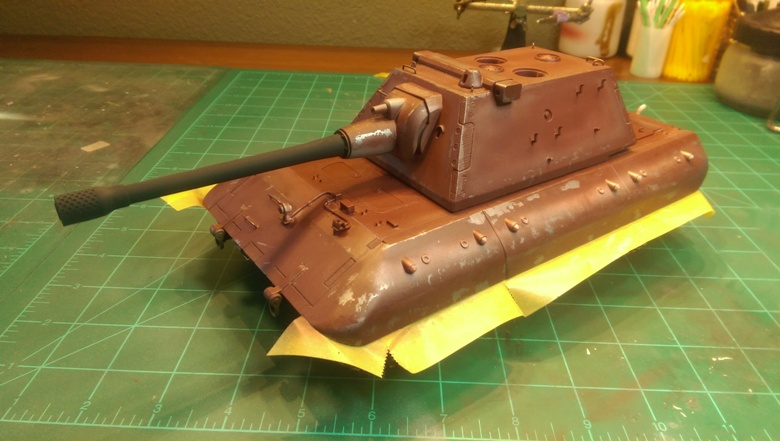
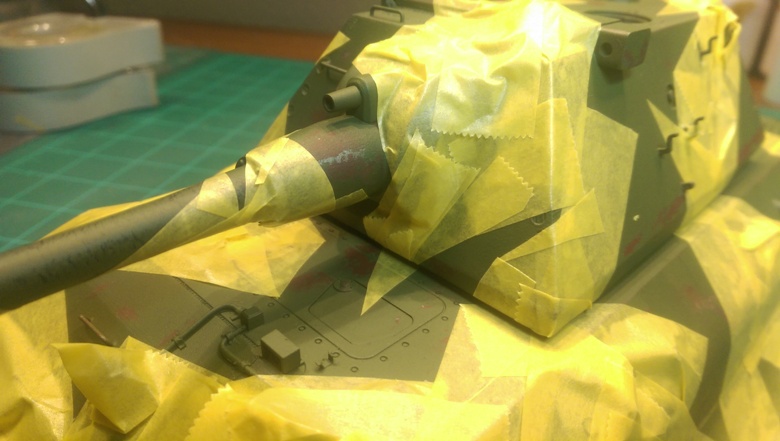
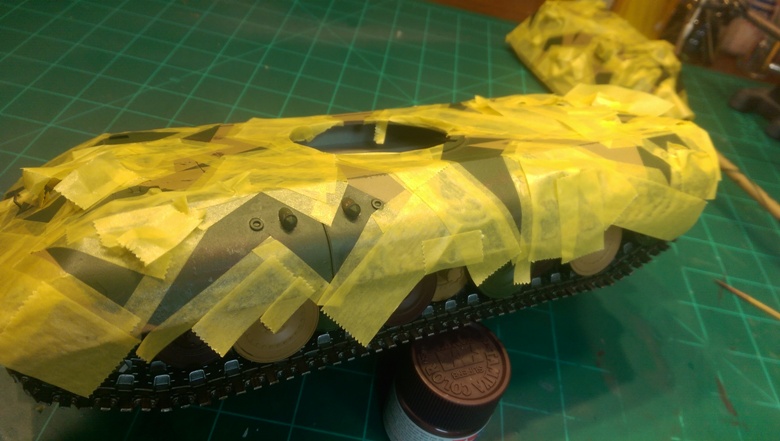
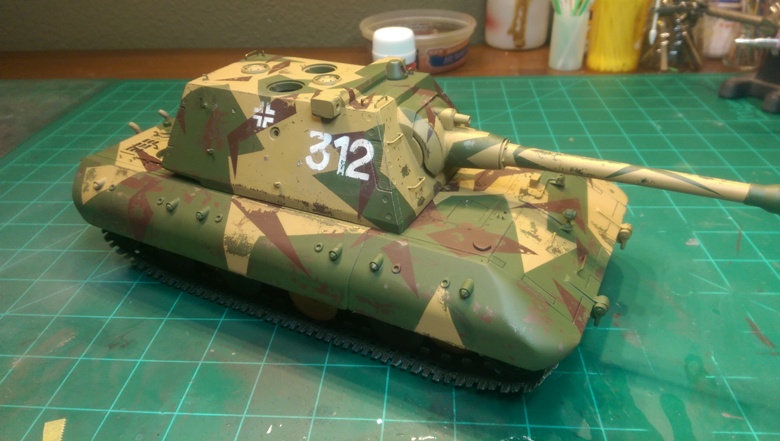
The E-50 has some paint on it, just need to figure out how to do the toothed idler. Seems to be flat on the inside, been trying something out with a idler from a tamiya Tiger II.

ISU has a bunch of PE work involved so that one's being put on the back burner for now. But I did start something else to get me moving again.
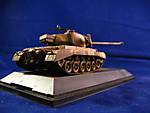
T-54


Tamiya base and Legend conversion


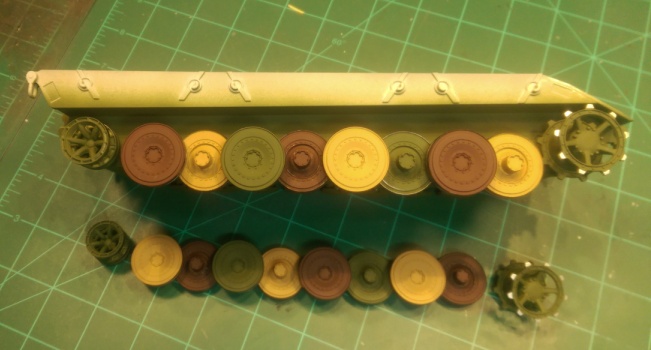
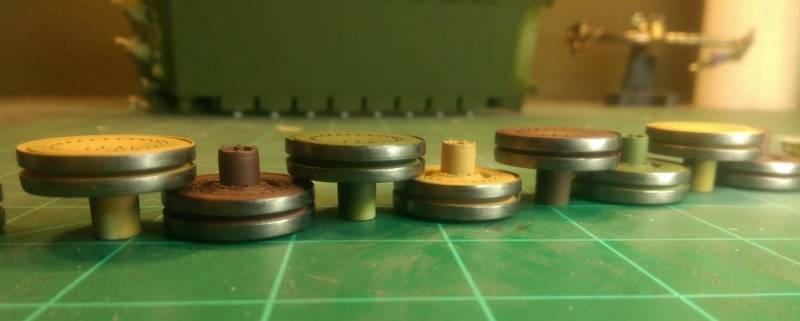
Legend spider road wheels. Purchased T-54 idlers from shapeways, so I'm spared trying to make my own.

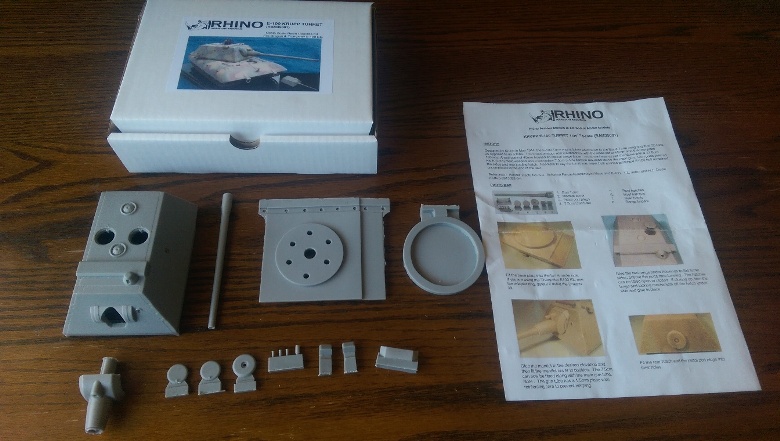
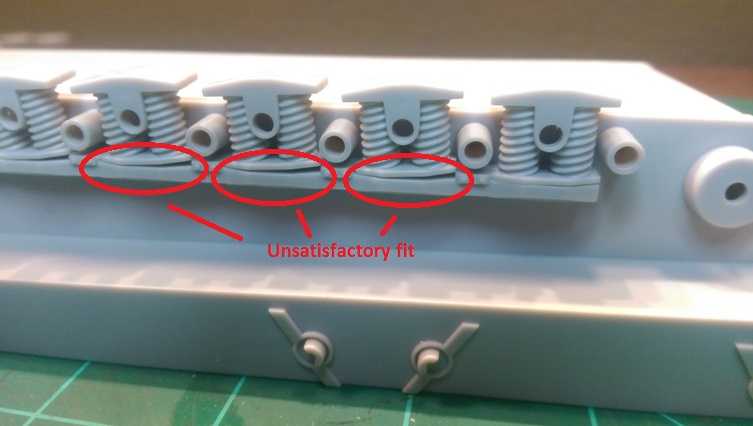
Kind of got me excited since this is my first conversion kit and first go at a resin. Man those really thick casting block parts were a real pain to clean up, good thing I have a dremel.

Had to do some repair to the back because of the casting block. Hatches in place and added the grab handle on the commander's copula. The periscopes have clear plastic on them. Looks really nice in person. The gun mantle has the dust cover which I'm sticking with since I like it. I don't see why the in game doesn't have it. Confuses me why some tanks has such and such and other don't.


Dshk in place. Used the kit coax gun from a trumpy T-62. Needs some more things done, and the locator holes for the copula search light need to be filled in.


Kit gun barrel, some styrene tube and a muzzle break from a Trumpy IS-3M. If you want to be picky, the evacuator should be slightly further back and the gun barrel length should be slightly shorter.


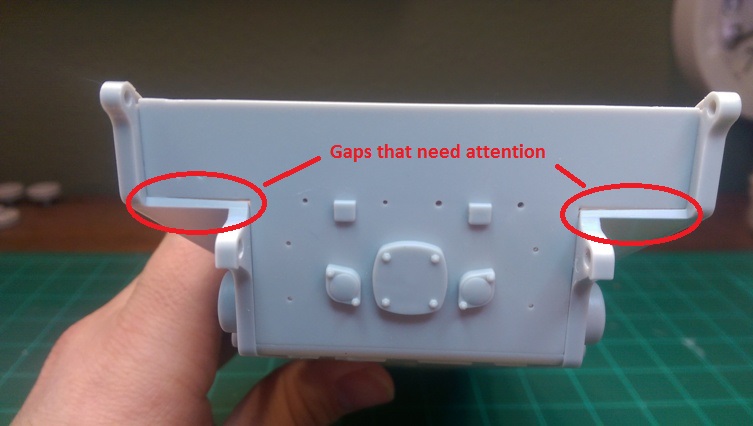
Engine deck in place, needs some repair around the back corner. Seems small chunks broker off while I was removing it from the casting block. Fender supports removed and just need to put the finishing touches on the back.


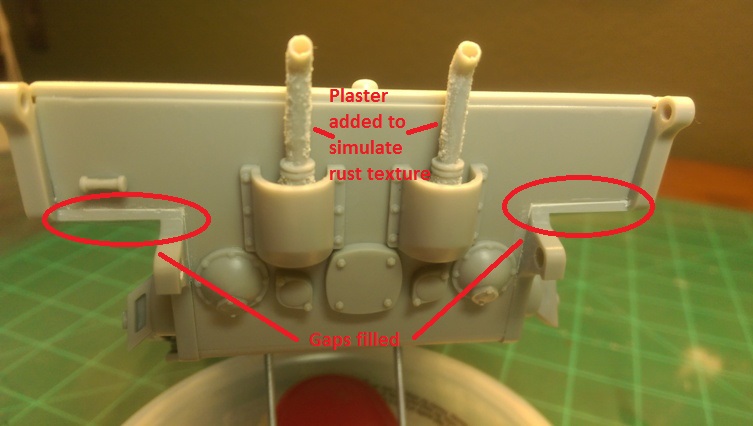
Fender supports in place and a bunch of cutting and sanding along with some brass wire in place.

And this is where I am at right now.


Already starting on the head light. Rounded one up from a Trumpy KV kit and will be using the kit head light guard with some brass rod to make it higher. Splash guard being moved lower, bulges on the fender being removed as per the render.

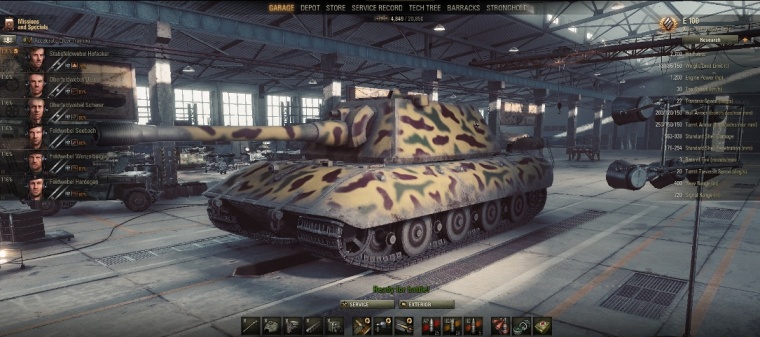
In game render isn't a straight up 1949 T-54, so some stuff from the kit T-55 is being retained. The convoy lights for one, splash guard needs to be modified. The cut out for the headlight should be smaller since there is only one headlight here. Bunch of AM stuff coming in, like tow cables, indy tracks, etc. All this along with my new air compressor/air brush with the Medium green I plan on using for this build.


suikmoto
Visit this Community
Tartu, Estonia
Joined: June 30, 2014
KitMaker: 152 posts
Armorama: 92 posts
Posted: Saturday, February 07, 2015 - 05:20 PM UTC
Got the e100 yesterday and i totally forgot to take starting pic so im kinda out if i wont get another kit of vehicle that i have in game.Although i have seen 1/72 e75 somewhere.
AnalogKid
Visit this Community
Texas, United States
Joined: December 20, 2014
KitMaker: 46 posts
Armorama: 42 posts
Posted: Friday, February 13, 2015 - 05:01 AM UTC
Greetings all...here with my next update on my E-100 build:

The best thing about paper panzers, in my opinion, is that you can be a bit more creative in what colors and camouflage patterns you apply to the vehicle. One of the challenges I am finding as I build model after model of German WWII armor is changing up the colors and patterns. Luckily German armor of this era allows for a lot of variation as patterns were, for the most part, applied in the field. Also, from what I can gather, patterns - beyond the base dunkelgelb - were also applied in the factory in limited cases (disc camo, etc). It is this approach that helped me shape how to paint this E-100.

My philosophy is founded on a fictional German manufacturing capacity that was more robust than it actually was in 1945 since the production of an E-100 beyond prototype/testing would have to have had a relatively strong industrial capacity. Taking this logic further, the ability to paint the E-100s in the factory would also be somewhat stable and intact. I also know historical record shows that in late 1944 the order was given to start painting (by 1945) the base coat in dark green and opposed to dark yellow and that the dark yellow and red were to be pattern colors. I also took this into account in my approach to this piece. I decided on a base dark green RAL 6011 (as opposed to RAL 6003) which is represented on the model with XF-67 - NATO Green. I've used the old standard XF-61 numerous times in the past and wanted to try a different shade of dark green. Over that is dark yellow and red-brown in a hard-edge (to simulate the use of patterns/stencils), factory-applied pattern: yellow over green splinter pattern with red-brown splinters on top. I chose the splinter pattern to mimic those seen on German aircraft of the era. Again, something different.

My experimentation continued with my recent learning and really liking the ability to chip paint with the “hairspray” technique. I was scheming while in the middle of the build phase about paint chipping all the way down to the bare metal of the tank. To do this I would have to paint chip "up" with successive hairspray layers after each coat is down. For this model I used a base coat of Vallejo Model Air steel in select, high-traffic areas followed by a hairspray layer. Over this went a coat of Vallejo RAL 8012 red oxide and select areas were chipped away. I took a picture of all sides of the model to record where I chipped away because the next successive coat would cover it all up. Next went on another layer of chipping solution (aka, hairspray) and then the XF-67. Using photo reference I chipped some areas down to bare "metal" (Vallejo steel) and even more areas down to red oxide only. Then, more pictures for reference and a layer of satin varnish to protect the green basecoat, taping off the splinter camo areas, then a layer of more chipping solution, and putting down a layer of (XF-59). Utilizing the pictures I selected a few areas to chip away: less on this layer but a few down to base "metal", a few down to red oxide, and a few more down to base green. Then, more satin varnish to seal it in, taping off of splinter shapes for the final layer of camo pattern (XF-9, Hull Red). For chipping purposes I wasn't too concerned with getting down to bare metal from the top red-brown coat but chipped away a few red-brown splinters down to base green or splintered yellow...maybe one or two down to red oxide. The markings are sprayed with Tamiya XF-2 utilizing stencils and then chipped as well to simulate wear and tear of the paint.

About one more week and I’ll be done. My personal goal is next Friday, a week from today. I’ll post pics here on the final product.


ComradeMP
#0
Visit this Community
United States
Joined: July 31, 2011
KitMaker: 472 posts
Armorama: 453 posts
Posted: Friday, February 13, 2015 - 10:21 AM UTC
Finishing up the rear of the turret. Just need to add some welds here and there, also the loader's hatch is missing a locking latch. Waiting for an AM antenna mount to come in.


Headlight came from a KV, made my own headlight guard. Boxes on the left fender in place. The splash guard locator holes filled, it needs to sit lower on the front plate.


Cleaned up the spider web wheels. Lots of flash and some openings on the wheels were still solid, so I had to drill them out. A few wheels have certain tiny areas not cast right, some mud will cover up these tiny imperfections. The new idler from shapeways came in. Need to wash off the oily residue on it. Each idler is a single piece with both idlers held together by two pins on the inside. Really nice easy to clean up, in a not seen area.