Campaigns: Completed Campaigns
Campaigns that are completed should be grouped here.
Hosted by Richard S.
World of Tanks Campaign II
TheSpearman
Visit this Community
Dublin, Ireland
Joined: August 09, 2010
KitMaker: 33 posts
Armorama: 28 posts
Posted: Monday, February 16, 2015 - 11:26 PM UTC
I finally returned to my KV-85 after doing nothing over the Christmas/New Year period.


Construction is done and basic layer of paint is on. Hopefully I don't mangle the weathering stage.
Pedro
Visit this Community
Wojewodztwo Pomorskie, Poland
Joined: May 26, 2003
KitMaker: 1,208 posts
Armorama: 1,023 posts
Posted: Friday, February 20, 2015 - 04:53 AM UTC
ComeradeMP, nice work with the T54 conversion, I'm currently playing this in game and it is a beast, especially as a "scout killer"

My campaign build is coming along slowly, too many details to redo or add. I'm already anticipating not making it for the deadline.

Monty for Scale:


Detailed description of the build and much more photos in my blog on Armorama: Commander Models T29 build log

Cheers,
Greg
AnalogKid
Visit this Community
Texas, United States
Joined: December 20, 2014
KitMaker: 46 posts
Armorama: 42 posts
Posted: Friday, February 20, 2015 - 08:05 AM UTC
Hello Everyone...here with my final build post for this campaign and pics of my completed E-100. This was a very fun project and was a joy to do. I learned more along the way and especially in the area of paint chipping. I am still not happy with some of the top-level paint-chipping (those added by painting acrylic spots on the top layer) but every model is a learning process for me. Someday I will hopefully perfect this technique. Total hours invested in this project: 72.

Thank you all for stopping in to take a look and a shout out to all my fellow modelers in this campaign...great job everyone. Now, I haven't had time in the last month to play some WoT...maybe this weekend as I take a break from the workbench for a couple of days I'll get back into my virtual E-100...and proceed to get quickly killed

-Len


suikmoto
Visit this Community
Tartu, Estonia
Joined: June 30, 2014
KitMaker: 152 posts
Armorama: 92 posts
Posted: Sunday, February 22, 2015 - 02:15 AM UTC
As i missed my chance with e100 would this thing work?http://modelcollect.com/germany-wwii-e-75-heavy-tank-with-128-gun
Fully upgraded e75 with 12,8cm gun.
spongya
Staff MemberAssociate Editor
MODELGEEK
Visit this Community
Budapest, Hungary
Joined: February 01, 2005
KitMaker: 2,365 posts
Armorama: 1,709 posts
Posted: Sunday, February 22, 2015 - 05:59 PM UTC
That would be great At least we'd see how this kit looks like
dcandal
Visit this Community
Buenos Aires, Argentina
Joined: September 07, 2006
KitMaker: 918 posts
Armorama: 212 posts
Posted: Monday, February 23, 2015 - 01:54 AM UTC
Hi, I´m going to begin this campaigns with a War Thunder Marder,


ComradeMP
#0
Visit this Community
United States
Joined: July 31, 2011
KitMaker: 472 posts
Armorama: 453 posts
Posted: Tuesday, February 24, 2015 - 07:09 AM UTC

Quoted Text

ComeradeMP, nice work with the T54 conversion, I'm currently playing this in game and it is a beast, especially as a "scout killer".

Cheers,
Greg


Thanks. I like it quite a bit, I like to run and gun all the big tanks.

A bit more work done. Welds on the upper hull/glacis plate done.


The supplied brass wire is just there. Two rolled up bundles in a bag and three rods loose in the box. Instructions indicate different size, but honestly they all look exactly the same size. When it came doing the tension bars on the engine deck, I used some .5 plastic rod. I tried the brass rod, but i couldn't fit two side by side in the notches. Signal lights placed like in the WoT render, canisters at the back in place. The casting blocks on it were really big, so it took some time and patience to clean it up without damaging the detail. I have a plastic rod in place of a log, either going to texture the rod or try and find an appropriately sized wood dowel.


Fuel lines are done too. Just need to work on the other fender stowage box, Taking a dremel to the casting block and trying to make it sit flat isn't too fun. Cleaning up all the resin dust isn't either. Eureka xxl tow cables also came in. Just waiting for the antenna mount and the turret will be done. Hull just needs the stowage box and fender supports, some fine details for the signal light/fender tension bars and I'll be done with the hull work. Just need to build the indy link track and she'll be ready for paint.
dfens666
Visit this Community
Ontario, Canada
Joined: April 04, 2012
KitMaker: 31 posts
Armorama: 31 posts
Posted: Friday, February 27, 2015 - 04:46 AM UTC
Hi Everyone:

This is my first post in the forum and my first ever "campaign". I am entering simply to build my (meager) skills and to motivate myself for my next build.

I have recently started plastic modeling. I built a few when I was a kid, but they ended up blown up with firecrackers or burnt into a toxic cloud of black smoke. My kids gave me an excuse to get back into modeling as a hobby and now it is a welcome diversion. Like many of you I have limited time, but an unlimited amount of hobbies!

I have always had a crack addicts brain for computer gaming. From Pong to Space Invaders to Missile Command to Time Bandit to Pitfall to.... well- it really does go on forever. Many years ago I began playing online games with my 2600 baud modem and was immediately hooked. I became an early adopter in the FPS genre and spent hours homing my skills as a virtual maniac. Playing another human really is different than playing against a computer.

WOT Stats by Lead Farmer, on Flickr

I was a Beta player when WOT was first introduced. I was immediately hooked and have played the game for years. I have played around 15 thousand games (yikes). I find that both sad and pathetic. But it sure is fun!

Top 10 light tanks by Lead Farmer, on Flickr
Top 10 medium tanks by Lead Farmer, on Flickr
Top 7 Heavy Tanks by Lead Farmer, on Flickr
Top 10 Tds by Lead Farmer, on Flickr
Top 6 SPGs by Lead Farmer, on Flickr

I have mostly played the German tank line and have unlocked almost everything. As a beta tester I played mostly the Russians. When the game went live, I had a yearning to drive a Tiger tank and for that reason I choose (primarily) the German line.

IS7 Winter Ops by Lead Farmer, on Flickr
Derp Star by Lead Farmer, on Flickr
As far as modeling goes, my experience has been very limited. WOT inspired me to begin building tanks. I have only built a few and my goal this year is to build 12 models- roughly 1 a month. So far I have built a Trumpeter T62 (Nov 2014) and the IS7 (Dec 2014). When the fast scouts were introduced I fell in love with the T49 (I am grinding the M41 right now and on the way to the T49). In January I built a T49 by combining 2 different kits- the AFV club M41 and the Academy Sheridan. For February I am building a 1/32 scale Bf109 G Trop (almost done). My next build will be for the WOT campaign- the needle gunned Panther.

Panther F WOT Campaign Entry by Lead Farmer, on Flickr

My general theory on modeling has thus far been this: I aim to represent, not replicate. I am building and painting a piece of plastic in scale. I don't care about the number of rivets or the exact color or pattern of the camo. If the WOT developers have taught us anything, it is that letting your imagination run wild can generate some really interesting visual stimulation. I have an idea what I want my model to look like and am striving every month to get to that level.

I am greatly inspired by those willing to teach. I would have never started model building again without the great guidance available on the internet. You will be witnessing my first build log here- warts and all. I will attempt to check back in and answer questions if need be. Thanks in advance for the help!

ComradeMP
#0
Visit this Community
United States
Joined: July 31, 2011
KitMaker: 472 posts
Armorama: 453 posts
Posted: Friday, February 27, 2015 - 12:53 PM UTC
I remember that screen name! I've seen you around a game or two before.

I did some more work on the front. Made a new splash guard out of strip styrene. I like to recycle the left over brass from PE frets, here I used a bit to make some parts. The conversion kit came with spare PE parts and bolts, I used them where I could.


More of close up to show.... well I don't know what you call that.


The fuel lines are done. Cut off the round "caps" on the fuel cells and added some spare bolts. Some work on the tow cable retainer, used some styrene rod, coiled some wire. Tow rope is a Eureka XXL set, I really like it.


Another view of the back. Finally got around to putting that grab handle in place. Just one more tiny piece to make and the back will be done.


Getting closer and closer to the finish. And just a little something for me.


Just waiting for a patch of logo our clan uses:
dfens666
Visit this Community
Ontario, Canada
Joined: April 04, 2012
KitMaker: 31 posts
Armorama: 31 posts
Posted: Friday, February 27, 2015 - 07:46 PM UTC
ComradeMP:

Love the T54. I was lucky enough to buy a T59 way back when and I believe that it is the best tank in the game for $$$. I am grinding my 4th skill for the crew on that thing!

When I get a chance I will upload a shot I took of my RC T55 (1/16)- I built it a few years back.

I have always been baffled that Tamiya doesn't seem to take advantage of their great engineering and release more versions of the same kits- ie. T59, T54 etc after their great T55.
ComradeMP
#0
Visit this Community
United States
Joined: July 31, 2011
KitMaker: 472 posts
Armorama: 453 posts
Posted: Wednesday, March 18, 2015 - 10:55 AM UTC
1/16 T-55, now that's something I'd like to try someday. Only have two T-34's (76/85), and I've yet to take a crack at them.

I got to test out my new airbrush and air compressor, simply flawless. Painted the lower hull with Model Master Acryl Medium Green, during which I realized I forgot a small piece that belonged behind the rear right grille. The log is styrene tube which I then took a small saw to. Can't see it too well in the picture, but I like how it turned out. Just need to plug the ends and prime/paint.


Wheels painted. Tracks pain-stakingly assembled. Cleaning them up wasn't fun, and had plenty of hand cramps.


Completed the turret with an antenna mount and raised part on the commander's sight like the game render. Clear parts I added covered, and turret primed. Just waiting for some paint. Dushka just needs the cable on it.

Now I need to figure out the white outlined red star decal. I don't think I have one in my stash the right size.
Steel_Spektor
Visit this Community
Queensland, Australia
Joined: December 19, 2012
KitMaker: 74 posts
Armorama: 68 posts
Posted: Sunday, March 22, 2015 - 11:55 AM UTC
Dragon Pz 1A update. Hull together and wheels done. Tracks to do and attaching the small details. Fit is OK, no real problems.

 photo Pz1box_zpsf038b1f8.jpg

 photo 20150323_141822_zpskae1tdsl.jpg

 photo 20150323_141809_zpspnr4na9s.jpg
ComradeMP
#0
Visit this Community
United States
Joined: July 31, 2011
KitMaker: 472 posts
Armorama: 453 posts
Posted: Monday, March 23, 2015 - 10:36 AM UTC
Things are coming together, and everything is almost done.


Dshk painted metallic grey, and layered some thinned out flat black. I remembered I had a PE ammo box so I glued some sheet brass for the mount.


Ammo box done and primed. Even had a PE ammo belt. Just covered it painted a nice straight line and done.


Dshk is done and glued in place.


Turret is given some glosscote, decals and more glosscote. Now it's ready for a pin wash.


Unditching log is being painted by hand. Last little tidbit, and I'll be able to glosscote the hull.

Going to weather the lower hull before I add the road wheels/tracks. Tracks just need a quick prime/paint before I glue them on and finish this whole build off.
dfens666
Visit this Community
Ontario, Canada
Joined: April 04, 2012
KitMaker: 31 posts
Armorama: 31 posts
Posted: Tuesday, March 31, 2015 - 10:13 AM UTC
My goal this year has been a model a month and I am (as usual) a little behind. My Panther was held up a little by my Feb build (the first aircraft I have done in 30+ years), but now it is full steam ahead. This post will be photo heavy and I apologize if you have a slow connection in advance. I am trying to host stuff on FLICKR- not sure if I like it yet.

Before I build a model, I attempt to define my goals. I almost always build from my head and don't try to represent anything that necessarily existed. Remember- represent, not replicate! For this model, I decided to stick as best I could to the theme of the campaign- World of Tanks (with a few liberties- ie WOT Logo, number). I am attempting for the first time to build something as close to accurate as my patience will allow.

The L100 gun was never on a real Panther. The turret (the "Schmalturm") only existed on a few tanks and was never really implemented in mass production. The tank I am depicting only exists in one place- a time-sucking video game. Dragon just released their #6799 kit which is very close to the WOT version.
dfens666
Visit this Community
Ontario, Canada
Joined: April 04, 2012
KitMaker: 31 posts
Armorama: 31 posts
Posted: Tuesday, March 31, 2015 - 10:17 AM UTC
The model went together very well and I was impressed with my first Dragon kit. The instructions were a little unclear in areas (LOTS of optional steps). This kit is an amalgam of many and has lots of extra parts. The instructions do clearly show which parts are not used (in the parts list), but in the heat of battle I am always wondering if I have missed something? As usual, the parts that end up flying into the abyss are one-offs. Having said all that- I will definitely look at Dragon again once my stack is diminished.

Things worth noting during construction.

Lower Glacis Front by Lead Farmer, on Flickr

Weird lower front glacis photoetch?

Hull Torsion Bars by Lead Farmer, on Flickr

Torsion bar construction somewhat convoluted, but I enjoy the moving suspension and prefer this over a recent Trumpeter build (IS7).

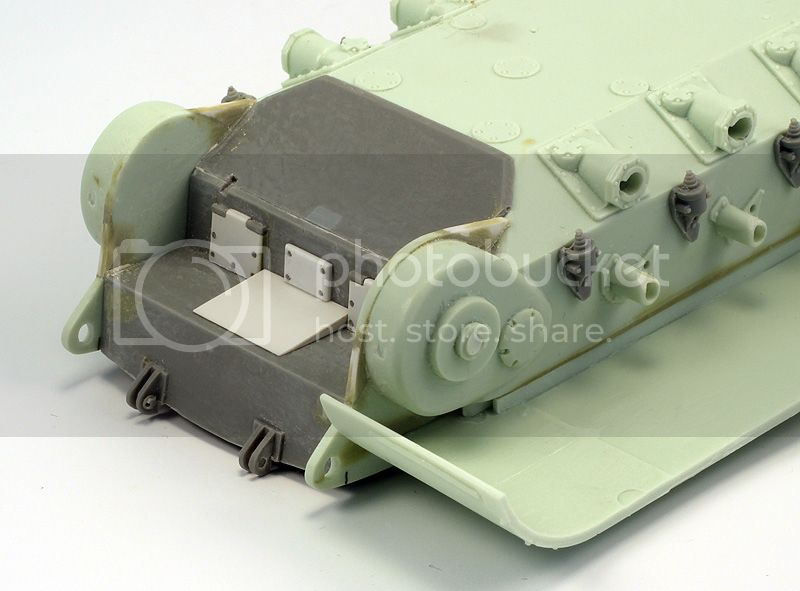
Rear Glacis Aluminum by Lead Farmer, on Flickr

Rear stowage boxes had to be mutilated to fit the in game tank. I used my patented aluminum tape method.

Gun Brace Delete by Lead Farmer, on Flickr

Front cannon support had to be removed. I discovered this too late and had to work around the drivers and gunners view blocks . The bow machine gun here was replaced with brass initially (more on that later).

Rear Deck Before Primer by Lead Farmer, on Flickr

Great detail on the rear deck with the (very thin) photoetch.

Spare Track Too Many Pins by Lead Farmer, on Flickr

All 6 spare track pins inserted- later on (after gluing, of course), I noticed that there are only 3 per side. Out came the file and drill . I tried to bang up the fenders a little bit, but was not very successful.

Vision Blocks Pre Paint by Lead Farmer, on Flickr

Although the vision blocks look like crap here, once assembled they came out very nice. This is another patented process made with reflective green cardboard/heavy paper from a dollar store gift bag. Not sure if the in game tank has green vision blocks or not, but I use them all the time cause they look cool.

Brass Handle by Lead Farmer, on Flickr

A grab handle was eaten by my workbench. I mostly replace all my grab handles with brass, but the Dragon ones are actually very useable provided you are careful to not let them go flying into oblivion.

Upper Gun Shield by Lead Farmer, on Flickr

Photoetch upper gun shield- fit is so-so and the gaps were made up with 12 minute epoxy. A few small gaps here and there- but fit is very good with this kit. FYI- you can see my paint masks on the vision blocks here, as well.

LOOONNNGGG 75mm by Lead Farmer, on Flickr

The gun is v-e-r-y long. I find it to be the best gun on the Panther. Although you won't get any one-shot kills, it penetrates almost anything and has laser accuracy. I still remember the first time I saw it in the game. What the heck! is that? Looks like a pole-vaulter on approach to the bar...

Schmalturn Pre Prime by Lead Farmer, on Flickr

Primer ready.

Post Prime by Lead Farmer, on Flickr

Looks good, but a tad dark. Normally, I prime with black or darken a grey up to almost black. This is lighter than that, but not enough for final chipping. Three pins in the spare track link hangers as per the game. The tow cable attachment point had to be slightly modified to bring it inline with the game depicted version.

I base coated the model with a homebrew of auto primer (Plasticote) mixed with a metallic from Home Despot (Rustoleum Flat Iron). It turned out a little dark. Whadda ya gonna do?


dfens666
Visit this Community
Ontario, Canada
Joined: April 04, 2012
KitMaker: 31 posts
Armorama: 31 posts
Posted: Tuesday, March 31, 2015 - 10:55 AM UTC
The paint scheme I chose is a desert stripe pattern. The WOT crew most likely used RAL 8000 (I used Tamiya XF-57) over a coat of RAL 7021 (I used Tamiya XF-63). The paint is extremely weathered with lots of bare metal evident. Perhaps it has seen a few sandstorms? 
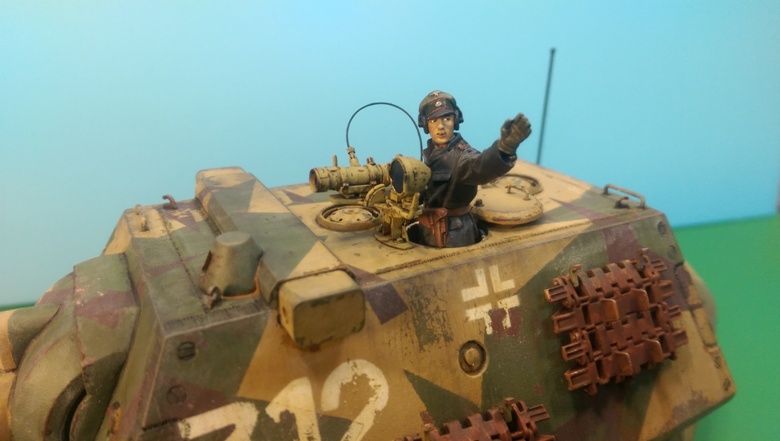
I felt this was an excellent opportunity to expand on my weathering skills. After serious chipping (hairspray method), the paint was further drybrushed with a metallic oil paint to depict bare metal (I was not 100% happy with the brightness of the primer under the chipping).

Rear Left Crane Fresh Camo Panther L100 DFENS by Lead Farmer, on Flickr

Rear Right Fresh Camo Panther L100 DFENS by Lead Farmer, on Flickr

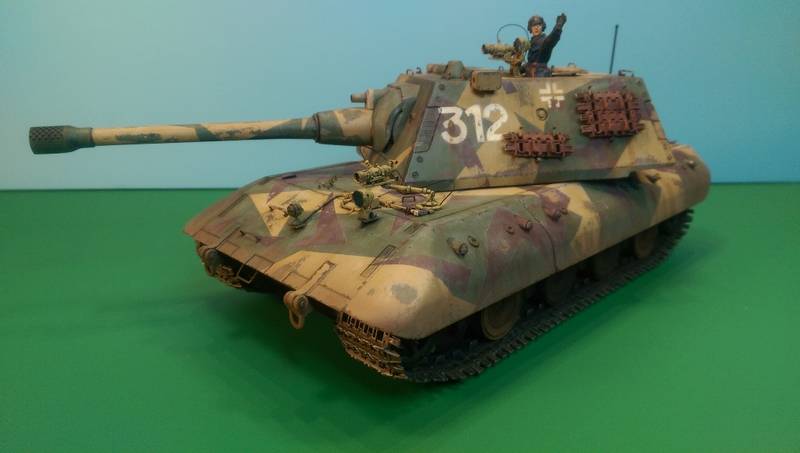
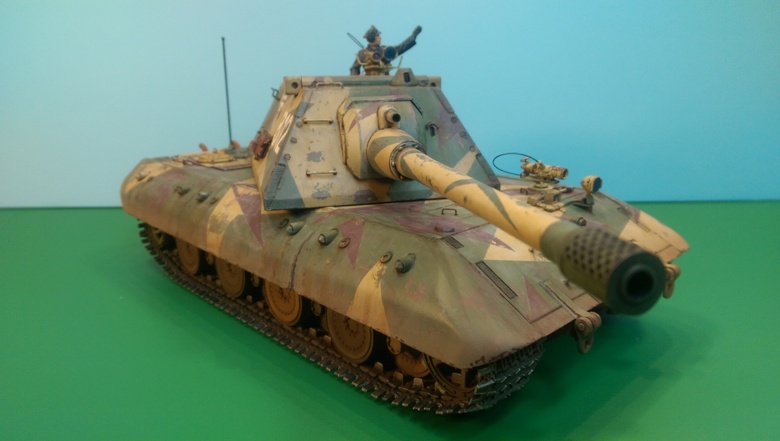
Front Right Quarter Fresh Camo Panther L100 DFENS by Lead Farmer, on Flickr

Front Left Quarter Fresh Camo Panther L100 DFENS by Lead Farmer, on Flickr

Rear Glacis Fresh WXing Panther L100 DFENS by Lead Farmer, on Flickr

Rear Deck Fresh WXing Panther L100 DFENS by Lead Farmer, on Flickr

The nice thing about the game is that you can take screen shots to your hearts content. I took many shots in the game garage and a few in game depending on what I wanted to examine. Imagine being able to look with fairly good detail at your subject in realtime 3-D? This is the advantage to this specific Armorama campaign.

Left Front Crane Panther L100 WOT by Lead Farmer, on Flickr

Left Front Crane Panther L100 DFENS by Lead Farmer, on Flickr

Right Front Quarter Crane Panther L100 WOT by Lead Farmer, on Flickr

Right Front Quarter Crane Panther L100 DFENS by Lead Farmer, on Flickr

Left Side Crane Panther L100 WOT by Lead Farmer, on Flickr

Left Side Crane Panther L100 DFENS by Lead Farmer, on Flickr

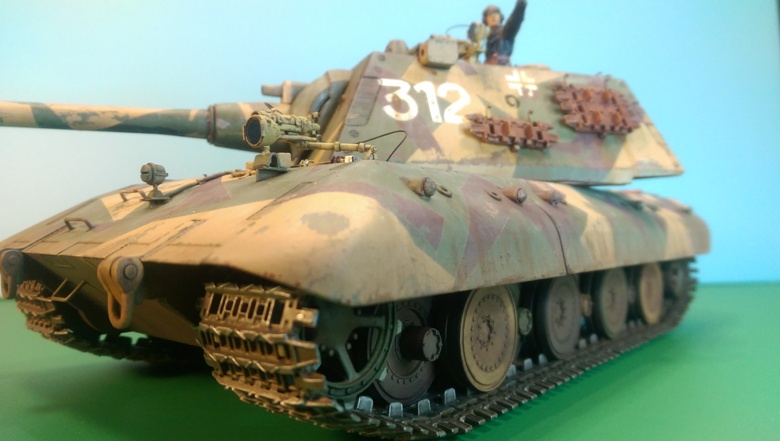
Left Front Quarter Panther L100 WOT by Lead Farmer, on Flickr

Left Front Quarter Panther L100 DFENS by Lead Farmer, on Flickr

Left Front Quarter Crane Panther L100 WOT by Lead Farmer, on Flickr

Left Front Quarter Crane Panther L100 DFENS by Lead Farmer, on Flickr

Left Rear Quarter Crane Panther L100 WOT by Lead Farmer, on Flickr

Left Rear Quarter Crane Panther L100 DFENS by Lead Farmer, on Flickr

The next step is final weathering and tracks. I was lucky enough to attend a model show about 10 minutes from my front door a few weekends ago and met the fine people at "The Barrel Store" (LOL- they are also heavy WOT fans!). The world of aftermarket stuff is somewhat intimidating and it is hard to buy stuff sight unseen. I was lucky (overwhelmed?) enough to have an almost unlimited look at their massive stock. They have everything you can imagine for your aftermarket needs. I was able to examine a set of Friulmodel tracks and decided to buy some for the Tamiya T55 as well as this tank- but lo-and-behold they were sold out of late Panther tracks! I did buy a great brass hull machine gun and had to rip out my (inaccurate for the game) homebrew gun.

Aftermarket Hull Machine Gun by Lead Farmer, on Flickr

I have lots of odds and ends left- light weathering, a base and some build stuff (antennae etc). My tracks should be in within a few weeks (hopefully).

Right Front Quarter Panther L100 DFENS by Lead Farmer, on Flickr

Right Side Crane Panther L100 DFENS by Lead Farmer, on Flickr

Right Rear Quarter Crane Panther L100 DFENS by Lead Farmer, on Flickr

Rear Left Panther L100 DFENS by Lead Farmer, on Flickr

Left Side Panther L100 DFENS by Lead Farmer, on Flickr

Thanks for reading and watch for my final update within the month!

Rear Panther L100 DFENS by Lead Farmer, on Flickr
spongya
Staff MemberAssociate Editor
MODELGEEK
Visit this Community
Budapest, Hungary
Joined: February 01, 2005
KitMaker: 2,365 posts
Armorama: 1,709 posts
Posted: Wednesday, April 01, 2015 - 12:05 AM UTC
Simply astonishing Panther...
ComradeMP
#0
Visit this Community
United States
Joined: July 31, 2011
KitMaker: 472 posts
Armorama: 453 posts
Posted: Thursday, April 02, 2015 - 11:34 AM UTC
As the kids would say, that Panther tho... Did a really good job on it.

I finished up. Weathering is still a weak area for me, but I'm learning. Spare tracks needs some attention but everything else is done.


Better pictures once the sun is out. Seeing as there's some time before the deadline. I want to see if I can also finish up the ISU/BL-10.
Removed by original poster on 04/05/15 - 19:10:42 (GMT).
dfens666
Visit this Community
Ontario, Canada
Joined: April 04, 2012
KitMaker: 31 posts
Armorama: 31 posts
Posted: Sunday, April 05, 2015 - 12:11 AM UTC
Andras: Thx for the kind words.
Comrade: Great job on the T54- awesome detail at this scale...

As promised for you- a shot of my RC t55. I have barely driven it as it is a little under-engineered, but got a few photos in the neighborhood at a vacant lot. This photo was blown up to a poster and hangs on the workshop wall, warts and all! I was a rookie on this build and am going to go back and repaint it. I wasn't happy with the stenciled #'s, but there it is (same as the Tiran in the movie "The Beast").

T55 Txt by Lead Farmer, on Flickr
ComradeMP
#0
Visit this Community
United States
Joined: July 31, 2011
KitMaker: 472 posts
Armorama: 453 posts
Posted: Wednesday, April 08, 2015 - 07:30 PM UTC
Ok, here it is all done.


https://youtu.be/AKxlJiLjPHg
dfens666
Visit this Community
Ontario, Canada
Joined: April 04, 2012
KitMaker: 31 posts
Armorama: 31 posts
Posted: Tuesday, April 14, 2015 - 05:47 PM UTC
Great job on the build and video, Comrade! I was wondering how you were going to tackle the barrel- nicely done. The video really wraps it up- I have to start doing that...
djohannsen
Visit this Community
Virginia, United States
Joined: June 24, 2005
KitMaker: 364 posts
Armorama: 355 posts
Posted: Saturday, April 25, 2015 - 06:34 PM UTC
Turned my attention to other projects for a while, but finally made some progress... Rivet detail(that I inadvertently removed) was replaced with Calibre 35 resin rivets, and the AFV Club bogies have been mounted. Here's what she's looking like right now:

http://i83.photobucket.com/albums/j303/djohannsen/20150426_084125_zpsqkwqw3fm.jpeg
Steel_Spektor
Visit this Community
Queensland, Australia
Joined: December 19, 2012
KitMaker: 74 posts
Armorama: 68 posts
Posted: Tuesday, April 28, 2015 - 03:08 PM UTC
Paint is on, Tamiya Field Grey. Black oil wash on as well. I haven't enjoyed this kit as it is a bit too small and fiddly for me. I'll stick with the medium and heavy tanks I reckon.


Steel_Spektor
Visit this Community
Queensland, Australia
Joined: December 19, 2012
KitMaker: 74 posts
Armorama: 68 posts
Posted: Monday, May 04, 2015 - 09:07 AM UTC
All done. I went for a dusty Pz 1 but not too worn. Comments welcome.

 photo 1_zpsk6qusi7n.jpg

 photo 6_zpsaga439pv.jpg

 photo 4_zpsj4qsnin6.jpg