


Campaigns
Where Armorama group builds can be discussed, organized, and updates posted.
Where Armorama group builds can be discussed, organized, and updates posted.
Hosted by Darren Baker, Richard S.
What the Flak? Official Campaign

Namabiiru

#399

Joined: March 05, 2014
KitMaker: 2,888 posts
Armorama: 1,920 posts

Posted: Saturday, October 25, 2014 - 08:57 AM UTC
Great Job, Kr K! Your rust and metallic finishes are really convincing!

jmsbd07
Joined: April 11, 2014
KitMaker: 96 posts
Armorama: 94 posts
Posted: Monday, November 10, 2014 - 06:33 AM UTC
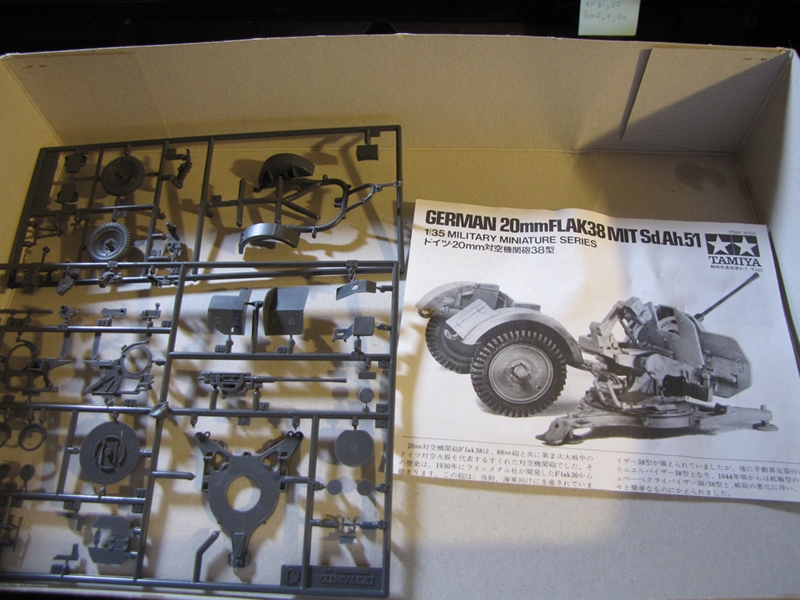
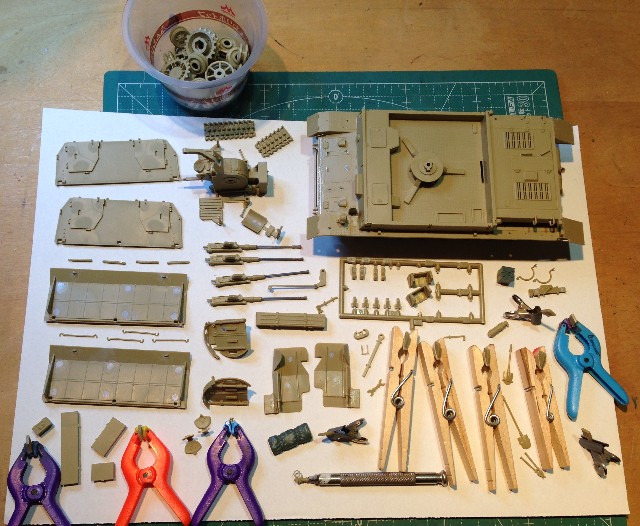
well I thought I might enter a smaller kit, the 20mm Flak 38 quad mount.
 Supplies by Tommy Styrvoky, on Flickr
there's some other stuff in the photo for other builds, but I just bought the kit yesterday.
Supplies by Tommy Styrvoky, on Flickrthere's some other stuff in the photo for other builds, but I just bought the kit yesterday.
Namabiiru
#399
Joined: March 05, 2014
KitMaker: 2,888 posts
Armorama: 1,920 posts
Posted: Tuesday, November 11, 2014 - 03:33 AM UTC
A classic, Tommy. 

pablo_g

Joined: October 21, 2003
KitMaker: 529 posts
Armorama: 500 posts

Posted: Thursday, November 13, 2014 - 01:29 AM UTC
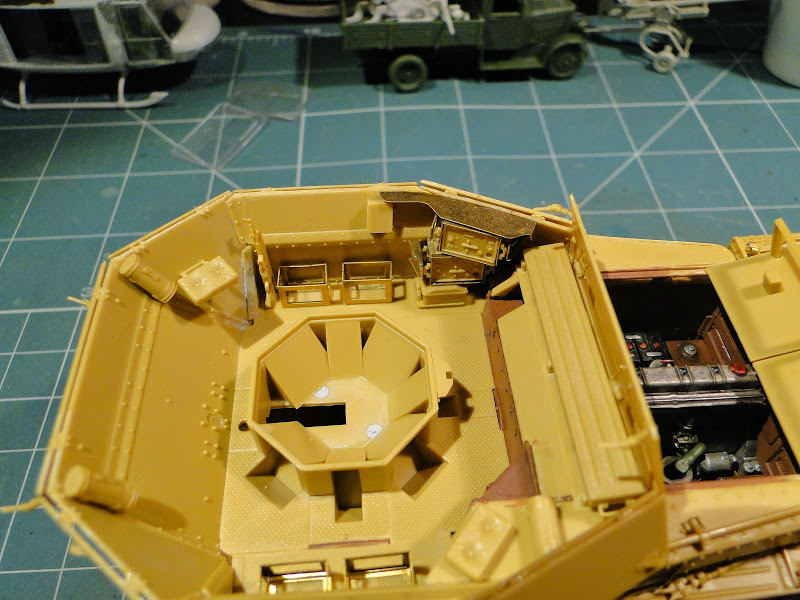
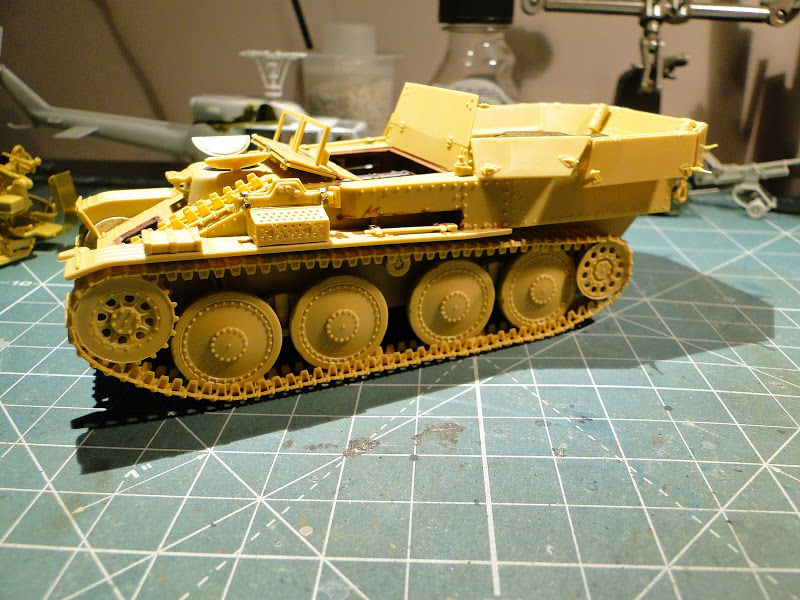
Hi, I see you going pretty good guys. Also I'm going to make this set as Tommy, if I have time, I will only add Horch 4x4 Type 1a. And here is my progress on the construction of the main character of the campaign.


Paweł
I will only add Horch 4x4 Type 1a. And here is my progress on the construction of the main character of the campaign. Paweł
Namabiiru
#399
Joined: March 05, 2014
KitMaker: 2,888 posts
Armorama: 1,920 posts
Posted: Thursday, November 13, 2014 - 03:01 AM UTC
Wow! Just look at that engine! Nice work, as always, Pawel. But I must say I'm appalled at how neat and uncluttered your workbench is. You really must do something about that! 
jmsbd07
Joined: April 11, 2014
KitMaker: 96 posts
Armorama: 94 posts
Posted: Sunday, November 16, 2014 - 05:33 AM UTC
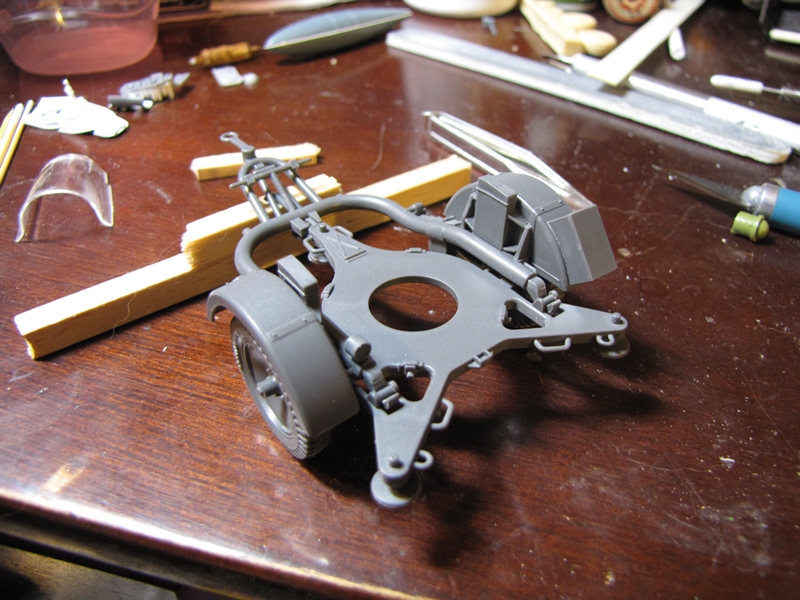
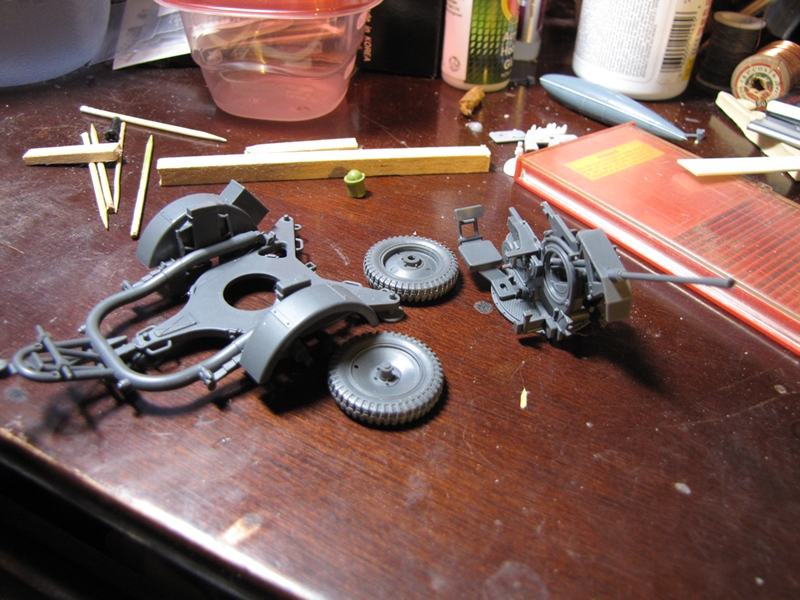
 Flak 38 quadmount by Tommy Styrvoky, on Flickr
the parts are ready for paint, I will probably be painting them in german grey or dark yellow.
Namabiiru
#399
Joined: March 05, 2014
KitMaker: 2,888 posts
Armorama: 1,920 posts
Posted: Sunday, November 16, 2014 - 05:48 AM UTC
Tommy,
I had to laugh when I saw your photo and the putty work on the armor. Not because of your work, but because my mobelwagen kit uses the same sprues for the quad gun mount, and I've spent massive amounts of time filling and sanding all the inconvenient ejector pin holes.
I had to laugh when I saw your photo and the putty work on the armor. Not because of your work, but because my mobelwagen kit uses the same sprues for the quad gun mount, and I've spent massive amounts of time filling and sanding all the inconvenient ejector pin holes.
jmsbd07
Joined: April 11, 2014
KitMaker: 96 posts
Armorama: 94 posts
Posted: Sunday, November 16, 2014 - 09:18 AM UTC
I wasn't sure about applying putty but I did anyway, out of all the Tamiya kits I have built, this one has had more molding flash on parts and really bad locations for pin marks (there are some on the wooden flooring next to the seats). It was somewhat hard to apply the putty and remove it, without affecting any of the adjacent rivets of the shield.
Namabiiru
#399
Joined: March 05, 2014
KitMaker: 2,888 posts
Armorama: 1,920 posts
Posted: Sunday, November 16, 2014 - 09:58 AM UTC
I feel yor pain, Bro!
I hope I'm not being too forward if I offer some recommendations based on the few bits I see in your photo.
First, I recommend a decent set of jeweller's files as a manifold improvement over sandpaper when dealing with putty. I would almost call them indispensible--I think I reach for one of my files at least fifty times for every one time I reach for a piece of sandpaper.
I used to use tube-type putty, such as Tamiya's, but I find that in most instances liquid filler, like Mr Surfacer (I use 500, 1000, and 1200 in jars), makes filling small cracks and ejector pin marks much easier than tube-type paste putty.
This kit also caused me to take a keen interest in Matt Odom's how-to feature for making a sander for tight spaces: http://aeroscale.kitmaker.net/features/6219
Unfortunately, I'm still hunting for a cheap, second-hand, electric toothbrush so I haven't been avle to give that one a try yet.

35th-scale

Joined: November 21, 2007
KitMaker: 3,212 posts
Armorama: 2,807 posts

Posted: Sunday, November 16, 2014 - 01:37 PM UTC
I did that kit a while back as well Tommy and removing those ejector pin sink-holes on the back of the shield without removing the rivits was a pain in what I sit on! I would agree with Mark on the suggestion for the fine files....indespensible.
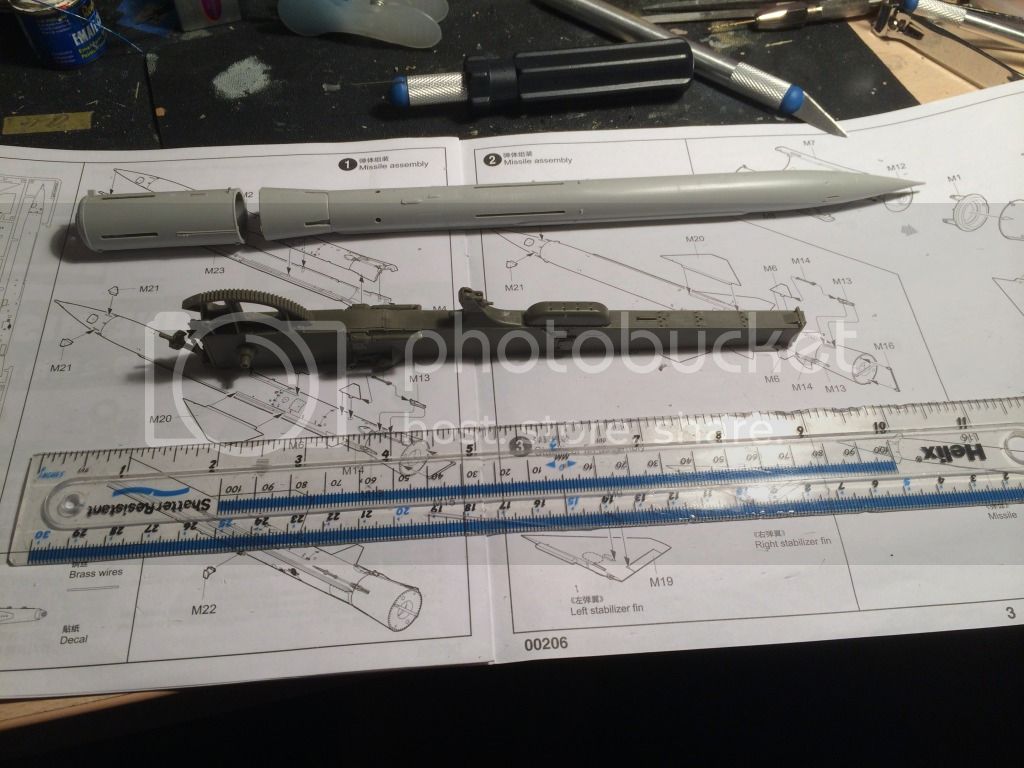
I started on my Trumpeter Sam 2 over the weekend.

It's going together very well so far.
Launcher in the different parts:
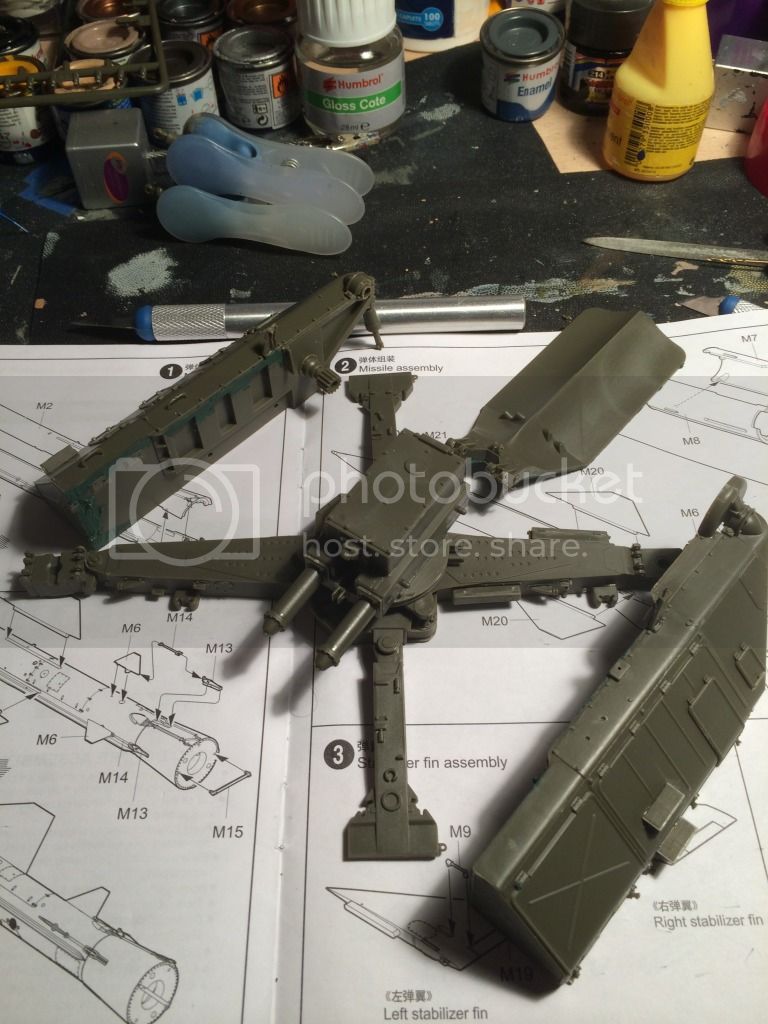
Some little bits of filler needed along the insides of the two "control" units, but nothing much, and on the underside of the blast deflector.
And started the missile, booster and actual arm of the launcher:
I started on my Trumpeter Sam 2 over the weekend.
It's going together very well so far.
Launcher in the different parts:
Some little bits of filler needed along the insides of the two "control" units, but nothing much, and on the underside of the blast deflector.
And started the missile, booster and actual arm of the launcher:

pablo_g
Joined: October 21, 2003
KitMaker: 529 posts
Armorama: 500 posts
Posted: Sunday, November 16, 2014 - 09:13 PM UTC
Quoted Text
Wow! Just look at that engine! Nice work, as always, Pawel. But I must say I'm appalled at how neat and uncluttered your workbench is. You really must do something about that!
Thanks mate, cleaned up before painting, normally I have on the desk creative chaos and mess.
C[ ]
Paweł

ziggy1
Joined: July 21, 2005
KitMaker: 248 posts
Armorama: 231 posts
Posted: Monday, November 17, 2014 - 04:51 AM UTC
Tommy,
I just built the same kit for this campaign, and I know how bad the flash and ejector pin marks are. I had a hell of a time fixing mine. But, it is a nice little kit to build!
Cheers,
Ziggy
I just built the same kit for this campaign, and I know how bad the flash and ejector pin marks are. I had a hell of a time fixing mine. But, it is a nice little kit to build!
Cheers,
Ziggy
Dragon164
#226

Joined: February 20, 2012
KitMaker: 1,909 posts
Armorama: 1,066 posts

Posted: Monday, November 17, 2014 - 07:09 AM UTC
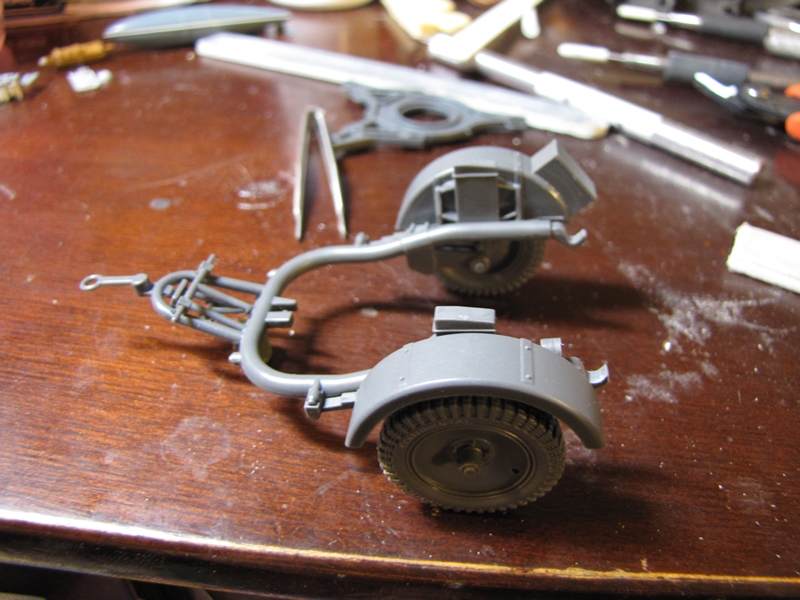
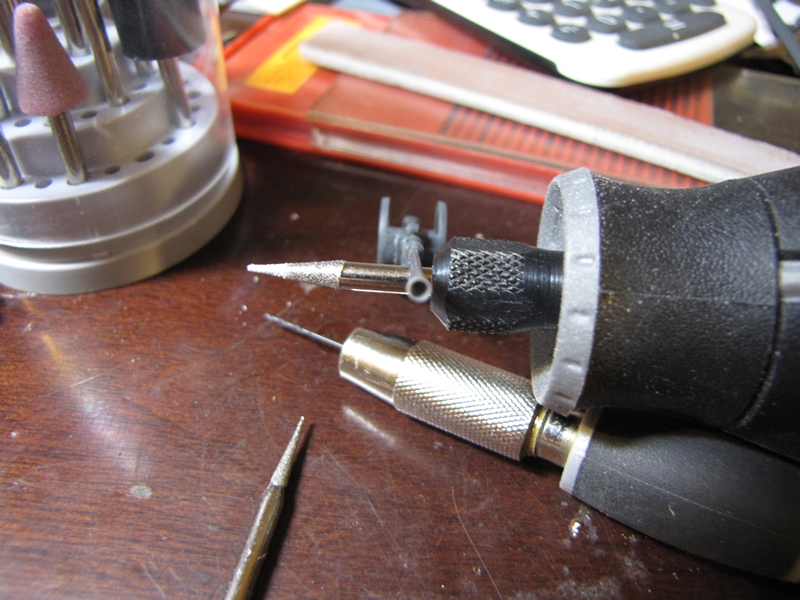
Since I can upload pics again here is the kit I am doing and the progress I have made.
I have not much extra to the basic kit but did use some drills and a diamond burr to hollow out the gun and flash hider.
Cheers Rob.
here is the kit I am doing and the progress I have made.I have not much extra to the basic kit but did use some drills and a diamond burr to hollow out the gun and flash hider.
Cheers Rob.

Namabiiru
#399
Joined: March 05, 2014
KitMaker: 2,888 posts
Armorama: 1,920 posts
Posted: Monday, November 17, 2014 - 07:56 AM UTC
Nice work on that muzzle, Rob!
Dragon164
#226
Joined: February 20, 2012
KitMaker: 1,909 posts
Armorama: 1,066 posts
Posted: Monday, November 17, 2014 - 08:46 AM UTC
Thanks Mark!
It's actually thinner than it looks in the pic.
Cheers Rob.
It's actually thinner than it looks in the pic.
Cheers Rob.

wedgetail53

Joined: October 02, 2008
KitMaker: 658 posts
Armorama: 629 posts
Posted: Monday, November 17, 2014 - 02:00 PM UTC
G'day fellas
OK, the Sd. Kfz. 7/2 is finally complete after waiting an age for the vegetation for the base.
Front: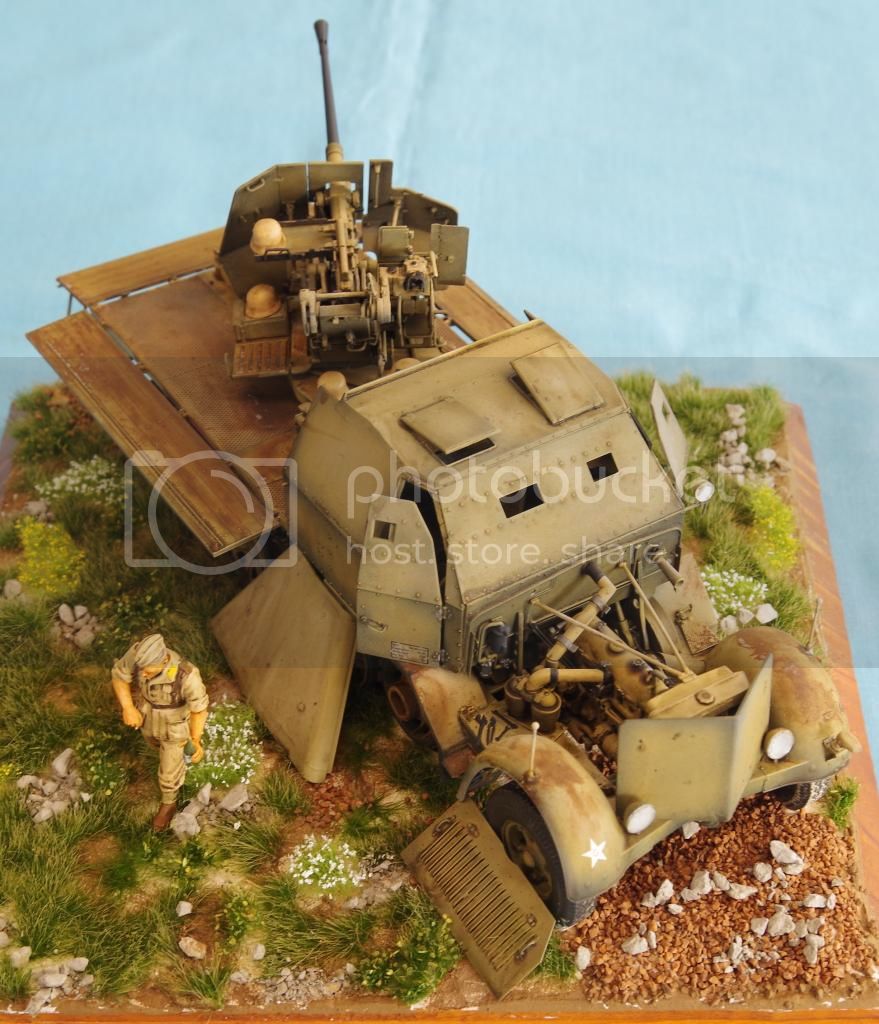
Left side:
Rear: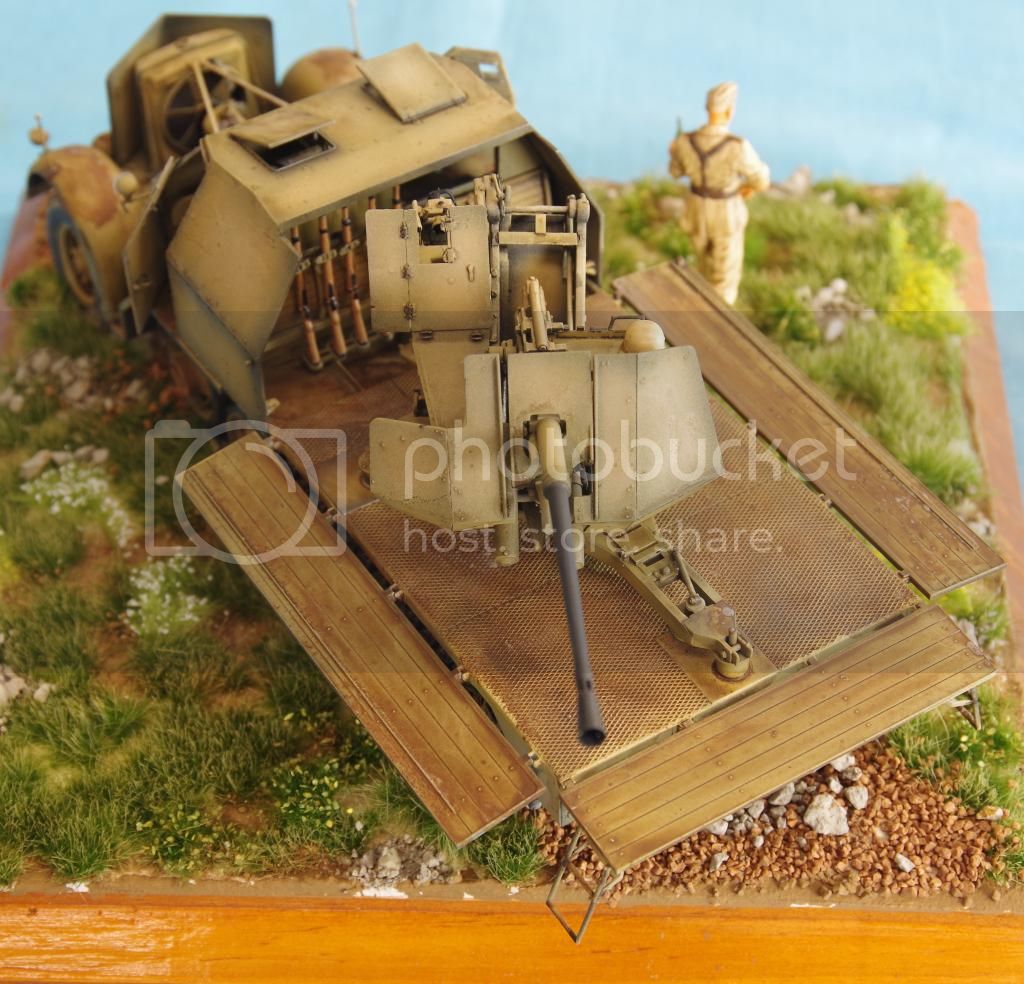
Right side: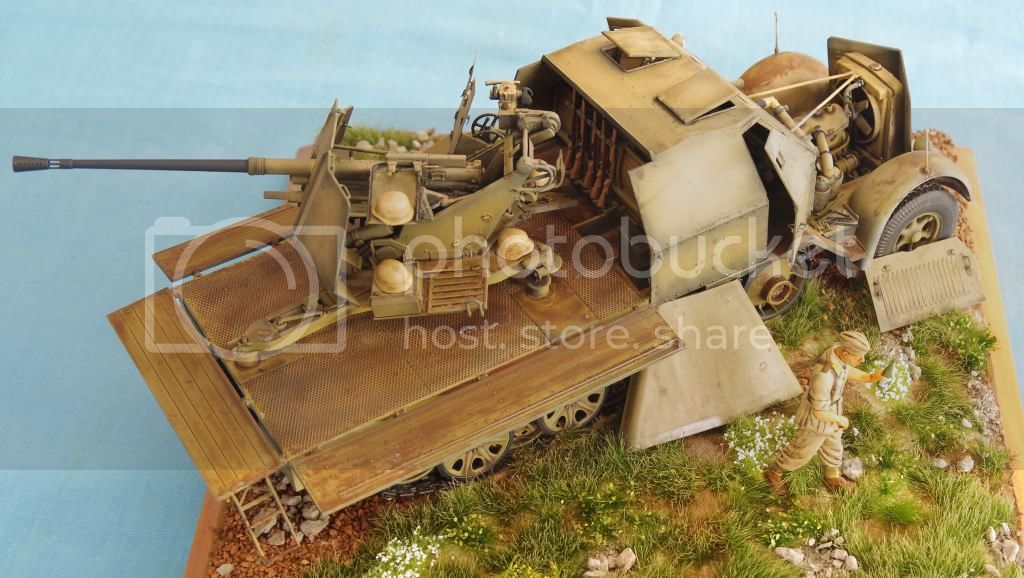
Engine detail (after adding all that detail, I wasn't about to cover it up!:
Regards
Rob
OK, the Sd. Kfz. 7/2 is finally complete after waiting an age for the vegetation for the base.
Front:
Left side:
Rear:
Right side:
Engine detail (after adding all that detail, I wasn't about to cover it up!:
Regards
Rob
Namabiiru
#399
Joined: March 05, 2014
KitMaker: 2,888 posts
Armorama: 1,920 posts
Posted: Monday, November 17, 2014 - 02:10 PM UTC
Quoted Text
G'day fellas
OK, the Sd. Kfz. 7/2 is finally complete after waiting an age for the vegetation for the base.
Should have used fast-growing grass, Rob, but whatever...
That is an amazing build! I don't know what else to say about it, but "Wow!"
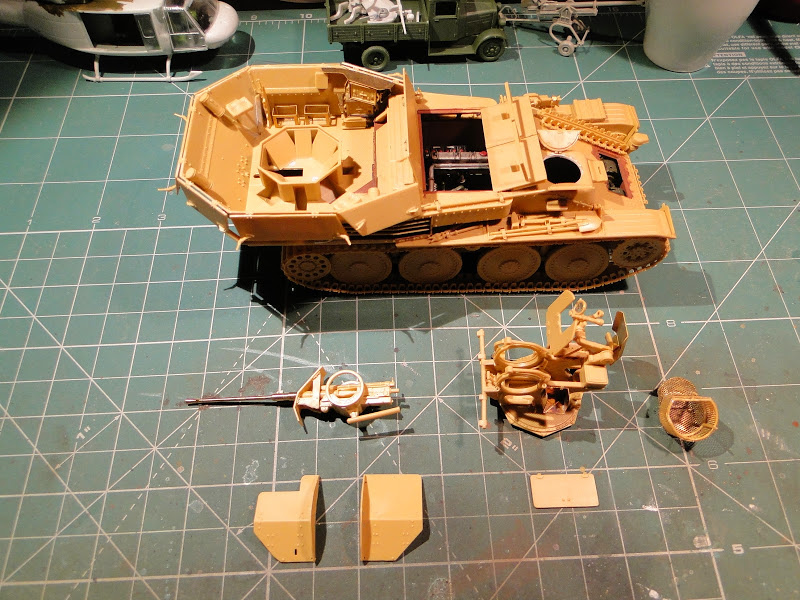
So here is my update: All the bits and bobs laid out and ready for priming.
Will have to get cracking on the AM tracks one of the days.

2ndWorcesters

Joined: March 15, 2014
KitMaker: 80 posts
Armorama: 80 posts
Posted: Monday, November 17, 2014 - 05:40 PM UTC
Wedgetail that dio is superb mate!
2ndWorcesters
Joined: March 15, 2014
KitMaker: 80 posts
Armorama: 80 posts
Posted: Monday, November 17, 2014 - 05:42 PM UTC
Looking forward to your next update on this one Mark.
SGTJKJ

#041

Joined: July 20, 2006
KitMaker: 10,069 posts
Armorama: 4,677 posts

Posted: Monday, November 17, 2014 - 07:30 PM UTC
Fantastic build, Rob! Great looking little diorama.
Sean, nice progress on the SA launcher and missile. It will be quite a beast. No wonder they were called flying telegraph poles by US pilots targetted by them in SEA.
Sean, nice progress on the SA launcher and missile. It will be quite a beast. No wonder they were called flying telegraph poles by US pilots targetted by them in SEA.


Giovanni1508

Joined: April 17, 2014
KitMaker: 652 posts
Armorama: 600 posts

Posted: Monday, November 17, 2014 - 08:25 PM UTC
Quoted Text
G'day fellas
OK, the Sd. Kfz. 7/2 is finally complete after waiting an age for the vegetation for the base.
Regards
Rob
Hi Rob,
Great job, very nice looking. I like very much the engine details. Really great !
jmsbd07
Joined: April 11, 2014
KitMaker: 96 posts
Armorama: 94 posts
Posted: Thursday, November 20, 2014 - 08:20 AM UTC
 1/35 Flak 38 by Tommy Styrvoky, on Flickr
Base coat added and some work has been done for chipping, some spots will be touched up where there is too much exposed metal. Next is the rust and washes.
Namabiiru
#399
Joined: March 05, 2014
KitMaker: 2,888 posts
Armorama: 1,920 posts
Posted: Thursday, November 20, 2014 - 01:58 PM UTC
Looking fabulous, Tommy!
35th-scale
Joined: November 21, 2007
KitMaker: 3,212 posts
Armorama: 2,807 posts
Posted: Friday, November 21, 2014 - 06:40 AM UTC
Lovely job Rob!
SAM2 missile is assembled. Some cleanup of seams and glue drops around the fins needed before painting. Launcher also done but will leave as seperate parts until its painted to allow proper access to the rail. Vietnam era Mutt is just to show the size of it....big!


SAM2 missile is assembled. Some cleanup of seams and glue drops around the fins needed before painting. Launcher also done but will leave as seperate parts until its painted to allow proper access to the rail. Vietnam era Mutt is just to show the size of it....big!


gcdavidson
Joined: August 05, 2003
KitMaker: 1,698 posts
Armorama: 1,563 posts
Posted: Saturday, November 22, 2014 - 12:35 AM UTC
Decided on the Wolverine, also known as the Air Defence Special Equipment Vehicle (AD-SEV). Kit bash of Trumpeter's AVGP Grizzly and ASLAV-PC.
The real thing:

And after some chopping, sanding, and p-card:

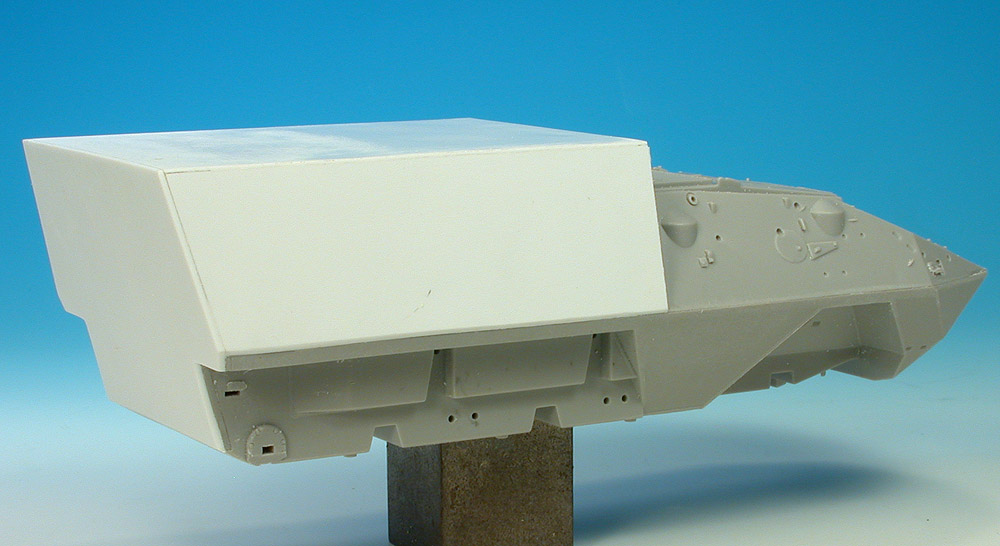
The real thing:
And after some chopping, sanding, and p-card:
 |

WEB HOSTING BY


Copyright ©2021 Armorama and Kitmaker Network, a subsidiary of Silver Star Enterprises
All Rights Reserved. Please read our Conditions of Use and Privacy Policy.
All Rights Reserved. Please read our Conditions of Use and Privacy Policy.