_GOTOBOTTOM
Dioramas: Buildings & Ruins
Ruined buildings and city scenes.
Hosted by Darren Baker
Rough road, on the road again...
Stickframe
#362
Visit this Community
California, United States
Joined: December 01, 2013
KitMaker: 1,661 posts
Armorama: 1,202 posts
Posted: Saturday, August 16, 2014 - 10:42 AM UTC
Hello fellow model builders. I'm starting a new project - this time set in Afghanistan, the subject is roadwork and reconstruction, featuring the following and more:


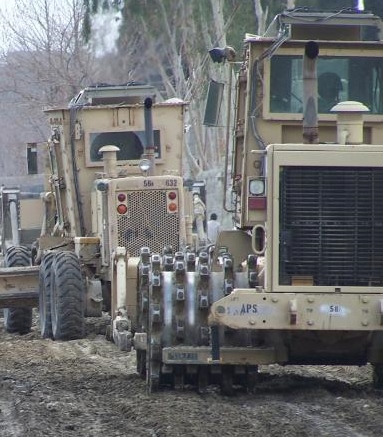
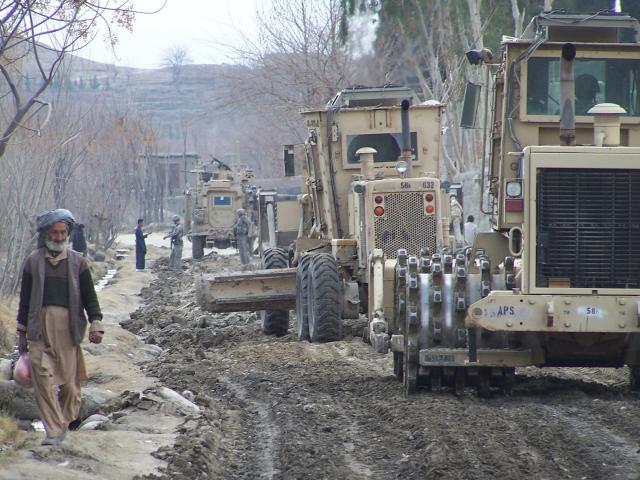
At the outset, this was going to be the dio I was looking for to feature the Meng CAT D9....however, after doing some research, including on line checking, and communicating with a few of our very own Armorama associates, who are in Afghanistan right now, operating heavy equipment, building roads...it unfortunately(for me) became pretty clear that while the D9 might be there, it's not in common usage...and in particular for grading and earthwork....CRAP!!! I really wanted to build that piece of iron!

It turns out the D7 is indeed the (US) choice for most grading....hmmmm what to do...I've seen the new D6 kit, but that's too small -

I'll follow up more with equipment below, first back to the idea. There's quite a bit of roadwork underway in Afghanistan in almost all landscapes - so, the concept for this dio is about earthwork along a wadi - maybe there was a big washout? next to a village - please see below:


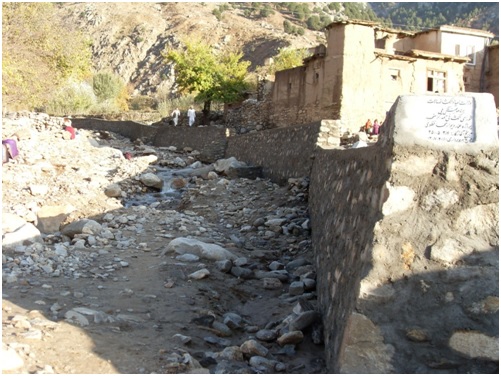
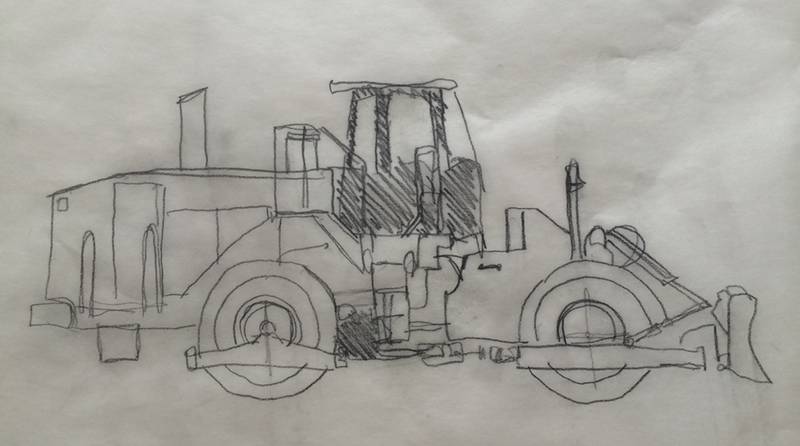
and from these two images....the sketch:


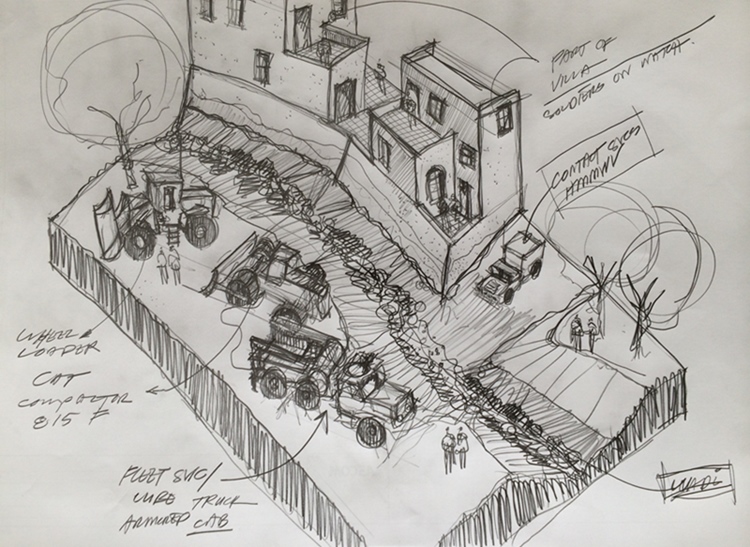
and there you have it - should be fun! brings a bit of everything!

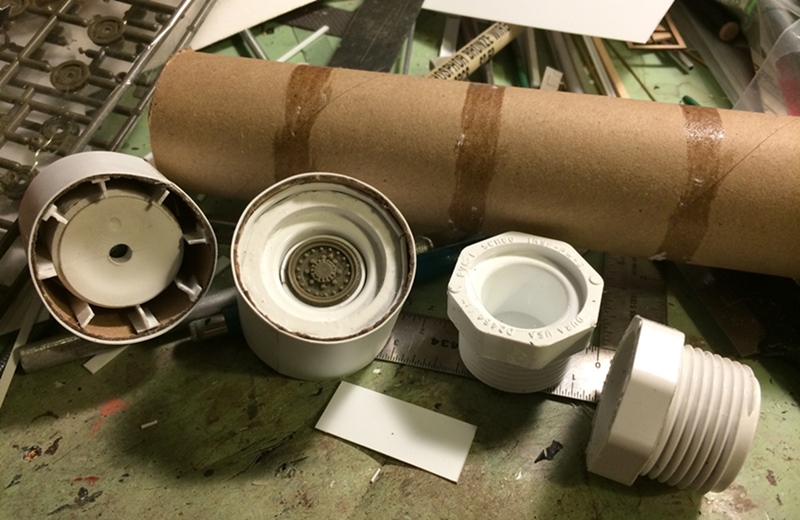
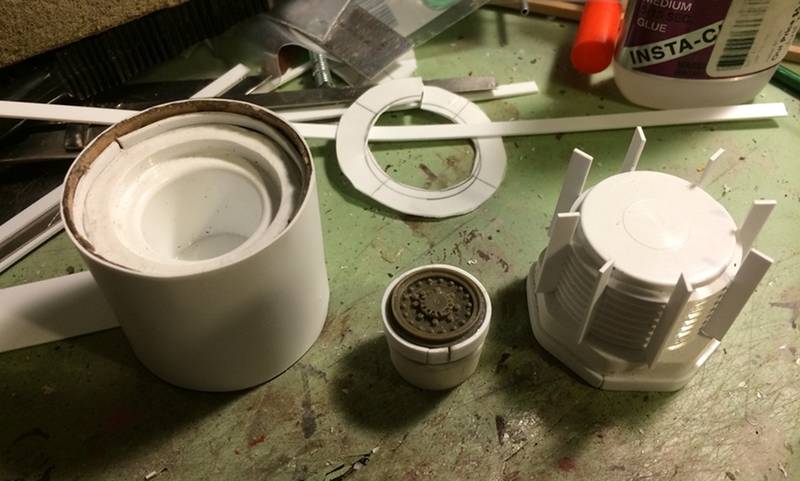
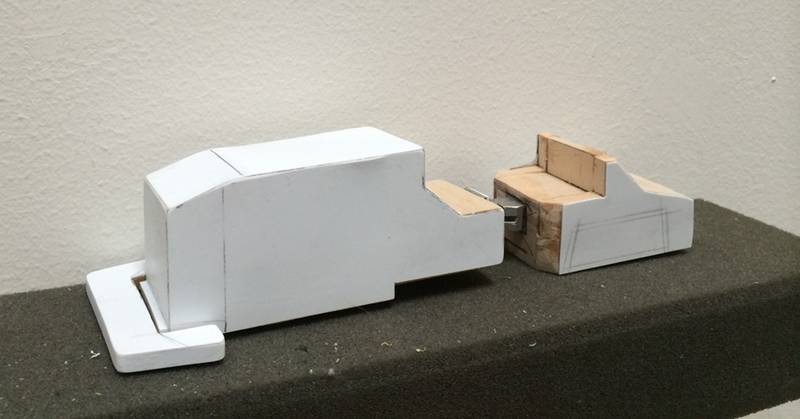
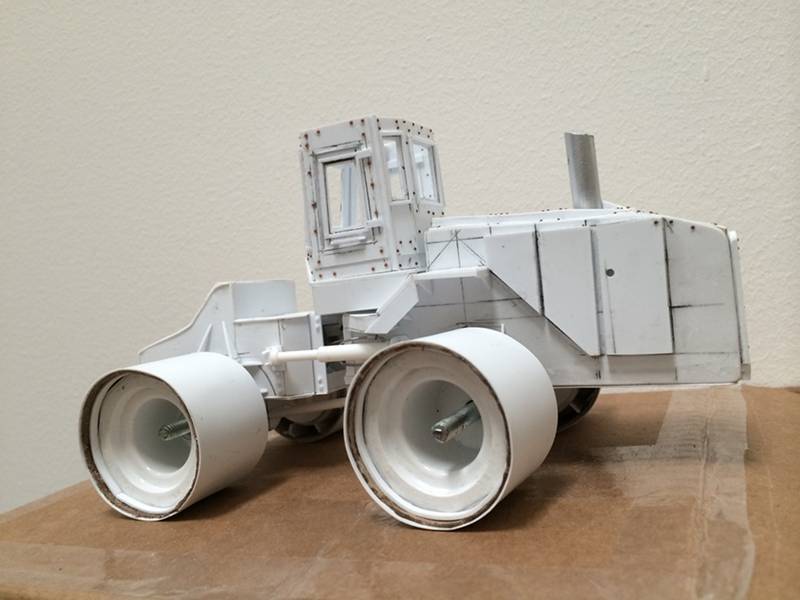
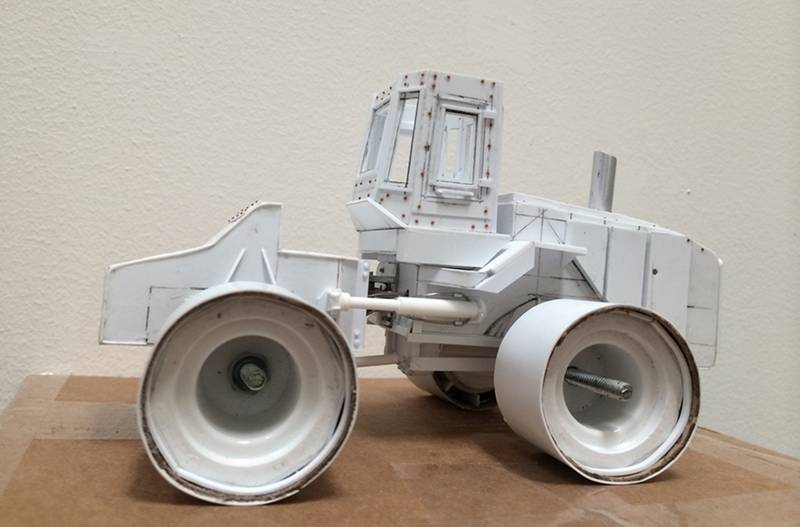
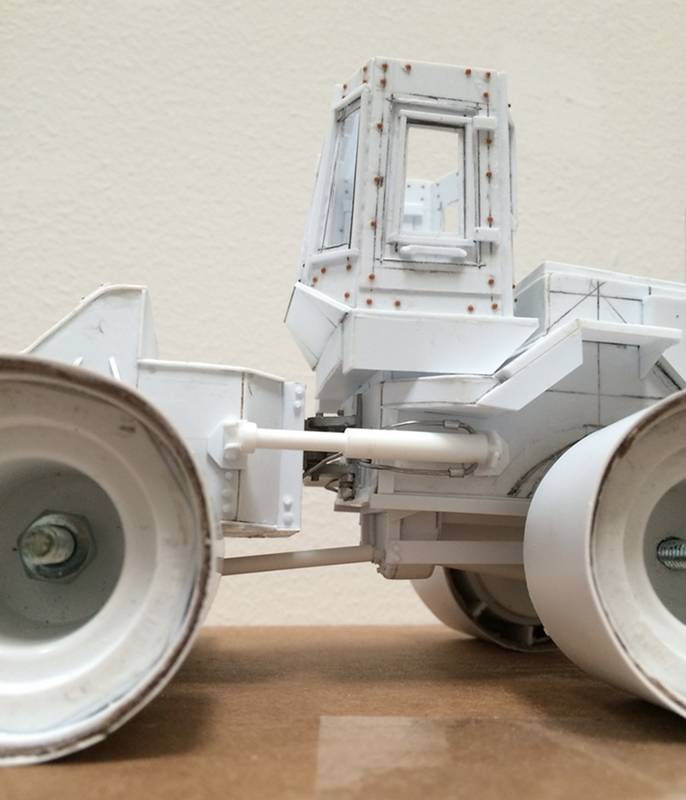
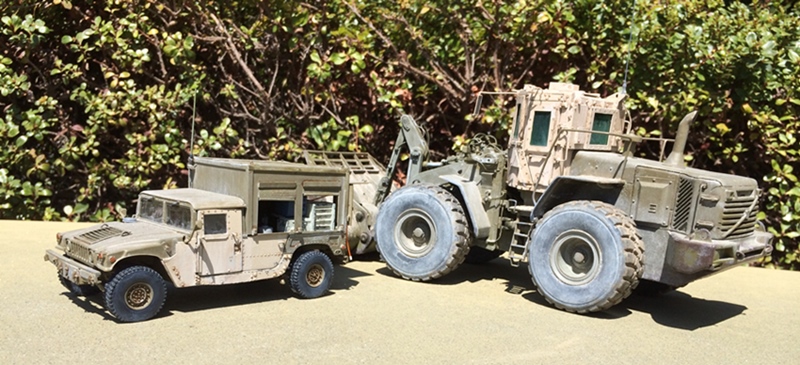
Now, on to the vehicles....per above, no dozer for me - so, instead, a wheel loader, and a Sheepsfoot compactor (a CAT 815....yes, full scratch! woo hoo!)

Plus, the hmmwv contact service truck already shown, and an MTVR I'll make into a lube/fleet service truck (this, is a stretch - I've seen images of this truck doing many things, but not this, exactly, so, we'll see where this goes)

and of course, scenery and figures, soldiers and locals....

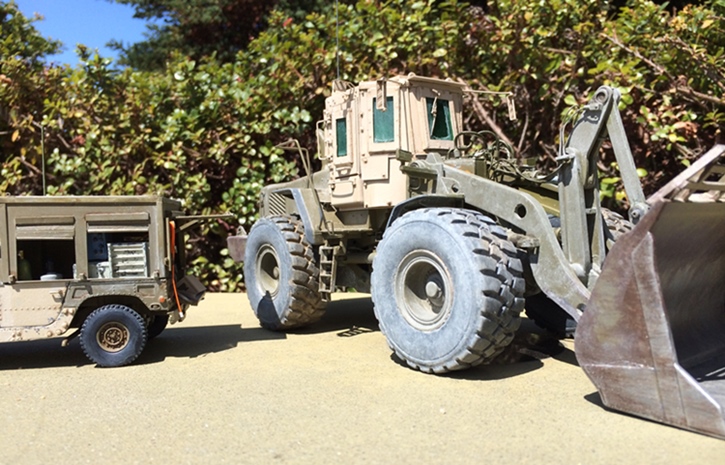
So - while I was a bit depressed without being able to do the D9 - I needed another choice, and came across a kids toy for a Volvo loader

I did some checking on this and found a couple of things:

First, a fellow called Charles King did a build up of one of these and did a nice job of it! but - it was not what I was looking for - I want an armored cab - which led to problem two:

I could find CAT wheel loaders with armor, but not the Volvo. So, I made a hybrid between the two.

The kids toy was essentially just that, so it was chunky -without many "sharp" details - it looked like a toy!!!

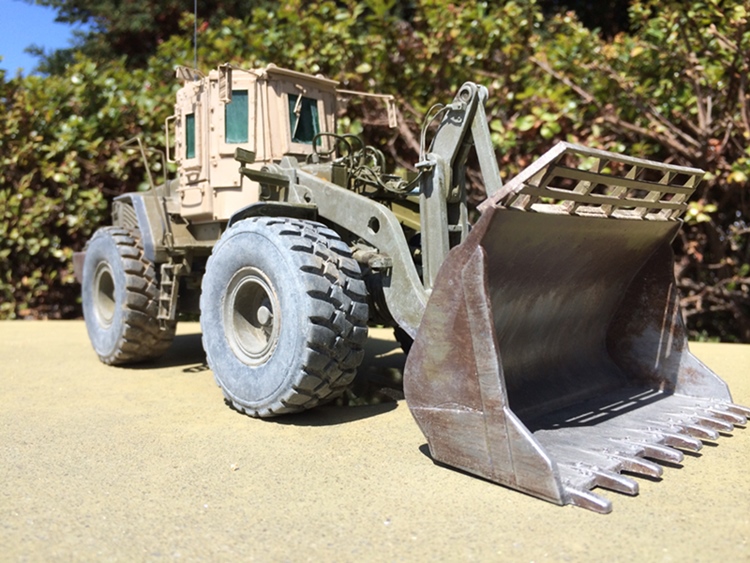
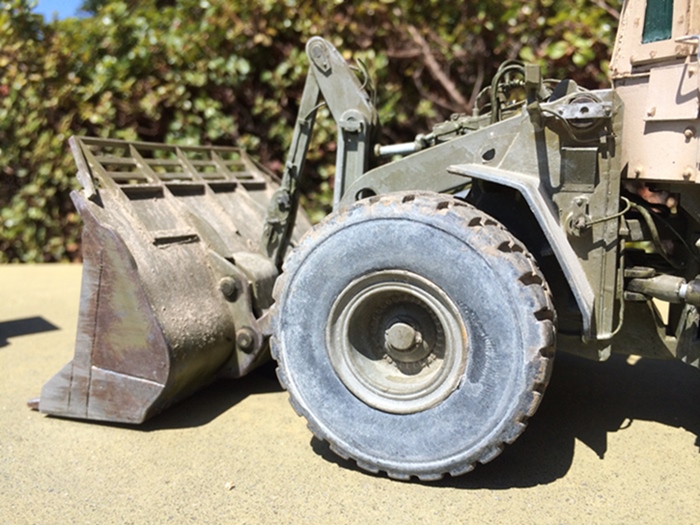
Also, unlike the Cat, the Volvo only has three hydraulic cylinders powering the loader bucket, and looking very "simple", the rest of the motion is done through mechanical action....short of going on and on, this was not immediately leaning toward a credible model....but, I carried on and think it turned out fine - I need to hit it with a bit more dust here and there, but I'm calling the loader - done!

have a look:


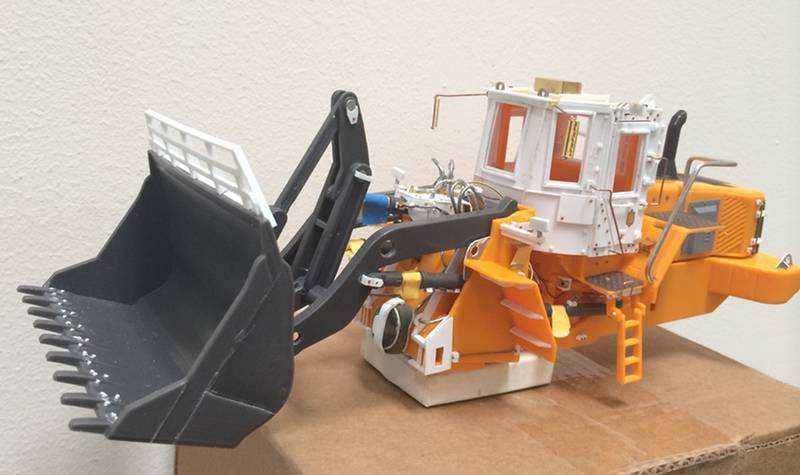
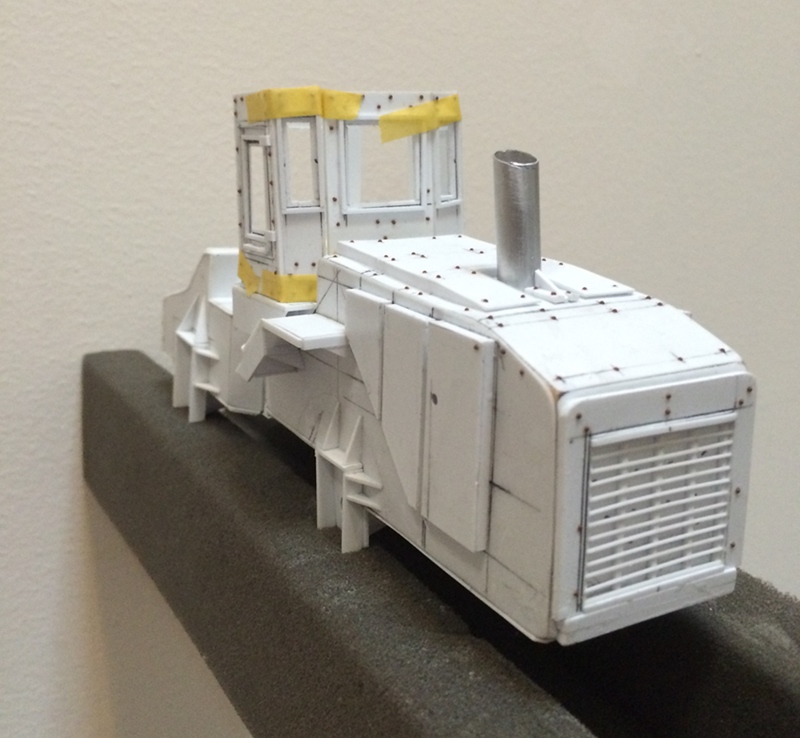
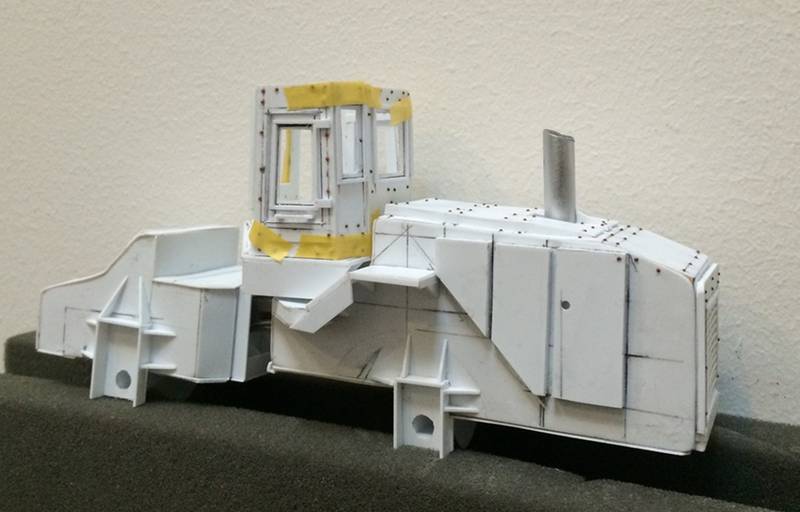
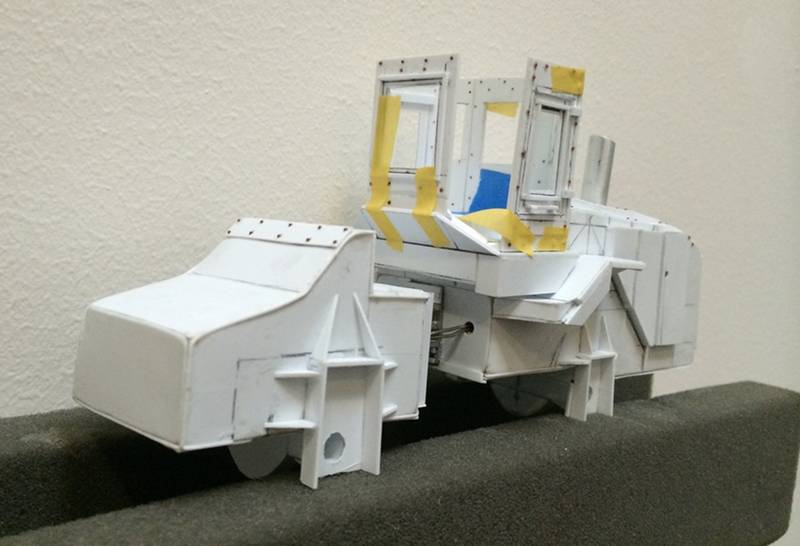
There was a bit added to this this, and bits removed - some of the add-ons are fundamental - the cab, handrails, hydraulics, and cage above the blade - but, a few parts more subtle. The original top hydraulic cylinder on the "toy" looks too thin, so, I borrowed an element from the Cat version of the armored loader which "boxes" in the cylinder. In this case, I think it looks bigger - and better!

As for removal, I re-scored any joint line I could find to give some definition, cut out louvers in the rear hood, and cut openings into the bottom portion of the frame, which in real life exposes the driveshaft etc -

and with paint:


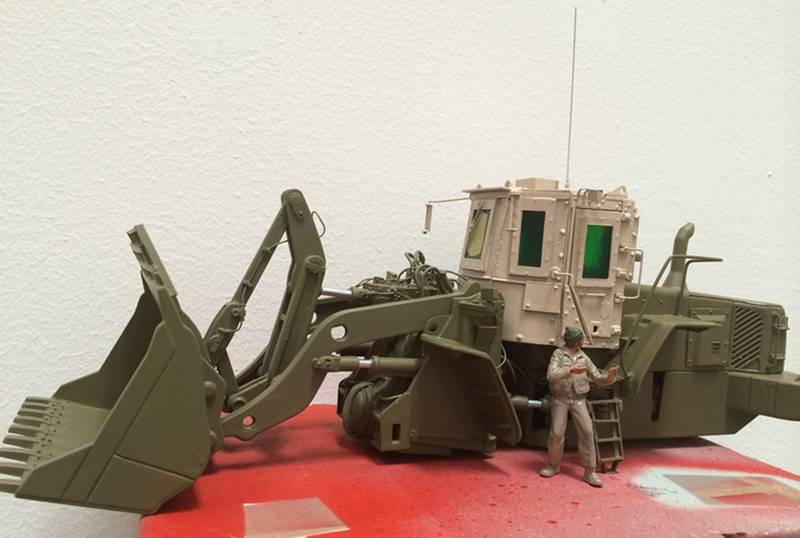
This is a 1/32 scale kit - I added mostly 1/35 scale details - like the cab door height, hand rail height over the fenders etc - as shown with a 1/35 guy....and I think acceptable as 1/35....it's huge in any event...

finally - some weather:


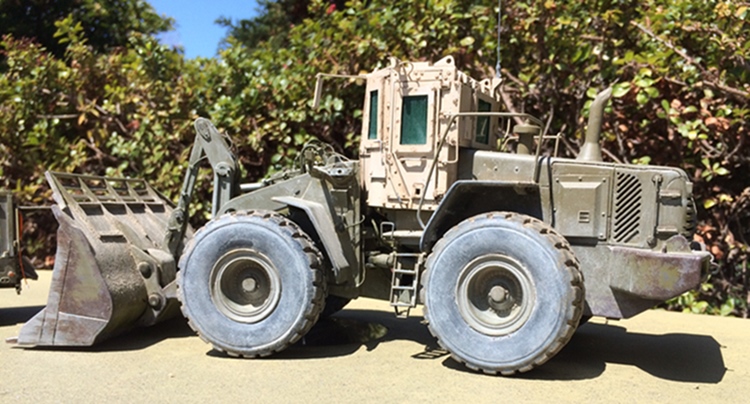
and there you have it - on the road again!

Next up will be the scratch built sheepsfoot roller!

Thanks for checking it out

NIck
IronOwl
Visit this Community
Georgia, United States
Joined: January 07, 2013
KitMaker: 572 posts
Armorama: 302 posts
Posted: Saturday, August 16, 2014 - 10:58 AM UTC
that is awesome

Sascha(Ironowl)
jrutman
Visit this Community
Pennsylvania, United States
Joined: April 10, 2011
KitMaker: 7,941 posts
Armorama: 7,934 posts
Posted: Saturday, August 16, 2014 - 11:03 AM UTC
What the...... I can only surmise that if you can build something so good and so fast and so unique....you da debble boi!!!
I saw that first pic and thought that was the real vehicle and you were showing us what you wanted to build!!! Holy cow man.
J
justsendit
Visit this Community
Colorado, United States
Joined: February 24, 2014
KitMaker: 3,033 posts
Armorama: 2,492 posts
Posted: Saturday, August 16, 2014 - 11:37 AM UTC

Quoted Text

I saw that first pic and thought that was the real vehicle and you were showing us what you wanted to build!!! Holy cow man.


Jerry,
I saw that opening shot and immediately suspected it was the ol' switch-a-roo. ... hmmmm? Still, after staring at it for a while, my mind couldn't accept that it wasn't the real deal. ... zzzzztttt! ... brain short-circuit!

Incredible work, Nick!!!

--mike
panzerconor
Visit this Community
Massachusetts, United States
Joined: February 08, 2012
KitMaker: 1,271 posts
Armorama: 1,253 posts
Posted: Saturday, August 16, 2014 - 03:42 PM UTC
It's hard to fathom how you do all this hahaha. It's almost like magic, only cooler. Really looking forward to how it comes out, I love the environment you chose. The in progress photo is incredible as well, almost looks cooler in that state! (Almost, but not quite)

Can't wait for this to keep going!

-Conor
roudeleiw
Visit this Community
Luxembourg
Joined: January 19, 2004
KitMaker: 2,406 posts
Armorama: 2,224 posts
Posted: Saturday, August 16, 2014 - 08:15 PM UTC
This Layout looks very interesting and I will definitely follow your progress. Your scratch add-ons on the vehicle are superb! Somewhat I admire the capacity to do such clean work.

Claude
1stjaeger
Visit this Community
Wien, Austria
Joined: May 20, 2011
KitMaker: 1,744 posts
Armorama: 1,727 posts
Posted: Saturday, August 16, 2014 - 11:32 PM UTC

Yeah, yeah, it's not that bad....


Well done m8!! Superb transformation from toy to model!!

You are brilliant..and you are soooo fast!!!

Just like the others I'll be looking forward to seeing the completed scene!!

..considering your "speed", I'd say by the end of next week!!??!!

Cheers

Romain

Stickframe
#362
Visit this Community
California, United States
Joined: December 01, 2013
KitMaker: 1,661 posts
Armorama: 1,202 posts
Posted: Sunday, August 17, 2014 - 04:00 AM UTC
Hi fellow model builders - thanks for your comments

Now, the tougher parts begin! Ought to be interesting. As the dialogue on another recent build pointed out - the key is getting everything built up to the same level.....we'll see if/ how that gets pulled off!!

While the vehicle building for this will be a challenge (actually, I really like that part - the nastier the better!! More styrene and an xacto please! Haha) getting the landscape/topography, stone/mud wall along the wadi, and the villa to look "right" might be the real hurdle!!! Ought to be fun!

Thanks again for the comments
Cheers
Nick
matt
Staff MemberCampaigns Administrator
Visit this Community
New York, United States
Joined: February 28, 2002
KitMaker: 5,957 posts
Armorama: 2,956 posts
Posted: Monday, August 18, 2014 - 09:05 AM UTC
This ones gonna be intersting. After looking at the volvoce site, some loaders do only use the 3 cylinder design like the toy.... interesting
Stickframe
#362
Visit this Community
California, United States
Joined: December 01, 2013
KitMaker: 1,661 posts
Armorama: 1,202 posts
Posted: Thursday, August 21, 2014 - 07:58 AM UTC
Hello - a bit of an update via lunchtime post!

The scratch building of my "sheepsfoot" roller compactor has begun - for quick reference, the picture below is of the real thing:


If you're not familiar with these, they are commonly used to compact earth to the point where it (the ground) becomes structurally stable - and is called a "sheepsfoot" because of the iron "feet" attached to the roller. By using these individual pads, the weight of the vehicle is pressed very heavily in only those places, rather than more evenly across the whole roller - and as such, you guessed it, they compact the ground!

I had a variety of small tech probs, so rather than printing out my "scaled" version of the CAT spec of this, I traced it from my laptop screen....uhhh, yeah....a bit non-tech, but it works:


and this and the other side are serving as my templates - NO laughing at the method!!

Because, you'll find more to laugh at coming up next...making the rollers. As part of my ongoing effort to develop the ugliest work in progress images:


So whaddya get when you cross some pvc plumbing fittings, some strip styrene, a cardboard tube, and some LAV wheel parts???? - Roller wheels of course!! turns out the diameter of the cardboard cylinder is almost perfect. I wrapped thin styrene over it...and you get the rest -there's a longer, ongoing story regarding the "feet" - to be discussed later...

Next - the overall form. Like the loader this machine is big and fairly clunky, and articulated in the middle - so, for the frame, I used wood, clad with styrene - so far so good:


And that's where we are today - next steps will be the gradual refinement of the body of the vehicle, followed by mechanicals, then the cab -

thanks for checking it out!

Cheers
Nick
1stjaeger
Visit this Community
Wien, Austria
Joined: May 20, 2011
KitMaker: 1,744 posts
Armorama: 1,727 posts
Posted: Thursday, August 21, 2014 - 10:06 PM UTC


It can look whatever you like now....in the end it will be a compactor!!!

I admire your scratchbuilding skills and your chuzpe!

Impatient to see progress on this dio!!! Not the easiest choice, but that's not deterring you, does it!!

This project is so fascinating, because you tackle it despite the lack of available vehicles, a difficult terrain and lots of other problems!!

You are not going to post the umpteenth Tiger in the ukrainian lowlands!

Thanks for that and good luck!!

Cheers

Romain

fhvn4d
#159
Visit this Community
Massachusetts, United States
Joined: April 07, 2008
KitMaker: 803 posts
Armorama: 564 posts
Posted: Thursday, August 21, 2014 - 11:20 PM UTC
Not sure what I sent you and what I didn't......


165thspc
#521
Visit this Community
Kentucky, United States
Joined: April 13, 2011
KitMaker: 9,465 posts
Armorama: 8,695 posts
Posted: Thursday, August 21, 2014 - 11:49 PM UTC
SUPER Impressed! Following this thread with great interest. Love heavy construction equipment!
retiredyank
Visit this Community
Arkansas, United States
Joined: June 29, 2009
KitMaker: 11,610 posts
Armorama: 7,843 posts
Posted: Friday, August 22, 2014 - 12:31 AM UTC
Subscribe... Subscribe. Where's the subscribe button! So, really. You have like a brigade of gnomes working on this thing, don't you.? Seriously impressive. I too thought the first photo was of an actual vehicle. If my hobby skill culminated in that beautiful beast, I would satisfactorily lay down my knife and retire knowing that I had created something near perfect. I say "near" only because I believe that you must have a dozen or so gnomes aiding in this.
jrutman
Visit this Community
Pennsylvania, United States
Joined: April 10, 2011
KitMaker: 7,941 posts
Armorama: 7,934 posts
Posted: Friday, August 22, 2014 - 06:50 AM UTC
Ummmm......what was it Napoleon said?
L'audace,Laudace,tujours L.audace? Not knowing French I am probably spelling it incorrectly but it states my meaning.
Very audacious project for sure.
J
Stickframe
#362
Visit this Community
California, United States
Joined: December 01, 2013
KitMaker: 1,661 posts
Armorama: 1,202 posts
Posted: Friday, August 22, 2014 - 10:09 AM UTC
Holy smoke!! well guys, I guess the pressure is on!

for me...Mr. Neat Guy himself and his "cool ideas"....Jerry, your quote has forced me to consider another, less famous, and in this case, more desperate of a quote:

"Feats don't fail me now!"

OK - so, this weekend, if all works out ok, the styrene will once again be flying and I'll make headway on the compactor - thanks to you heavy equipment fans for the support! I thought I couldn't be alone

Brian - shoot! first, thanks for a few more images; second, I wish I'd seen those of the armored loader a bit sooner!

cheers
Nick

ubisuck
Visit this Community
Quebec, Canada
Joined: December 20, 2012
KitMaker: 461 posts
Armorama: 255 posts
Posted: Friday, August 22, 2014 - 11:34 AM UTC

Quoted Text


cheers
Nick


You are incredible Nick. Absolutly awesome. Never seen so much talent.

Give me a little of it please
Stickframe
#362
Visit this Community
California, United States
Joined: December 01, 2013
KitMaker: 1,661 posts
Armorama: 1,202 posts
Posted: Monday, August 25, 2014 - 07:31 AM UTC
Hi fellow model builders - I'm making progress on the roller - I'm glad I worked on the loader first, just to get a sense of the scale and proportion of these - they're big! and clumsy...and there's more going on than meets the eye!

Please have a look:


So, there you have it - so far so good. This model is being built up from the sketch above, which is taken from a scaled photograph....so, not as precise as may be ideal, but, it has, for the most part been working OK -

Clearly there is quite a way to go, but ,the fundamentals are in place, and even generally perpendicular and parallel!!

thanks for checking it out!

Nick
justsendit
Visit this Community
Colorado, United States
Joined: February 24, 2014
KitMaker: 3,033 posts
Armorama: 2,492 posts
Posted: Monday, August 25, 2014 - 08:12 AM UTC
Nick,
This is a fantastic update! What are you using to create the bolts on the skin?

--mike
1stjaeger
Visit this Community
Wien, Austria
Joined: May 20, 2011
KitMaker: 1,744 posts
Armorama: 1,727 posts
Posted: Monday, August 25, 2014 - 08:57 AM UTC


Awesome!!

Makes you humble!!!

Cheers

Romain

Stickframe
#362
Visit this Community
California, United States
Joined: December 01, 2013
KitMaker: 1,661 posts
Armorama: 1,202 posts
Posted: Wednesday, August 27, 2014 - 07:30 AM UTC
Hi Mike - thanks for checking it out - I use three types of bolts - the brown ones are by Tichy Train Group, next, are some in grey, by Grandt Line - both are really nice. They come on a little plastic sprue - and, look like little bolts.

You drill a hole in the project, and slide these in. Installation can be tedious (yes, pretty slow going) - especially if you're doing plenty of them, but it's not really all that bad - consider it a zen exercise! Finally, I use a lot of cut hexagon rod -also a bit tedious, but better for bigger bolts -

Hi Romain - thanks, but, I think you're just being nice to me now, to lull me into a sense of security...until I get into the dio!!! then, I better be on my game!!!

A brief update on the build - as noted above, more and more bolts - the cab is assembled and glued together, but not to the model. Also did the transfer case, drivelines and started the hydraulics. So far, so good, please take a look:


So, still a long way to go, but getting there! the proportions don't look as weird in real life - these are on the way out the door to work pics...god enough for an update! I think the next step will be the front blade and hydraulics etc -

thanks for having a look!

Nick
justsendit
Visit this Community
Colorado, United States
Joined: February 24, 2014
KitMaker: 3,033 posts
Armorama: 2,492 posts
Posted: Wednesday, August 27, 2014 - 07:40 AM UTC
Sooooooo cool!!!

--mike
jrutman
Visit this Community
Pennsylvania, United States
Joined: April 10, 2011
KitMaker: 7,941 posts
Armorama: 7,934 posts
Posted: Wednesday, August 27, 2014 - 07:43 AM UTC
You are a steely eyed lantern jawed modelmaking man!
J
1stjaeger
Visit this Community
Wien, Austria
Joined: May 20, 2011
KitMaker: 1,744 posts
Armorama: 1,727 posts
Posted: Wednesday, August 27, 2014 - 08:18 AM UTC

OMG!

Some people are definitely more talented for certain things than others..!!

Big deal, we all knew that, didn't we....but did it have to become that apparent!!

Great show m8!!

We appreciate you making our day!!

Cheers

Romain

matt
Staff MemberCampaigns Administrator
Visit this Community
New York, United States
Joined: February 28, 2002
KitMaker: 5,957 posts
Armorama: 2,956 posts
Posted: Wednesday, August 27, 2014 - 12:42 PM UTC
And the pressure mounts....... on me. I had to reorder the masters for the pads on the wheels due to a bad mix of RTV for the mold and subsequent cleaning attempt. Replacement has been ordered and will be here by the 10 of september. I'll have them turned around as fast as I can.
 _GOTOTOP