Hosted by Richard S.
The Green Machine

retiredyank

Joined: June 29, 2009
KitMaker: 11,610 posts
Armorama: 7,843 posts

Posted: Monday, July 06, 2015 - 01:27 AM UTC
Don't forget to post photos of the completed build to the campaign gallery. I am going to build Academy's M18 Hellcat, as I found it in my stash and want to make sure to complete this one. I have to order some more etch, for the Abrams and have yet to make it past the running gear.
erichvon

Joined: January 17, 2006
KitMaker: 1,694 posts
Armorama: 1,584 posts

Posted: Monday, July 06, 2015 - 02:41 AM UTC
Bloody typical! Painted the SS driver up in peas pattern, looking good but doesn't bloody fit! Thought fine I just won't have a driver now where's the steering wheel. Vanished  Now searching for a scrap jeep to nick the steering wheel off. Think there's one in the loft....
 Now searching for a scrap jeep to nick the steering wheel off. Think there's one in the loft....
retiredyank

Joined: June 29, 2009
KitMaker: 11,610 posts
Armorama: 7,843 posts

Posted: Monday, July 06, 2015 - 03:17 AM UTC
Quoted Text
Bloody typical! Painted the SS driver up in peas pattern, looking good but doesn't bloody fit! Thought fine I just won't have a driver now where's the steering wheel. VanishedNow searching for a scrap jeep to nick the steering wheel off. Think there's one in the loft....
Always. ALWAYS test fit. I learned to build the etch, before touching the styrene. Lost many a piece, before. You could try to locate one, in the buy/sell forum.?

erichvon

Joined: January 17, 2006
KitMaker: 1,694 posts
Armorama: 1,584 posts

Posted: Monday, July 06, 2015 - 07:46 AM UTC
I usually do Matt but have no idea why I didn't this time. Stupidity on my part lol. I've found another one now so I can add the final part 

LowFiveJoe

Joined: April 28, 2015
KitMaker: 22 posts
Armorama: 16 posts

Posted: Monday, July 06, 2015 - 05:15 PM UTC
I was able to get some building AND paint slinging done this weekend. Here is the chassis built up
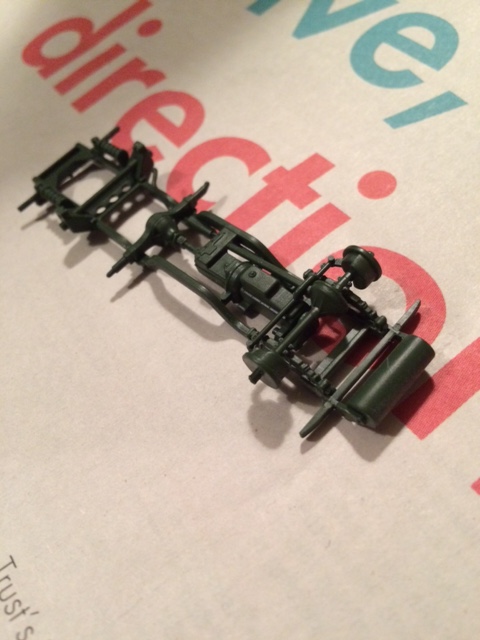
It's a pretty simple build in 1/72 so I decided to compensate with paint. I'm trying out "real metal" techniques (I think that's what it called); the first attempt was a chocolate brown with rust tones speckled on.
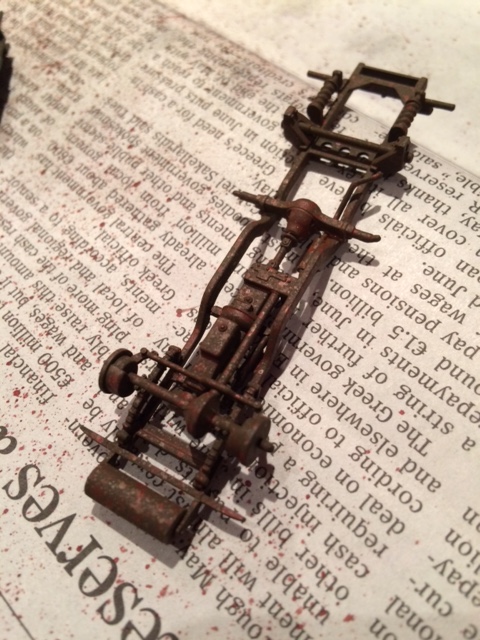
I toned it down with a few coats of a light rust tone and added some OD here and there.
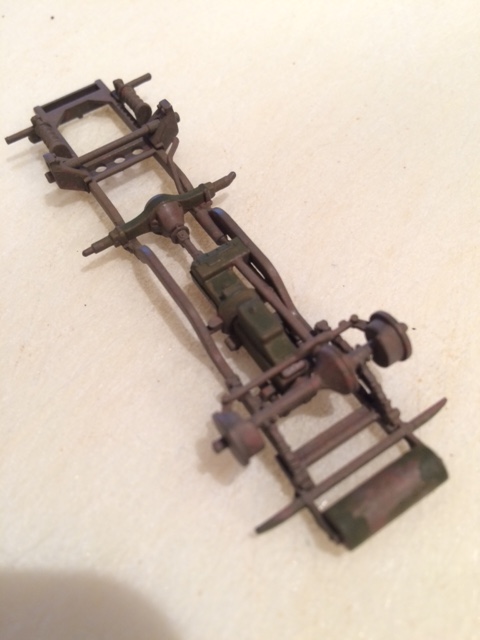
I'm going to add some rusty washes to tie it all together. Since it won't really be all that visible, I thought it would be a good chance to experiment.
And finally, the "people compartments"
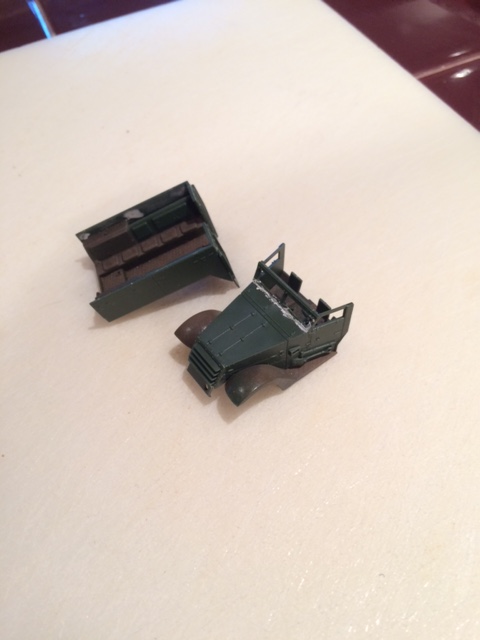
Similar rusty treatment to the deck and running boards.

It's a pretty simple build in 1/72 so I decided to compensate with paint. I'm trying out "real metal" techniques (I think that's what it called); the first attempt was a chocolate brown with rust tones speckled on.

I toned it down with a few coats of a light rust tone and added some OD here and there.

I'm going to add some rusty washes to tie it all together. Since it won't really be all that visible, I thought it would be a good chance to experiment.
And finally, the "people compartments"

Similar rusty treatment to the deck and running boards.
LowFiveJoe

Joined: April 28, 2015
KitMaker: 22 posts
Armorama: 16 posts

Posted: Thursday, July 09, 2015 - 04:32 PM UTC
I made some more progress this week. The body is assembled and I shot a base coat Tamiya XF-62.
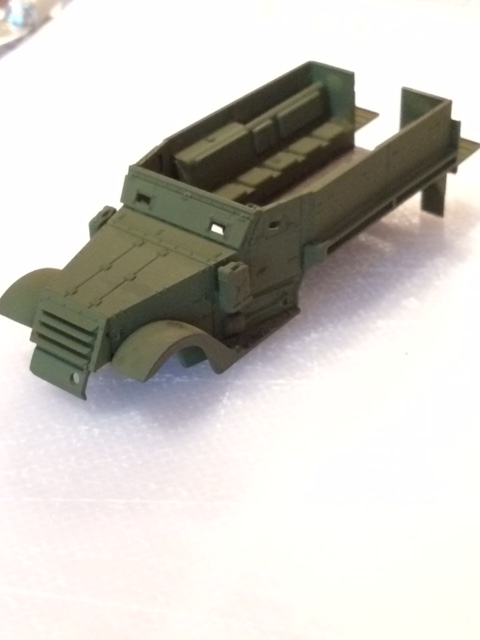
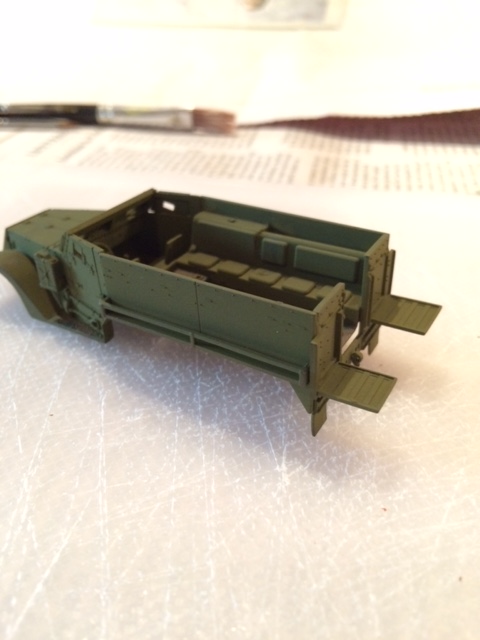
The coat came out a lot greener than I had expected, but then again, I'm still new to acrylics. I'm sure the oil dot method, washes, and etc will change it up a bit.
The coat came out a lot greener than I had expected, but then again, I'm still new to acrylics. I'm sure the oil dot method, washes, and etc will change it up a bit.
Hammerhead11

Joined: May 29, 2015
KitMaker: 14 posts
Armorama: 14 posts

Posted: Thursday, July 09, 2015 - 08:57 PM UTC
Construction on the M10 is complete and it's all ready for paint.


Posted: Saturday, July 11, 2015 - 04:51 PM UTC
M4 Mortar Carrier, started to get a few bits together.


retiredyank

Joined: June 29, 2009
KitMaker: 11,610 posts
Armorama: 7,843 posts

Posted: Saturday, July 11, 2015 - 05:26 PM UTC
Brett: I love the turret armor. I have been meaning to do the same to a M36.
John: She's coming along, nicely.
I have ordered some parts to build an M1A2 Tusk II.
John: She's coming along, nicely.
I have ordered some parts to build an M1A2 Tusk II.
Bravo1102

Joined: December 08, 2003
KitMaker: 2,864 posts
Armorama: 2,497 posts

Posted: Monday, July 13, 2015 - 03:30 PM UTC
Really nice work everyone. Still trying to clear the workbench of accumulated junk to get started. 


windysean

Joined: September 11, 2009
KitMaker: 1,917 posts
Armorama: 735 posts

Posted: Monday, July 13, 2015 - 10:22 PM UTC
Quoted Text
Really nice work everyone. Still trying to clear the workbench of accumulated junk to get started.
Yep, that's where I am too!
-Sean H.

Hammerhead11

Joined: May 29, 2015
KitMaker: 14 posts
Armorama: 14 posts

Posted: Thursday, July 16, 2015 - 12:49 AM UTC
Quoted Text
Brett: I love the turret armor. I have been meaning to do the same to a M36.
Thanks! I've always felt that the open topped tank destroyers looked better with something up top. But thats just my personal opinion. I should have more photos up soon, I've managed to prime the tank and get the first few coats of paint on.
Bravo1102

Joined: December 08, 2003
KitMaker: 2,864 posts
Armorama: 2,497 posts

Posted: Saturday, July 18, 2015 - 09:02 PM UTC
Quoted Text
Quoted TextReally nice work everyone. Still trying to clear the workbench of accumulated junk to get started.
Yep, that's where I am too!
-Sean H.
I managed to clear off part of the work bench. An all metal 1/32 Napoleon 12 pounder Cannon is kind of small so I started cleaning it up. Pictures taken, just have to upload them. US cannon in the Civil War were painted green.
TankSGT

Joined: July 25, 2006
KitMaker: 1,139 posts
Armorama: 946 posts

Posted: Sunday, July 19, 2015 - 03:53 AM UTC
I started on the hull of my M46 early Dragon kits can have fit issues and a bit of flash.
Tom
Tom

retiredyank

Joined: June 29, 2009
KitMaker: 11,610 posts
Armorama: 7,843 posts

Posted: Sunday, July 19, 2015 - 10:59 AM UTC
Quoted Text
I started on the hull of my M46 early Dragon kits can have fit issues and a bit of flash.
Tom
It is common on the Imperial series and before.

TankSGT

Joined: July 25, 2006
KitMaker: 1,139 posts
Armorama: 946 posts

Posted: Sunday, July 19, 2015 - 01:35 PM UTC
I built the M26A1 quite awhile ago forgot about the issues. It's nothing a little old time model building can't handle. All these new wonder kits have us a bit spoiled.
Tom
Tom
LowFiveJoe

Joined: April 28, 2015
KitMaker: 22 posts
Armorama: 16 posts

Posted: Sunday, July 19, 2015 - 05:27 PM UTC
After a week on the road, I was able to make some progress over the weekend. Here's the body prep'd for decals.
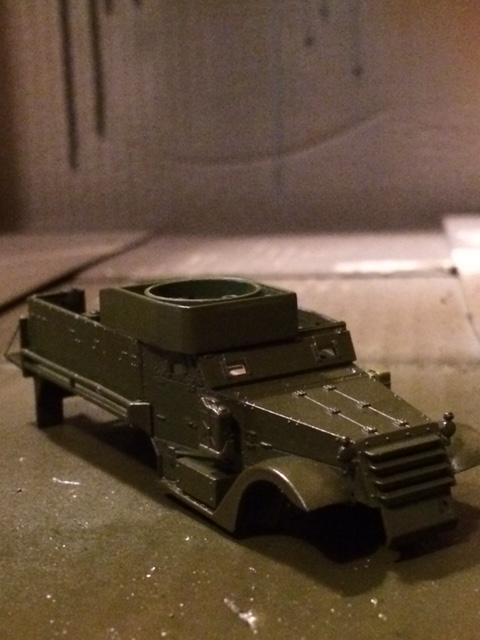
And a few after shots.
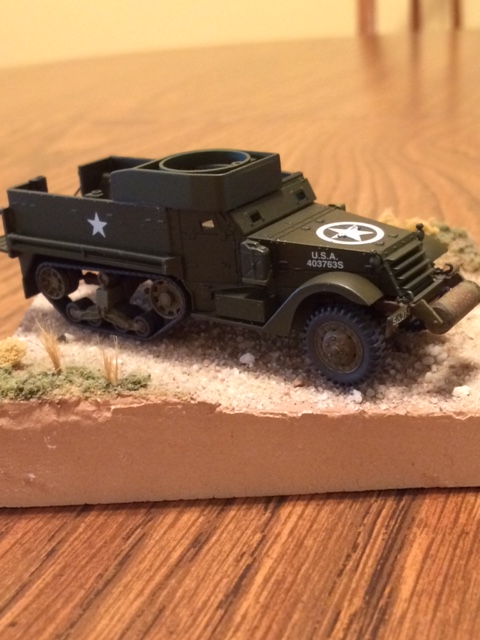
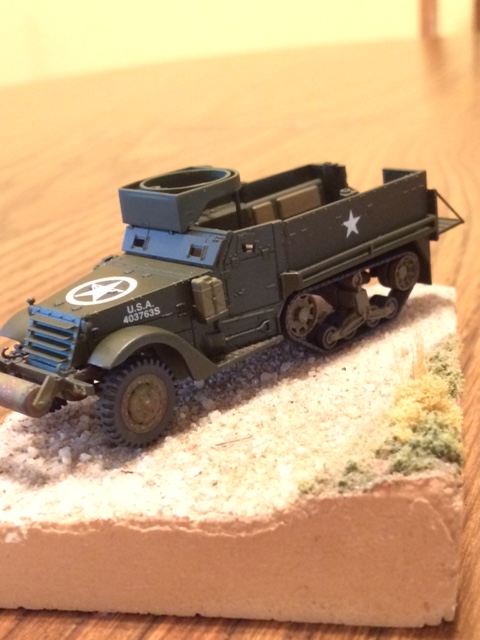
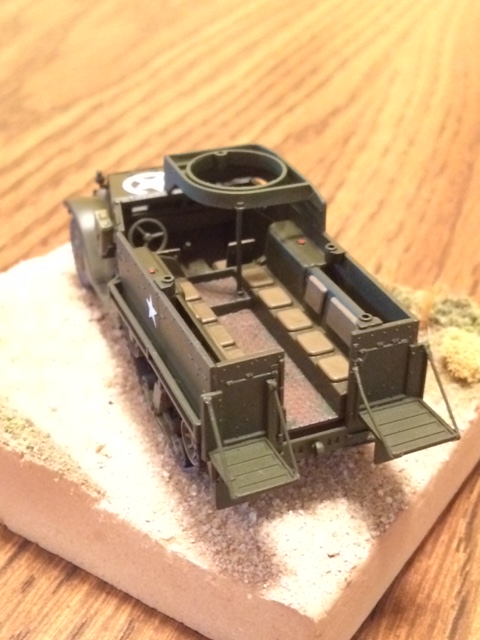
The OD paint really darkened up with the gloss coat. I'm currently working on some pin-washes, and once those dry (oil takes forever apparently) I'll start with oil dot streaking and such. I'm also scratch building some tarps, and working on the kit's MGs. I had started on a nice metal finish, but got ahead of myself and applied a wash which promptly lifted the base coat off. Doh! The base is a spare I had sitting around, I plan on starting a cobblestone street scene based on a photo.
And a few after shots.
The OD paint really darkened up with the gloss coat. I'm currently working on some pin-washes, and once those dry (oil takes forever apparently) I'll start with oil dot streaking and such. I'm also scratch building some tarps, and working on the kit's MGs. I had started on a nice metal finish, but got ahead of myself and applied a wash which promptly lifted the base coat off. Doh! The base is a spare I had sitting around, I plan on starting a cobblestone street scene based on a photo.
Hammerhead11

Joined: May 29, 2015
KitMaker: 14 posts
Armorama: 14 posts

Posted: Sunday, July 19, 2015 - 11:17 PM UTC

windysean

Joined: September 11, 2009
KitMaker: 1,917 posts
Armorama: 735 posts

Posted: Monday, July 20, 2015 - 10:05 PM UTC
Quoted Text
The OD paint really darkened up with the gloss coat. I'm currently working on some pin-washes, and once those dry (oil takes forever apparently) I'll start with oil dot streaking and such. I'm also scratch building some tarps, and working on the kit's MGs. I had started on a nice metal finish, but got ahead of myself and applied a wash which promptly lifted the base coat off. Doh! The base is a spare I had sitting around, I plan on starting a cobblestone street scene based on a photo.
I found that too. I have only used oils once so far, but it took weeks to dry. I was told that what base coat you use makes a huge difference.
-Sean H.

LowFiveJoe

Joined: April 28, 2015
KitMaker: 22 posts
Armorama: 16 posts

Posted: Monday, July 20, 2015 - 11:10 PM UTC
Windysean, I think your base coat comment is right on. The oil wash has evaporated nicely in my mixing cup, leaving a nice flat grime; the wash on the vehicle is still damp and glossy. Time will tell.
Hammerhead, M10 is looking good!
Hammerhead, M10 is looking good!

Bluestab

Joined: December 03, 2009
KitMaker: 2,160 posts
Armorama: 1,906 posts

Posted: Tuesday, July 21, 2015 - 08:31 AM UTC
I'll start off on my Italeri M4A1 Sherman in 1/72 scale. I got this kit for Christmas a few years ago. It's not my normal scale. This seemed like I good time to take a whack at it. My understanding is that this is a rebox of the Esci kit. Italeri added rubber band tracks. For its age and size, the moldings are pretty clean with not a lot of clean up needed.
Starter picture.

Stared with the suspension and lower hull. The lower hull is a multi-piece deal....which I dislike because most of the time they fit so-so. The suspension assemblies go together well. The suspension assemblies fit to the lower hull sides.

The kit comes with the choice of indie-links or rubberband links. I decided to go with the flexi tracks due to the size.

Assembled the lower hull. Fit was good. The kit comes with a floor plate and engine with driveshaft. You cannot see these so I decided to not use them. I did use the firewalls as they would add strength to the hull.


Upper hull added to the lower hull.

And that's it so far. There's not a lot to the kit. It has been alright to build. To be honest, I'm just building it to build it.
Starter picture.

Stared with the suspension and lower hull. The lower hull is a multi-piece deal....which I dislike because most of the time they fit so-so. The suspension assemblies go together well. The suspension assemblies fit to the lower hull sides.

The kit comes with the choice of indie-links or rubberband links. I decided to go with the flexi tracks due to the size.

Assembled the lower hull. Fit was good. The kit comes with a floor plate and engine with driveshaft. You cannot see these so I decided to not use them. I did use the firewalls as they would add strength to the hull.


Upper hull added to the lower hull.

And that's it so far. There's not a lot to the kit. It has been alright to build. To be honest, I'm just building it to build it.
LowFiveJoe

Joined: April 28, 2015
KitMaker: 22 posts
Armorama: 16 posts

Posted: Tuesday, July 21, 2015 - 05:21 PM UTC
Sweet, another braille-scale. I'll be interested to see your progress, especially at the paint and weathering stage.
Hammerhead11

Joined: May 29, 2015
KitMaker: 14 posts
Armorama: 14 posts

Posted: Sunday, July 26, 2015 - 04:32 AM UTC

TankSGT

Joined: July 25, 2006
KitMaker: 1,139 posts
Armorama: 946 posts

Posted: Sunday, July 26, 2015 - 07:47 AM UTC
Hammerhead11

Joined: May 29, 2015
KitMaker: 14 posts
Armorama: 14 posts

Posted: Sunday, July 26, 2015 - 09:49 AM UTC
Quoted Text
Brett, that's a nice M10 your way ahead of me. My M46 hull.
Tom, Thank you, Im excited to see your M46 progress.
 |


