Campaigns: Completed Campaigns
Campaigns that are completed should be grouped here.
Hosted by Richard S.
The Green Machine
BMCTomcat
Visit this Community
Pennsylvania, United States
Joined: September 13, 2014
KitMaker: 73 posts
Armorama: 56 posts
Posted: Saturday, October 24, 2015 - 11:27 PM UTC
for a price under $30 .. still worth to be purchased ..


seems a little plain .. so I decided to do a little scratch ..


not perfect .. better than nothing at all (for me) ..


Tom
TankSGT
Visit this Community
New Jersey, United States
Joined: July 25, 2006
KitMaker: 1,139 posts
Armorama: 946 posts
Posted: Monday, October 26, 2015 - 06:27 PM UTC
My M46 has had some progress, Mr Surfacer on the hull and turret to improve the cast texture. I added open periscopes for the driver and co driver. I always hated tanks built with all the periscopes down. If the hatch is closed no one can see out how are they moving.


I also have replaced the gunners telescope tube with a wider one based on many pictures. Next step is the canvas mantle cover with the old stand by tissue and white glue.

Tom
retiredyank
Visit this Community
Arkansas, United States
Joined: June 29, 2009
KitMaker: 11,610 posts
Armorama: 7,843 posts
Posted: Tuesday, October 27, 2015 - 01:12 AM UTC
Thomas: Excellent work! I look forward to seeing the canvas mantle cover.

I have laid down three coats of paint, on my M18 and been disappointed with all of them. I'm currently trying to determine the best way to mask it, without tape.
TankSGT
Visit this Community
New Jersey, United States
Joined: July 25, 2006
KitMaker: 1,139 posts
Armorama: 946 posts
Posted: Tuesday, October 27, 2015 - 03:22 AM UTC
Are you tring to mask the interior? What about wet tissue? I have used it in aircraft cockpits and wheel wells. I should say damp not soaked. It can be placedone easily and once dry makes a good mask.

Tom
retiredyank
Visit this Community
Arkansas, United States
Joined: June 29, 2009
KitMaker: 11,610 posts
Armorama: 7,843 posts
Posted: Tuesday, October 27, 2015 - 12:29 PM UTC

Quoted Text

Are you tring to mask the interior? What about wet tissue? I have used it in aircraft cockpits and wheel wells. I should say damp not soaked. It can be placedone easily and once dry makes a good mask.

Tom


I was considering just that. But, I just got my monthly check and ordered some Humbrol MaskAll.
Bluestab
Visit this Community
South Carolina, United States
Joined: December 03, 2009
KitMaker: 2,160 posts
Armorama: 1,906 posts
Posted: Thursday, October 29, 2015 - 06:14 AM UTC
Update on the braille Sherman.

Paint. Just basic a Olive Drab.


I had a couple of shots of the detail painting. I had painted the wood handles tan but they looked cartoonish. I repainted them with a dark tan but I either forgot to take the pictures or I deleted them thinking they were redundant shots. The darker tan tools blend in a bit more in the pictures.

But here it is with the detail bits painted, a light drybrushing, and the decals. I added length of scrap styrene "board" to the front and placed the two extra roadwheels there. What is supposed to be a tarp was placed on the side rear deck. It helped give it a little personality. Some crates and jerry cans would have been nice, especially since I moved the extra track holders to the sides where they are supposed to go, leaving the stowage rack empty.


And the obligatory posing next to a coin and a larger scale vehicle for size comparison.


And with that I'm calling this one done. It was a so-so build. I don't build this scale and it really didn't wow me. I get there are limitations to work with with this scale. I thought the misplacement of the spare track holders was glaring. I probably wouldn't have built this kit if it wasn't for the campaign.

Anyway, I'll hold off on a gallery picture for now. I'll probably pose the sherman with the Humvees for a group picture for the gallery.

Let's start the Humvee builds. As mentioned this duo is being built for another modelling website as part of a Gulf War Anniversary group build. I'm doing a diorama for that one, but I'll just post the vehicles here due to the deadline for this one here. The Humvees are Academy's M988 Cargo Carrier and the M1025.

Starter pictures. I'm building the two simultaneously.


Both these vehicle are the same when it comes to their frames, suspension, drive-train. I didn't document both vehicles' frames/drivetrains/suspension builds separately. I marked one frame with black dots and jumped back and forth.

This is the M1025,no black dots, parts removed and ready for assembly.


Suspension coils added. Axle units assembled.


Axle units added.


Suspension arms added. Fit was great. This is the M998, note the black dots.


Both sub-assemblies posed together.


Drivetrains, fuel tanks, exhausts.


I went ahead and painted the underside of the bodies, the frames, and drive-trains.


A little better shot after the parts dried.


And the bits all mounted to the body.


So now the builds become more individual. I began work on the cab and bed of the M998. You can see another M998 I built last year as a tow vehicle for a M102 howitzer. The reason is to test and check a few things for the diorama aspect. I won't go in to detail on that.

Anyway, the sidewalls for the bed were added. As were the shifters, the rear, and the insert cover for the transmission hump.


The M1025's turn. Shift levers and the rear added. The gunner's step added. The hitches are there for both but you cannot see them.


Anyway, until next update.
BMCTomcat
Visit this Community
Pennsylvania, United States
Joined: September 13, 2014
KitMaker: 73 posts
Armorama: 56 posts
Posted: Wednesday, November 04, 2015 - 04:57 AM UTC
nice building everyone

around 40 days left .. here's some progress ..

for the assembly .. I don't think I need more additional details on it ..

fresh from the oven .. I mean .. the wash ..


Tom
Armorsmith
Visit this Community
Pennsylvania, United States
Joined: April 09, 2015
KitMaker: 1,063 posts
Armorama: 1,000 posts
Posted: Wednesday, November 04, 2015 - 07:23 AM UTC
Very nice. I particularly like the shad of OD. Mind giving some details of how you painted it?

Thanks.
BMCTomcat
Visit this Community
Pennsylvania, United States
Joined: September 13, 2014
KitMaker: 73 posts
Armorama: 56 posts
Posted: Wednesday, November 04, 2015 - 08:16 AM UTC

Quoted Text

Very nice. I particularly like the shad of OD. Mind giving some details of how you painted it?

Thanks.


sure .. I used the mix of three Tamiya paints : OD (XF62), Nato Green (XF67), and Flat White (XF2) .. with the ratio 8:1:1 .. just estimates as you desired ..
thanks for your comment ..

Tom
retiredyank
Visit this Community
Arkansas, United States
Joined: June 29, 2009
KitMaker: 11,610 posts
Armorama: 7,843 posts
Posted: Wednesday, November 04, 2015 - 03:08 PM UTC
Tom: The first layer of paint to be laid down is my favorite step. Your green is very convincing.
metooshelah
#011
Visit this Community
Jerusalem, Israel
Joined: February 06, 2009
KitMaker: 1,507 posts
Armorama: 1,304 posts
Posted: Wednesday, November 04, 2015 - 07:32 PM UTC
and so it begins...

meng's m3a3
voyager m3a3 detail set
afv club tracks

may end up not using the AFV tracks, the kit includes workable tracks, which i thought would be awfully cast. in reality they are actually very well made (still searching for my camera so no detailed photos yet) so i may just keep them for something else.

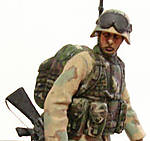
Untitled by nathan ram, on Flickr
BMCTomcat
Visit this Community
Pennsylvania, United States
Joined: September 13, 2014
KitMaker: 73 posts
Armorama: 56 posts
Posted: Thursday, November 05, 2015 - 07:34 AM UTC

Quoted Text

Tom: The first layer of paint to be laid down is my favorite step. Your green is very convincing.


ouch .. I admit that it does not match the color of the original OD .. and I was also confused on what the original OD looks like
anyway thanks for the input Matt

Tom
retiredyank
Visit this Community
Arkansas, United States
Joined: June 29, 2009
KitMaker: 11,610 posts
Armorama: 7,843 posts
Posted: Thursday, November 05, 2015 - 08:06 AM UTC

Quoted Text


Quoted Text

Tom: The first layer of paint to be laid down is my favorite step. Your green is very convincing.


ouch .. I admit that it does not match the color of the original OD .. and I was also confused on what the original OD looks like
anyway thanks for the input Matt

Tom


I did not mean my opinion to be derogatory in any way. I consider the first layer of paint to be a milestone.
Bluestab
Visit this Community
South Carolina, United States
Joined: December 03, 2009
KitMaker: 2,160 posts
Armorama: 1,906 posts
Posted: Monday, November 09, 2015 - 06:32 AM UTC
More on the Humvees.

I began work on the interiors so that I could get them painted green. This is the M1025. It got its side body panels and pieces to separate the front seats from the rear.


Next, the M998 received the insert pieces for the bed floor and the cover pieces for the rear door openings.


Staying with the M998...these are the cab components. The top, doors, windshield/dash, seats, and cab rear-wall are all to be painted green. I'll add the windows afterwards. For the soft-top "glass" I tend to use clear plastic bags. I think it looks better.


And now the major parts of the M1025's interior. There's the top, windshield, rear hatch, doors, and seats.


Assembled enough to lay down some paint on the interior.


And a quick shot of paint. I went with a basic dark green. I figure it will work well after a heavy dry-brushing to show the interior details. Plus, it should contrast well with the sand colored exteriors.


And now I get side-tracked with something else for a few days.
ltb073
Visit this Community
New York, United States
Joined: March 08, 2010
KitMaker: 3,662 posts
Armorama: 3,078 posts
Posted: Tuesday, November 10, 2015 - 02:42 AM UTC
A nice wide verity of stuff being build here
Here is my progress  photo P1090497.jpg
Added some storage bags to the rear
 photo P1090496.jpg
 photo P1090495.jpg
and the of course the OD Green
 photo P1090501.jpg
More soon
Bluestab
Visit this Community
South Carolina, United States
Joined: December 03, 2009
KitMaker: 2,160 posts
Armorama: 1,906 posts
Posted: Monday, November 16, 2015 - 04:29 AM UTC
Back to work.

I got the interiors green so I shifted to finishing up assembly of the exterior to get it ready for exterior paint. The hoods are the biggest assemblies left to do.
I also used plastic from one of the kit's plastic bags to make the windows for the soft top. I posed them unzipped and hanging down.


Added the eats, radios, and the assorted details I had left off until now.


For the truck version I decided to go with the open bed with side rails and seats.


And with that both Humvees are ready for paint. I just have to mask them off and shoot the paint.


And that's where I am now.
scaleyback
Visit this Community
Louth, Ireland
Joined: March 06, 2013
KitMaker: 29 posts
Armorama: 25 posts
Posted: Tuesday, November 24, 2015 - 07:59 PM UTC
I'm calling this one done. I would have had it done sooner but I had a slight disaster when I got a bit over exuberant with an oil wash I think I've managed to salvage it somewhat.

I don't usually use add-ons. A little bit underwhelmed with the PE, especially at this scale but the metal barrel is great. The resin stowage is pretty nice too. I added the barbed wire at the last minute after seeing many pics of Bradleys in Desert Storm with it.

I've learnt a lot with this campaign and look forward to seeing you guys' work.


Bluestab
Visit this Community
South Carolina, United States
Joined: December 03, 2009
KitMaker: 2,160 posts
Armorama: 1,906 posts
Posted: Friday, November 27, 2015 - 10:16 AM UTC
Update on the Humvees.

With the interiors painted, I masked off the open parts and gave it a coat of sand colored paint.


Once the paint had dried I finished the dash/windshields and added the glass to them and the doors. I made all four of the M1025's partially rolled down.


I added the M998's soft top. Notice the ill-fit.


M998 rear view. You can see the added plastic for the rear window.


For the M1025, I started by mounting the doors and windshield. I'll add the roof to this. Normally this works well but the kit's roof was warped and required some persuasion to work.


The M998 with doors and the gap. I decided to let it ride. I've had a few Jeeps and the soft tops often have alignment issues. And don't get me started on the zip up windows.


Persuading the roof to sit right.


Assembled up to this point.


I'll probably start weathering next and getting them ready for decals. Then I'll call them done in terms of this campaign.
ltb073
Visit this Community
New York, United States
Joined: March 08, 2010
KitMaker: 3,662 posts
Armorama: 3,078 posts
Posted: Saturday, November 28, 2015 - 12:23 AM UTC
He is a progress update got the markings and some color added
 photo P1090516.jpg
added some storage as well
 photo P1090518.jpg
pablo_g
Visit this Community
Wojewodztwo Slaskie, Poland
Joined: October 21, 2003
KitMaker: 529 posts
Armorama: 500 posts
Posted: Sunday, November 29, 2015 - 12:00 AM UTC
Hello all,
I decided to take part in this campaign. I will build M5A1 from Tamiya, I hope that the event 19 December.


Bluestab
Visit this Community
South Carolina, United States
Joined: December 03, 2009
KitMaker: 2,160 posts
Armorama: 1,906 posts
Posted: Sunday, November 29, 2015 - 04:05 AM UTC
Last update.

I started weathering. I used olive green to pick out the details.


Weathering on the M998. Plus I really didn't like how the doors looked so I tried to fix them. I'm still not happy with them.


Decals. I kept the decals simple. The decals for the M1025 were in horrible shape and fell apart in water. I ended up using some from an older Tamiya sheet.


And the two Humvees flanking the braille Sherman.


And with that I'm calling this one done. I'm probably going to rework the M998, maybe rework the rear to have a covered canopy. Thanks for the campaign and I definitely feel better about it after adding the Humvees.
retiredyank
Visit this Community
Arkansas, United States
Joined: June 29, 2009
KitMaker: 11,610 posts
Armorama: 7,843 posts
Posted: Wednesday, December 02, 2015 - 02:25 AM UTC
I am not able to finish this build, due to a family emergency. I will likely have to be absent, for a couple of months. The builds, here are amazing. You are earning your ribbons.
Nito74
Visit this Community
Lisboa, Portugal
Joined: March 04, 2008
KitMaker: 5,386 posts
Armorama: 4,727 posts
Posted: Wednesday, December 02, 2015 - 02:44 AM UTC
Take care Matt !
I'll manage this one

ltb073
Visit this Community
New York, United States
Joined: March 08, 2010
KitMaker: 3,662 posts
Armorama: 3,078 posts
Posted: Wednesday, December 02, 2015 - 04:51 PM UTC

Quoted Text

I am not able to finish this build, due to a family emergency. I will likely have to be absent, for a couple of months. The builds, here are amazing. You are earning your ribbons.


Hey Matt Hope everything works out ok for you
And here is my build which I thought was finished
 photo P1090523.jpg
 photo P1090524.jpg
Until I found a spot that I missed on the rear crate
 photo P1090526.jpg photo P1090527.jpg photo P1090525.jpg
BMCTomcat
Visit this Community
Pennsylvania, United States
Joined: September 13, 2014
KitMaker: 73 posts
Armorama: 56 posts
Posted: Thursday, December 03, 2015 - 04:18 AM UTC

Quoted Text

I did not mean my opinion to be derogatory in any way. I consider the first layer of paint to be a milestone.


My bad Matt , but you were right about the green. And I think I've got the wrong setting of my camera or the lighting ...


Hey, the color is changing ...


Quoted Text

I am not able to finish this build, due to a family emergency. I will likely have to be absent, for a couple of months. The builds, here are amazing. You are earning your ribbons.


I hope everything goes well for you ...