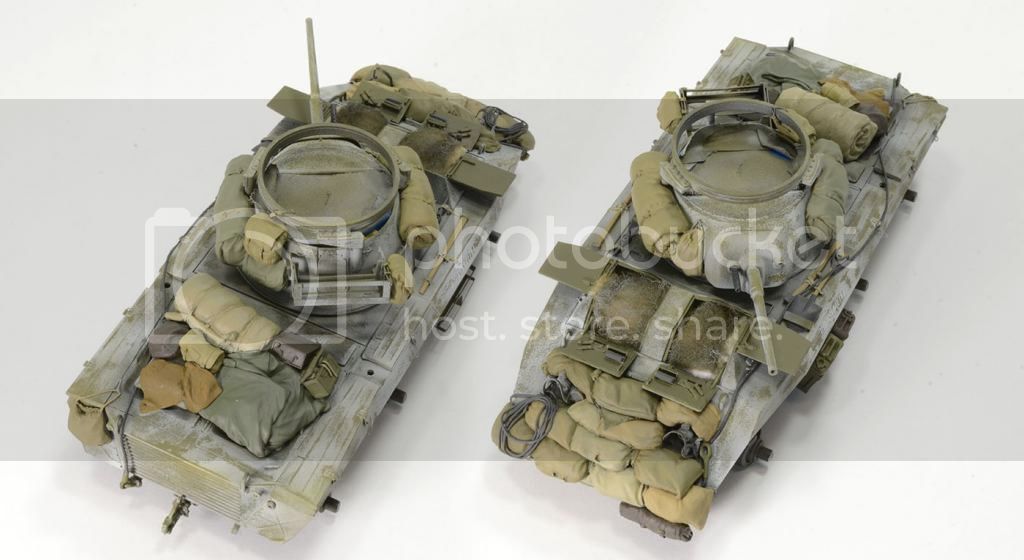
Hey Jelger, thanks for the comments! I agree, the OD is a bit "bright" but I'm sure it will get knocked back significantly with all the weathering, etc. I also think the exposure of the photos (on white) makes it seem even brighter, compared to the real thing.
Appreciate your feedback as I play around with all of these new (to me anyway) techniques!
Cheers. -Jeff
Hosted by Darren Baker
M8 Greyhound & BoB Vignette

jfeller

Joined: December 06, 2014
KitMaker: 96 posts
Armorama: 96 posts

Posted: Wednesday, January 07, 2015 - 09:12 PM UTC

jfeller

Joined: December 06, 2014
KitMaker: 96 posts
Armorama: 96 posts

Posted: Sunday, January 11, 2015 - 07:56 AM UTC
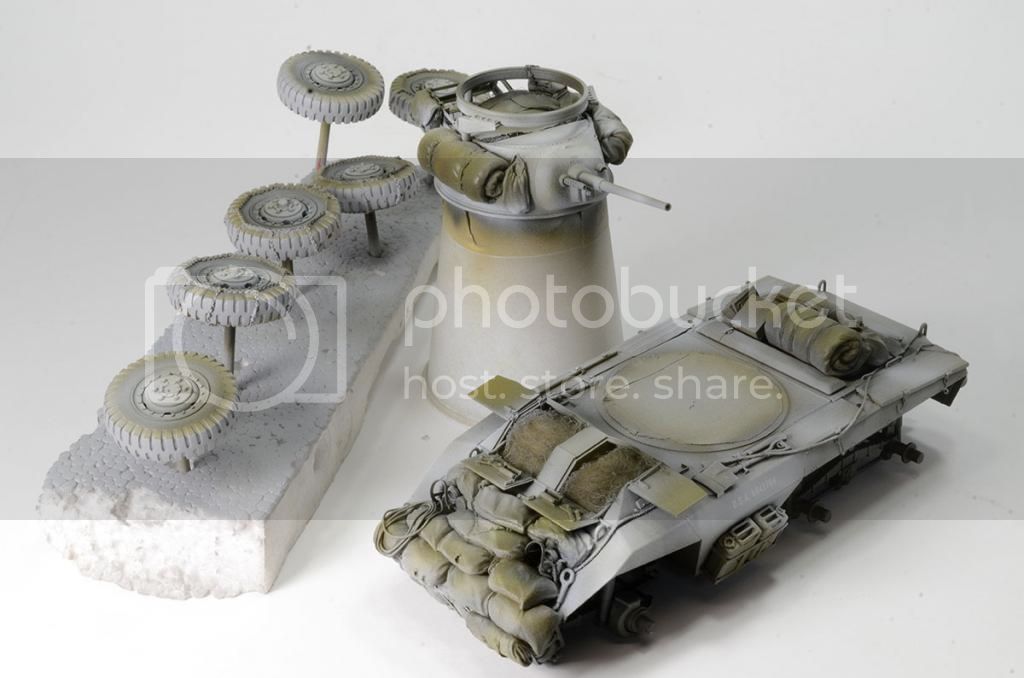
I took the plunge and did the HS/Whitewash on the M8 today! Here's the base of white, which as a reminder was Tamiya Flat White mixed with water.
And here it is after some chipping/distress with warm water, a paint brush, and a metal paint stirrer.
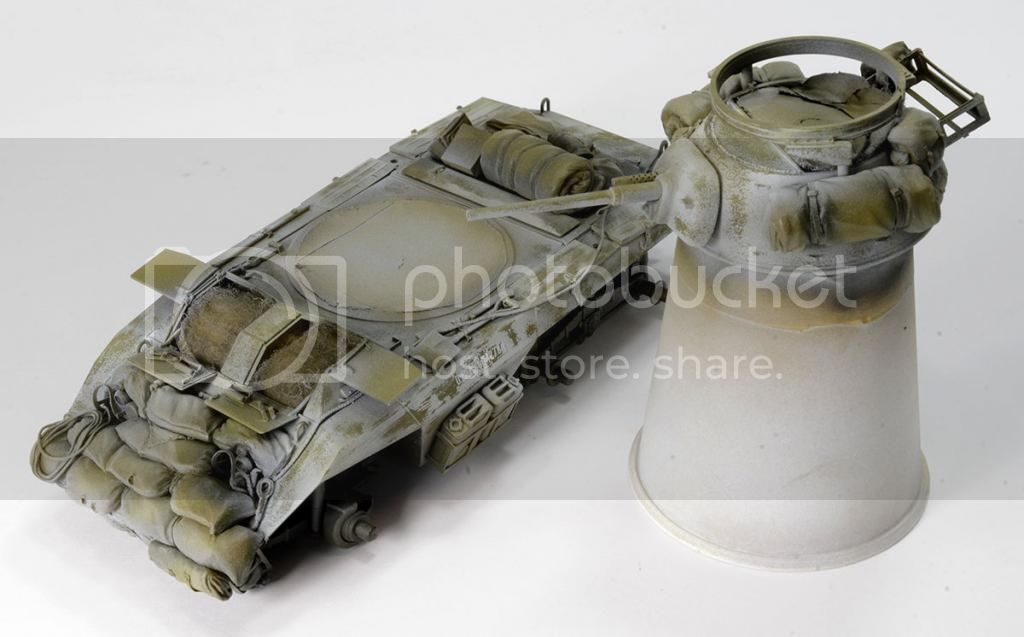
I'm pretty happy overall. The white reads more grey than I thought it would, but I'd rather it be that than too white. From a scale perspective, I think that's better. The wheels are not pictured, because somebody forgot to spray them with HS before shooting the white!! So, I'll be reapplying the OD to the wheels. Might not do the whitewash on them after all since they'll be pretty muddy.
Looking forward to getting this thing dirty. Up next, detail painting and filters....


And here it is after some chipping/distress with warm water, a paint brush, and a metal paint stirrer.

I'm pretty happy overall. The white reads more grey than I thought it would, but I'd rather it be that than too white. From a scale perspective, I think that's better. The wheels are not pictured, because somebody forgot to spray them with HS before shooting the white!! So, I'll be reapplying the OD to the wheels. Might not do the whitewash on them after all since they'll be pretty muddy.
Looking forward to getting this thing dirty. Up next, detail painting and filters....


panzerconor

Joined: February 08, 2012
KitMaker: 1,271 posts
Armorama: 1,253 posts

Posted: Sunday, January 11, 2015 - 09:40 AM UTC
Love it! I always liked the M8/M20 variants and this build is not a disappointment. I think the white wash came out fine, not too grey at all.
-Conor
-Conor
jrutman

Joined: April 10, 2011
KitMaker: 7,941 posts
Armorama: 7,934 posts

Posted: Sunday, January 11, 2015 - 07:25 PM UTC
I don't know how I missed all of this awesomeness up till now but I am glad to finally find it. Very nice work. Specially like the 50cal mount.
J
J

jfeller

Joined: December 06, 2014
KitMaker: 96 posts
Armorama: 96 posts

Posted: Sunday, January 11, 2015 - 10:37 PM UTC
Thanks Jerry! Likewise, I'm following your Falaise dio with great anticipation.... cheers.

jfeller

Joined: December 06, 2014
KitMaker: 96 posts
Armorama: 96 posts

Posted: Wednesday, January 14, 2015 - 10:56 AM UTC
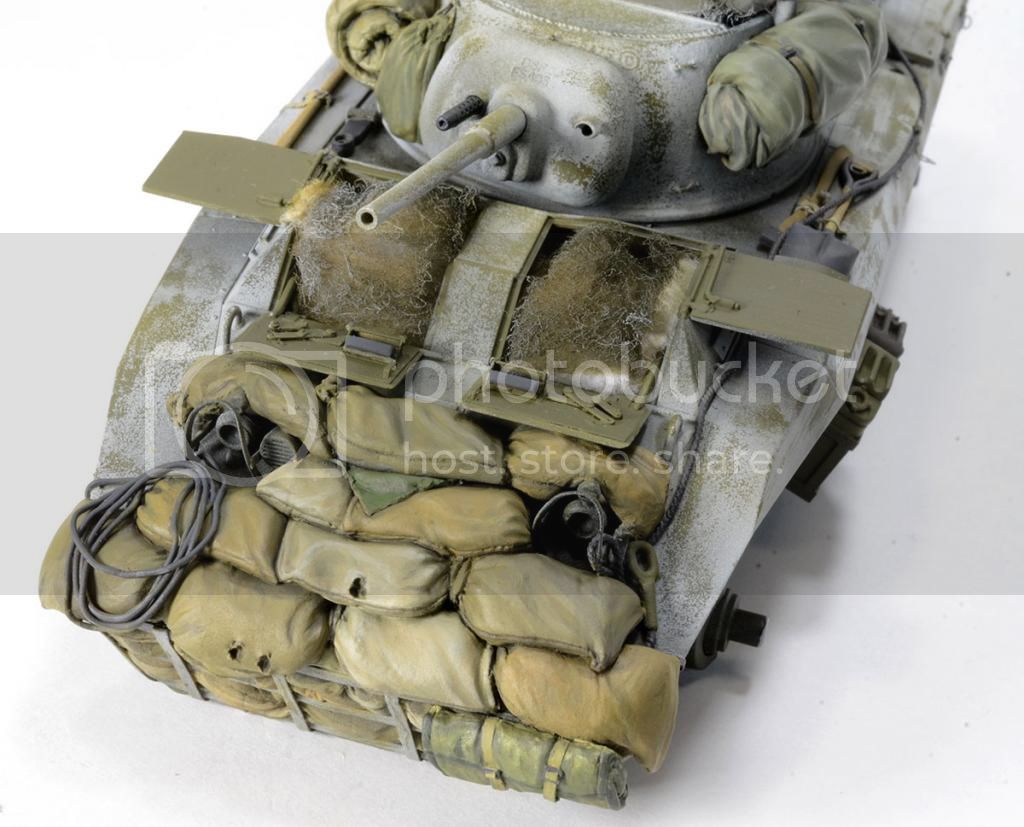
This week has been crazy...the day job has been keeping me busy 14 hours a day!  So only managed to do a little bit of the detail painting. Figured I'd start with the most prominent stuff, the sandbags, to see how the contrast would look with the whitewash.
I did some web research to find a color photo of sandbags from WWII. Came up with this shot:
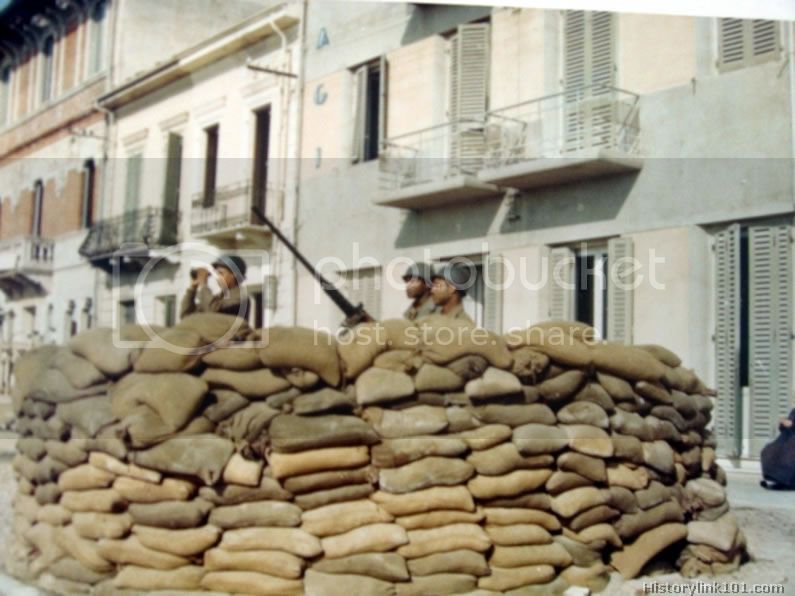
I figured there would be some variations in coloring between bags, and this picture provided good evidence. So using my trusty Series 7 #1 brush, and Vellejo colors of Canvas (light olive/tan), Old Wood (tanish), and German Cammo Beige (beige - duh), I painted up the 'bags.
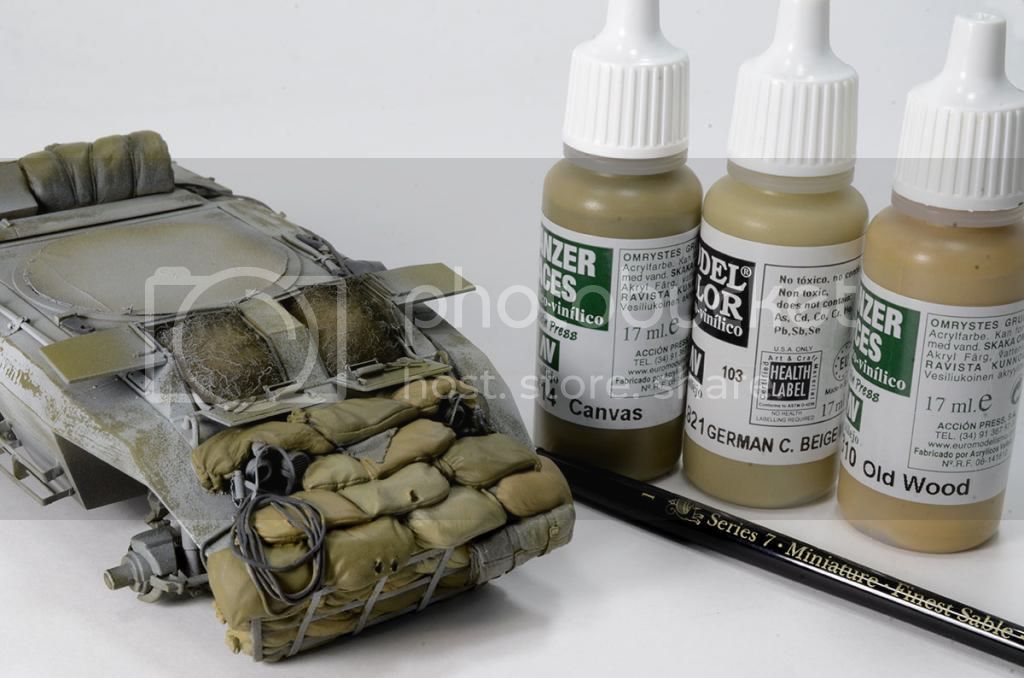
Will need to go back in and touch up some of the areas, but this at least helps me get a better idea of where I'm headed with this. I'm pleased with the color variation in the bags, and the contrast with the white wash.
That's it for now. Back at the bench this weekend, so stay tuned. Cheers.
 So only managed to do a little bit of the detail painting. Figured I'd start with the most prominent stuff, the sandbags, to see how the contrast would look with the whitewash.
I did some web research to find a color photo of sandbags from WWII. Came up with this shot:

I figured there would be some variations in coloring between bags, and this picture provided good evidence. So using my trusty Series 7 #1 brush, and Vellejo colors of Canvas (light olive/tan), Old Wood (tanish), and German Cammo Beige (beige - duh), I painted up the 'bags.

Will need to go back in and touch up some of the areas, but this at least helps me get a better idea of where I'm headed with this. I'm pleased with the color variation in the bags, and the contrast with the white wash.
That's it for now. Back at the bench this weekend, so stay tuned. Cheers.

jrutman

Joined: April 10, 2011
KitMaker: 7,941 posts
Armorama: 7,934 posts

Posted: Wednesday, January 14, 2015 - 08:44 PM UTC
I agree about the color variation. Spot on. I also think that is a very nicely designed resin set.
J
J

jfeller

Joined: December 06, 2014
KitMaker: 96 posts
Armorama: 96 posts

Posted: Sunday, January 18, 2015 - 10:50 PM UTC
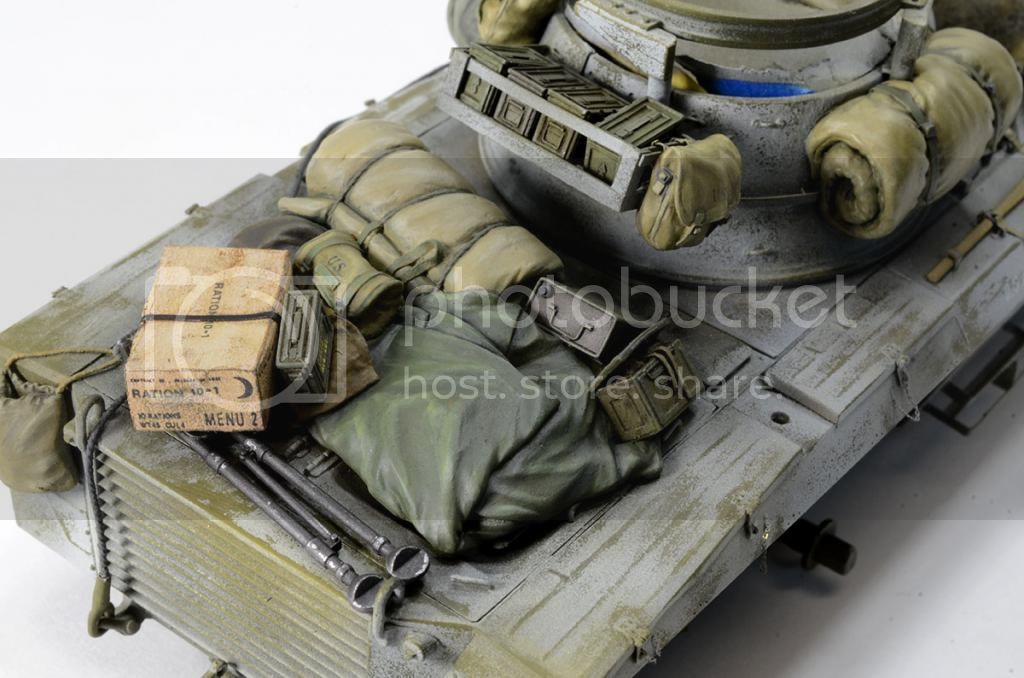
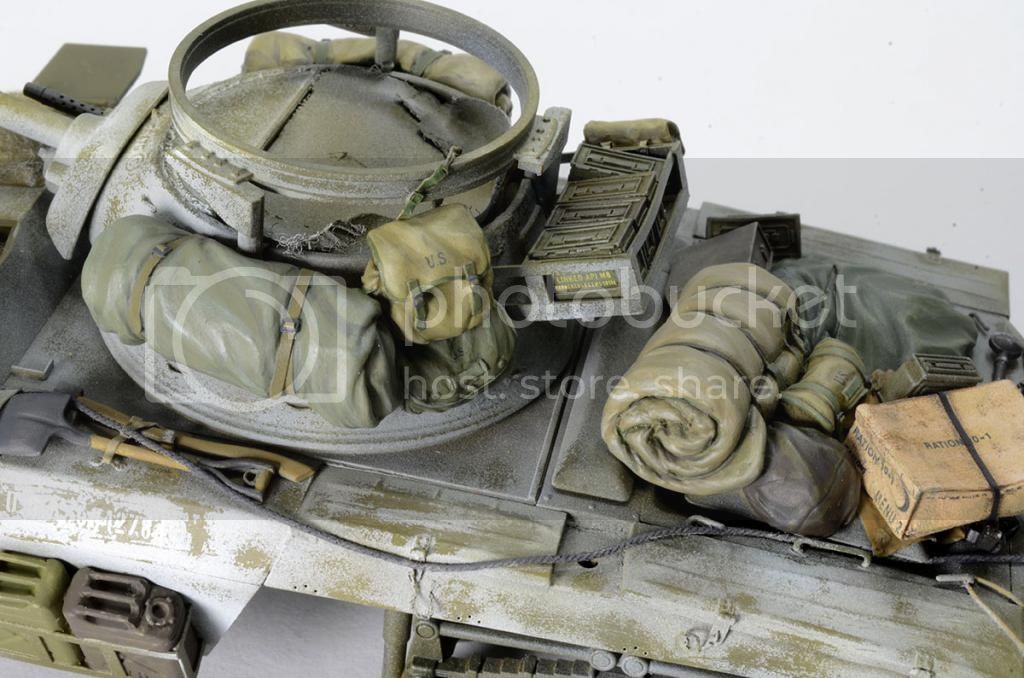
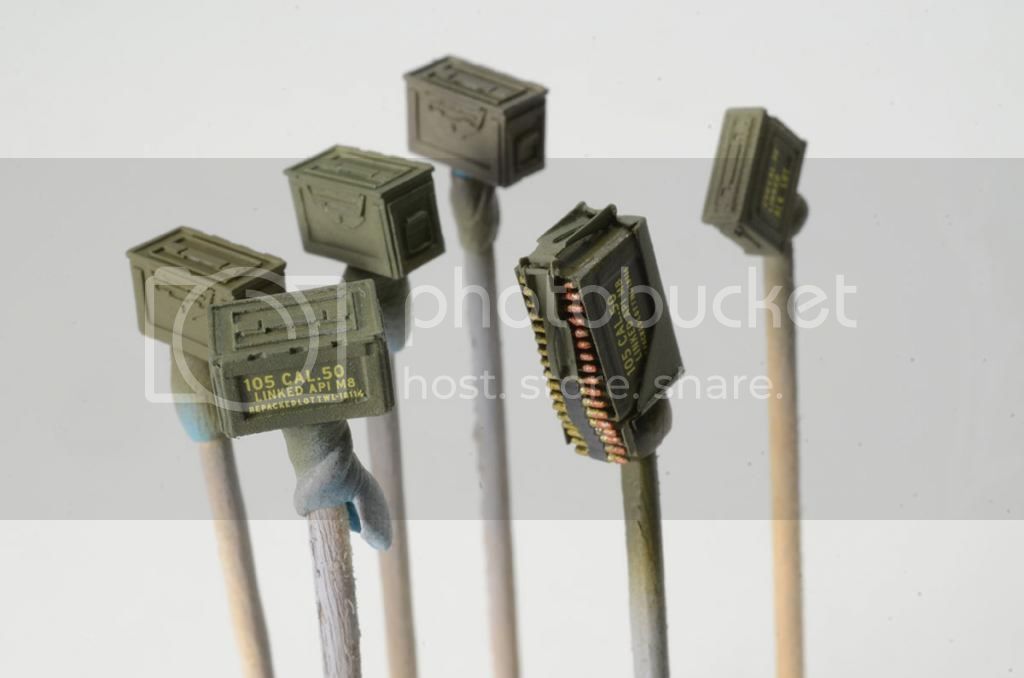
Slowly working through all the detail painting before I can move on to weathering. Here's the ammo boxes finished and ready for weathering. Note the various shades of OD used for each. Since 4 of these will be next to each other on the turret basket, I wanted the difference to be noticeable. Markings are from Archer Fine Transfers.


jfeller

Joined: December 06, 2014
KitMaker: 96 posts
Armorama: 96 posts

Posted: Monday, January 19, 2015 - 01:55 AM UTC

jfeller

Joined: December 06, 2014
KitMaker: 96 posts
Armorama: 96 posts

Posted: Monday, January 19, 2015 - 02:31 AM UTC
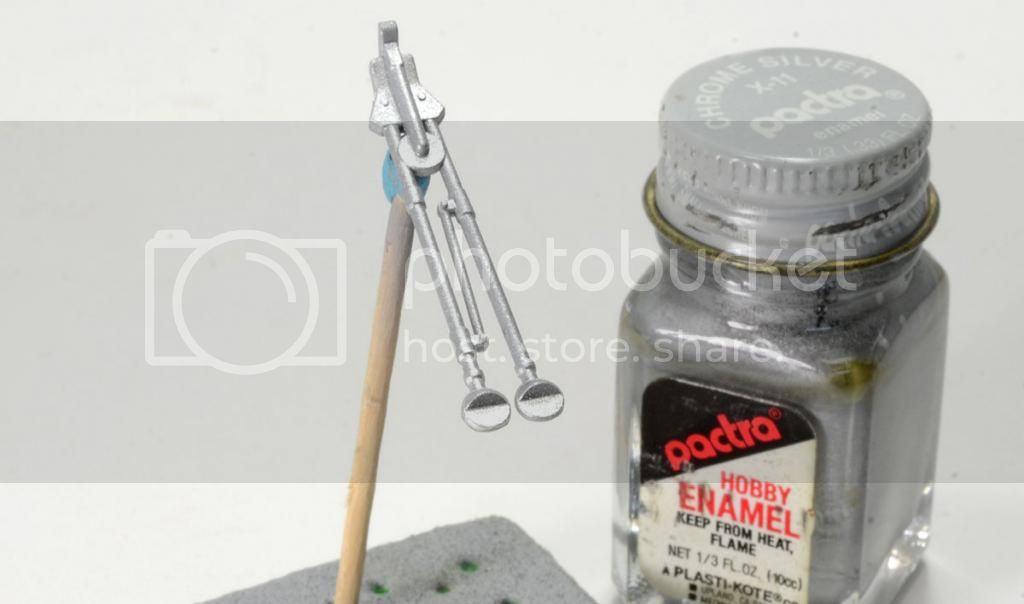
After trying the HS technique on the whitewash, figured I'd keep playing around with this trendy approach to chipping. I had a couple of accessories that we're not on the M8 yet: a .50 Cal tripod, a "liberated" toolbox, and an oil can of some sort. I painted them all using a sliver base. (Yes, that's a bottle of Pactra. I've had that lil bugger for over 20 years.)
I ended giving the toolbox and oilcan a second coat of dark brown, thinking that the silver might be a bit much. Here's everything with the topcoat, after 2 coats of HS.
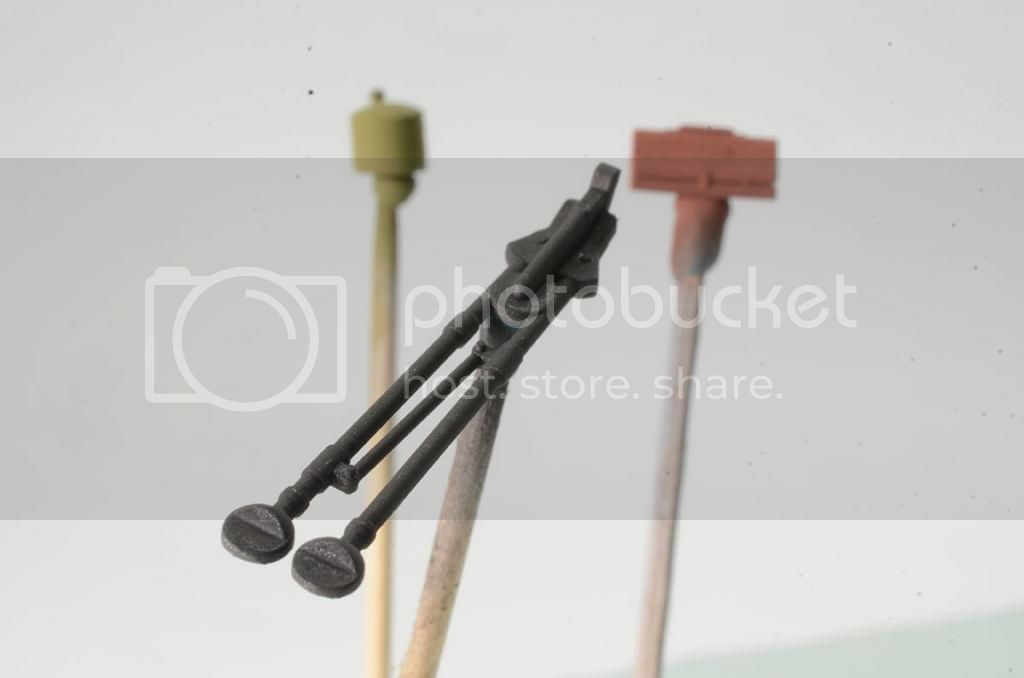
And here's the results after some chipping and a little graphite pigment.
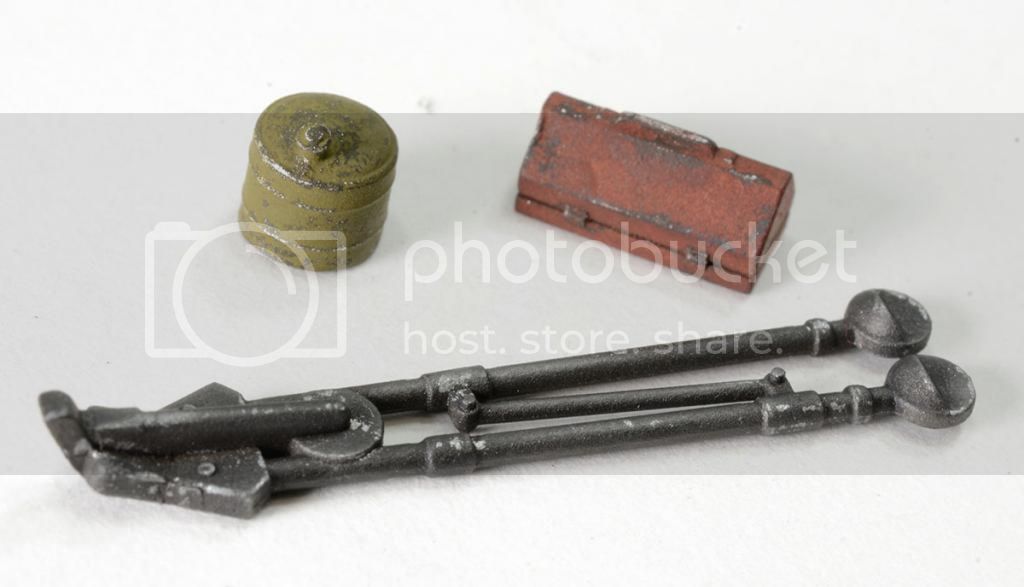
Interestingly enough, some of the silver on the toolbox and oil can ended up showing through too, with a nice effect after all. Gotta love happy accidents!

I ended giving the toolbox and oilcan a second coat of dark brown, thinking that the silver might be a bit much. Here's everything with the topcoat, after 2 coats of HS.

And here's the results after some chipping and a little graphite pigment.

Interestingly enough, some of the silver on the toolbox and oil can ended up showing through too, with a nice effect after all. Gotta love happy accidents!

jfeller

Joined: December 06, 2014
KitMaker: 96 posts
Armorama: 96 posts

Posted: Monday, January 19, 2015 - 02:36 AM UTC
And here's the almost complete MG.
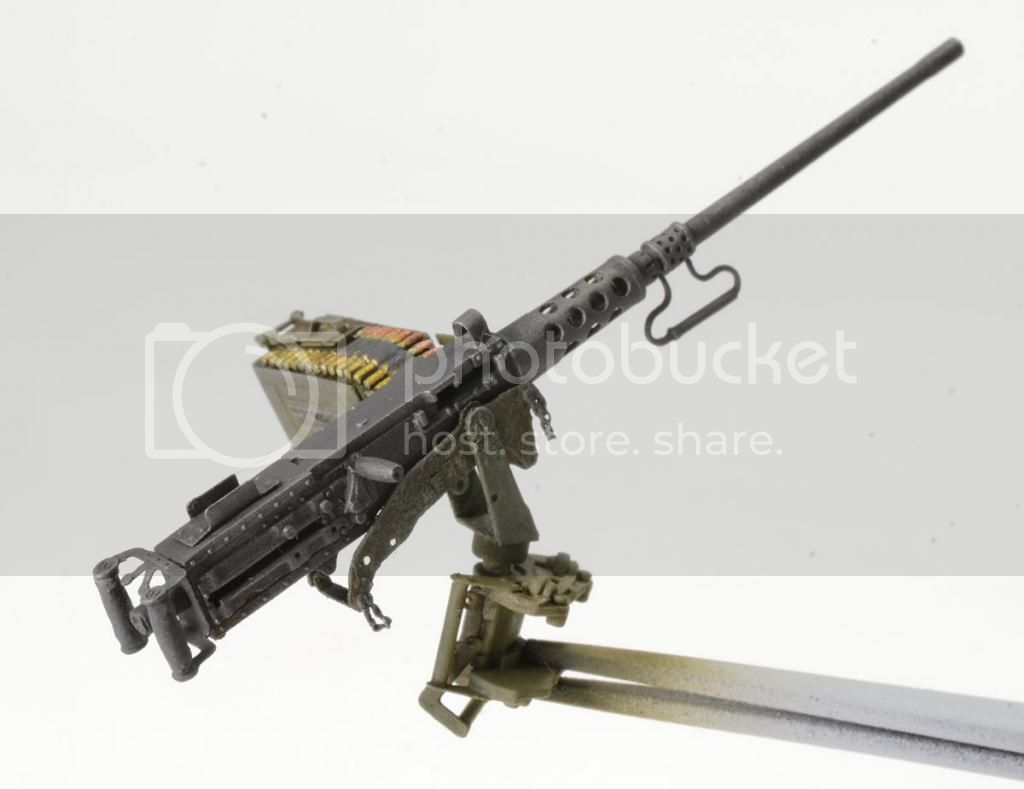
This shot shows some of the texture and very small casting marks I added to the cradle. My ref pics show this cradle to be a cast part.
Still not sure how to paint the handles on the gun. If memory serves right, early versions we're wood, but later one's were bakelite? If anyone has more details, let me know. Also, i've seen bakelite with that bronwish/brick color, but maybe black too?

jfeller

Joined: December 06, 2014
KitMaker: 96 posts
Armorama: 96 posts

Posted: Monday, January 19, 2015 - 02:38 AM UTC
Oh, and still need to adjust MG locking chains so they fall naturally with gravity. Will wait for final placement on gun ring to make sure I get the right angle. 


justsendit

Joined: February 24, 2014
KitMaker: 3,033 posts
Armorama: 2,492 posts

Posted: Monday, January 19, 2015 - 03:46 AM UTC
I am really enjoying this build. Great job! ... carry on!
—mike
—mike

panzerconor

Joined: February 08, 2012
KitMaker: 1,271 posts
Armorama: 1,253 posts

Posted: Monday, January 19, 2015 - 06:27 AM UTC
This si coming out fantastically, I'm stunned that you just now decided to post your work! It's incredible. Makes me want to break out all my WWII US kits, but I've got to hold back or risk drowning in projects.
I also purchased some of the aftermarket kit's you used for the M-20 I've got. Might have to build that next after seeing this! Inspiring stuff.
-Conor
I also purchased some of the aftermarket kit's you used for the M-20 I've got. Might have to build that next after seeing this! Inspiring stuff.
-Conor
pcmodeler

Joined: January 17, 2002
KitMaker: 292 posts
Armorama: 236 posts

Posted: Tuesday, January 20, 2015 - 07:54 PM UTC
Great job. A bunch of us in the Richmond AMPS group did an M8 group build a few years ago so I know what you're going through in detailing this. I love the external stowage/etc. that you've added. I still have a lot of external stowage from the Verlinden set to add to mine.
https://www.facebook.com/#!/mark.fergel/media_set?set=a.10152005719949149.1073741841.719254148&type=3
https://www.facebook.com/#!/mark.fergel/media_set?set=a.10152005719949149.1073741841.719254148&type=3

jfeller

Joined: December 06, 2014
KitMaker: 96 posts
Armorama: 96 posts

Posted: Wednesday, January 21, 2015 - 09:02 AM UTC
Thanks Mark! Indeed, very aware of the AMPS Richmond M8 build. I spent a lot of time perusing the website looking at the various build logs. I'm up in Dumfries, VA BTW, part of the Washington Armor Club chapter of AMPS. Cheers. 

jrutman

Joined: April 10, 2011
KitMaker: 7,941 posts
Armorama: 7,934 posts

Posted: Wednesday, January 21, 2015 - 07:25 PM UTC
Really nice effects on the 50cal tripod and oil can brother.
The 50cal is lookin good as well.
I had a lot of WWII era guns in my arms room in Germany still in the 1970s and 80s. They had black bakelite on the rear and charging handles.
A few nice details most guys miss on that gun are the canvas cover that was issued with the tripod that covered the top part when folded and also the locking lugs on all three legs that tightened after you adjusted the legs telescoping feature.
This build is very inspiring for me. It's nice to see all the ranges of color in the equipment. Hard to make OD look "random" if you know what I mean.
J

pablo_g

Joined: October 21, 2003
KitMaker: 529 posts
Armorama: 500 posts

Posted: Thursday, January 22, 2015 - 07:59 AM UTC
Beautiful job Jeff, machine gun looks amazing. Could you write what paint you used to achieve this effect? 
Paweł

Paweł

jfeller

Joined: December 06, 2014
KitMaker: 96 posts
Armorama: 96 posts

Posted: Thursday, January 22, 2015 - 10:33 PM UTC
Quoted Text
A few nice details most guys miss on that gun are the canvas cover that was issued with the tripod that covered the top part when folded and also the locking lugs on all three legs that tightened after you adjusted the legs telescoping feature.
Jerry, thanks for the additional details on the tripod. May not include this time, cause actually the tripod will be under some additional stowage items, but I love little things like that!
Appreciate your thoughts and comments, and glad you're enjoying the build. May need your input when I start the figures since I know you've done a lot of figure modification on your projects.
Cheers.
-Jeff

jfeller

Joined: December 06, 2014
KitMaker: 96 posts
Armorama: 96 posts

Posted: Thursday, January 22, 2015 - 10:49 PM UTC
Quoted Text
Beautiful job Jeff, machine gun looks amazing. Could you write what paint you used to achieve this effect?
Thanks Pawel! Appreciate the kind words! Here's how I like to do my MGs and any gun metal surface:
- Dark Grey base coat (I never use any black on my models. It always reads too dark in scale.)
- Then, I add a subtle dark redish/brown wash, usually enamel. This imparts a slight tint that represents the parkerized finish used on US gun metal.
- Then I use a powdered graphite (either commercial (AK) or rubbing a 2B pencil on some sandpaper) and a swab or makeup applicator to rub the graphite on the large surfaces to impart an overall sheen.
- If this is too much, and it was in this case, I'll take a small brush slightly moist w/ water and "dial back" some of the sheen
- Finally, I'll use a sharp 2B-6B pencil to pick out the raised detail
I know some guys like to dry bush silver or even light grey to pick out the detail, then some graphite. But I find this to be just a little too harsh/contrasty for my taste. But that's why I love this hobby...so many techniques and approaches, and none of them are wrong!!
Cheers!
bwavants

Joined: December 04, 2014
KitMaker: 11 posts
Armorama: 11 posts

Posted: Friday, January 23, 2015 - 04:38 AM UTC
Hey Jeff, great build log! I'm getting back into the hobby after an 8 year break, and stumbled on your blog. Very nice job on the M8. I built this a long while ago but your blog is motivating me to do another one. Thanks for sharing all of your work.

jfeller

Joined: December 06, 2014
KitMaker: 96 posts
Armorama: 96 posts

Posted: Friday, January 23, 2015 - 07:34 AM UTC
Brett, how are you doing old friend? Glad to hear you're getting back into the hobby. I have not kept up with most of the old SLAM or IPMS members, other than Chris from CRM and Charlie Pritchett who I usually see at the AMPS Nationals. Just got back into the hobby myself a few years ago. In fact I bought this M8 from Chris back in St. Louis!
Cheers. -Jeff
Cheers. -Jeff

bwavants

Joined: December 04, 2014
KitMaker: 11 posts
Armorama: 11 posts

Posted: Friday, January 23, 2015 - 09:08 AM UTC
Hey Jeff - wow! If you just got back into the hobby a few years ago, you didn't get any rust on those skills! I'm just reconnecting with the SLAM and IPMS folks here. Are you part of the Washington Armor Club? I was part of that when I lived in Northern VA in the early and mid-90's. It was a great group of guys. Keep this going. I'm (re)learning a ton!

jfeller

Joined: December 06, 2014
KitMaker: 96 posts
Armorama: 96 posts

Posted: Sunday, January 25, 2015 - 10:15 AM UTC

panzerconor

Joined: February 08, 2012
KitMaker: 1,271 posts
Armorama: 1,253 posts

Posted: Sunday, January 25, 2015 - 10:40 AM UTC
Awesome! This one is almost hard to believe, every little detail pops out. Not a dull piece on there.
Looking forward to more!
-Conor
Looking forward to more!
-Conor

 |


