Armor/AFV
For discussions on tanks, artillery, jeeps, etc.
M113 - Tamyia - 1:35 + addons
PantherCharlie
Visit this Community
Maryland, United States
Joined: June 13, 2011
KitMaker: 48 posts
Armorama: 47 posts
Posted: Monday, November 28, 2016 - 03:20 AM UTC
I'm happy to see you back at work, my friend. Don't worry about the wooden box seats - the folding seats were still installed when I joined the unit. I helped build the boxes in the motor pool and received my first injury in-country when a stack of them fell over onto my lower back. It still gives me problems to this day, almost fifty years later.

As for the panther wearing cow camouflage, just do the best you can. It can't be much worse than the original! James did such a good job replicating it that he displayed a photo of the real one at the model show to prove it wasn't he who could not paint a decent cat!
Kenaicop
#384
Visit this Community
Nevada, United States
Joined: August 23, 2005
KitMaker: 1,426 posts
Armorama: 1,316 posts
Posted: Monday, November 28, 2016 - 07:25 AM UTC
Cable up them radios too! (Yeah, that's me)

ReconTL3-1
Visit this Community
Texas, United States
Joined: June 07, 2006
KitMaker: 726 posts
Armorama: 687 posts
Posted: Monday, November 28, 2016 - 11:16 PM UTC

Quoted Text

James,

Actually I've already downloaded all your galery photos (from the model show and on the table too). Your work is just outstanding. I know that I won't be even close to that but guess what, I want Bill to be proud and this is kind of tribute to him and all US soldiers who fought this war.

The biggest challange will be front plate "kind of cow" and the stencils. As far as You noticed my M113 will not have the wooden boxes (hope Bill wont be upset about that) so it is already not the exact replica.

Do You have any tips to me how manage to draw these stencils and cow?


Lucasz,

It seems that Bill is pretty pleased with your efforts, so there are no worries there.

For the stencils, I used dry transfers from Archer Fine Transfers and from Woodland Scenics since I am not good at applying decals. I used them for the stars on the sides which were later covered with "mud", the registration marks, unit bumper codes, and then larger letters for the LEE ANNE and PATSY on the track. It is a bit tedious and takes some time, but I think they are worth the effort. As for the the Panther that looks kind of like a cow, I hand painted that. You might want to trace the outline of the trim vane on a piece of paper, then draw the Panther in pencil to get it sized to your liking. You could then draw it on the kit's trim vane and then paint in the details or you could cut out the panther from the paper and use it as a stencil, then paint in the details.

Here are a couple of pictures of the trim vane before the model was placed on the diorama that you can use as references. You might be able to trace these or you might be able to print them out it scale and make a decal out of it.


I hope this info helps.
Cheers,
James
ReconTL3-1
Visit this Community
Texas, United States
Joined: June 07, 2006
KitMaker: 726 posts
Armorama: 687 posts
Posted: Monday, November 28, 2016 - 11:28 PM UTC
James,

Thanks for sharing the photo of you on the radios in your track. That one photo is a wealth of reference material in regards to the wiring of the radios. I wish I had been able to look at it when I was wiring my model. I was Light Infantry so my radio was usually on my back or someone else's back.

The radios in my model were configured a bit differently, but I did my best copying what I could find in period manuals. You really can't see it in the diorama much, but I know it is there.


Cheers,
James
Stojkovic1987
Visit this Community
Wojewodztwo Slaskie, Poland
Joined: March 26, 2015
KitMaker: 255 posts
Armorama: 254 posts
Posted: Sunday, January 01, 2017 - 03:36 PM UTC
Hello,

Good news guys, the Friul tracks are assembled!
This means I can go further with the build.

Stojkovic1987
Visit this Community
Wojewodztwo Slaskie, Poland
Joined: March 26, 2015
KitMaker: 255 posts
Armorama: 254 posts
Posted: Friday, August 03, 2018 - 07:55 PM UTC
Hello guys!

Sorry for such a slow progres. But as I promised the buildi is still on right track to be ended shortly.

I made my version of interior:


Also prepared the wholee thing for painting


The painting stages so far:
Black primer


Aluminium color


overal OD with modulation


All the best!
ReconTL3-1
Visit this Community
Texas, United States
Joined: June 07, 2006
KitMaker: 726 posts
Armorama: 687 posts
Posted: Saturday, August 04, 2018 - 03:20 AM UTC
Looking good, Lukasz! I saw your latest photos on FB and was wondering if this was the same model. It is good to see you making progress on it again.

Cheers,
James
iamheaminot
Visit this Community
Invercargill, New Zealand
Joined: January 03, 2004
KitMaker: 265 posts
Armorama: 185 posts
Posted: Saturday, August 04, 2018 - 09:10 AM UTC
Just noticed this very informative thread which brings back memories of serving with the track for seven years. We (New Zealand) had the M113a1. Initially with the standard cupola then the T50 turret. There were quite a number of changes to fittings to make the vehicles comply with Ministry of Transport regulations so we could drive them on the road.
We called the green internal colour Centurion Green. Mind you I have never seen a Roman centurion that colour.
Second, those small levers either side of the floor mounted levers were called pivot steer.
Oh dear, the memories
Stojkovic1987
Visit this Community
Wojewodztwo Slaskie, Poland
Joined: March 26, 2015
KitMaker: 255 posts
Armorama: 254 posts
Posted: Thursday, August 09, 2018 - 06:35 AM UTC
I tried to paint the "Lee Anne" stencil at the front side armor.


The original photo shows it was different - bigger and another font used. But I tried my best and I'm quite happy with the result.


Project will be continued
Stojkovic1987
Visit this Community
Wojewodztwo Slaskie, Poland
Joined: March 26, 2015
KitMaker: 255 posts
Armorama: 254 posts
Posted: Monday, August 20, 2018 - 03:03 AM UTC
Hello there guys!

The progres is now visible. I added wash and it is time for next weathering stages.


All the best!
ReconTL3-1
Visit this Community
Texas, United States
Joined: June 07, 2006
KitMaker: 726 posts
Armorama: 687 posts
Posted: Monday, August 20, 2018 - 02:15 PM UTC
This is coming along nicely, Lukasz. There are a few things that I noticed, though, if this model is to represent Bill Rambow's track LEE ANNE. The name LEE ANNE is painted on both sides of the hull as well as on both sides of the gun tub. I know it is tedious making your own markings since decals for this do not exist. I used dry transfers on my rendition of C-14 and the sloping of the gun tub made the application of LEE ANNE a bit tricky. I noticed that the registration number under the US Army does not match LEE ANNE. C-14's registration number was 12Y889. I am figuring that after experiencing what it is like getting the LEE ANNE onto the hull that hand rendering the registration number would be a pain in the butt, so I imagine you used some registration numbers that were in a set of decals. I figure you did the same with the bumper markings on the rear of the track since the left bumper indicates the track is from the 11th Armored Cavalry Regiment and is track E-2. The real LEE ANNE was C-14 from 2d Battalion, 47th Infantry (Mechanized), 9th Infantry Division. I had to make my own from dry transfers. I imagine that you were using the decals or dry transfers that you have available to you which is understandable. Most photos of this track do not show some of those markings so you may not have known what they were.

I am not trying to nit pic your model or be overly critical as you have done an excellent job on yours. Your painting skills with the chipping of the paint are better than mine and you should be proud of your effort. I just happen to be a retired Infantryman, a good friend of Bill's, and am a Museum Exhibits Specialist so things like historically accurate markings, etc when building a model representing an actual vehicle stand out to me when I see them. Most of the models I make are of actual vehicles and in order to make them as authentic and as historically accurate for the displays and exhibits they are in I try to make sure all of the markings, scratches, equipment, etc match any pictures of the real vehicle, recollections from the veterans who served on them, etc. Mine have to be accurate in these aspects because they are displayed in exhibits attended by those who served on them so I can't use artistic license as one might when building a model for fun. (not that building those are not fun - I do have fun building them, but they take more time to get the small details that the crew would look for correct) The main purpose of me mentioning the things I wrote in the first paragraph above is to let you know what things would make your model more realistic if your intention is to create an accurate representation of C-14. Since you already have most of the markings applied, it would be pretty difficult to change them. Do you plan on putting the LEE ANNE markings on the right side of the hull and on both sides of the gun tub? If so, I think that will be fine. You can avoid making the weird looking Panther on the trim vane because by the time Bill became the driver of LEE ANNE, the trim vane had been broken off of the track a few times while busting brush and you can just leave it off of the model.

Keep up the great work.

Cheers,
James

Stojkovic1987
Visit this Community
Wojewodztwo Slaskie, Poland
Joined: March 26, 2015
KitMaker: 255 posts
Armorama: 254 posts
Posted: Monday, August 20, 2018 - 03:54 PM UTC
Hello James,

You got me right!

I decided to make Lee Anne on the side of the track and gun tub - both sides (did not know about LEE ANNE on the right side of the vehicle - will do that!)

As for the stencils on the bumpers and sides of the walls I honestly decided not to do it by myself (cutting the signs from decals or use stencils) because the effect will be not the best. Having that in my mind I decided to use the decals from the kit. It will be inaccurate but after weathering of the bumpers it schould'nt be so visble.

Generally I'm trying to find balance between fun and accuracy. LEE ANNE is a great inspiration, but I already spend almoust 3 years to build this kit and any extra super detailing could make it another three…

Anyway the "VOW" on the front trim vane is a "must have" option James
ReconTL3-1
Visit this Community
Texas, United States
Joined: June 07, 2006
KitMaker: 726 posts
Armorama: 687 posts
Posted: Tuesday, August 21, 2018 - 04:33 AM UTC
Hello Lukasz,

I think you have done a good job towards achieving a good balance between accuracy and fun. I look forward to seeing the model when it is weathered.

I certainly can understand not wanting to try to attempt making the markings with stencils or decals. It was very tedious with the dry transfers and trying to line up the individual numbers and letters took a lot of time and did not quite come out how I wanted it to, but being a Soldier, I know that our markings are not always perfect since many of them are applied by the crews themselves or the unit's maintenance section. Some slanting and misalignment is actually fairly common.

Have you figured out how you are going to make the Panther on the trim vane?

Cheers,
James
Stojkovic1987
Visit this Community
Wojewodztwo Slaskie, Poland
Joined: March 26, 2015
KitMaker: 255 posts
Armorama: 254 posts
Posted: Tuesday, August 21, 2018 - 10:51 PM UTC
Hey James,

The Panther/Cow or whatever it looked like will be painted by hand.

I'm quite convinced it should turn out quite simillar. After all I can repaint the element, so it will not be a big danger to spoil all the work.


ReconTL3-1
Visit this Community
Texas, United States
Joined: June 07, 2006
KitMaker: 726 posts
Armorama: 687 posts
Posted: Wednesday, August 22, 2018 - 09:52 AM UTC
Cool. I look forward to seeing the completed model.

Cheers,
James
Sunbeamrapier
Visit this Community
Vejle, Denmark
Joined: April 17, 2015
KitMaker: 59 posts
Armorama: 19 posts
Posted: Wednesday, August 22, 2018 - 11:21 AM UTC
Great little man - BUT, beware the toxic fumes!!😂😂
Stojkovic1987
Visit this Community
Wojewodztwo Slaskie, Poland
Joined: March 26, 2015
KitMaker: 255 posts
Armorama: 254 posts
Posted: Thursday, August 23, 2018 - 06:59 AM UTC
Hello again,

This time one shot of extra elements that will be added to my build.

Some questions:
- is the barrel in right color? AFV club say it should be in steel color?
- is ammo in right color?
PantherCharlie
Visit this Community
Maryland, United States
Joined: June 13, 2011
KitMaker: 48 posts
Armorama: 47 posts
Posted: Friday, August 24, 2018 - 12:03 AM UTC
The gun color looks perfect. Those are some beautiful models of the 106 rounds. The problem is, unless you are depicting a fire mission, all those nice shiny rounds would be hidden away in their packing tubes. Vietnam, in either the rainy season or the dusty dry season was not a place where you would expose the rounds to the elements.

So if you are shooting for realism (excuse the pun), two rounds would be the most ever in view - one in the hands of the loader in the process of being loaded into the breech, and perhaps another in the hands of an ammo handler inside the track, or perhaps being pulled out of its container.

In my track, these were always stacked on the deck, between the benches, and butted up against the engine rear access panel. The caps of the containers had been unsealed, but left in place to protect the ammo from the environment

There were usually cases of C-rats on top of a few tiers of 106mm rounds and, if we were lucky, a few cases of beer and sodas on top of those. The whole stack of tubes and boxes served as a foot rest for the .50 gunner. James depicted this perfectly in his rendition of C-14.

BTW, long before I was Charlie One-Four Delta, the driver, my first assignment in the weapons squad track was as the 106mm and 90mm recoilless gunner, as I had a secondary MOS of 11H. Off the track, when we were humping or in laager, I started out as the M-60 "pig" assistant gunner, eventually working my way up the the .50 gunner. That last explains why I painted my girlfriend's name on the cupola tub, back when C14 was still named Patsy, as she is in James's diorama.

If anyone is interested, here's a link to my Facebook photo album for Vietnam.

https://www.facebook.com/bill.rambow.5/media_set?set=a.2004593480013&type=3&fb_dtsg_ag=AdwtmS8CeZ9pFzJyZJfS5w8bFPsCykJ2_ibawHY4iseStg%3AAdxOSk77IAOaOFjCnhrQMJQqwIkVLoA9pClyF255UAxN0w
PantherCharlie
Visit this Community
Maryland, United States
Joined: June 13, 2011
KitMaker: 48 posts
Armorama: 47 posts
Posted: Friday, August 24, 2018 - 07:16 AM UTC
I took a closer look at your photo. Is the whole gun painted OD? Only the mount, sight cover were olive drab. The gun itself was indeed a dark steel color. Here is the best picture I have that shows the 106 in its entirety. This is a pretty true representation of the color, despite color shifting over the years. This was taken by a buddy on another track on my very first operation in-country, before C14 had any name painted on her.
OK screwed that up. The photo URL is below.
PantherCharlie
Visit this Community
Maryland, United States
Joined: June 13, 2011
KitMaker: 48 posts
Armorama: 47 posts
Posted: Friday, August 24, 2018 - 07:18 AM UTC
https://gallery.kitmaker.net/showphoto.php/photo/464214
Stojkovic1987
Visit this Community
Wojewodztwo Slaskie, Poland
Joined: March 26, 2015
KitMaker: 255 posts
Armorama: 254 posts
Posted: Friday, August 24, 2018 - 07:58 AM UTC
Thanks Bill for the photo.

Do You remember that this steel color was shiny or rather satin?
In the photo You posted it is not reflexing the sunshines or any type of light. So I assume this should be very dark steel with satin finish?

By the way I must say it again Bill, your albus from Nam era is just wonderful!! So good reference material.

I'm counting on You that You won't leave me in my build of "Lee Anne" M113.
And I hope You do not mind that the stencils aren't the real ones…
graeme838
Visit this Community
United Kingdom
Joined: February 20, 2009
KitMaker: 16 posts
Armorama: 8 posts
Posted: Friday, August 24, 2018 - 08:24 AM UTC
Check out this website - it's been put together by someone who served in Vietnam as an M113 driver and has a number of pictures of his track, including some of the interior.

http://www.cibthebook.com/

I've not got round to building one yet but when I do this I'll be looking to do something like this.

By the way the page owner is both an author and a modeller - his 'Combat Infantryman Badge' fiction books are pretty good (except the last quarter of the last book, but thats just my opinion)
Stojkovic1987
Visit this Community
Wojewodztwo Slaskie, Poland
Joined: March 26, 2015
KitMaker: 255 posts
Armorama: 254 posts
Posted: Friday, August 24, 2018 - 06:54 PM UTC
Well, it is Bill's website

So I have him already on my side. Thanks for help anyway!
PantherCharlie
Visit this Community
Maryland, United States
Joined: June 13, 2011
KitMaker: 48 posts
Armorama: 47 posts
Posted: Saturday, August 25, 2018 - 01:24 AM UTC
First of all, I promise not to leave you, but don't take too long as I'm getting pretty old!

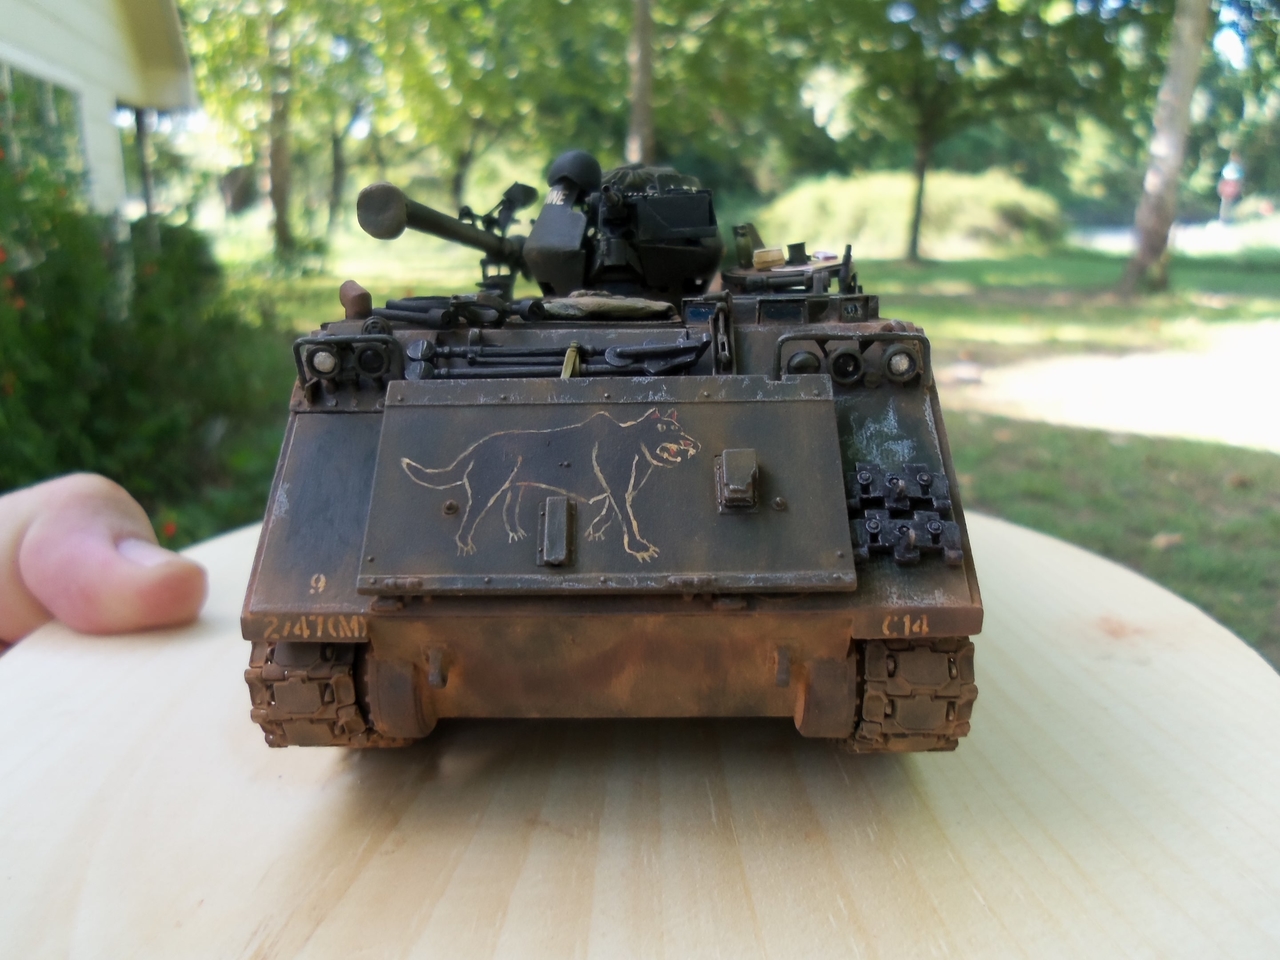
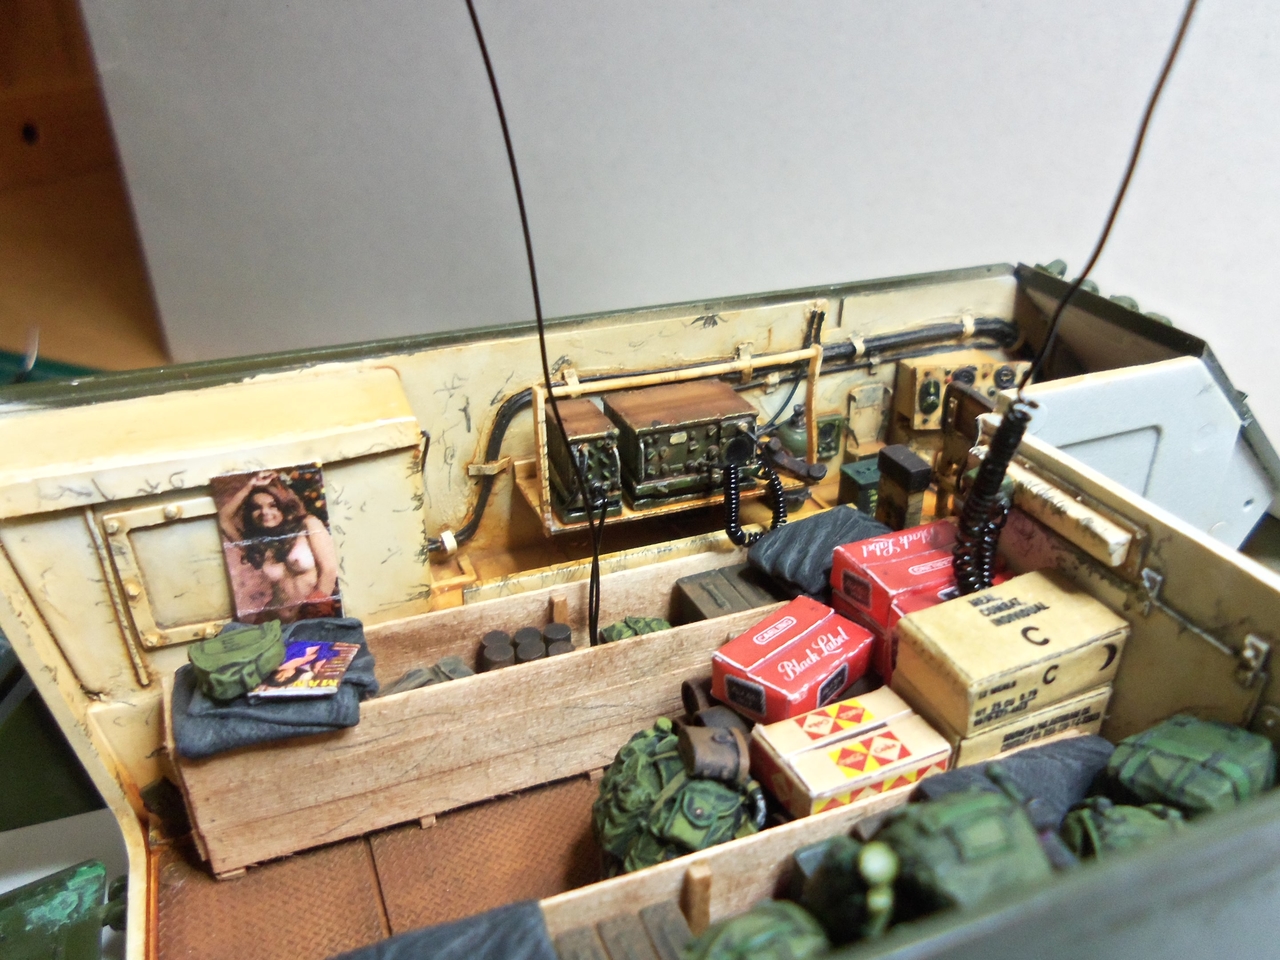
The only time the recky rifle ever looked shiny was when it had been recently rubbed down with gun oil. The outside of the barrel had a ridged surface. By that I mean there were tiny concentric grooves in it and that would cut down on the reflective properties. I don't know if they were just a result of the milling process or if it was by design. So the simple answer is the RR looked like it had a semi-matte finish - not flat, but not glossy, on all the unpainted surfaces. The OD parts had a slight gloss to them, but in scale I think they would look better matte, which is how I did mine when I built Lee Anne a few decades ago.

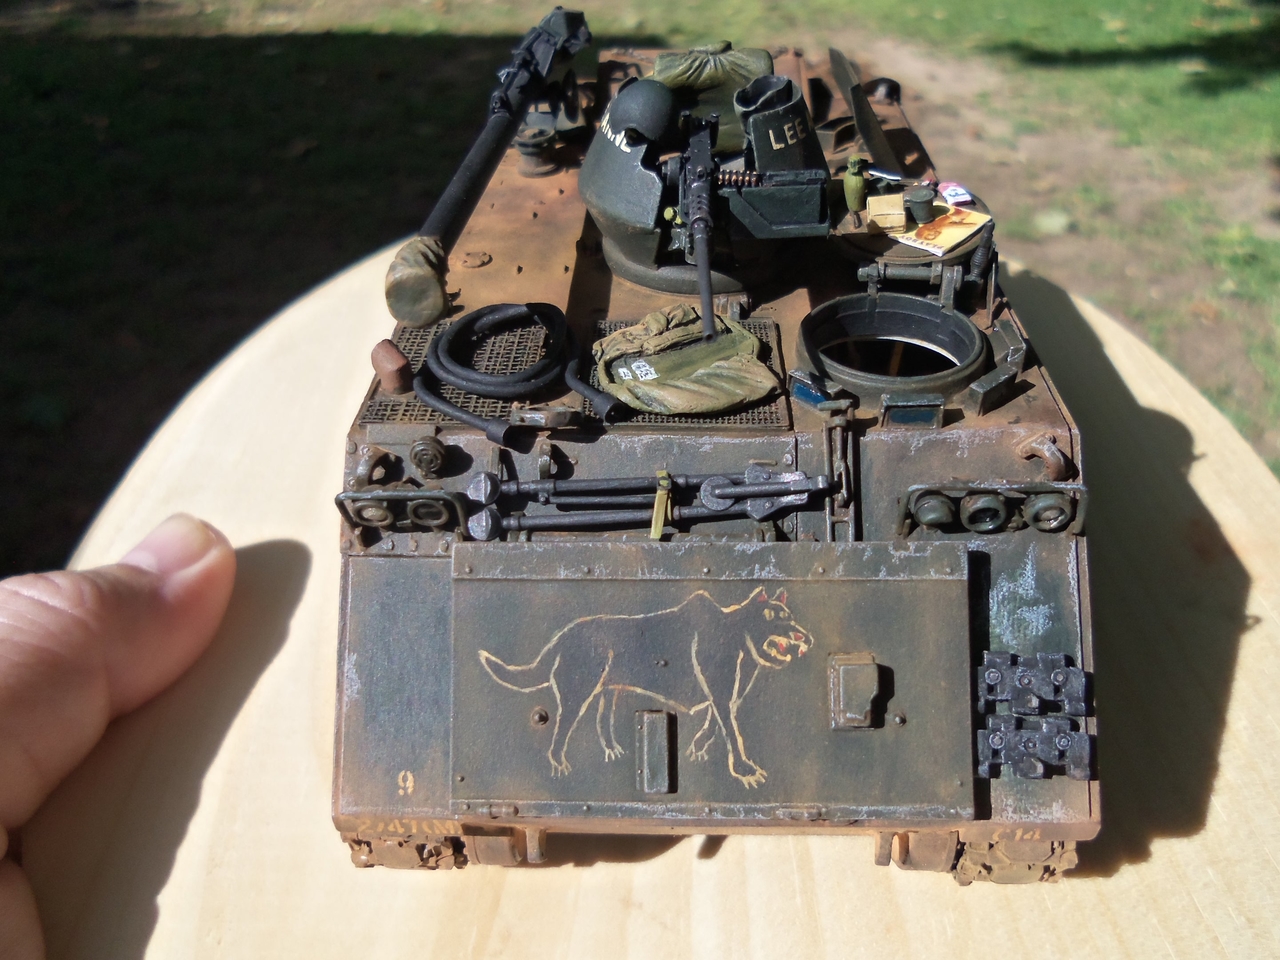
That was my first attempt at building an AFV, let alone a diorama, and in those days there were virtually no add-ons available for the Tamiya kit, which was the only one. So I had to scratch build the 106, primarily out of brass, and boil styrene sheet to curve the parts of the cupola and the M60 gun shields. Considering it was the first model I had built since I was a teenager mad about model planes, it came out quite well and even won a 1st place in category prize at the only show I entered it in. I'll have to put up an album of it but in the meantime here's a shot of the model, dressed as "Monkey's Uncle", the name of C14 in my books.

http://www.cibthebook.com/images/MonkeysUncleModel.jpg

The lettering was done in Photoshop, BTW. I then did a pen & ink sketch transformation in PS that was used in the frontispiece of "CIB-Combat Infantryman Badge".

The shine you see on the 106 barrel on my model is a result of the metallic paint I custom mixed from silver and matte black, if I remember correctly, and I think it looks pretty much the way I remember the real thing, but perhaps newly oiled. :-)

You can see four shots of the diorama as well as the pen and ink "sketch" on my book webpage here:

http://www.cibthebook.com/real_panthers.htm

You mentioned fonts in a previous post talking about Lee Anne and it brought a smile to my face. In 1967 that was a word not even in my lexicon. I used masking tape and cut block letters out of it then brushed white GI paint on to produce the name. You are lucky I didn't free-hand it as I did when I drove for my last of three Charlie Company Commanders CO's track. He wanted the name changed from "The Kingdom" to "Ship of Fools" (his name was Captain Morgan - like the rum) . I painted a square rigged ship with its sails all in disarray and the name all in yellow paint and I doubt a font exists to duplicate it.

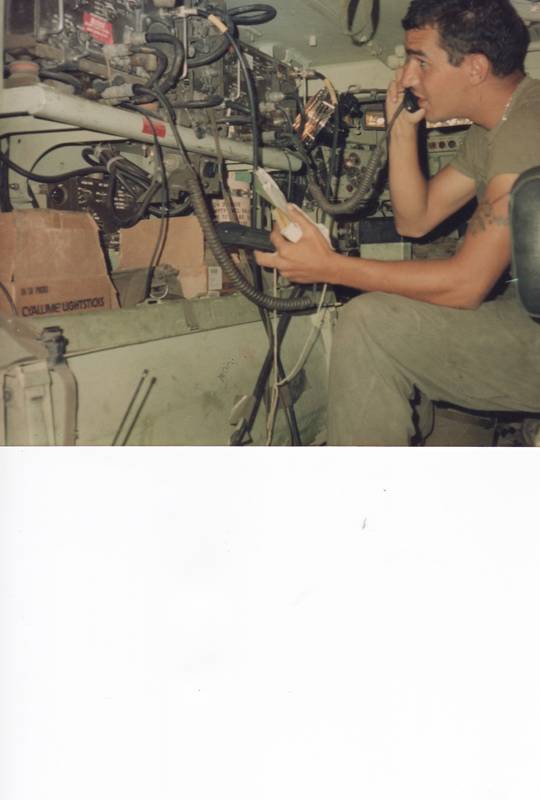
"Charlie One-Four Delta standing by on your push, out." (push was GI jargon for radio frequency)
Stojkovic1987
Visit this Community
Wojewodztwo Slaskie, Poland
Joined: March 26, 2015
KitMaker: 255 posts
Armorama: 254 posts
Posted: Monday, August 27, 2018 - 08:25 AM UTC
Well Bill,

There is no Chance I'll left this project on shelf again.

Next photos after some oils. Wheels are dry fitted of course.
Lee Anne stancil on the right side as well.


The 106 barrel is being repainted, so stay tuned.