

Łukasz,
Nice work so far!
If you are having trouble making crates from actual wood, using plastic strip is also possible (and in my honest opinion also easier). Personally I prefer making wooden parts from pc strip and scratching in the wood grain myself with the tip of a file. After sanding it down a little, the woodgrain looks very realistic, and its very easy to do.
Of course engrave the wood grain on all the strips (and make the edges and ends rough using the edge of the file) before gluing them together, for the most realistic effect. :-)
Armor/AFV
For discussions on tanks, artillery, jeeps, etc.
For discussions on tanks, artillery, jeeps, etc.
Hosted by Darren Baker, Mario Matijasic
M113 - Tamyia - 1:35 + addons

young_sven

Joined: May 14, 2010
KitMaker: 749 posts
Armorama: 743 posts
Posted: Wednesday, August 12, 2015 - 11:29 PM UTC
casailor
Joined: June 22, 2007
KitMaker: 165 posts
Armorama: 97 posts
KitMaker: 165 posts
Armorama: 97 posts
Posted: Thursday, August 13, 2015 - 12:31 AM UTC
I crewed on M-577A1s and those small levers were for the pivot steer (on A-1s at least) they wer eusually disconnected orremoved since pivot steering tended to both throw tracks and tear up pavement. My track time was post Vietnam so I don't know what they did in country.
casailor
Joined: June 22, 2007
KitMaker: 165 posts
Armorama: 97 posts
KitMaker: 165 posts
Armorama: 97 posts
Posted: Thursday, August 13, 2015 - 12:35 AM UTC
The M-577A1 I crewed on was a gasser converted to a diesel, plus it wa a very early production model that had been converted from a M-113. You could tell because the welds where the standing height extension was welded to the top were visible. Later, purpose-built models had smooth sides.

Stojkovic1987

Joined: March 26, 2015
KitMaker: 255 posts
Armorama: 254 posts
Posted: Friday, August 14, 2015 - 12:30 AM UTC
Hey, Richard!
Its nice to have another Vet in my thread.
Now I feel much stronger synergy in building, even if its so slow...
Its nice to have another Vet in my thread.
Now I feel much stronger synergy in building, even if its so slow...
PantherCharlie

Joined: June 13, 2011
KitMaker: 48 posts
Armorama: 47 posts
Posted: Friday, August 14, 2015 - 04:13 AM UTC
Quoted Text
If you are having trouble making crates from actual wood, using plastic strip is also possible (and in my honest opinion also easier). Personally I prefer making wooden parts from pc strip and scratching in the wood grain myself with the tip of a file. After sanding it down a little, the woodgrain looks very realistic, and its very easy to do.
Of course engrave the wood grain on all the strips (and make the edges and ends rough using the edge of the file) before gluing them together, for the most realistic effect. :-)
Hi Richard, that's exactly what I did back in the '80s when I built my "Lee Anne" diorama. But for this project I could not resist using the stock of left-over model ship and railroad lumber I had. I also wanted to model all the interior structural pieces of the boxes since, in some of the planned models, the cushions will be removed or folded back to reveal part of the inside of the boxes and their explosive contents.
This could still be done with styrene, but you would need several different thicknesses and widths, and basswood is a heck of a lot easier to trim and sand to size than plastic. Also, graining all those little components would tip the easiness factor back in favor of the wood, I think.
A little added benefit is that the raw basswood perfectly models the unfinished softwood lumber we built the original boxes from, and all it needs is a little weathering with powdered pigment to make it perfect.
Once the various pieces were cut, all done with a single-edge razor blade, which I did assembly-line fashion, gluing up a box took only a few minutes, with a little setting time between sides. It's really not as complicated as it might appear.
Great to have another track crewman on board this thread. Where did you operate your M577?
Stojkovic1987
Joined: March 26, 2015
KitMaker: 255 posts
Armorama: 254 posts
Posted: Friday, August 14, 2015 - 10:21 PM UTC
Hi all,
While yje crates are being in construction, I've used the great decals from Sven and make small progres with the interior.
Step by step it is more interesting.
By the way, little Markus is still demanding mora time from me

While yje crates are being in construction, I've used the great decals from Sven and make small progres with the interior.


Step by step it is more interesting.
By the way, little Markus is still demanding mora time from me

Kilo_Uniform

Joined: July 03, 2015
KitMaker: 280 posts
Armorama: 135 posts
Posted: Saturday, August 15, 2015 - 03:01 PM UTC
@Lukasz
Looking good with the decals - keep up the good work.
Enjoy young Markus - they grow up way to quickly.
Regards,
Kobus
Looking good with the decals - keep up the good work.
Enjoy young Markus - they grow up way to quickly.
Regards,
Kobus
young_sven
Joined: May 14, 2010
KitMaker: 749 posts
Armorama: 743 posts
Posted: Saturday, August 15, 2015 - 03:28 PM UTC
Quoted Text
Quoted Text
If you are having trouble making crates from actual wood, using plastic strip is also possible (and in my honest opinion also easier). Personally I prefer making wooden parts from pc strip and scratching in the wood grain myself with the tip of a file. After sanding it down a little, the woodgrain looks very realistic, and its very easy to do.
Of course engrave the wood grain on all the strips (and make the edges and ends rough using the edge of the file) before gluing them together, for the most realistic effect. :-)
Hi Richard, that's exactly what I did back in the '80s when I built my "Lee Anne" diorama. But for this project I could not resist using the stock of left-over model ship and railroad lumber I had. I also wanted to model all the interior structural pieces of the boxes since, in some of the planned models, the cushions will be removed or folded back to reveal part of the inside of the boxes and their explosive contents.
This could still be done with styrene, but you would need several different thicknesses and widths, and basswood is a heck of a lot easier to trim and sand to size than plastic. Also, graining all those little components would tip the easiness factor back in favor of the wood, I think.
A little added benefit is that the raw basswood perfectly models the unfinished softwood lumber we built the original boxes from, and all it needs is a little weathering with powdered pigment to make it perfect.
Once the various pieces were cut, all done with a single-edge razor blade, which I did assembly-line fashion, gluing up a box took only a few minutes, with a little setting time between sides. It's really not as complicated as it might appear.
Great to have another track crewman on board this thread. Where did you operate your M577?
Hi Bill,
I think you mixed up my post with Richard's
By the way, I am really enjoying all the input you are providing in this build thread, great stuff and thanks for that!
PantherCharlie
Joined: June 13, 2011
KitMaker: 48 posts
Armorama: 47 posts
Posted: Saturday, August 15, 2015 - 05:13 PM UTC
[/quote]
Hi Bill,
I think you mixed up my post with Richard's
By the way, I am really enjoying all the input you are providing in this build thread, great stuff and thanks for that!
[/quote]
Me! Mixed up? No more than a couple dozen times a day. :-)
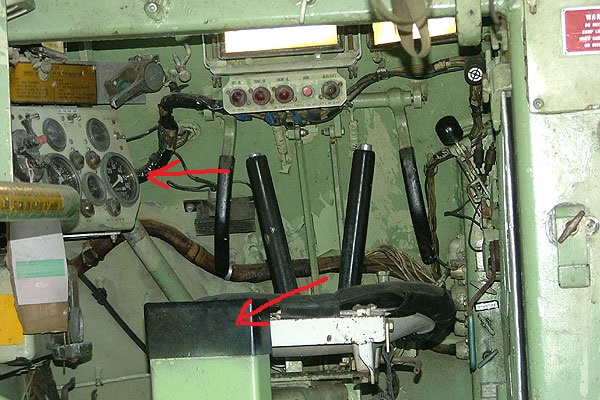
While I have you, Sven, I've determined from some photos of my track and other early gas tracks in-country that they did not have the oval plates around the gas filler. I did not remember them on ours and finally found some photos to back up my memory.
Here's James O'Leary's theory: "Sven was probably looking at the same reference book that I recently got. There are two tracks that they use for the close up pictures. One is the number three preproduction pilot M113 which is the one with that oval plate. The other is a track from the Patton Museum that is painted as a 3/5 Cav ACAV but it has a more modern square engine exhaust pipe since it is a later version M113A1 and the museum just painted it to represent a Vietnam vehicle although it had parts from more modern variants.
Perhaps the oval plate was on some of the first M113s that were produced in late 1959 and perhaps up until 1961 or 62 when they figured out the plate wasn't needed so by the time they built the tracks that 2/47 had they no longer had the oval plate. Since the oval plates were not on the 2/47 tracks, the models of them won't have them either."
https://www.flickr.com/photos/bill_rambow/19753003040/in/album-72157653894963784/
Also visible in this photo is another detail the kit designers and after-market enhancement makers get wrong on the early tracks. The top of the housing box for the fire extinguisher activating handle, nestled under the forward-left antenna guard, was actually slanted, not horizontal to fit beneath the guard.
So, just two more bits of minutiae about the tracks to store away in your memory bank.
Hi Bill,
I think you mixed up my post with Richard's
By the way, I am really enjoying all the input you are providing in this build thread, great stuff and thanks for that!
[/quote]
Me! Mixed up? No more than a couple dozen times a day. :-)
While I have you, Sven, I've determined from some photos of my track and other early gas tracks in-country that they did not have the oval plates around the gas filler. I did not remember them on ours and finally found some photos to back up my memory.
Here's James O'Leary's theory: "Sven was probably looking at the same reference book that I recently got. There are two tracks that they use for the close up pictures. One is the number three preproduction pilot M113 which is the one with that oval plate. The other is a track from the Patton Museum that is painted as a 3/5 Cav ACAV but it has a more modern square engine exhaust pipe since it is a later version M113A1 and the museum just painted it to represent a Vietnam vehicle although it had parts from more modern variants.
Perhaps the oval plate was on some of the first M113s that were produced in late 1959 and perhaps up until 1961 or 62 when they figured out the plate wasn't needed so by the time they built the tracks that 2/47 had they no longer had the oval plate. Since the oval plates were not on the 2/47 tracks, the models of them won't have them either."
https://www.flickr.com/photos/bill_rambow/19753003040/in/album-72157653894963784/
Also visible in this photo is another detail the kit designers and after-market enhancement makers get wrong on the early tracks. The top of the housing box for the fire extinguisher activating handle, nestled under the forward-left antenna guard, was actually slanted, not horizontal to fit beneath the guard.
So, just two more bits of minutiae about the tracks to store away in your memory bank.
Stojkovic1987
Joined: March 26, 2015
KitMaker: 255 posts
Armorama: 254 posts
Posted: Saturday, August 15, 2015 - 10:20 PM UTC
Good to know how the tracks had changed through the years.
I have to search wich type of M113 we used in the Polish army.
I have to search wich type of M113 we used in the Polish army.
Stojkovic1987
Joined: March 26, 2015
KitMaker: 255 posts
Armorama: 254 posts
Posted: Sunday, August 30, 2015 - 10:40 PM UTC
Hello again,
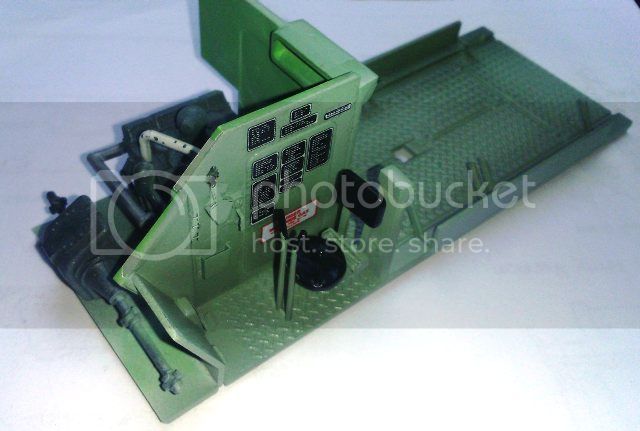
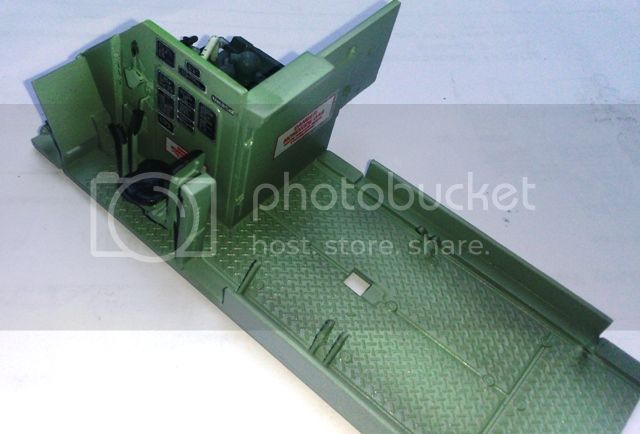
I'm still fighting with the interior. This time wash was added (In some areas have to clean the excess wash).
Hope it is getting to look better and better.
I'm still fighting with the interior. This time wash was added (In some areas have to clean the excess wash).


Hope it is getting to look better and better.
PantherCharlie
Joined: June 13, 2011
KitMaker: 48 posts
Armorama: 47 posts
Posted: Monday, August 31, 2015 - 04:04 AM UTC
Looking good, Łukasz. Coming along very well. Two details for you. Break out the black paint for the gauge bezels (rings) and the vinyl cap at the top of the driver's seat stanchion.
Stojkovic1987
Joined: March 26, 2015
KitMaker: 255 posts
Armorama: 254 posts
Posted: Monday, September 07, 2015 - 06:13 PM UTC
Thanks Bill for advice.
Do you have any photos that I can refer to?
It would be a great help. Even a small handmade picture.
Do you have any photos that I can refer to?
It would be a great help. Even a small handmade picture.

Frenchy

Joined: December 02, 2002
KitMaker: 12,719 posts
Armorama: 12,507 posts
Posted: Monday, September 07, 2015 - 06:46 PM UTC
The dashboard dials are painted black (if you have doubts about what my arrow is pointing at  ) :
) :
H.P.
) :H.P.
Stojkovic1987
Joined: March 26, 2015
KitMaker: 255 posts
Armorama: 254 posts
Posted: Wednesday, September 09, 2015 - 06:43 PM UTC
Thanks Henri. This helps me a lot!
The dials will be black of course.
Hope to make some progres during the weekend...
The dials will be black of course.
Hope to make some progres during the weekend...
Stojkovic1987
Joined: March 26, 2015
KitMaker: 255 posts
Armorama: 254 posts
Posted: Saturday, September 26, 2015 - 10:26 PM UTC
Hi all,
Sorry about so slow updates, but my small son is absorbing all my time so nt much is left for scale modeling.
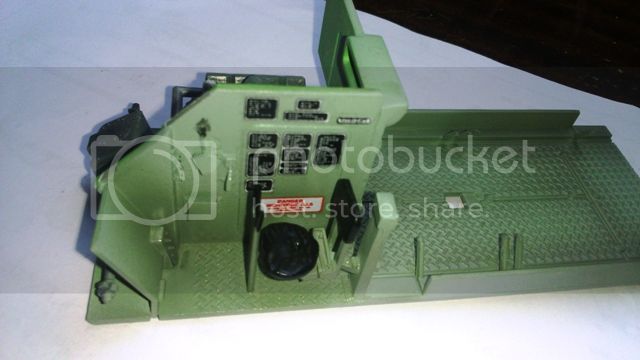
I've made some progres according to Your suggestions. Even a glass on the instrument panel was quite fast reproduced and look as below: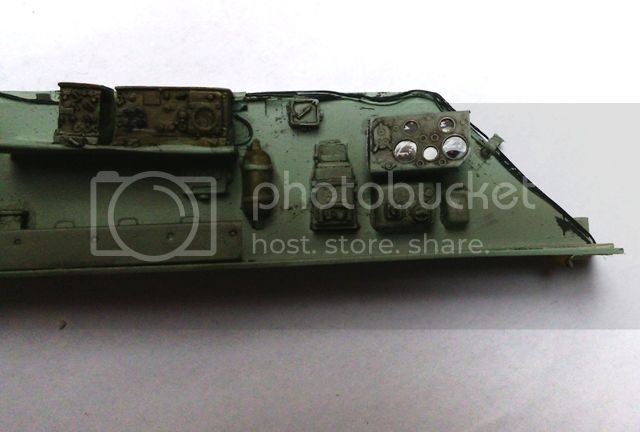
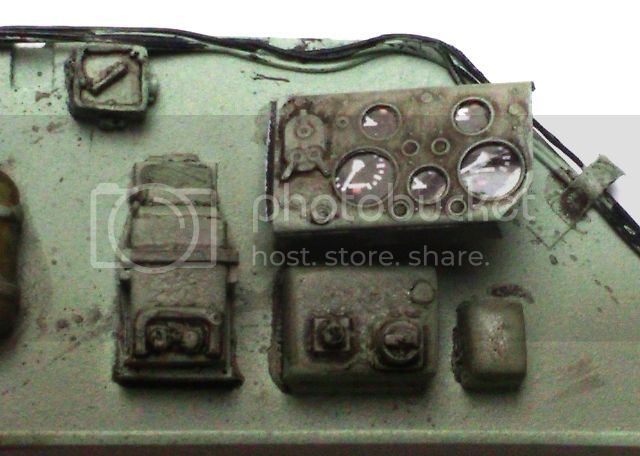
Unfortunately the clock decal just slipped away and I did'nt noticed that and glued with CA.

Also I repainted te piece about what was writing Pierre.
Hope You like the progres.
Sorry about so slow updates, but my small son is absorbing all my time so nt much is left for scale modeling.
I've made some progres according to Your suggestions. Even a glass on the instrument panel was quite fast reproduced and look as below:


Unfortunately the clock decal just slipped away and I did'nt noticed that and glued with CA.

Also I repainted te piece about what was writing Pierre.
Hope You like the progres.
Stojkovic1987
Joined: March 26, 2015
KitMaker: 255 posts
Armorama: 254 posts
Posted: Saturday, October 31, 2015 - 12:25 PM UTC
Hello,
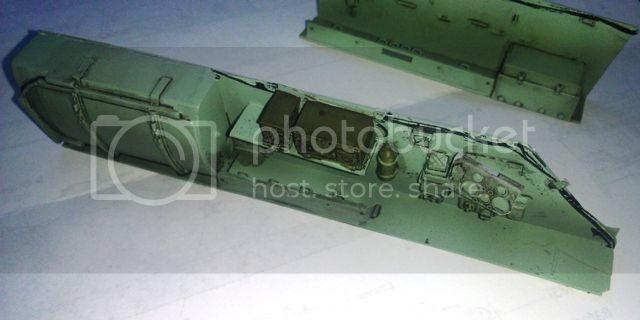
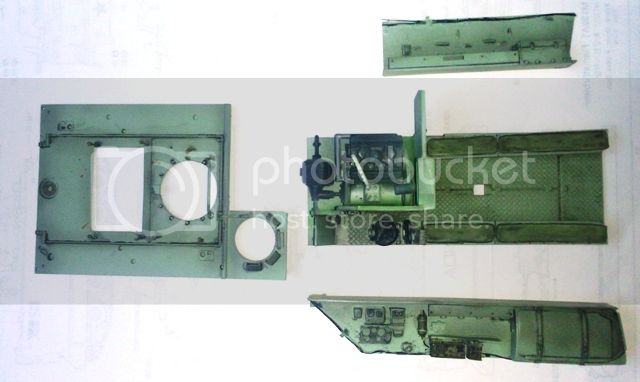
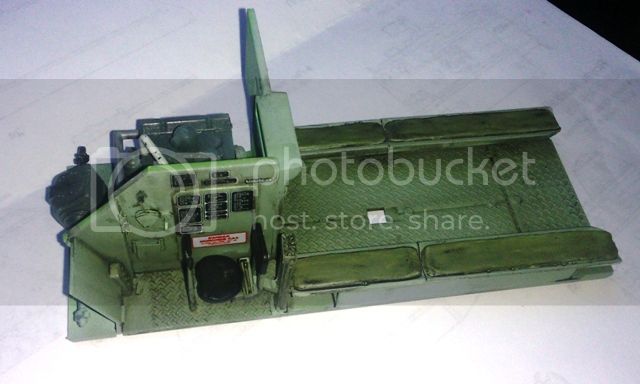
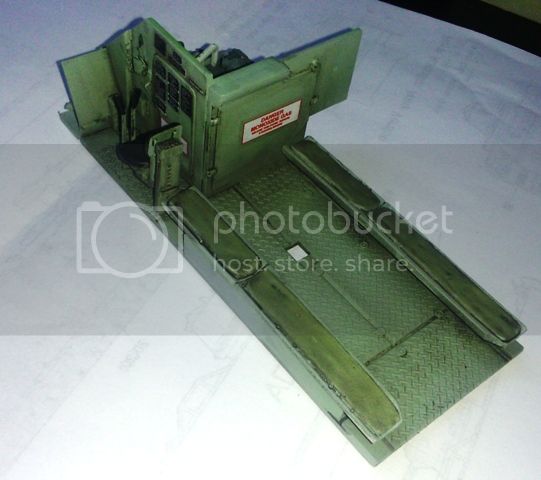
The tracks get some dirty work on the floor.
I've got the feeling that everyone is just fed up with the photos of my interior job. Tough the works are going so slow...
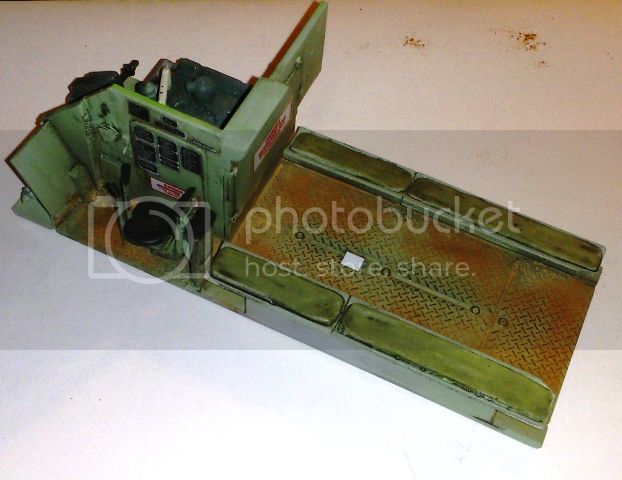

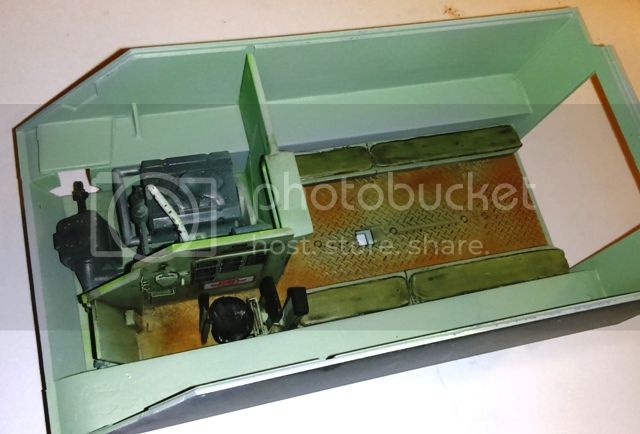
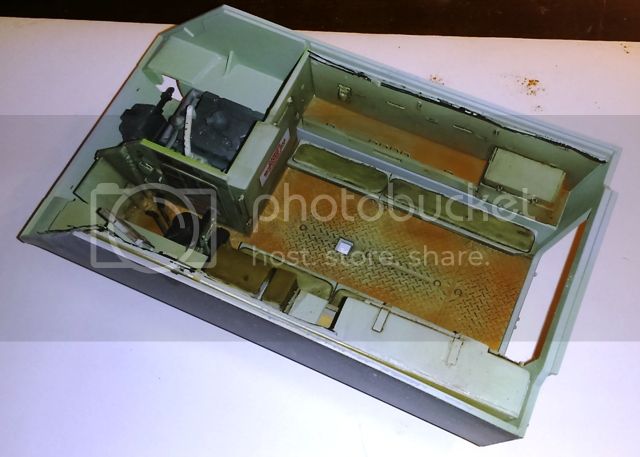
Slowly but stright to the end
The tracks get some dirty work on the floor.
I've got the feeling that everyone is just fed up with the photos of my interior job. Tough the works are going so slow...


Slowly but stright to the end
Chris64inthesky
Joined: February 18, 2010
KitMaker: 2 posts
Armorama: 2 posts
Posted: Saturday, October 31, 2015 - 01:10 PM UTC


Modelrob
Joined: October 20, 2015
KitMaker: 304 posts
Armorama: 293 posts
Posted: Saturday, October 31, 2015 - 03:02 PM UTC
The interior is coming out looking very nice.
Kilo_Uniform
Joined: July 03, 2015
KitMaker: 280 posts
Armorama: 135 posts
Posted: Saturday, October 31, 2015 - 04:13 PM UTC
Hi Lukasz
Glad to see you are still working on this - the interior looks good. Keep up the good work - I can't wait to see the end result.
Regards,
Kobus
Glad to see you are still working on this - the interior looks good. Keep up the good work - I can't wait to see the end result.
Regards,
Kobus
Stojkovic1987
Joined: March 26, 2015
KitMaker: 255 posts
Armorama: 254 posts
Posted: Sunday, November 01, 2015 - 01:32 AM UTC
Thanks for suport.
I feel guilty for slow-motion works of mine wit this model especialy to Bill, Jean-Pierre and Sven, because They give me a real helping hand here.
From other hand, I think that good built is about not speeding but about relax and systematic progress.
I feel guilty for slow-motion works of mine wit this model especialy to Bill, Jean-Pierre and Sven, because They give me a real helping hand here.
From other hand, I think that good built is about not speeding but about relax and systematic progress.
Stojkovic1987
Joined: March 26, 2015
KitMaker: 255 posts
Armorama: 254 posts
Posted: Thursday, December 31, 2015 - 09:58 PM UTC
ello Guys,
I've got this set:
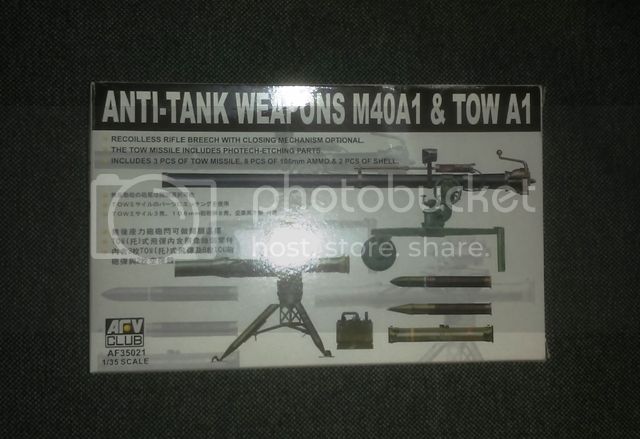
Now it should be much easier to reproduce the "Lee Anne".
Especialy because of great photo source by Bill.
I also got some stencils to make the font on the side of the tracks.
I've got this set:

Now it should be much easier to reproduce the "Lee Anne".
Especialy because of great photo source by Bill.
I also got some stencils to make the font on the side of the tracks.
Stojkovic1987
Joined: March 26, 2015
KitMaker: 255 posts
Armorama: 254 posts
Posted: Sunday, November 27, 2016 - 11:50 PM UTC
Hello everyone,
I'm back with this thread.
First I need to paint the small things in interior and glue tchem together (ammo boxes, cloths and some other stuff).
Then I'll try to assemble the main cannon and try to fit it to the upper armour.
Please do not let me stop the build again!
I'm back with this thread.
First I need to paint the small things in interior and glue tchem together (ammo boxes, cloths and some other stuff).
Then I'll try to assemble the main cannon and try to fit it to the upper armour.
Please do not let me stop the build again!
ReconTL3-1
Joined: June 07, 2006
KitMaker: 726 posts
Armorama: 687 posts
Posted: Monday, November 28, 2016 - 12:13 AM UTC
Hello Lucasz,
I am glad to see that you are back to working on this project. I am looking forward to seeing your progress on this thread soon.
Not too long ago I had completed a diorama featuring Bill Rambow's track and crew titled "Breakfast in the Boonies". My model is of his track during the time period when he was the gunner, so LEE ANNE is only on the gun tub and the driver's wife's name is on the sides of the track (Patsy). Here is a link to it from Armorama. https://armorama.kitmaker.net/forums/251755&page=1
Hopefully some of the pictures may be helpful for your project. If you have any questions as to what I used or anything else, please feel free to ask.
Take care and have a great day.
James
Stojkovic1987
Joined: March 26, 2015
KitMaker: 255 posts
Armorama: 254 posts
Posted: Monday, November 28, 2016 - 02:12 AM UTC
James,
Actually I've already downloaded all your galery photos (from the model show and on the table too). Your work is just outstanding. I know that I won't be even close to that but guess what, I want Bill to be proud and this is kind of tribute to him and all US soldiers who fought this war.
The biggest challange will be front plate "kind of cow" and the stencils. As far as You noticed my M113 will not have the wooden boxes (hope Bill wont be upset about that) so it is already not the exact replica.
Do You have any tips to me how manage to draw these stencils and cow?
 |

WEB HOSTING BY


Copyright ©2021 Armorama and Kitmaker Network, a subsidiary of Silver Star Enterprises
All Rights Reserved. Please read our Conditions of Use and Privacy Policy.
All Rights Reserved. Please read our Conditions of Use and Privacy Policy.