Tennessee, United States
Joined: April 04, 2002
KitMaker: 1,290 posts
Armorama: 658 posts
Posted: Thursday, February 18, 2016 - 01:15 AM UTC
I was looking through some of my photos, for other forums when I found several of an American MK V from the Patton Museum. What I noticed were some gaps in the joints on one of the gun sponsons. Now I don't fill so bad about the gaps I built into my MK V


They are not large gaps, but they are gaps!
Tennessee, United States
Joined: April 04, 2002
KitMaker: 1,290 posts
Armorama: 658 posts
Posted: Thursday, February 18, 2016 - 01:17 AM UTC
I also noticed that the Patton Museum MK V had exhaust routed differently than the Meng kit.

The exhaust pipe goes through the first support on both "tanks", but stays on the deck for the 1:1 scale version. Interesting, but nothing I going to fret over.
Australian Capital Territory, Australia
Joined: October 26, 2012
KitMaker: 58 posts
Armorama: 58 posts
Posted: Saturday, February 20, 2016 - 10:19 AM UTC
Looking good there Jeff. And if you didn't tell me, I wouldn't have known the error with the exhaust.
Okay so I have made steady progress with the M270.
Undercoat

Okay now before I show the next two photos I want to admit to something. This is the first time I have used an airbrush for modelling. I have owned my airbrush for about 4 months, but the fear of really stuffing up after all the hard work of building, kept me from using it. Also some running repairs on the side panel of Rocket Launcher.


Next layer of colours to come.
On the bench currently:
Lots of procrastination!!!!
The most over engineered, incorrectly instructed model I have ever had the displeasure of trying to build. Panda Hobby's M-ATV MRAP
Bayern, Germany
Joined: September 30, 2013
KitMaker: 1,615 posts
Armorama: 1,500 posts
Posted: Saturday, February 20, 2016 - 09:43 PM UTC
Building logs: http://armored76.wordpress.com/
Finished projects: http://armored76.wordpress.com/portfolio/
New Mexico, United States
Joined: June 16, 2014
KitMaker: 681 posts
Armorama: 603 posts
Posted: Saturday, February 20, 2016 - 11:44 PM UTC
Cristian,
Very nice work indeed!
As to the cables and connectors, I've had good luck in the past using varied sizes of solder with polystyrene tubing stretched like sprue and slipped over the ends to represent the connectors.
Again, well done!
PH
On the Bench
MiniArt Grant Mk I with Interior
IBG Marmon-Herrington MKII
Bayern, Germany
Joined: September 30, 2013
KitMaker: 1,615 posts
Armorama: 1,500 posts
Posted: Saturday, February 20, 2016 - 11:46 PM UTC
Thank you, Paul! That's a great idea! My main problem was to find the right gauge wire, so far but adding some tubing over the wire end solves at least half the problem

Building logs: http://armored76.wordpress.com/
Finished projects: http://armored76.wordpress.com/portfolio/
Tennessee, United States
Joined: April 04, 2002
KitMaker: 1,290 posts
Armorama: 658 posts
Posted: Sunday, February 21, 2016 - 03:13 AM UTC
Cristian,
That is one big ugly sucker. Beautiful job bringing it to life.
ColinEdm
 Associate Editor
Alberta, Canada
Joined: October 15, 2013
KitMaker: 1,355 posts
Armorama: 1,229 posts
Posted: Sunday, February 21, 2016 - 08:32 AM UTC
The voices are back.....excellent....
New Mexico, United States
Joined: June 16, 2014
KitMaker: 681 posts
Armorama: 603 posts
Posted: Sunday, February 21, 2016 - 09:02 AM UTC
Made a little progress on the Bishop. Also got some PE work done on the forward turret bulkhead, but not enough to warrant photos.

PH
On the Bench
MiniArt Grant Mk I with Interior
IBG Marmon-Herrington MKII
Bayern, Germany
Joined: September 30, 2013
KitMaker: 1,615 posts
Armorama: 1,500 posts
Posted: Sunday, February 21, 2016 - 11:02 AM UTC
Thank you, Jeff and Colin!
Paul, this looks better and better! That elevation mechanism is a piece of jewelry.
Building logs: http://armored76.wordpress.com/
Finished projects: http://armored76.wordpress.com/portfolio/
Cavan, Ireland
Joined: May 21, 2015
KitMaker: 34 posts
Armorama: 32 posts
Posted: Sunday, February 21, 2016 - 01:03 PM UTC
Brad, that's coming along nicely and a good first attempt at airbrushing. Hope my first attempt is as good when I finally get the airbrush.
Cristain, looks stunning.
Jeff, if you haven't pointed out the issues I would never of spotted or know, either way looks a great build.
New Mexico, United States
Joined: June 16, 2014
KitMaker: 681 posts
Armorama: 603 posts
Posted: Sunday, February 21, 2016 - 06:17 PM UTC
Quoted Text
Paul, this looks better and better! That elevation mechanism is a piece of jewelry.
Thanks! I'll finish the detail painting and weathering once it's installed I the superstructure so I can see relationships between components.
PH
On the Bench
MiniArt Grant Mk I with Interior
IBG Marmon-Herrington MKII
Colorado, United States
Joined: March 27, 2003
KitMaker: 345 posts
Armorama: 247 posts
Posted: Monday, February 22, 2016 - 05:08 AM UTC
I ADDed back to my Dora project, and got the other side complete. In the picture the pieces are just "dry stacked" to show the scale of the beast.
I purchased the turned barrel, and it's really nice, and heavy. It way overpowers the counter weight in the breach. I'll be adding weight, and try to find a machine shop to drill out the barrel to lighten it.
Still lots of fiddly bits to add.


Bayern, Germany
Joined: September 30, 2013
KitMaker: 1,615 posts
Armorama: 1,500 posts
Posted: Monday, February 22, 2016 - 11:39 AM UTC
What a cool looking beast, Dave!!!
Building logs: http://armored76.wordpress.com/
Finished projects: http://armored76.wordpress.com/portfolio/
Vietnam
Joined: May 07, 2006
KitMaker: 416 posts
Armorama: 312 posts
Posted: Monday, February 22, 2016 - 06:53 PM UTC
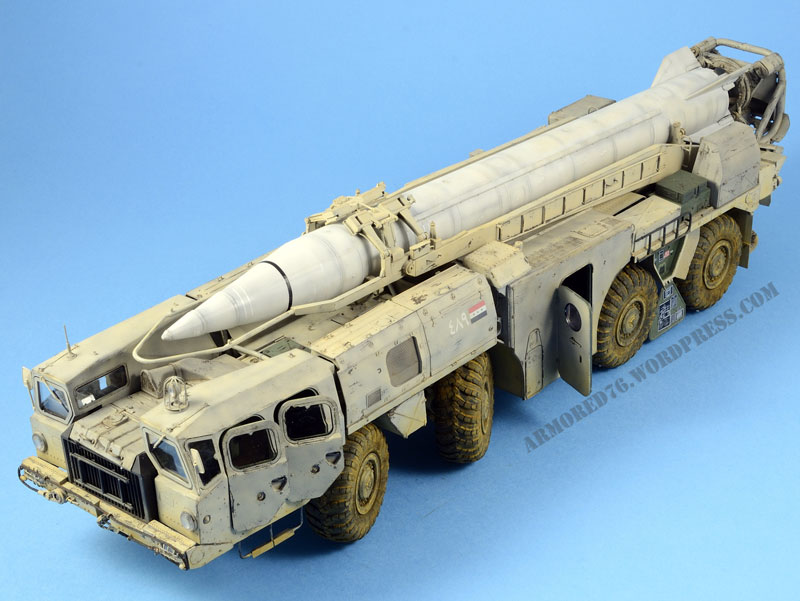
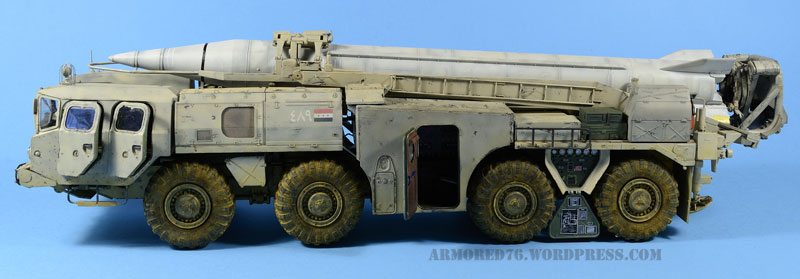
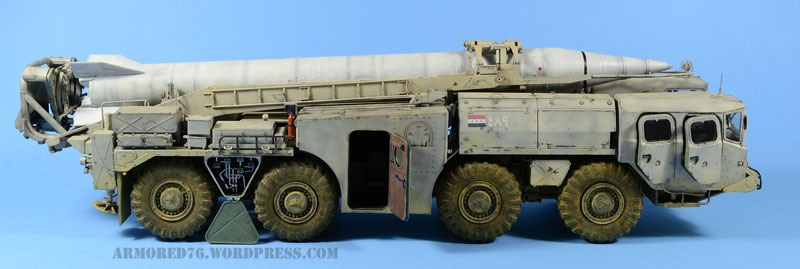
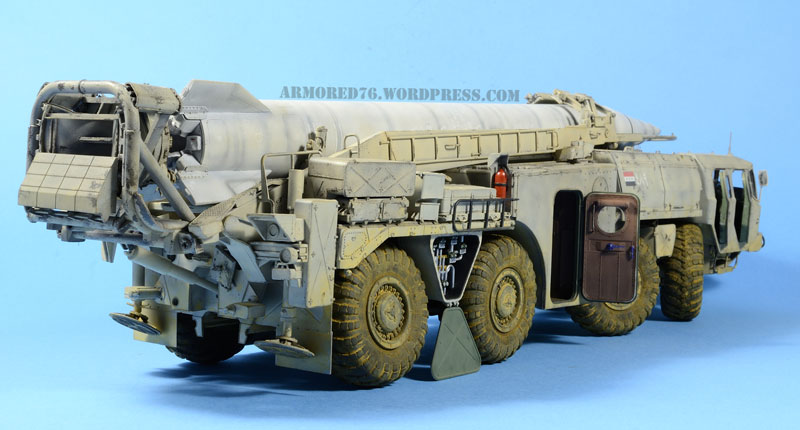
Bravo, your attractive Scud-B, Cristian.
My city in the first months of the year:


It effects my assembling. A very slow velocity.


An over-handed chip and dirt inside. Sorry, Russ brothers.


K.
Bayern, Germany
Joined: September 30, 2013
KitMaker: 1,615 posts
Armorama: 1,500 posts
Posted: Monday, February 22, 2016 - 07:26 PM UTC
That interior looks absolutely awesome!!! I wonder how much of that is going to be visible in the end.
Please excuse my ignorance but what are you celebrating in your city? It certainly doesn't look like everyday ornaments.
Building logs: http://armored76.wordpress.com/
Finished projects: http://armored76.wordpress.com/portfolio/
ColinEdm
 Associate Editor
Alberta, Canada
Joined: October 15, 2013
KitMaker: 1,355 posts
Armorama: 1,229 posts
Posted: Monday, February 22, 2016 - 07:44 PM UTC
Paul, your Bishop is coming along very nicely, lots of fiddly work to deal with.
Dave, that Dora is a monster, you are a braver man than I.
Mr. K, very nice work as well.
My Marders have been shelved for a bit as I have been hit with a number of reviews to do, hopefully I can get the exteriors sprayed up this weekend.
The voices are back.....excellent....
Colorado, United States
Joined: March 27, 2003
KitMaker: 345 posts
Armorama: 247 posts
Posted: Monday, February 22, 2016 - 07:58 PM UTC
Mr K.
More importantly, what city is it?
Reminds me of somewhere I've been: Adelaide, Bangalore?
Vietnam
Joined: May 07, 2006
KitMaker: 416 posts
Armorama: 312 posts
Posted: Monday, February 22, 2016 - 08:16 PM UTC
Quoted Text
That interior looks absolutely awesome!!! I wonder how much of that is going to be visible in the end.
...
Ya, it's difficult to view inside when I dry-fix the upper hull.

Thanks, all of you. I live in Saigon, Vietnam. Those pics are taken in the lunar new year ('Tet' in VN).
Sincerely,
K.

#0
United States
Joined: July 31, 2011
KitMaker: 472 posts
Armorama: 453 posts
Posted: Tuesday, February 23, 2016 - 09:04 PM UTC
I've finished up the hulls. All that's left there is the tools and skirt/supports, which I will add a bit later. Ran into a bit of trouble getting things lined up, so there will be a bit of filling to be done. Have a noticeable gap just under the vertical front plate.

Tennessee, United States
Joined: April 04, 2002
KitMaker: 1,290 posts
Armorama: 658 posts
Posted: Wednesday, February 24, 2016 - 02:25 AM UTC
I am taking a short break from my Mk IV & Mk V to work on a base for the Mk IV. It will be simple with the tank smashing through a barbed wire obstacle common in late 1917. I have a picture frame with glass removed and a sheet of styrofoam as based secured inside. I will start ground work as soon as it quits raining/snowing and I can go outside to secure the wood for the fence posts. There is a row of hackberry trees along the front of my little wood lot. They are constantly providing limbs every time there are strong winds

Attached are two photos of my "barbed wire." It is made from cut window screen.


Cavan, Ireland
Joined: May 21, 2015
KitMaker: 34 posts
Armorama: 32 posts
Posted: Wednesday, February 24, 2016 - 01:40 PM UTC
Nice to see all the builds progressing along, all look fantastic.
Me, well almost there now on the build only a few pieces of PE remaining and this will be ready for tidy up and priming.
 Terminator WiP
 by
Manxman, on Flickr
 Terminator WiP
 by
Manxman, on Flickr
 Terminator WiP
 by
Manxman, on Flickr
 Terminator WiP
 by
Manxman, on Flickr
England - South West, United Kingdom
Joined: January 20, 2005
KitMaker: 103 posts
Armorama: 95 posts
Posted: Saturday, February 27, 2016 - 10:50 PM UTC
ColinEdm
 Associate Editor
Alberta, Canada
Joined: October 15, 2013
KitMaker: 1,355 posts
Armorama: 1,229 posts
Posted: Sunday, February 28, 2016 - 06:38 AM UTC
Beautiful work on the A7V Jason!
I have basecoated both my Marders, starting on the Sicilian camo on the 'Early'...I love how it looks but I don't think I ever want to do it again, I have to wait for my eyes to un-cross before finishing it off!

The voices are back.....excellent....
Bayern, Germany
Joined: September 30, 2013
KitMaker: 1,615 posts
Armorama: 1,500 posts
Posted: Sunday, February 28, 2016 - 11:52 AM UTC
@Jeff: Great "barbed wire" idea! Is that a metallic or plastic screen?
@Peter: Looking good! I bet those gun mantles will look great with paint on and some washes. That busy turret really sets this vehicle apart. Goes directly to my "have to build one soon" list

@Jason: That looks fantastic! The detailing is spot on and the weathering looks very realistic! Also the decals look painted on, specially the one of the exhaust grill (?). And then I haven't even mentioned the interior!!! Will the top stay removable?
Colin: STUNNING camo work! Is this brush painted or masked somehow? Looks absolutely amazing!
Building logs: http://armored76.wordpress.com/
Finished projects: http://armored76.wordpress.com/portfolio/

 They are not large gaps, but they are gaps!









 Attached are two photos of my "barbed wire." It is made from cut window screen.


