Campaigns: Active Campaigns
Campaigns that are either in planning or underway should be grouped here.
Campaigns that are either in planning or underway should be grouped here.
Hosted by Richard S.
Campaign 500+
Armored76

Joined: September 30, 2013
KitMaker: 1,615 posts
Armorama: 1,500 posts

Posted: Tuesday, February 02, 2016 - 08:41 PM UTC
Looks good, Brad! Just make sure the additional PE parts would take this over 500.
erichvon

Joined: January 17, 2006
KitMaker: 1,694 posts
Armorama: 1,584 posts

Posted: Wednesday, February 03, 2016 - 05:47 AM UTC
Did some more work on the 251 today. What a ****ing nightmare! I found that if you put the hull top on first the backplate has huge gaps and no amount of repositioning helps. The gaps ae far too big to fill. I even conte,plated making a new hull backplate at one point! In view of that I took the top off and put the backplate on first then the hull top. Still big gaps but nothing a bit of filler couldn't sort out. I hadn't noticed until after the glue had set that the hull top is slightly further over on one side than the other so the side bins won't have identical spaces with the side armour. Hopefully I can disguise that by attaching foliage to the sides(it is Normandy after all) and fingers crossed it will hide my error. To top it all off while I was trying to get it all to fit together I caught one of the front wheels and it snapped off which means I'm going to have to drill it and put a pin in. Not at all pleased. Well at least it's a learning curve on DML 251's.I've got another 4 sat here waiting to be built as well as two 250's. On the next one I'm not following their instructions and will build it in a sequence that I KNOW is better. Bloody DML instructions 

Wilso2276

Joined: October 26, 2012
KitMaker: 58 posts
Armorama: 58 posts

Posted: Wednesday, February 03, 2016 - 02:16 PM UTC
Okay. I have made a start on the monster. This kit is by far the most parts I have ever done.
The doors are going to be connected in the open position. And the window is movable still, to drop the blast shield


The back wall of the cab. Comms gear mounted

The doors are going to be connected in the open position. And the window is movable still, to drop the blast shield


The back wall of the cab. Comms gear mounted


Wilso2276

Joined: October 26, 2012
KitMaker: 58 posts
Armorama: 58 posts

Posted: Thursday, February 04, 2016 - 04:43 PM UTC
New update.
Dry fit of the back wall of the cabin.

And the front wall of the cabin

Dry fit of the back wall of the cabin.

And the front wall of the cabin


Ranger74

Joined: April 04, 2002
KitMaker: 1,290 posts
Armorama: 658 posts

Posted: Thursday, February 04, 2016 - 08:20 PM UTC
Brad,
Looked at your top photo and thought' "that interior green is way too yellow!" Then I saw the bottom photo and it looked to be correct shade. Was lighting different between the two photos? Good start, by the way.
Looked at your top photo and thought' "that interior green is way too yellow!" Then I saw the bottom photo and it looked to be correct shade. Was lighting different between the two photos? Good start, by the way.

Wilso2276

Joined: October 26, 2012
KitMaker: 58 posts
Armorama: 58 posts

Posted: Friday, February 05, 2016 - 01:38 AM UTC
Hi Jeff, yeah the top picture didn't come out quite right. The green is more like the bottom picture. Still not quite the right colour green, but a lot closer than the top picture. I also noticed in the dry fit the console beside the driver was sitting in backwards, so fixed that before installation.
erichvon

Joined: January 17, 2006
KitMaker: 1,694 posts
Armorama: 1,584 posts

Posted: Friday, February 05, 2016 - 05:07 AM UTC
I've made a concerted effort over the last few days to get this finished and am almost there. It's all together (bar adding a few little bits that will get knocked off if I put them on first) and mow ready for painting. I've already put the dunkel gelb on so just camouflage and weathering now. There's some horrendous gaps on this kit as you can see by the amount of filling I had to do on the back and around the gun mount. I had to shave off the top of the holder for the drivers visor otherwise the gun platform wouldn't fit flush. Also the hull tops on skewift as it's further over on one side due to there not being any decent locating notches and it being a crap fit. The glue had set before I realised. Hopefully I can disguise that once I get some foliage on it. One thing I had noticed during the build is bits appear on the line drawings in the instructions that haven't been mentioned. If you decide to build one of these then familiarise yourself with photos of real vehicles first. It was only because I've got a pile of pics saved that I noticed. Anyway onto the pics.
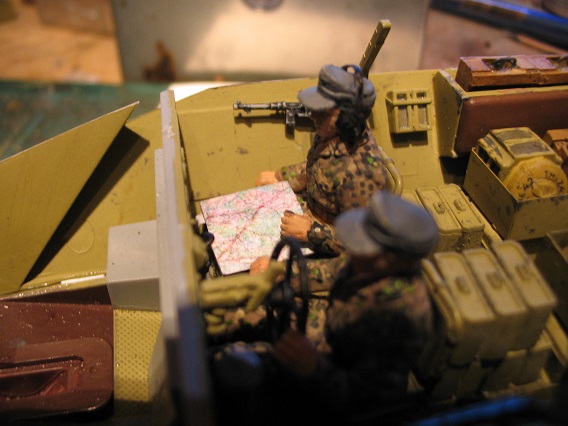
Photocopied map. Fre, free, free lol
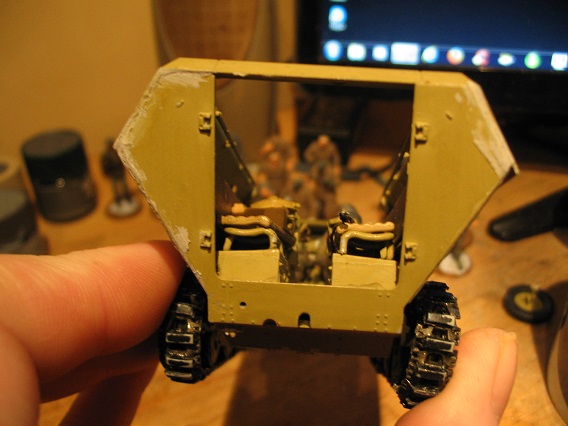
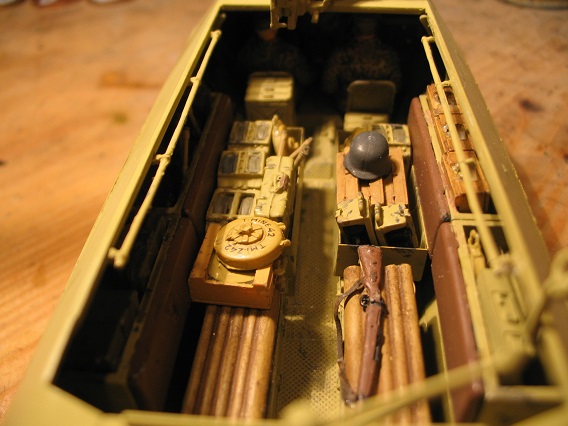
Once it's all painted I plan to hang various bits and bobs from the internal rails. I've seen a lot of pics where that's been done and I wantthat fully laden and lived in look.
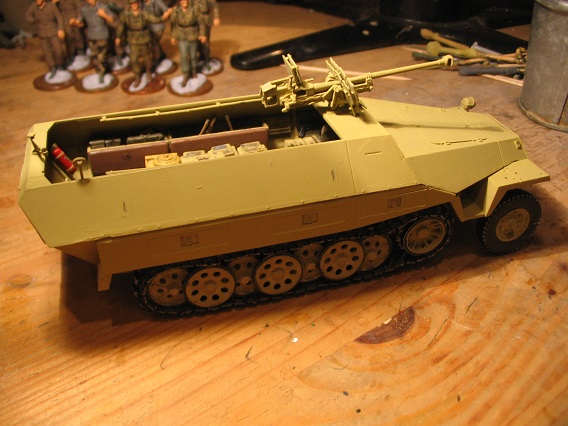
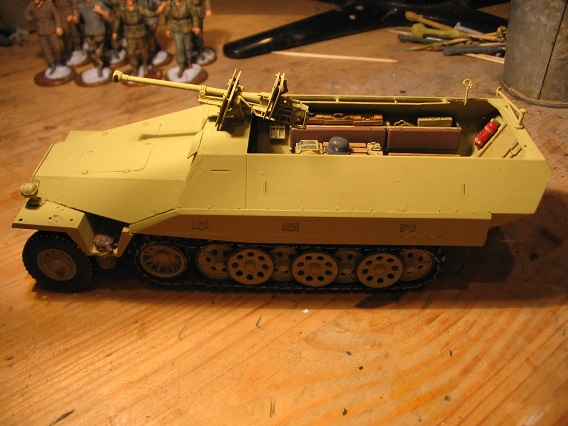
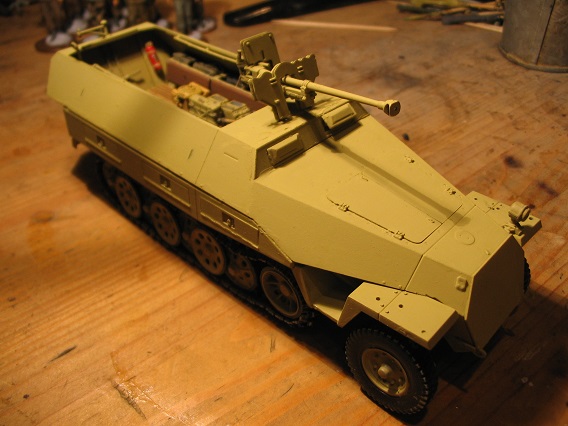
I invested in the Archers fire extinguisher decals which add a nice touch. I wasn't sure what colour to do them but on checking pics of real ones, I could do red, dunkel gelb, olive grun or black so went for the red for a bit of variety. Hopefully I can get this finished off over the weekend and then start on the next one as I've got a few weeks until the Sdkfz 250/251 campaign starts so should be able to build one before it starts. Trying to decide whether to go for three colour cam or just green over the dark yellow? Think I'll do the green then decide.

Photocopied map. Fre, free, free lol


Once it's all painted I plan to hang various bits and bobs from the internal rails. I've seen a lot of pics where that's been done and I wantthat fully laden and lived in look.


I invested in the Archers fire extinguisher decals which add a nice touch. I wasn't sure what colour to do them but on checking pics of real ones, I could do red, dunkel gelb, olive grun or black so went for the red for a bit of variety. Hopefully I can get this finished off over the weekend and then start on the next one as I've got a few weeks until the Sdkfz 250/251 campaign starts so should be able to build one before it starts. Trying to decide whether to go for three colour cam or just green over the dark yellow? Think I'll do the green then decide.

champy

Joined: January 20, 2005
KitMaker: 103 posts
Armorama: 95 posts

Posted: Friday, February 05, 2016 - 05:24 PM UTC
A few more updates, getting ready for the camo scheme, going to opt for a grey green rather than an actual green as it feels more accurate.
Tracks and running gear have been painted (xf61 running gear and xf69 on the tracks)
Interior needs final washes and weathering but I'm waiting to see what bleeds through from the exterior.


Tracks and running gear have been painted (xf61 running gear and xf69 on the tracks)
Interior needs final washes and weathering but I'm waiting to see what bleeds through from the exterior.


erichvon

Joined: January 17, 2006
KitMaker: 1,694 posts
Armorama: 1,584 posts

Posted: Friday, February 05, 2016 - 09:24 PM UTC
Jason that's looking superb. It's a shame there's not a crew on the market as that would just top it off. Love how it's turning out.

champy

Joined: January 20, 2005
KitMaker: 103 posts
Armorama: 95 posts

Posted: Friday, February 05, 2016 - 09:31 PM UTC
Yeah it would look good with a crew however it would have to be only part of the crew as it had 18 in total! 


Ranger74

Joined: April 04, 2002
KitMaker: 1,290 posts
Armorama: 658 posts

Posted: Friday, February 05, 2016 - 10:05 PM UTC
Brad,
Yea, the interior "green" is a little more pale, kinda of hard to describe. Been a long time since I was living in a M113/M557!
The best paint I found to replicate it is Polly Scale 'S Type Sky". Once my current bottle is gone, no replacements.
Yea, the interior "green" is a little more pale, kinda of hard to describe. Been a long time since I was living in a M113/M557!
The best paint I found to replicate it is Polly Scale 'S Type Sky". Once my current bottle is gone, no replacements.

Ranger74

Joined: April 04, 2002
KitMaker: 1,290 posts
Armorama: 658 posts

Posted: Friday, February 05, 2016 - 10:10 PM UTC
Karl,
Looking good! The interior makes an American M2/M3 look spacious!
Looking good! The interior makes an American M2/M3 look spacious!

Ranger74

Joined: April 04, 2002
KitMaker: 1,290 posts
Armorama: 658 posts

Posted: Friday, February 05, 2016 - 10:11 PM UTC
Jason,
How any of the openings can you open so as to see some of the interior?
How any of the openings can you open so as to see some of the interior?
erichvon

Joined: January 17, 2006
KitMaker: 1,694 posts
Armorama: 1,584 posts

Posted: Friday, February 05, 2016 - 11:26 PM UTC
Thanks Jeff, almost there now. It was pretty cramped in there before I put the stowage boxes in. They must have been a real pain in the neck in real life with them overhanging the throughway. I would imagine there was a lot of swearing and bruised shins due to them! With it being a pioneer (engineer to us) vehicle there's more specialised stuff to carry on top of normal infantry kit. It makes me wonder how they fitted the troops in there as well  . I would imagine it was very uncomfortable.
 . I would imagine it was very uncomfortable.
champy

Joined: January 20, 2005
KitMaker: 103 posts
Armorama: 95 posts

Posted: Saturday, February 06, 2016 - 03:37 AM UTC
Here are a few updates, fast moving onto the best bit, weathering! Going to let everything cure overnight then get a gloss and decals done then onto oils. I always get worried at this stage as everything looks so stark and bright but it always seems to turn out ok so fingers crossed.


I had a lot of overspray which is why I've hand painted the edges with the thinned base colours, which gets hidden with washes and filters, anyone have advice as to how to avoid overspray and dusting which I always seem to get!


I had a lot of overspray which is why I've hand painted the edges with the thinned base colours, which gets hidden with washes and filters, anyone have advice as to how to avoid overspray and dusting which I always seem to get!

champy

Joined: January 20, 2005
KitMaker: 103 posts
Armorama: 95 posts

Posted: Saturday, February 06, 2016 - 03:47 AM UTC
Quoted Text
Jason,
How any of the openings can you open so as to see some of the interior?
Hi Jeff well you can open all of them, even the hatches on the running gear but realistically you'd be looking through the side windows, drivers visors and main doors (one each side). A huge amount can be seen through the doors as the vents on the roof are open so it lets a lot of light through which is excellent!

Ranger74

Joined: April 04, 2002
KitMaker: 1,290 posts
Armorama: 658 posts

Posted: Saturday, February 06, 2016 - 04:34 AM UTC
Have gloss coated the Mk IV and Mk V and added decals. I usually don't gloss coat armor, except the brown paint was so flat! I normally take a Q-tip and smooth the paint surface where decal is to go. It generally works ok.


I had to research the vehicle number for 'Lodestar", the Mk IV. The number provided with the kit decals is actually for 'Lodestar III.' I found a set of extra decals from my "buete" A13, Cruiser Mk I build and pieced four numbers together to get what I needed.

 Sorry for the blurry picture.
The markings on the Mk V are for an American vehicle from Company C, 301st Heavy Tank Battalion. The 301st, as the only operational American heavy tank battalion was assigned to the British 4th Tank Brigade and used the same "red-white-red" identity markings. The 301st modified the markings to be able to identify, from a distance to which company the tank was assigned. In this case "brown-red-white' marked all C Company vehicles. C Company was the only company in the 301st with all Mk Vs. A & B Companies had a majority of Mk V* which were six feet longer, behind the gun sponsons to be able to cross wider German trenches. #9191 was the only Co C tank to make it across the main German trench in their Hindenburg Line. I had to piece together the numbers from decals in the Mv IV kit.


I had to research the vehicle number for 'Lodestar", the Mk IV. The number provided with the kit decals is actually for 'Lodestar III.' I found a set of extra decals from my "buete" A13, Cruiser Mk I build and pieced four numbers together to get what I needed.

 Sorry for the blurry picture.
The markings on the Mk V are for an American vehicle from Company C, 301st Heavy Tank Battalion. The 301st, as the only operational American heavy tank battalion was assigned to the British 4th Tank Brigade and used the same "red-white-red" identity markings. The 301st modified the markings to be able to identify, from a distance to which company the tank was assigned. In this case "brown-red-white' marked all C Company vehicles. C Company was the only company in the 301st with all Mk Vs. A & B Companies had a majority of Mk V* which were six feet longer, behind the gun sponsons to be able to cross wider German trenches. #9191 was the only Co C tank to make it across the main German trench in their Hindenburg Line. I had to piece together the numbers from decals in the Mv IV kit.

Ranger74

Joined: April 04, 2002
KitMaker: 1,290 posts
Armorama: 658 posts

Posted: Saturday, February 06, 2016 - 04:35 AM UTC
Quoted Text
Quoted TextJason,
How any of the openings can you open so as to see some of the interior?
Hi Jeff well you can open all of them, even the hatches on the running gear but realistically you'd be looking through the side windows, drivers visors and main doors (one each side). A huge amount can be seen through the doors as the vents on the roof are open so it lets a lot of light through which is excellent!
View should be pretty good with the two side doors open. Makes be want to sell my Tauro kit to a collector!

Wilso2276

Joined: October 26, 2012
KitMaker: 58 posts
Armorama: 58 posts

Posted: Saturday, February 06, 2016 - 12:19 PM UTC
Jeff,
I know what you mean by hard to describe. I lived in M113/M577s for a portion of my Army career as well.
Love the work you have done on the Mk IV and Mk V. Just brilliant.
I know what you mean by hard to describe. I lived in M113/M577s for a portion of my Army career as well.

Love the work you have done on the Mk IV and Mk V. Just brilliant.
erichvon

Joined: January 17, 2006
KitMaker: 1,694 posts
Armorama: 1,584 posts

Posted: Saturday, February 06, 2016 - 04:20 PM UTC
I realised yesterday that we've still got 8 months left to run on the campaign and decided that as I've just about finished my half track and I've got another five to build to complete my pioneer platoon, I may as well start another one as I'm doing a 251/9 for the 250/251 campaign. This one's a basic Dragon 251/1 but I can get some AFV Club bridges to change it to a 251/7. I've got some more stowage boxes I took out of a DML 3 in 1 kit where they weren't required so an easy conversion. I'm doing this one as a demo section within the platoon hence the demo charges and flamethrower. The handles on the charges were crap so I cut them off and made new ones with fuse wire. As I go along I'll add more bits and bobs to the interior. This is where I'm at from starting yesterday. I'm building it in MY sequence as opposed to DML's. Having just built the D version, DML's build sequence seems to make things harder as logic appears to be missing from their design department so I'm doing it my way.
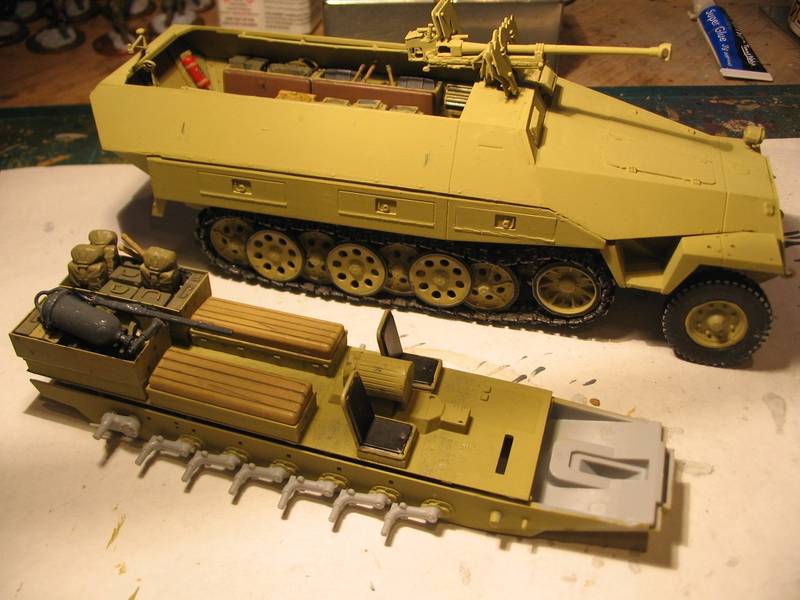
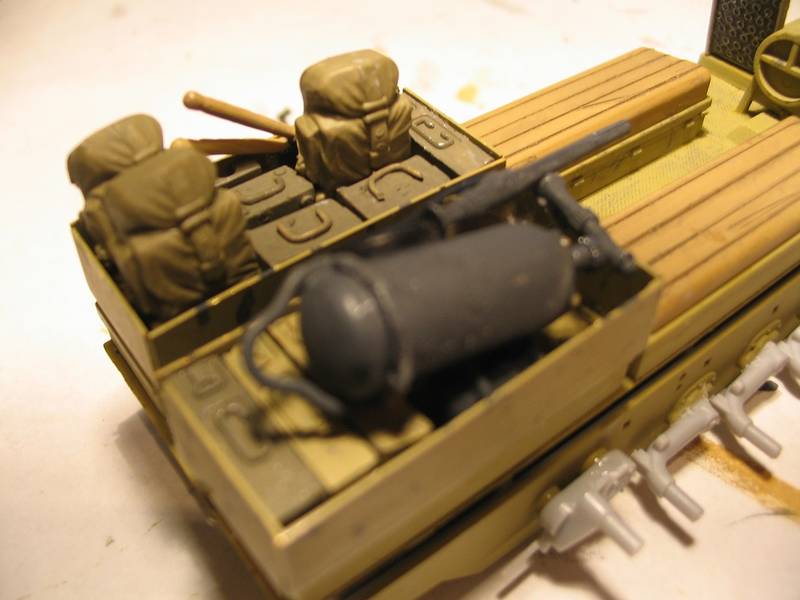
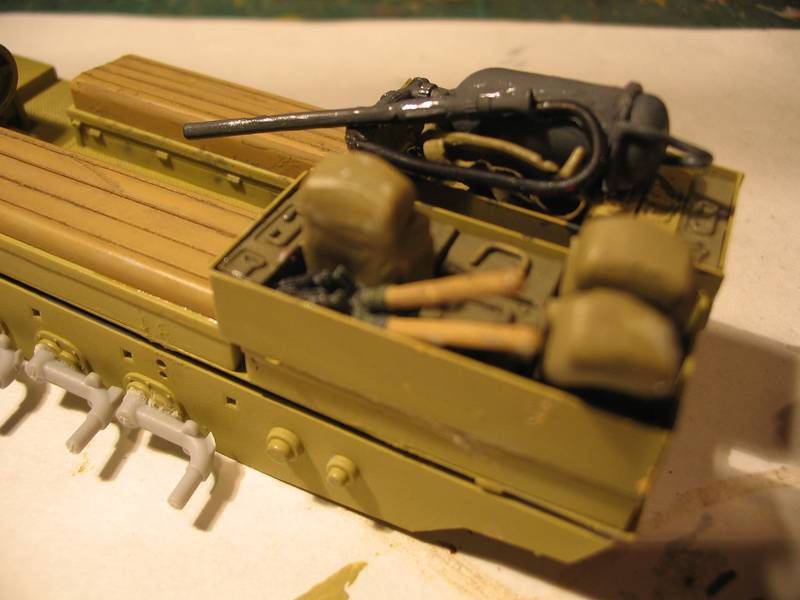
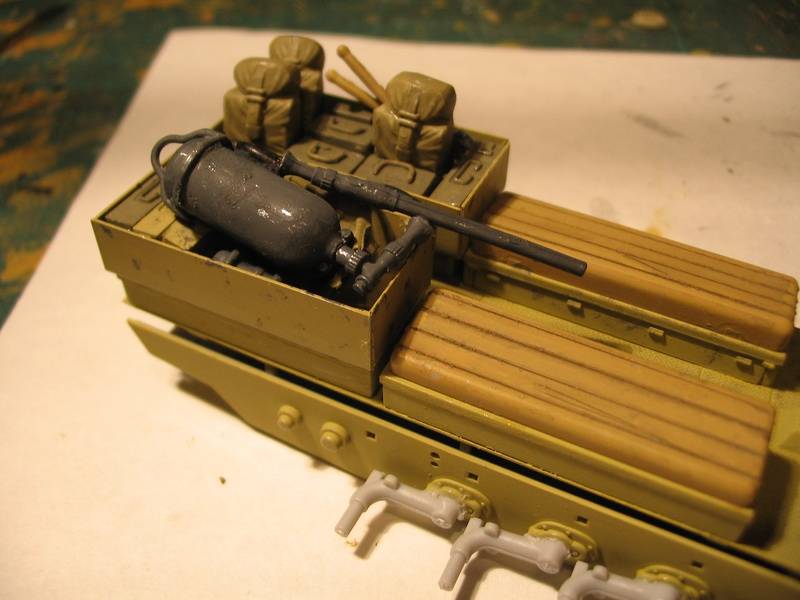
I ran a number 11 blade between the gaps in the seats to give them a bit more depth then gave it a wash of black so it settled in the grooves. Looks more effective I think. I've got a load of pioneer assault packs from some Zvezda pioneers I bought years ago so added a few of those. I'd forgotten all about them so may add a couple to the 251D before I finish it off.


I ran a number 11 blade between the gaps in the seats to give them a bit more depth then gave it a wash of black so it settled in the grooves. Looks more effective I think. I've got a load of pioneer assault packs from some Zvezda pioneers I bought years ago so added a few of those. I'd forgotten all about them so may add a couple to the 251D before I finish it off.
erichvon

Joined: January 17, 2006
KitMaker: 1,694 posts
Armorama: 1,584 posts

Posted: Saturday, February 06, 2016 - 04:25 PM UTC
I ditched the kit hose for the flamethrower as it was rigid plastic. It would have snapped if I tried to reposition it so I used thin insulated wire from my old police earpiece. That way I could bend it to a position that looked natural with it being stowed away. I knew it would come in handy at some stage lol.
Armored76

Joined: September 30, 2013
KitMaker: 1,615 posts
Armorama: 1,500 posts

Posted: Saturday, February 06, 2016 - 05:07 PM UTC
Great progress everyone! Good to see things running full steam 
After a long break, I managed to make some progress and take some images:
The vehicle decals have been applied, sealed and misted with the base color to blend them (looks a bit grainy, thou):

The tire sag has been prepared using the trusty "screw-in-the rubber" technique but I think I will go for slightly longer screws (18mm or 20mm instead of the current 16mm) since some of the tires are too deformed:

A mix of three pigments has been applied on top of each other to the tires and chassis. It is looking a bit rough for now but will be blended some more once dry then sealed with flat clear:


After a long break, I managed to make some progress and take some images:
The vehicle decals have been applied, sealed and misted with the base color to blend them (looks a bit grainy, thou):

The tire sag has been prepared using the trusty "screw-in-the rubber" technique but I think I will go for slightly longer screws (18mm or 20mm instead of the current 16mm) since some of the tires are too deformed:

A mix of three pigments has been applied on top of each other to the tires and chassis. It is looking a bit rough for now but will be blended some more once dry then sealed with flat clear:

Hisham

Joined: July 23, 2004
KitMaker: 6,856 posts
Armorama: 6,363 posts

Posted: Saturday, February 06, 2016 - 09:34 PM UTC

champy

Joined: January 20, 2005
KitMaker: 103 posts
Armorama: 95 posts

Posted: Monday, February 08, 2016 - 03:06 AM UTC

Ranger74

Joined: April 04, 2002
KitMaker: 1,290 posts
Armorama: 658 posts

Posted: Monday, February 08, 2016 - 10:09 PM UTC
Jason,
Great build! Nice, simple weathering. Congrats on completion.
Jeff
Great build! Nice, simple weathering. Congrats on completion.
Jeff
 |


