South Carolina, United States
Joined: December 03, 2009
KitMaker: 2,160 posts
Armorama: 1,906 posts
Posted: Saturday, January 23, 2016 - 01:37 AM UTC
Quoted Text
Looks nice! The Soviet markings would be something different. What other options do you have in mind?
I'm thinking of having it in Soviet colors, possibly being inspected by Soviet officials. Maybe it was taken after Kursk.
Another idea is to go with a German vehicle, on trials or the crew undergoing training. They draw a crowd of civilians, focusing on a couple of boys. Maybe title it, "It's not a Tiger" or "I thought you said it was a Tiger."
Tennessee, United States
Joined: April 04, 2002
KitMaker: 1,290 posts
Armorama: 658 posts
Posted: Saturday, January 23, 2016 - 08:13 AM UTC
Both the Mk IV and Mk V went to the paint shed for their primer coats.

Let them cure over night and see about color coat tomorrow. Still have plenty of snow on the ground so more model building is the order of the day!
Bayern, Germany
Joined: September 30, 2013
KitMaker: 1,615 posts
Armorama: 1,500 posts
Posted: Saturday, January 23, 2016 - 11:52 AM UTC
@Alex: I like the ideas and the titles a lot!
@Jeff: Great advance! I started first and will finish last while you complete two builds in the same time

Building logs: http://armored76.wordpress.com/
Finished projects: http://armored76.wordpress.com/portfolio/
spongya
 Associate Editor
Budapest, Hungary
Joined: February 01, 2005
KitMaker: 2,365 posts
Armorama: 1,709 posts
Posted: Monday, January 25, 2016 - 09:02 PM UTC
I'm going to be lazy about this...
I've finished the build- there's a review of the kit on Armorama, and there's my blog
 http://armorama.com/review/11943https://butterfingeredmodelbuilder.wordpress.com/2016/01/26/135-trumpeter-1k17-part-2-painting-and-weathering/


I'll upload some photos into the gallery.
Please visit me at my blog: https://butterfingeredmodelbuilder.wordpress.com/
England - East Midlands, United Kingdom
Joined: January 17, 2006
KitMaker: 1,694 posts
Armorama: 1,584 posts
Posted: Monday, January 25, 2016 - 09:27 PM UTC
Andras that's looking good.Talk about speedy builder lol. Just a few more pics now the hull sides are on as the top will be going on later so the crew area won't be able to be seen which is a bummer as I'm quite pleased with it. I used the driver supplied which is quite good. I was a bit dubious about this rubber bendy plastic but it took the paint really well and fitted reasonably well although I had to amputate his feet. I decided to stick a radio op in from the DML Halftrack crew 6193. He won't bloody fit! By that maxim the driver won't fit either which isn't good as I've got two sets of them so I had to use the driver out of one of my other half tracks. The headphones came out of one of the DML tank crew sets. The map is one I lifted off the internet and resized. I collected quite a few maps, resized them then opened them in an office document so I've got about 50 maps on a sheet of A4 and got my dad to print them off several times as he's got a top notch printer so that you can see them as clearly as bought ones. I've probably got enough maps now to last me about 10 years lol.
I've lightly weathered the inside, putting some wear on the floor where the paints worn off from being walked on and chipped the paint on the inside where things would be moved about. One of the problems I did find was putting stuff in the wall storage boxes as if it leaned too much towards the wall the top of the hull wouldn't go on but having said that you can't see the stores that well once the tops on so I didn't need so much stuff to fill them. As you can see there's an assortment of landmines, grenades etc in this vehicle. As it'll be one of a group I'm going to vary their loads, demolitions stuff, mining equipment, assault equipment (flamethrowers, satchel charges etc) to give a bit of variety between the vehicles.
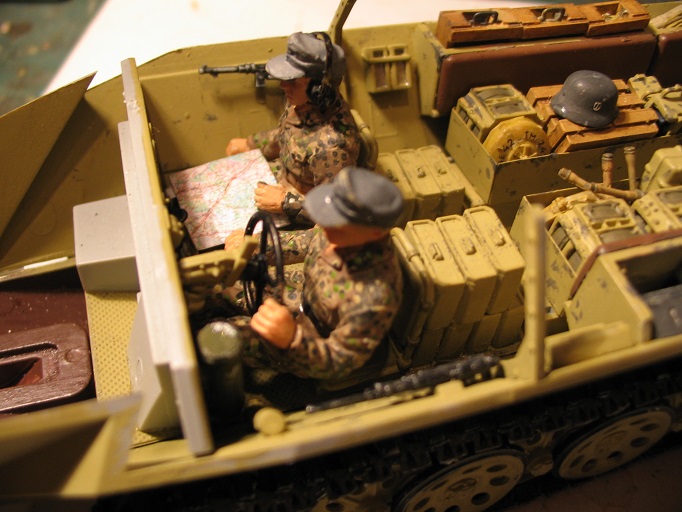
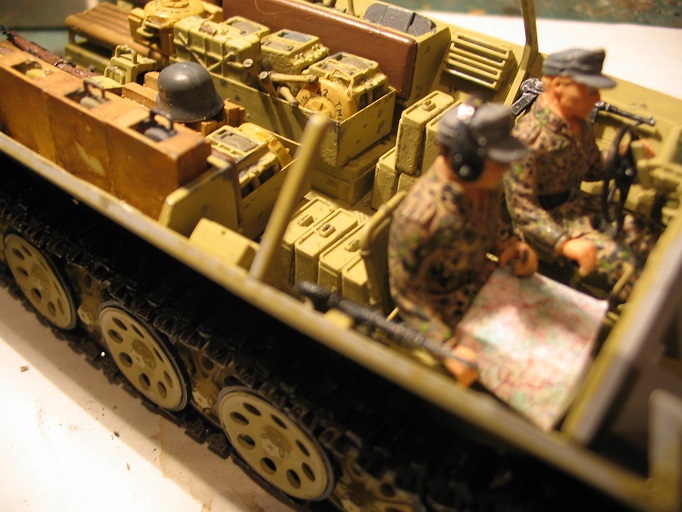
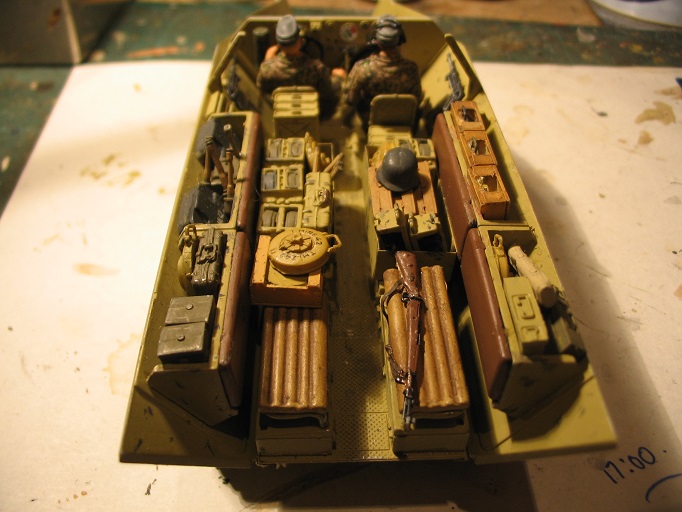
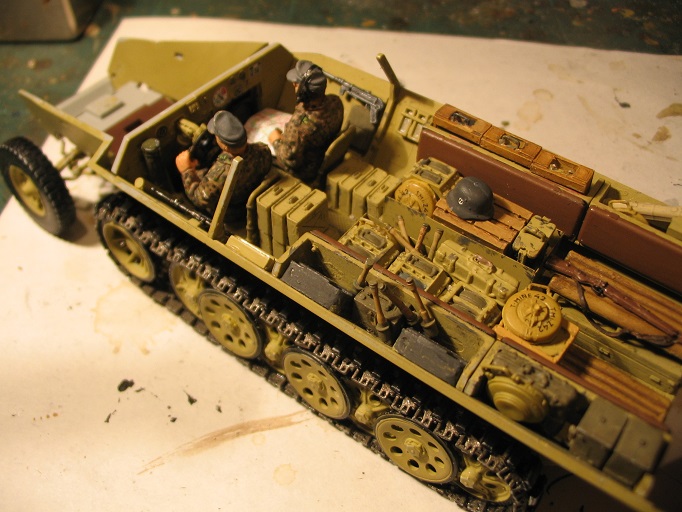
I'm not sure whether I'm pleased with the pea dot cam uniforms or not. I've ordered the Osprey book on painting SS uniforms so hopefully in future I can improve my technique. More pics to follow over the next few days as I'm nearing the home stretch. My new airbrush arrived this morning and I'm itching to have a go so I'll finish building this over the next couple of days then have a practice with the airbrush so I can get used to it before I finish painting it.
Nothing is so exhilarating in life as to be shot at with no result.
- Winston Churchill
spongya
 Associate Editor
Budapest, Hungary
Joined: February 01, 2005
KitMaker: 2,365 posts
Armorama: 1,709 posts
Posted: Monday, January 25, 2016 - 09:38 PM UTC
Quoted Text
Andras that's looking good.Talk about speedy builder lol.
Thank you

It's a review sample, and as such I was feeling pressured. This was a cake-walk compared to the D7 dozer I'm also reviewing; THAT was a forced march. (Both finished in two months; today I made the finishing touches on both. Pretty hard-core; fortunately I had the holidays to make progress.) Normally I'm much slower -this is why I build 1/72... Smaller kits, faster to finish.
For a while, though I think I'll lay off building. This was enough for now.

World of Tanks, here I come.
Amazing 251, by the way. I really like the interior.
Please visit me at my blog: https://butterfingeredmodelbuilder.wordpress.com/
Tennessee, United States
Joined: April 04, 2002
KitMaker: 1,290 posts
Armorama: 658 posts
Posted: Monday, January 25, 2016 - 10:48 PM UTC
Andras - congrats on fast finish. Building for review can be difficult at times, but you can get interesting kits you like

Karl - great build, lots of interesting thins to see, even the markings on the AT mines.
England - East Midlands, United Kingdom
Joined: January 17, 2006
KitMaker: 1,694 posts
Armorama: 1,584 posts
Posted: Tuesday, January 26, 2016 - 12:35 AM UTC
Andras and Jeff, thankyou for your kind words. I always like to add something to interiors that can be seen just to add a bit more realism and above all a bit more interest. As well as being transport I think of the vehicles as being someones office so they need all of their tools with them to complete their job/mission. Fortunately these days I've got a decent assortment of bits and bobs to put inside.
Nothing is so exhilarating in life as to be shot at with no result.
- Winston Churchill
Bayern, Germany
Joined: September 30, 2013
KitMaker: 1,615 posts
Armorama: 1,500 posts
Posted: Tuesday, January 26, 2016 - 12:40 PM UTC
@Andras: An unusual model built lightning fast

@Karl: Amazing details! also the uniform pattern looks more than just fine to me.
Building logs: http://armored76.wordpress.com/
Finished projects: http://armored76.wordpress.com/portfolio/
England - South West, United Kingdom
Joined: January 20, 2005
KitMaker: 103 posts
Armorama: 95 posts
Posted: Tuesday, January 26, 2016 - 01:48 PM UTC
All these builds are looking really good, its nice to get into a complex kit & the diversity on this thread is great WW1 right up to present! Thanks for the comments on my build, those Aber guns really are worth the upgrade, it must be said though that the kit parts are very good on their own! Hope to get the interior parts primed and painted by the weekend so will get some more pics up then

Vietnam
Joined: May 07, 2006
KitMaker: 416 posts
Armorama: 312 posts
Posted: Friday, January 29, 2016 - 12:33 PM UTC
Hi everyone,
I start this 500+ campaign with my kit.


I counted the track links 180 in total! Be patient to fix them.


K.
Bayern, Germany
Joined: September 30, 2013
KitMaker: 1,615 posts
Armorama: 1,500 posts
Posted: Friday, January 29, 2016 - 04:43 PM UTC
Now this is what I call a great choice!

It will pair up nicely with my second generation Scud.
Building logs: http://armored76.wordpress.com/
Finished projects: http://armored76.wordpress.com/portfolio/
Vietnam
Joined: May 07, 2006
KitMaker: 416 posts
Armorama: 312 posts
Posted: Friday, January 29, 2016 - 09:12 PM UTC
Thanks, Cristian.
I like your fast-in-progress 2nd gen Scud-B, too.
K.

ColinEdm
 Associate Editor
Alberta, Canada
Joined: October 15, 2013
KitMaker: 1,355 posts
Armorama: 1,229 posts
Posted: Saturday, January 30, 2016 - 11:22 AM UTC
The voices are back.....excellent....
New Mexico, United States
Joined: June 16, 2014
KitMaker: 681 posts
Armorama: 603 posts
Posted: Saturday, January 30, 2016 - 11:36 AM UTC
Those are lovely! Can't wait to see them fully dressed.
Paul H
On the Bench
MiniArt Grant Mk I with Interior
IBG Marmon-Herrington MKII
Bayern, Germany
Joined: September 30, 2013
KitMaker: 1,615 posts
Armorama: 1,500 posts
Posted: Saturday, January 30, 2016 - 02:05 PM UTC
Those really look great, Colin!
Building logs: http://armored76.wordpress.com/
Finished projects: http://armored76.wordpress.com/portfolio/
Tennessee, United States
Joined: April 04, 2002
KitMaker: 1,290 posts
Armorama: 658 posts
Posted: Saturday, January 30, 2016 - 09:07 PM UTC
Colin,
Quick work. Will be interesting to see how you paint the exposed fighting compartments after they have been built. Mine builds are easy to paint after construction, just simple exteriors. I have to paint as I build on interiors.
ColinEdm
 Associate Editor
Alberta, Canada
Joined: October 15, 2013
KitMaker: 1,355 posts
Armorama: 1,229 posts
Posted: Saturday, January 30, 2016 - 09:41 PM UTC
Thanks guys!
Jeff, the upper hulls, guns and tower sides are not glued in place so I will take them apart to make them easier to paint. The main fighting compartment will be dunkelgelb, while the drivers compartment will be elfenbein. The weathering will be tricky, we'll see how it goes. I'll complete the interior painting/weathering then glue everything together and then mask off for exterior painting/weathering.
The voices are back.....excellent....
Tennessee, United States
Joined: April 04, 2002
KitMaker: 1,290 posts
Armorama: 658 posts
Posted: Sunday, January 31, 2016 - 12:58 AM UTC
Colin - Sounds like you have a plan.
England - South West, United Kingdom
Joined: January 20, 2005
KitMaker: 103 posts
Armorama: 95 posts
Posted: Sunday, January 31, 2016 - 03:09 AM UTC
Finally managed to get the insides painted and ready for a gloss coat, I've never really painted a full interior with a view to displaying it (hope to make the roof removable) so weathering will be an interesting next step.....

Colorado, United States
Joined: March 27, 2003
KitMaker: 345 posts
Armorama: 247 posts
Posted: Sunday, January 31, 2016 - 04:13 AM UTC
Looks great.
How did you paint the white? Every time I try a white interior it comes out all blotchy
spongya
 Associate Editor
Budapest, Hungary
Joined: February 01, 2005
KitMaker: 2,365 posts
Armorama: 1,709 posts
Posted: Sunday, January 31, 2016 - 03:47 PM UTC
Dave,
If I may: I usually use very light grey primer as a base coat, and very lightly build up the white on top of it -this helps a lot.
Please visit me at my blog: https://butterfingeredmodelbuilder.wordpress.com/
England - South West, United Kingdom
Joined: January 20, 2005
KitMaker: 103 posts
Armorama: 95 posts
Posted: Sunday, January 31, 2016 - 05:06 PM UTC
To be honest I did struggle to get a good cote of paint on the interior, I did some pre-shading which came through ok but I did have to put on 2 cotes of white to get a good decent covering.
I used Humbrol grey primer as well, perhaps a white primmer would work better?
I also found the white paint (Tamiya XF2) was a little rough when it dried so I must have not got the thinner ratio quite right, it was almost like there was a dusting effect as well as a few large splodges here and there which I had to sand back a little. All of this will be masked by the weathering though (which is my favorite part of painting!)

Tennessee, United States
Joined: April 04, 2002
KitMaker: 1,290 posts
Armorama: 658 posts
Posted: Sunday, January 31, 2016 - 09:27 PM UTC
Besides armor I build 'tween-wars US Navy planes. I find Tamiya Fine White primer is excellent when using any light color or bright color, particularly yellow.
Australian Capital Territory, Australia
Joined: October 26, 2012
KitMaker: 58 posts
Armorama: 58 posts
Posted: Tuesday, February 02, 2016 - 02:03 AM UTC
Okay I know I am very late to the party, however I should be able to get this one looking exactly how I want it to.
I will be joining with

With some AM and maybe a little bit of scratch build to take the 491 over the 500 mark
On the bench currently:
Lots of procrastination!!!!
The most over engineered, incorrectly instructed model I have ever had the displeasure of trying to build. Panda Hobby's M-ATV MRAP


