Champy - looking great, going to be able to see any of the interior when the hull goes together?
Jeff
Campaigns: Active Campaigns
Campaigns that are either in planning or underway should be grouped here.
Campaigns that are either in planning or underway should be grouped here.
Hosted by Richard S.
Campaign 500+

Ranger74

Joined: April 04, 2002
KitMaker: 1,290 posts
Armorama: 658 posts

Posted: Sunday, January 17, 2016 - 01:28 AM UTC

Ranger74

Joined: April 04, 2002
KitMaker: 1,290 posts
Armorama: 658 posts

Posted: Sunday, January 17, 2016 - 01:31 AM UTC
Cristian,
SCUD is looking good. Like the suddle wear/rust on the launch rails.
Jeff
SCUD is looking good. Like the suddle wear/rust on the launch rails.
Jeff

Ranger74

Joined: April 04, 2002
KitMaker: 1,290 posts
Armorama: 658 posts

Posted: Sunday, January 17, 2016 - 01:48 AM UTC


 Just dodged two bullets on the Mk V build! The first was a .cal 50, but the second was a nuke


I had finished the painting and basic weathering on the tracks and was wrapping a set around the hull to adjust the tension when I heard a rattling inside the hull. I had lain the hull on its side and the machine gun in the right sponson had fallen inside the hull. I was able to remove the sponson roof, remove the MG and remount it. First bullet dodged.
While the MG mount dried I took my lunch dishes back to the kitchen and when starting back down the hall I saw my 18-month old grandson coming down the hall and talking up a storm. In his hands was the Mk V!!!!! He loves his "khaas", whether they have four wheels or tracks. I was able to retrieve the tank, return to my room and lock the door

Now to take a break as watch a football playoff game.

ColinEdm


Joined: October 15, 2013
KitMaker: 1,355 posts
Armorama: 1,229 posts

Posted: Sunday, January 17, 2016 - 03:48 AM UTC
Time for an update, life and work got in the way for a bit, but did get a bit done over Christmas. Bit of a comparison between the two kits, I can't see the difference, can you see the difference? (extra points if you know where that comes from!)


Did pretty much finish off the 'Early'

Just adding a bit of detail and then back to the 'Late'.


Did pretty much finish off the 'Early'

Just adding a bit of detail and then back to the 'Late'.

PRH001

Joined: June 16, 2014
KitMaker: 681 posts
Armorama: 603 posts

Posted: Sunday, January 17, 2016 - 10:58 AM UTC
Well, I got back to work on the Bishop for a few minutes today. I ended up knocking off one of the PE brackets and was unable to find it. Had to make another one from scrap copper sheet and wire.

Then I fit the rear transmission doors which took waaaay longer than they should have.

Ah well, at least I'm back to work on my campaign project. You've all been making really nice progress while I was working on the review piece.
Paul H


Then I fit the rear transmission doors which took waaaay longer than they should have.

Ah well, at least I'm back to work on my campaign project. You've all been making really nice progress while I was working on the review piece.
Paul H


PRH001

Joined: June 16, 2014
KitMaker: 681 posts
Armorama: 603 posts

Posted: Monday, January 18, 2016 - 10:27 AM UTC
Armored76

Joined: September 30, 2013
KitMaker: 1,615 posts
Armorama: 1,500 posts

Posted: Monday, January 18, 2016 - 11:59 AM UTC
The pre-shading looks great! Subtle but still noticeable.
Manxman

Joined: May 21, 2015
KitMaker: 34 posts
Armorama: 32 posts

Posted: Monday, January 18, 2016 - 01:25 PM UTC
Made steady progress over the last few days. Firstly the tracks where updated to give then a steel effect and then the complete tracks added to the hull. Not sure how much of this will be visible after snow but happyish with the look.

Terminator WiP by Manxman, on Flickr

Terminator WiP by Manxman, on Flickr
And then small bits still being added to the upper hull including the extra armor plates. (upper hull still only dry fitted)

Terminator WiP by Manxman, on Flickr

Terminator WiP by Manxman, on Flickr

Terminator WiP by Manxman, on Flickr

Terminator WiP by Manxman, on Flickr

Terminator WiP by Manxman, on Flickr

Terminator WiP by Manxman, on Flickr
And then small bits still being added to the upper hull including the extra armor plates. (upper hull still only dry fitted)

Terminator WiP by Manxman, on Flickr

Terminator WiP by Manxman, on Flickr

Terminator WiP by Manxman, on Flickr

Terminator WiP by Manxman, on Flickr
Armored76

Joined: September 30, 2013
KitMaker: 1,615 posts
Armorama: 1,500 posts

Posted: Monday, January 18, 2016 - 02:58 PM UTC
Looks very-very good!
The_musings_of_NBNoG

Joined: January 08, 2012
KitMaker: 520 posts
Armorama: 516 posts

Posted: Tuesday, January 19, 2016 - 11:04 AM UTC
Hi all; I signed up because I Love complicated builds...
I usually buy a great big kit, build the most complicated steps and then shelve it. you know...Meng TankTracks, M1132 Mine Plows, and stuff like that.
So I signed up to build another kit review...( it forces me to build the boring parts :-) )
this will be my build for this campaign:
https://www.youtube.com/watch?v=o29GRjZWZC0
I think learning how to post a photo again will be the hardest first step...

If anyone has advice or questions about the model...
Just let me know
~Chris


https://armorama.kitmaker.net/forums/243578&page=1#2055123
I wanted to see 1000+ pieces all out at once...lol

I usually buy a great big kit, build the most complicated steps and then shelve it. you know...Meng TankTracks, M1132 Mine Plows, and stuff like that.
So I signed up to build another kit review...( it forces me to build the boring parts :-) )
this will be my build for this campaign:
https://www.youtube.com/watch?v=o29GRjZWZC0
I think learning how to post a photo again will be the hardest first step...

If anyone has advice or questions about the model...
Just let me know
~Chris


https://armorama.kitmaker.net/forums/243578&page=1#2055123
I wanted to see 1000+ pieces all out at once...lol

Armored76

Joined: September 30, 2013
KitMaker: 1,615 posts
Armorama: 1,500 posts

Posted: Tuesday, January 19, 2016 - 12:40 PM UTC
Niiiice choice! Welcome aboard! 

Manxman

Joined: May 21, 2015
KitMaker: 34 posts
Armorama: 32 posts

Posted: Thursday, January 21, 2016 - 01:37 PM UTC
Nice choice there
Most of the work on the upper hull build is now complete. So decided to first move onto the KMT-8 mine cleaning system & EMT
Sorry the photos aren’t great

Terminator WiP by Manxman, on Flickr

Terminator WiP by Manxman, on Flickr
Second plough to be done then it’s onto the main gun turret and grenade gunner turrets.
Most of the work on the upper hull build is now complete. So decided to first move onto the KMT-8 mine cleaning system & EMT
Sorry the photos aren’t great

Terminator WiP by Manxman, on Flickr

Terminator WiP by Manxman, on Flickr
Second plough to be done then it’s onto the main gun turret and grenade gunner turrets.
Armored76

Joined: September 30, 2013
KitMaker: 1,615 posts
Armorama: 1,500 posts

Posted: Thursday, January 21, 2016 - 02:39 PM UTC
Looks like a tedious assembly...

champy

Joined: January 20, 2005
KitMaker: 103 posts
Armorama: 95 posts

Posted: Thursday, January 21, 2016 - 03:05 PM UTC
Manxman

Joined: May 21, 2015
KitMaker: 34 posts
Armorama: 32 posts

Posted: Thursday, January 21, 2016 - 03:23 PM UTC
Cristian, it wasn't tedious just fiddly as a lot of the parts have two position angles depending on whether you modelling deployed or raised. Me I'm going for the deployed look.
Jason that gun does look very nice, good luck with the other ones
Jason that gun does look very nice, good luck with the other ones
Armored76

Joined: September 30, 2013
KitMaker: 1,615 posts
Armorama: 1,500 posts

Posted: Thursday, January 21, 2016 - 05:24 PM UTC
Wow! That gun looks amazing!
Kilo_Uniform

Joined: July 03, 2015
KitMaker: 280 posts
Armorama: 135 posts

Posted: Thursday, January 21, 2016 - 09:08 PM UTC
@ Peter - Following your Terminator build closely - I have a Meng one in the stash and will be taking some notes. Good luck with the build further.
@ Jason - the gun looks awesome! Keep up the good work. Looking forward to see the next update.
Regards,
Kobus
@ Jason - the gun looks awesome! Keep up the good work. Looking forward to see the next update.
Regards,
Kobus

Ranger74

Joined: April 04, 2002
KitMaker: 1,290 posts
Armorama: 658 posts

Posted: Friday, January 22, 2016 - 05:24 AM UTC
erichvon

Joined: January 17, 2006
KitMaker: 1,694 posts
Armorama: 1,584 posts

Posted: Friday, January 22, 2016 - 08:55 AM UTC
Made a bit of progress finally. Decided to take the bench seats out and put the stowage boxes back in as otherwise it would just look like a 251with a couple of bridges on it rather than a dedicated pioneer vehicle which is what the 251/7 was. Now the boxes are back in I've filled them with an assortment of landmines as I have with the sidestowage boxes. Need to do a bit of work on the sides before I put them on though. I wish DML would make their instructions a bit clearer as sometimes you wonder if you've actually got the right instructions in the box! Doing the tracks was abit of a nightmare but I worked out my own method. I painted them first with a track colour I'd mixed then glued them with liquid poly so they were still flexible. Once I'd got them on I painted the track pads, cut the locating pins off the back (the pins didn't fit the holes) and then liquid polyed them on above the hole. A lot quicker and quite painless mentally. I'll do that for the others I've got to build as I've decided to build a full platoon of six 251/7's for my dio. I've noticed that the lip on the bottom of the sides stops them fitting flush so I need to shave it off to get them to fit properly which is bloody annoying. There's not a huge of assembly left fortunately and then I can get on with painting it. I've just ordered a dual action gravity feed airbrush as I just can't get on with the one I've got and after watching a couple of videos on You Tube of a build of this I thought I'd give one a try as I've got a few bits built up waiting to be camoed. This is where I'm up to today...
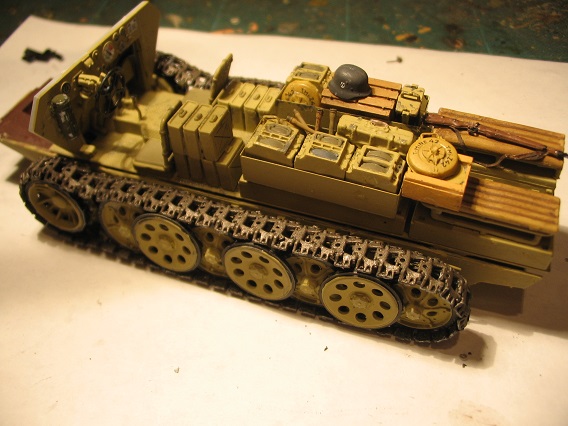
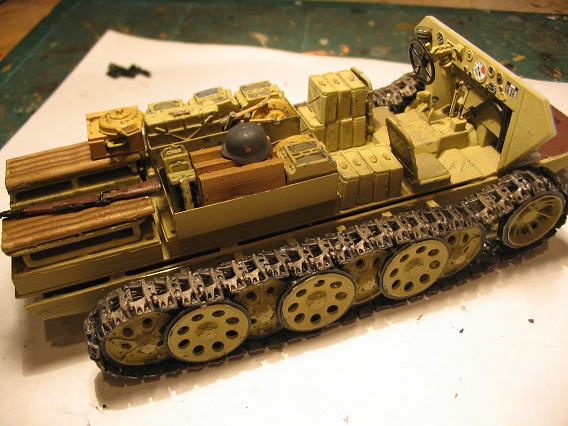
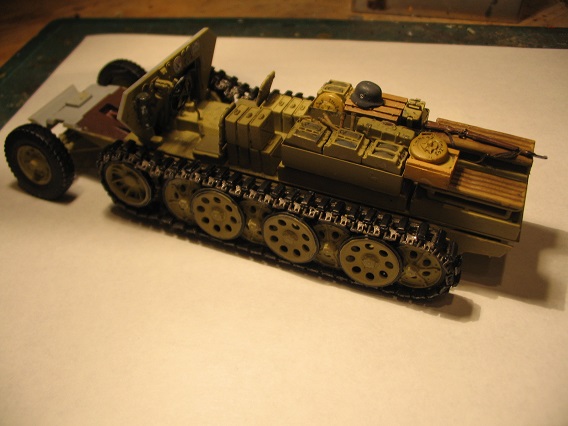
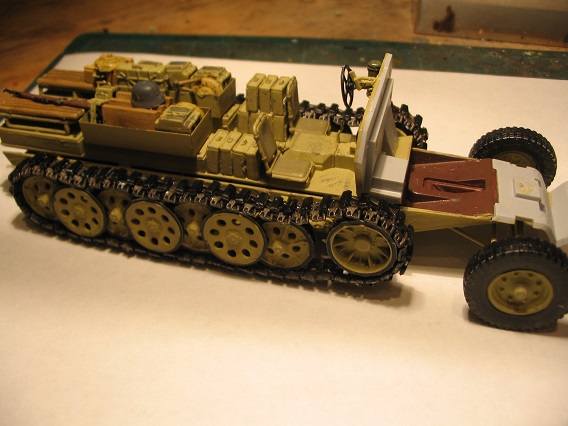
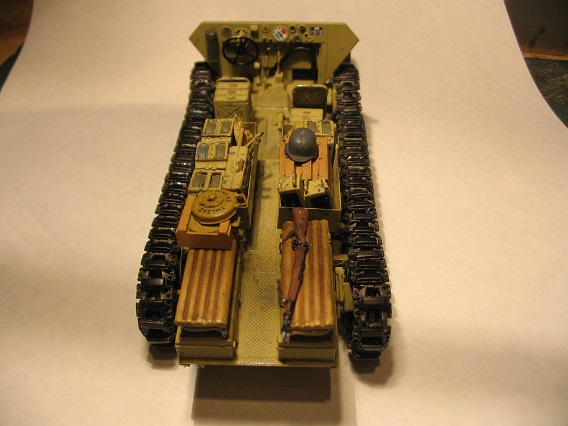
I've not decided yet whether to have it in motion with the driver in situ or parked up so I'll paint the driver up just in case I decide to go with that option. I've had to cut his feet off otherwise he wouldn't fit in.


I've not decided yet whether to have it in motion with the driver in situ or parked up so I'll paint the driver up just in case I decide to go with that option. I've had to cut his feet off otherwise he wouldn't fit in.
erichvon

Joined: January 17, 2006
KitMaker: 1,694 posts
Armorama: 1,584 posts

Posted: Friday, January 22, 2016 - 08:58 AM UTC
Jason, that MG looks superb. Love the detail on it. Looking forward to seeing that painted up as I bet that'll look cracking..
Armored76

Joined: September 30, 2013
KitMaker: 1,615 posts
Armorama: 1,500 posts

Posted: Friday, January 22, 2016 - 11:17 AM UTC
Shaping up nicely, Karl!

Ranger74

Joined: April 04, 2002
KitMaker: 1,290 posts
Armorama: 658 posts

Posted: Friday, January 22, 2016 - 11:26 AM UTC
Great work, Karl.

Bluestab

Joined: December 03, 2009
KitMaker: 2,160 posts
Armorama: 1,906 posts

Posted: Friday, January 22, 2016 - 11:35 AM UTC
Starter picture on my 1/35 Zvezda Panther ausf. D. The inset in the top right corner is the parts count noted on the box.

The kit comes with a turret interior. I wish they had included even a partial interior for the driver and hull gunner. There's no engine but I might add one I have from the spares. Almost 300 of the kit's parts are the track.
At this point, I'm not sure if I'll go with the kit's supplied markings, a Soviet used vehicle, or a more generic vehicle that may be used as part of a diorama at later point.
Armored76

Joined: September 30, 2013
KitMaker: 1,615 posts
Armorama: 1,500 posts

Posted: Friday, January 22, 2016 - 12:05 PM UTC
Looks nice! The Soviet markings would be something different. What other options do you have in mind?
erichvon

Joined: January 17, 2006
KitMaker: 1,694 posts
Armorama: 1,584 posts

Posted: Saturday, January 23, 2016 - 12:05 AM UTC
Thanks Cristian and Jeff. I'm glad it's starting to look like a half track now. Still a way to go but getting there.
 |


