Campaigns: Active Campaigns
Campaigns that are either in planning or underway should be grouped here.
Hosted by Richard S.
Trumpeter Mk.II Campaign
ComradeMP
#0
Visit this Community
United States
Joined: July 31, 2011
KitMaker: 472 posts
Armorama: 453 posts
Posted: Thursday, June 16, 2016 - 07:44 PM UTC
Hull is mostly done. Need to finish up the fenders, and then the casemate. PE grilles on.


Always go with the kit part here, but I finally tried out this grille. Some work to get it on, but it's on now.


Casemate fry fitted. Looks like there's gonna be some filling to do.
Martinvidas
Visit this Community
Noord-Brabant, Netherlands
Joined: February 13, 2011
KitMaker: 322 posts
Armorama: 300 posts
Posted: Saturday, June 18, 2016 - 10:34 PM UTC
Little Progress

Cantstopbuyingkits
Visit this Community
European Union
Joined: January 28, 2015
KitMaker: 2,099 posts
Armorama: 1,920 posts
Posted: Saturday, June 18, 2016 - 10:55 PM UTC
Cool use of spends casings as weights for the hull, Nartin.
Martinvidas
Visit this Community
Noord-Brabant, Netherlands
Joined: February 13, 2011
KitMaker: 322 posts
Armorama: 300 posts
Posted: Monday, June 20, 2016 - 09:53 PM UTC
Some basic color on the buggies

and one just posing
Bluestab
Visit this Community
South Carolina, United States
Joined: December 03, 2009
KitMaker: 2,160 posts
Armorama: 1,906 posts
Posted: Wednesday, June 22, 2016 - 10:37 AM UTC
I thought I had posted an update earlier...but I was wrong. For a refresher, I'm doing the Trumpeter Germanized KV-2.

The original idea was to backdate this to a Soviet vehicle. All they had in stock, at the time, was the Germanized version. Things don't go as planned.

Start off with the lower hull. The molds look to be showing wear and the side plates needed cleanup to remove ejection marks so it would sit flush with the hull sidewalls.


Added suspension arms, suspension stops, and return roller mounts.


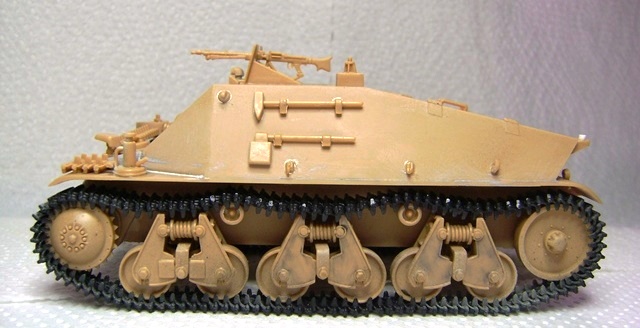
In keeping with the backdate plan, I went ahead and prepainted the lower hull and running gear dark green.


Upper-hull added. Here is where the plans began to change. I thought about going with a what-if vehicle. Initially, I was going to arm it with a 122mm gun. Then I thought about cutting the upper hull to move the turret ring to the rear and move the engine mid-hull. The mock-up looks pretty sweet. In the end I decided to back off of that idea and just pick up a Soviet version later...you can get these kits for under $20.


Time to start on the turret. I kind of buzzed ahead here on the build pics. Assembly was pretty straightforward.


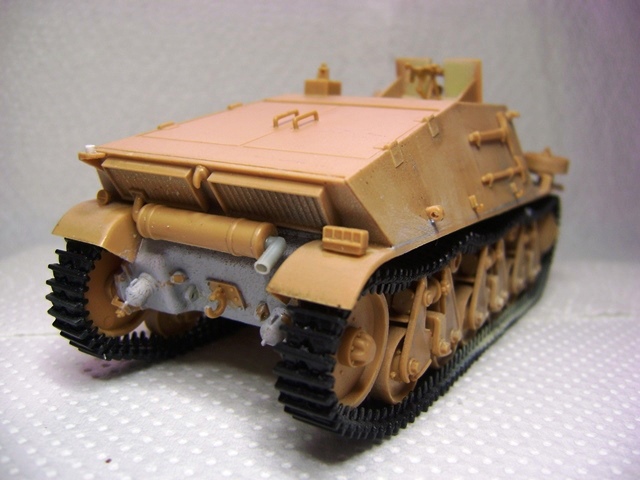
Back to work on the hull. Assembled and dry-fitted the fenders. I decided to open the hull hatch.


The kit has you make your own conduit for the German lights using wire tat they do not include. They include some decent diagrams. I decided to use stretched sprue.


Round rack for the rear deck. Assembly of the rack was a little fiddly. I thought I had a picture of it assembled....


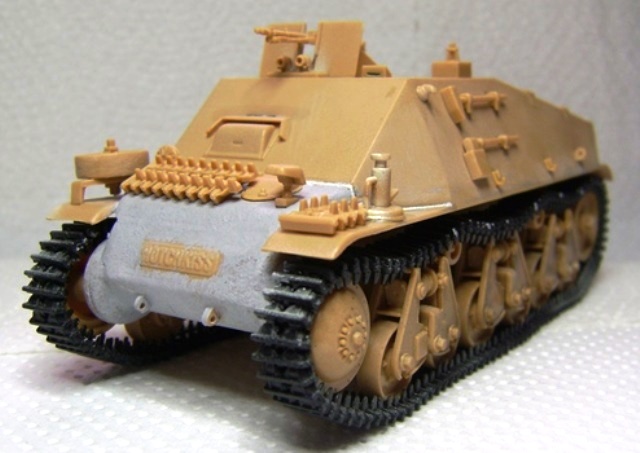
Basic assembly done and off to paint. Since it was already partially painted green, I decided to use it as a base coat and painted it overall dark green. The white splotch is filler...I forgot to fill in a hole. As an aside, alot of the German specific changes (open/closing holes) aren't really addressed in the instructions.


I was not sure what paint scheme I wanted to go with. In the end I decided to go with a winter camo scheme. I've seen some white KV2s and they looked pretty nice. So white it is.


Tracks. The kit comes with length&link as well as rubberband tracks. I've never used the rubber band tracks. The track lengths go together well and the top runs are molded pre-sagged.


While the tracks set up and dried (overnight), I did some initial drybrushing of German Grey to represent an overall dark grey paint job underneath, poking through.


Tracks set-up...I shot a coat of dark-dark grey. Let them sit outside to dry under the sun. Yeah this was done earlier today. Drybrushed steel over tracks. Put back outside for a couple of hours. The steel surfaces of the roadwheels were painted dark grey, to cover the dark green, then steel. For the return rollers' "rubber" I used dark grey as well.


Once the tracks had dried to the touch I decided to go ahead and mount the tracks. I got on a roll and before I knew it, I was applying decal set to the decals.
I had added the tracks and fenders. The extra indie lengths were assembled and added to the front plate.


There's still some other work left to be done...plus I see a few bugaboos I need to address in the pictures. I'll do that i the next update and it should be done. This is the 3rd Trumpy KV I've built. Nothing really jumped out as an issue. I started on this a couple of months ago...whenever the start picture was posted...but really got alot done over the past few days.
Martinvidas
Visit this Community
Noord-Brabant, Netherlands
Joined: February 13, 2011
KitMaker: 322 posts
Armorama: 300 posts
Posted: Thursday, June 23, 2016 - 09:38 AM UTC
The tracks are here:

tatbaqui
Staff MemberNews Writer
ARMORAMA
#040
Visit this Community
Metro Manila, Philippines
Joined: May 06, 2007
KitMaker: 2,713 posts
Armorama: 2,451 posts
Posted: Friday, June 24, 2016 - 06:50 PM UTC
Hello,

I like your winter camo Alex -- not yet distressed / scratched from combat use. I plan to do the same for another campaign build.

From last post, I thought it was ready for its war paint. I've thought it may be better to marry the upper and lower hulls rather than paint separately. That got me to see gaps between the two. Also added some small bits and scratched an exhaust pipe from sprue:


Well, this time it's ready for the paint shop!

Cheers,

Tat
SGTJKJ
#041
Visit this Community
Kobenhavn, Denmark
Joined: July 20, 2006
KitMaker: 10,069 posts
Armorama: 4,677 posts
Posted: Sunday, June 26, 2016 - 03:57 PM UTC
Looks very nice, Tat. Looking forward to see it with colors on.
tatbaqui
Staff MemberNews Writer
ARMORAMA
#040
Visit this Community
Metro Manila, Philippines
Joined: May 06, 2007
KitMaker: 2,713 posts
Armorama: 2,451 posts
Posted: Tuesday, June 28, 2016 - 12:28 PM UTC
Thanks Jesper. Sprayed on a black undercoat today. Been googling for some neat camo inspirations while waiting for it to cure. Cheers, Tat
ltb073
Visit this Community
New York, United States
Joined: March 08, 2010
KitMaker: 3,662 posts
Armorama: 3,078 posts
Posted: Sunday, July 03, 2016 - 10:54 PM UTC
Alex nice job on that beast KV
I got some work done on my Trumpy kit
 photo P1090889.jpg  photo P1090894.jpg photo P1090888.jpg photo P1090892.jpg photo P1090891.jpg
Need to add more rust wash to the treads and maybe a figure in the turret
noddy927
Visit this Community
Scotland, United Kingdom
Joined: February 15, 2013
KitMaker: 1,273 posts
Armorama: 568 posts
Posted: Monday, July 04, 2016 - 01:31 AM UTC
Here is my build which I started today.


Pete
tatbaqui
Staff MemberNews Writer
ARMORAMA
#040
Visit this Community
Metro Manila, Philippines
Joined: May 06, 2007
KitMaker: 2,713 posts
Armorama: 2,451 posts
Posted: Monday, July 04, 2016 - 05:25 AM UTC

Quoted Text

Alex nice job on that beast KV
I got some work done on my Trumpy kit
 photo P1090889.jpg  photo P1090894.jpg photo P1090888.jpg photo P1090892.jpg photo P1090891.jpg
Need to add more rust wash to the treads and maybe a figure in the turret


You have a killer there Sal -- I like the camo parttern! Tat
SGTJKJ
#041
Visit this Community
Kobenhavn, Denmark
Joined: July 20, 2006
KitMaker: 10,069 posts
Armorama: 4,677 posts
Posted: Thursday, July 07, 2016 - 11:38 PM UTC
Cool camo, Sal! Really striking.
ltb073
Visit this Community
New York, United States
Joined: March 08, 2010
KitMaker: 3,662 posts
Armorama: 3,078 posts
Posted: Friday, July 08, 2016 - 04:44 PM UTC
Thanks Tat and Jasper
Bluestab
Visit this Community
South Carolina, United States
Joined: December 03, 2009
KitMaker: 2,160 posts
Armorama: 1,906 posts
Posted: Friday, July 08, 2016 - 09:51 PM UTC
Thanks.

Tat,
Nice and clean build. The tracks look great.

Sal,
I like that camo.
tatbaqui
Staff MemberNews Writer
ARMORAMA
#040
Visit this Community
Metro Manila, Philippines
Joined: May 06, 2007
KitMaker: 2,713 posts
Armorama: 2,451 posts
Posted: Sunday, July 10, 2016 - 04:18 AM UTC
Thanks Alex -- hope to get back to painting when the weather clears up.
TacFireGuru
Visit this Community
Colorado, United States
Joined: December 25, 2004
KitMaker: 3,770 posts
Armorama: 2,263 posts
Posted: Sunday, July 10, 2016 - 08:23 AM UTC
Just now joining...needing to do some more artillery.

Mike
SGTJKJ
#041
Visit this Community
Kobenhavn, Denmark
Joined: July 20, 2006
KitMaker: 10,069 posts
Armorama: 4,677 posts
Posted: Sunday, July 10, 2016 - 12:02 PM UTC
Nice choice, Mike. Looking forward to see how it builds up. Does the kit both include plastic and metal barrel?
Kilo_Uniform
Visit this Community
Gauteng, South Africa
Joined: July 03, 2015
KitMaker: 280 posts
Armorama: 135 posts
Posted: Sunday, July 10, 2016 - 04:25 PM UTC
Hi Mike,

Looking forward to your D-30 build. As a gunner I'm keen to see how it turns out.

Looking forward to the next update.

Regards,
Kobus
TacFireGuru
Visit this Community
Colorado, United States
Joined: December 25, 2004
KitMaker: 3,770 posts
Armorama: 2,263 posts
Posted: Sunday, July 10, 2016 - 06:31 PM UTC

Quoted Text

Does the kit both include plastic and metal barrel?


Only plastic but with two different muzzle breaks (also plastic). I may change the parts out with an RB barrel (I have one for my T34/122 and it's amazingly nice).

Ordered some Mr. Color Sandy Brown (#19) for this...something different than green.

Kobus - Gunner? Which system? I was Fire Direction for 20 years.

Mike
TacFireGuru
Visit this Community
Colorado, United States
Joined: December 25, 2004
KitMaker: 3,770 posts
Armorama: 2,263 posts
Posted: Monday, July 11, 2016 - 10:51 PM UTC
Trails started. This is going to be built in the firing position. I need to find a decent photo of one of them in deployed position to see how far down the "spikes" for the trails go.


Mike
SGTJKJ
#041
Visit this Community
Kobenhavn, Denmark
Joined: July 20, 2006
KitMaker: 10,069 posts
Armorama: 4,677 posts
Posted: Tuesday, July 12, 2016 - 01:48 AM UTC
Nice start, Mike. A metal barrel might be a good idea on this one since the barrel will clearly be center piece. Alternative is camo netting or fine wet and dry sandpaper.
noddy927
Visit this Community
Scotland, United Kingdom
Joined: February 15, 2013
KitMaker: 1,273 posts
Armorama: 568 posts
Posted: Tuesday, July 12, 2016 - 07:46 PM UTC
Alot of work on the Ford Falcon


Needs polished to get a nice shine and get rid of the dust attracted to it.

Pete
TacFireGuru
Visit this Community
Colorado, United States
Joined: December 25, 2004
KitMaker: 3,770 posts
Armorama: 2,263 posts
Posted: Tuesday, July 12, 2016 - 09:24 PM UTC
Moving right along. From the trails being completed and connected to work on the carriage.

The blue foam is the base for the dio (sandy, some minor rock and scrub). It allowed me to set the depth of the base plate with the "stakes" mounted for firing.

Pretty impressed with the detail; there are some very fine and thin parts in plastic. Minor mold seams to deal with and care needed to remove the parts from the sprues. Very pleased with the kit so far.


(some seam removal still needed I see - closeups are good for that - LOL!)

Mike
SGTJKJ
#041
Visit this Community
Kobenhavn, Denmark
Joined: July 20, 2006
KitMaker: 10,069 posts
Armorama: 4,677 posts
Posted: Thursday, July 14, 2016 - 01:51 PM UTC
Finally a little more progress on my M1A1HA. The muddy tracks are done and the first color of the camouflage is on. Next is the black and the brown in the camouflage.

More to follow