

John, awesome job on the sub! Great painting and markings!
Guy, very nice camo and finsihing on the Pz. III. Looks great.
Paul, you should be able to simply wash the pigments off if you have not sealed them? Did you apply pigments directly to the T-34 or mixed with spirits or other? If you have just rubbed or dusted the pigments on, you should be able to wash them of with a wet brush.
Campaigns
Where Armorama group builds can be discussed, organized, and updates posted.
Where Armorama group builds can be discussed, organized, and updates posted.
Hosted by Darren Baker, Richard S.
Unfinished Business 2016
SGTJKJ

#041

Joined: July 20, 2006
KitMaker: 10,069 posts
Armorama: 4,677 posts

Posted: Thursday, April 14, 2016 - 06:30 AM UTC


Thirian24

Joined: September 30, 2015
KitMaker: 2,493 posts
Armorama: 2,344 posts
Posted: Thursday, April 14, 2016 - 04:34 PM UTC
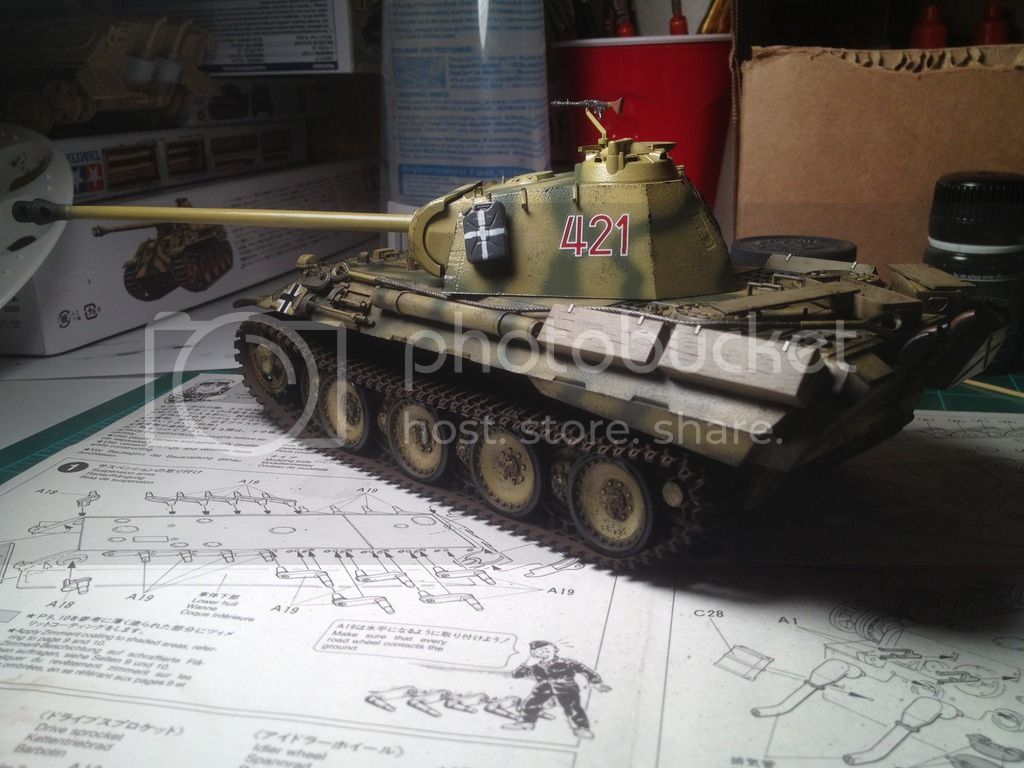
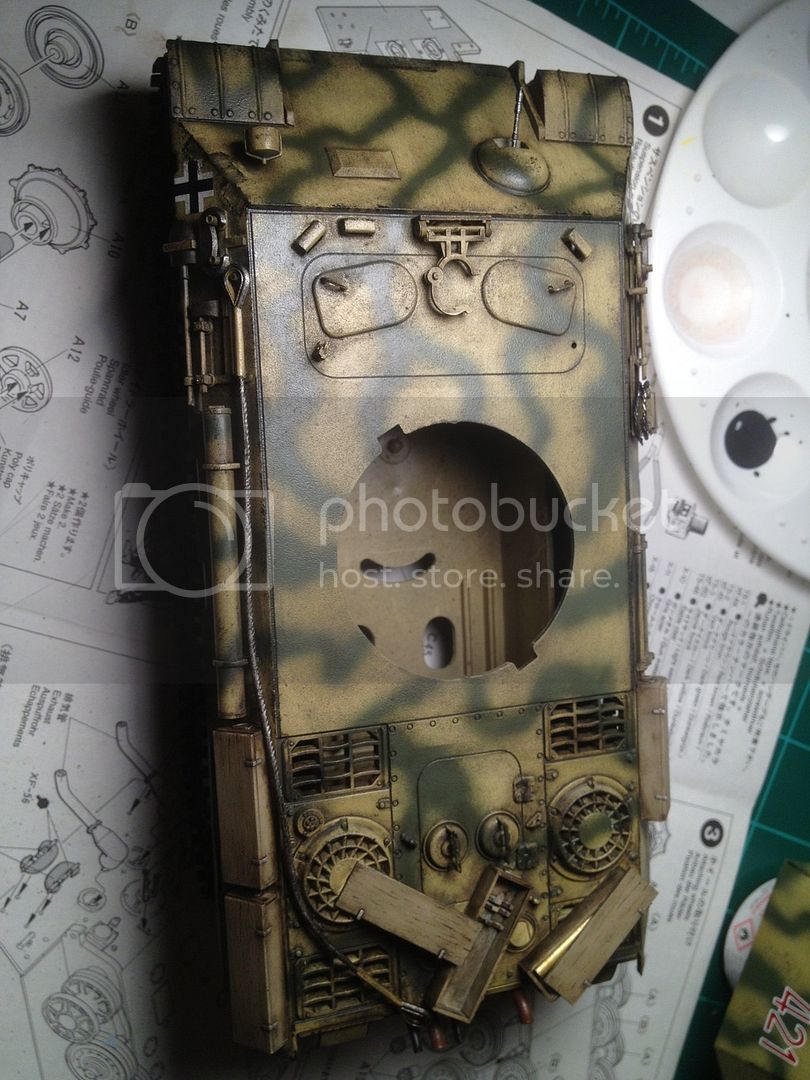
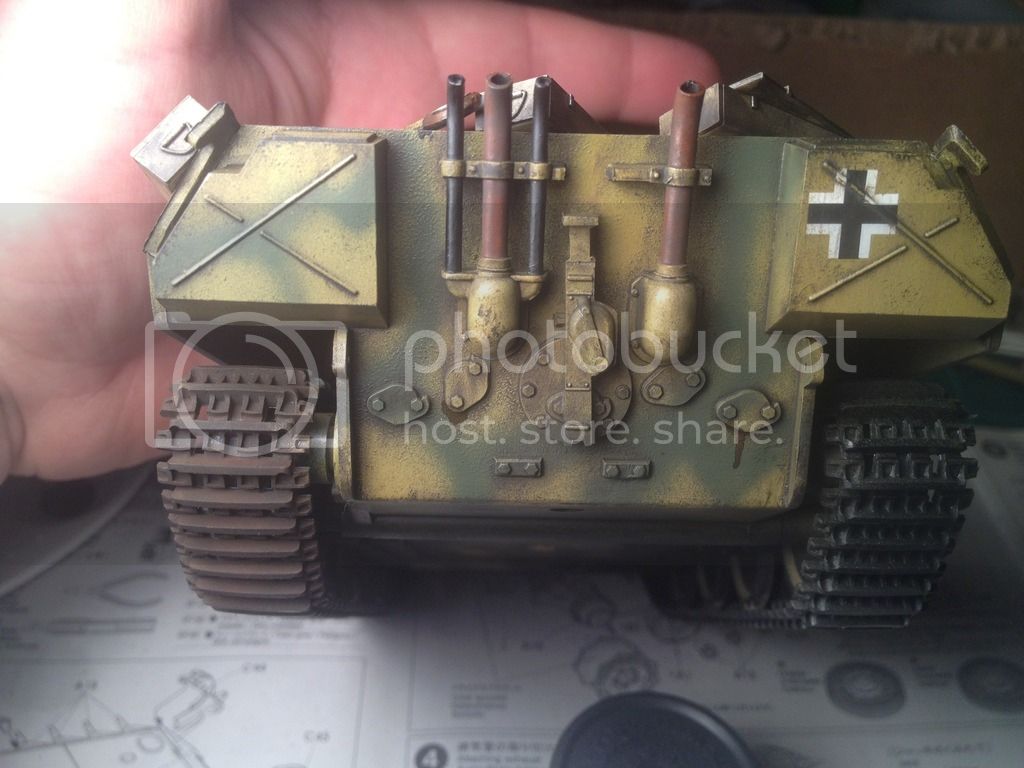
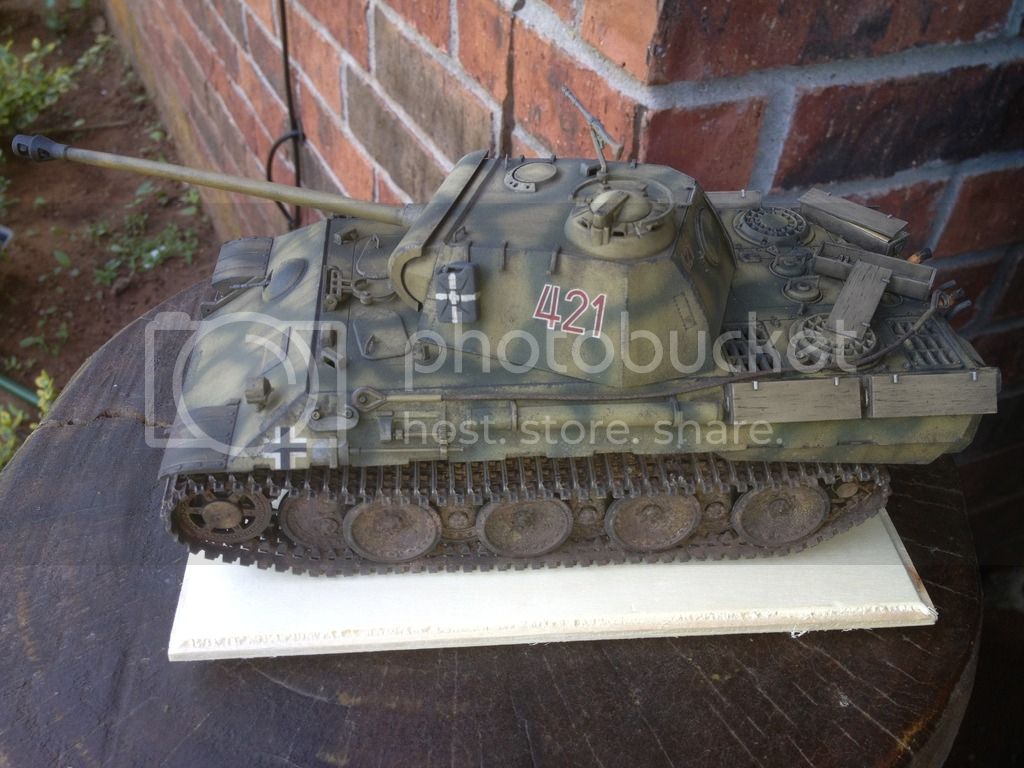
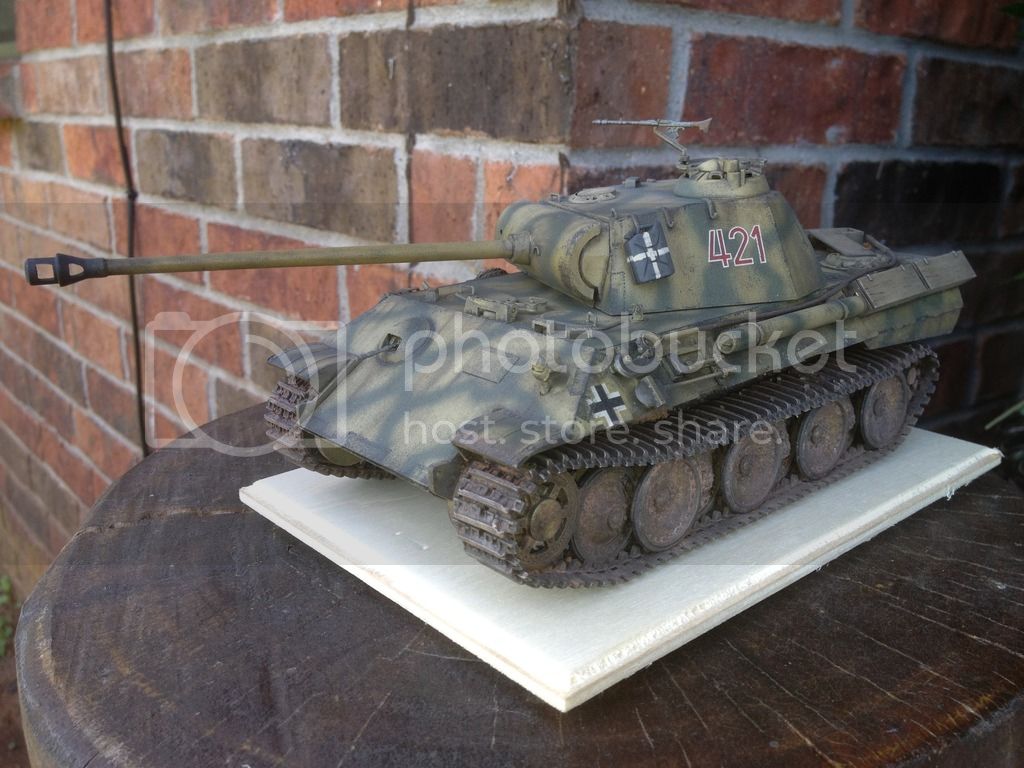
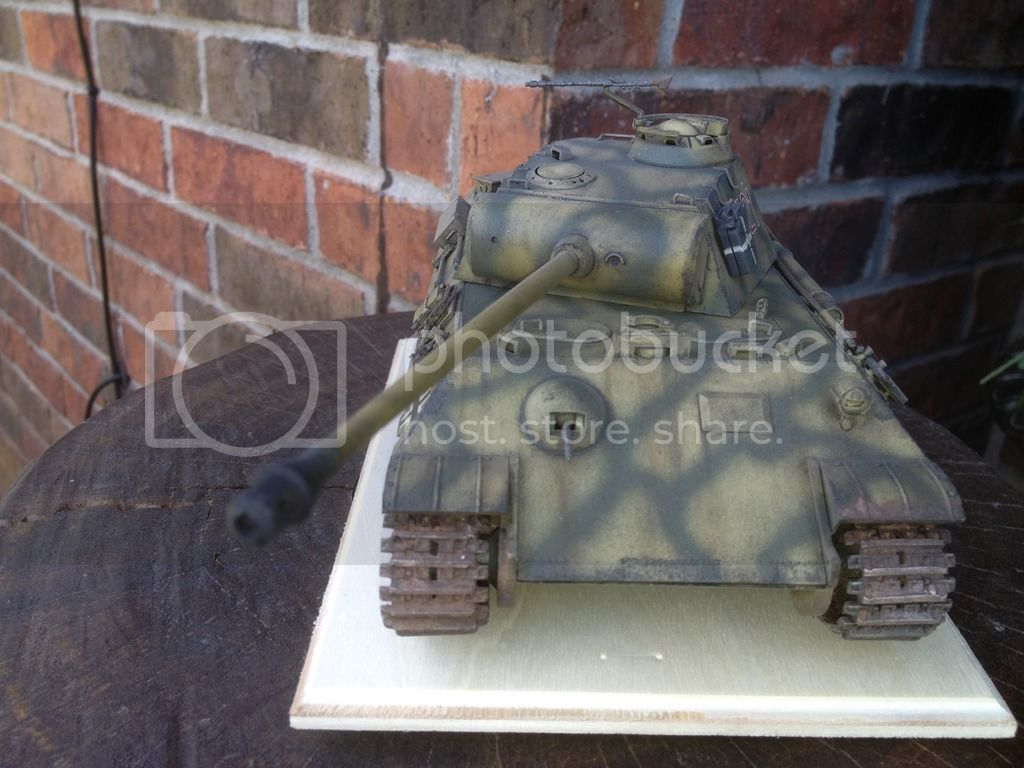
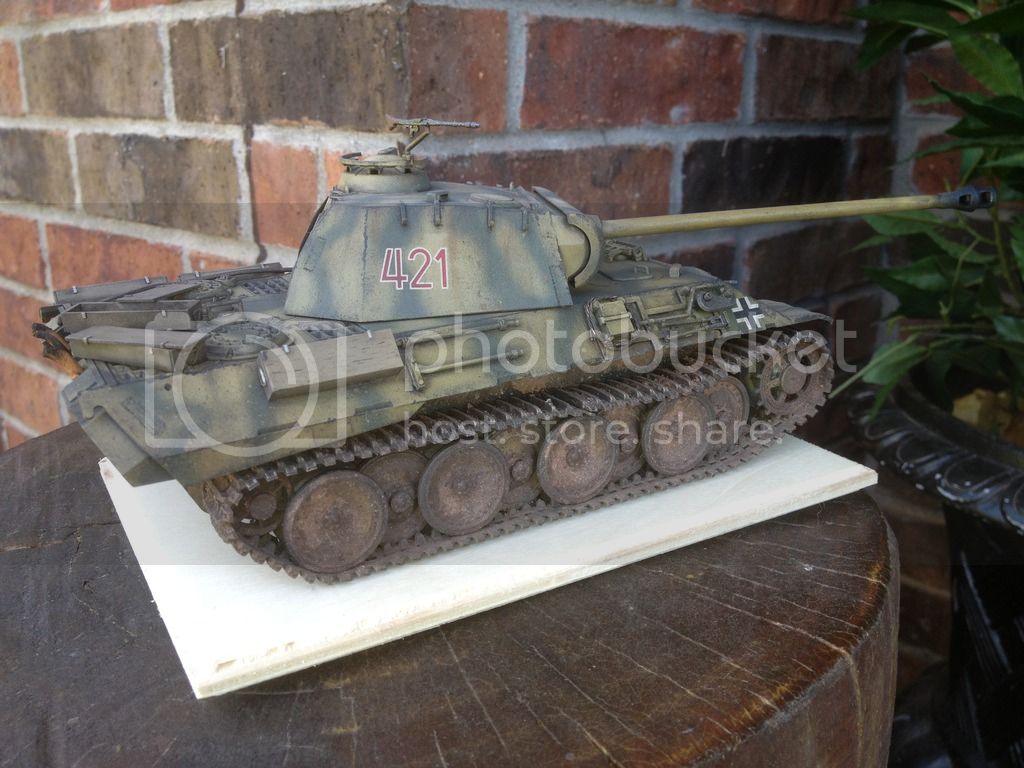
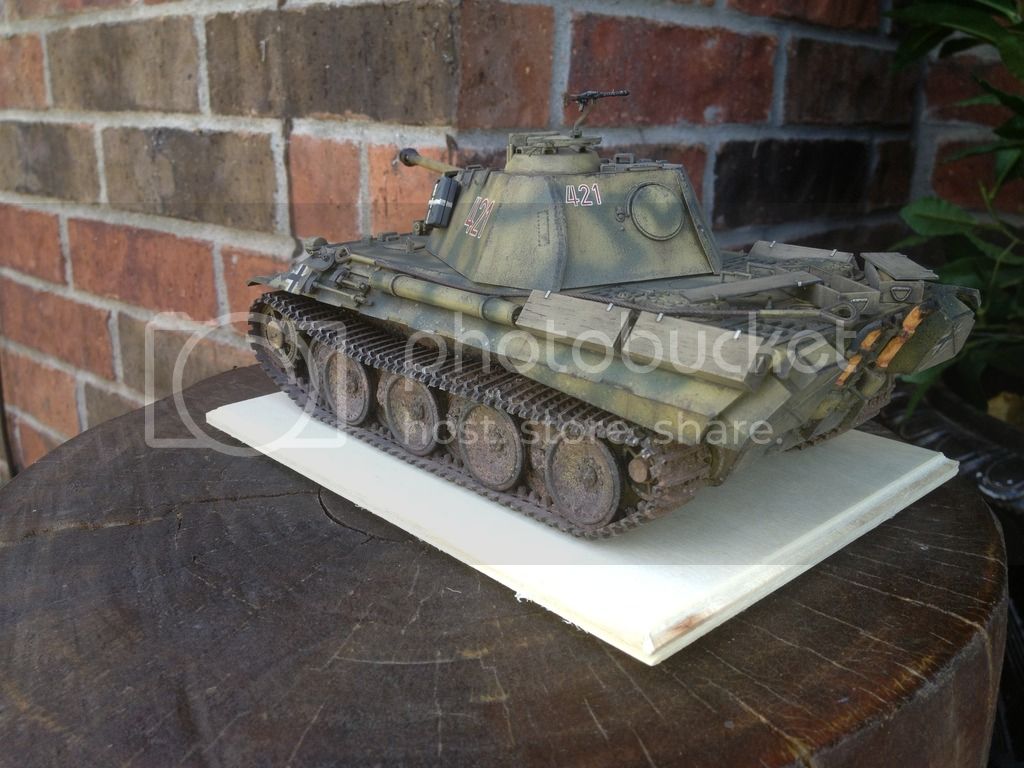
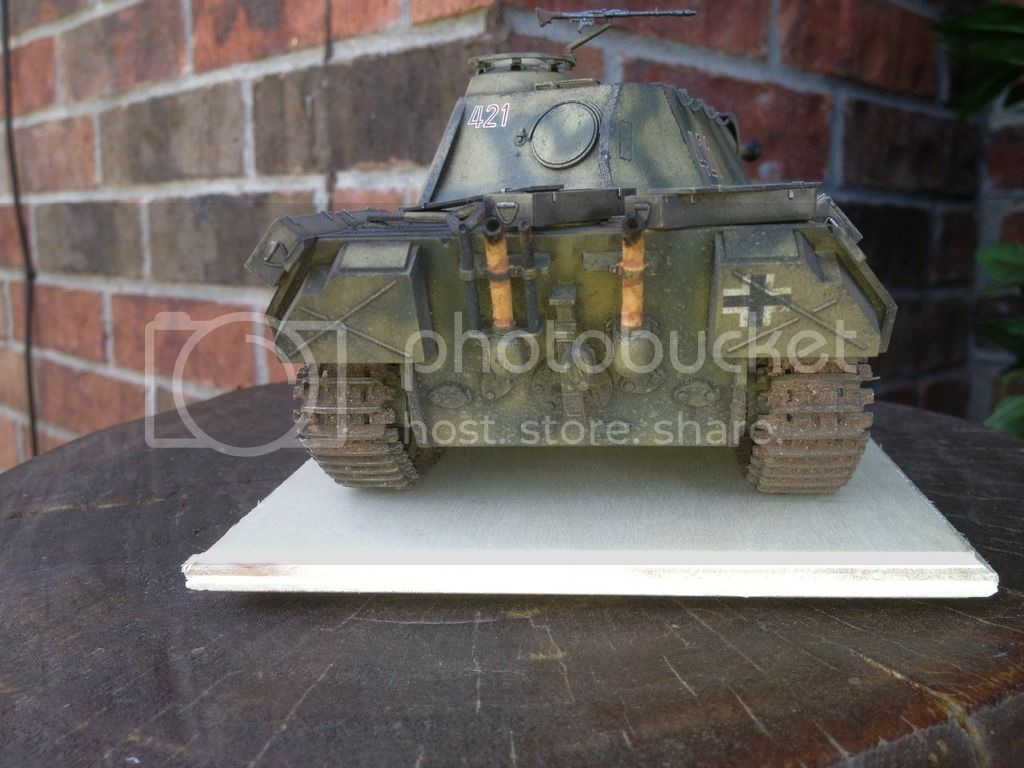
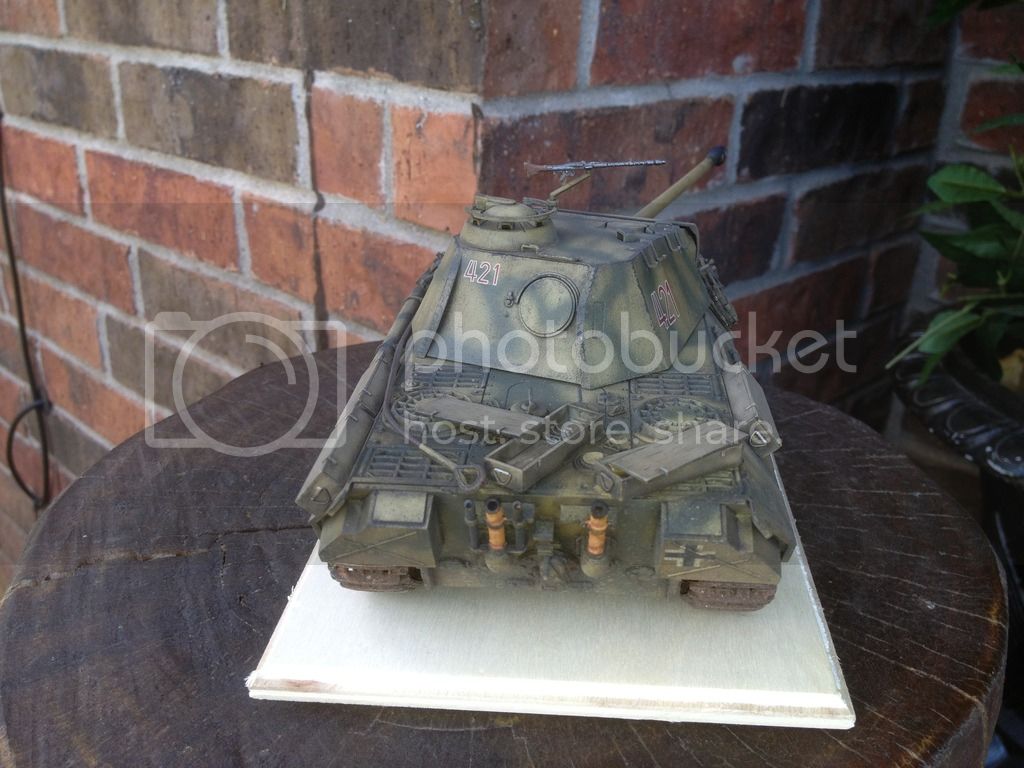
Nearing completion of this Panther. Need to finish weathering the turret and a few other small things.
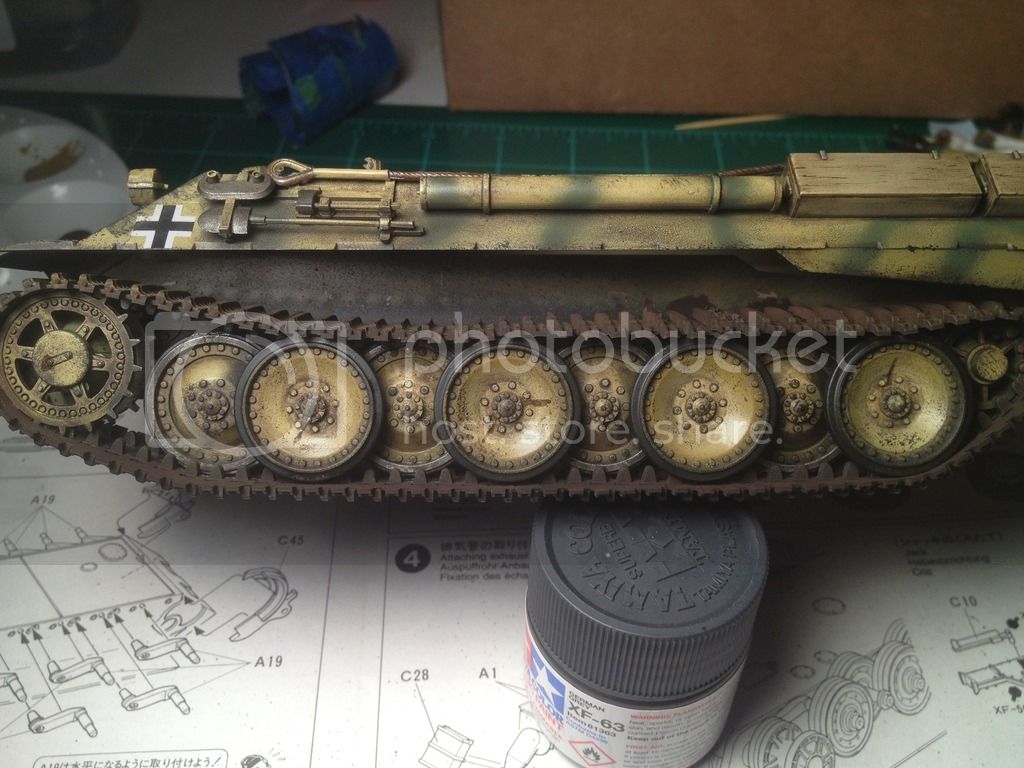
Cheers,
Dustin


Cheers,
Dustin

Sticky
Joined: September 14, 2004
KitMaker: 2,220 posts
Armorama: 1,707 posts
Posted: Thursday, April 14, 2016 - 04:51 PM UTC


165thspc

#521
Joined: April 13, 2011
KitMaker: 9,465 posts
Armorama: 8,695 posts
Posted: Thursday, April 14, 2016 - 05:38 PM UTC
Nice work on the Panther!

Thirian24
Joined: September 30, 2015
KitMaker: 2,493 posts
Armorama: 2,344 posts
Posted: Thursday, April 14, 2016 - 05:51 PM UTC
Thank you sir.

35th-scale

Joined: November 21, 2007
KitMaker: 3,212 posts
Armorama: 2,807 posts

Posted: Thursday, April 14, 2016 - 08:39 PM UTC
Lots of shelf queens turning into the Belle of the Ball!
That sub looks great John: like it's been used & abused and put away wet!
Guy, that Panzer looks great too. Nicely weathered!
That sub looks great John: like it's been used & abused and put away wet!
Guy, that Panzer looks great too. Nicely weathered!

tankmodeler

#417

Joined: March 01, 2004
KitMaker: 3,123 posts
Armorama: 2,539 posts

Posted: Friday, April 15, 2016 - 01:48 AM UTC
OK so I've joined again this year and hope to get the "What If" S-Tank Recce vehicle I started last year. And the rate I'm going I'll be finishing the Israeli Panther I am building for the Sci Fi campaign as well...
As for why? Well work got nuts and I'm reno-ing the house to sell, then moving, so I still may not get to these until next year!
Paul
As for why? Well work got nuts and I'm reno-ing the house to sell, then moving, so I still may not get to these until next year!
Paul


DaGreatQueeg

Joined: August 01, 2005
KitMaker: 1,049 posts
Armorama: 841 posts

Posted: Friday, April 15, 2016 - 04:31 AM UTC
Really nice looking weathering on the Panther Dustin!!
Some of my progress .....
cheers
Brent


Some of my progress .....
cheers
Brent


Thirian24
Joined: September 30, 2015
KitMaker: 2,493 posts
Armorama: 2,344 posts
Posted: Friday, April 15, 2016 - 10:22 PM UTC
Thank you Brent! Excellent job on yours as well sir!

MLD
Joined: July 21, 2002
KitMaker: 3,569 posts
Armorama: 2,070 posts
Posted: Saturday, April 16, 2016 - 01:09 AM UTC
Did you ever have one of those kits that fought you kicking and screaming every step of the way?
DML BMP1 and SP Designs -1M Kliver turret, and for some additional drama(more later) Masterclub clickable tracks.
On the plus side, Bench Time! after a 'vacation' 'week' that evaporated into two days sick and 4 days playing contractor around the house, an afternoon to build.

Gun is attached but not weathered to match the turret yet, missiles are attached to the mount, but not mounted yet.
Headlights are in, but the fiddly guards are not attached yet and the skirts cant be attached until the tracks are on.
Masterclub clickable tracks, just dont.. don't do it. Buy AEF kits by the truckload first, just dont.
Beautiful links every one of them. Casting numbers inside the links and contoured guide horns... THAT BREAK OFF WHEN YOU HANDLE THE LINKS....
Old bagged set has 190 links, new plastic boxed set has 200. MAYBE I can cobble together enough links... IF the old links and the new links click together...
they do!!
Huzzah!
But none of the links fit around the idler...(BMP link guide teeth go OUTSIDE the idler rim...)
@#$#$^!!@ !!!
so the already painted, filtered, washed, and dust washed idlers get filed down to fit inside the links...

It is days like these that explain why I get so few models done a year.
The state of things now.

I believe it is Beer:30 around here now.
Mike
DaGreatQueeg
Joined: August 01, 2005
KitMaker: 1,049 posts
Armorama: 841 posts
Posted: Saturday, April 16, 2016 - 01:53 AM UTC
Quoted Text
Did you ever have one of those kits that fought you kicking and screaming every step of the way?
..... I believe it is Beer:30 around here now.
Mike
:) Hang in there Mike as at least the end result is looking good!
Brent
MLD
Joined: July 21, 2002
KitMaker: 3,569 posts
Armorama: 2,070 posts
Posted: Saturday, April 16, 2016 - 08:46 PM UTC
Thanks for the encouragement Brent,
It's been sitting for 8+yrs at this point, too close to give up on it now...
It's been sitting for 8+yrs at this point, too close to give up on it now...
tankmodeler
#417
Joined: March 01, 2004
KitMaker: 3,123 posts
Armorama: 2,539 posts
Posted: Sunday, April 17, 2016 - 09:47 PM UTC
Quoted Text
I believe it is Beer:30 around here now.
Ahhhh, oh beer:30. My favourite time of the morning...

Thirian24
Joined: September 30, 2015
KitMaker: 2,493 posts
Armorama: 2,344 posts
Posted: Thursday, April 21, 2016 - 04:01 AM UTC
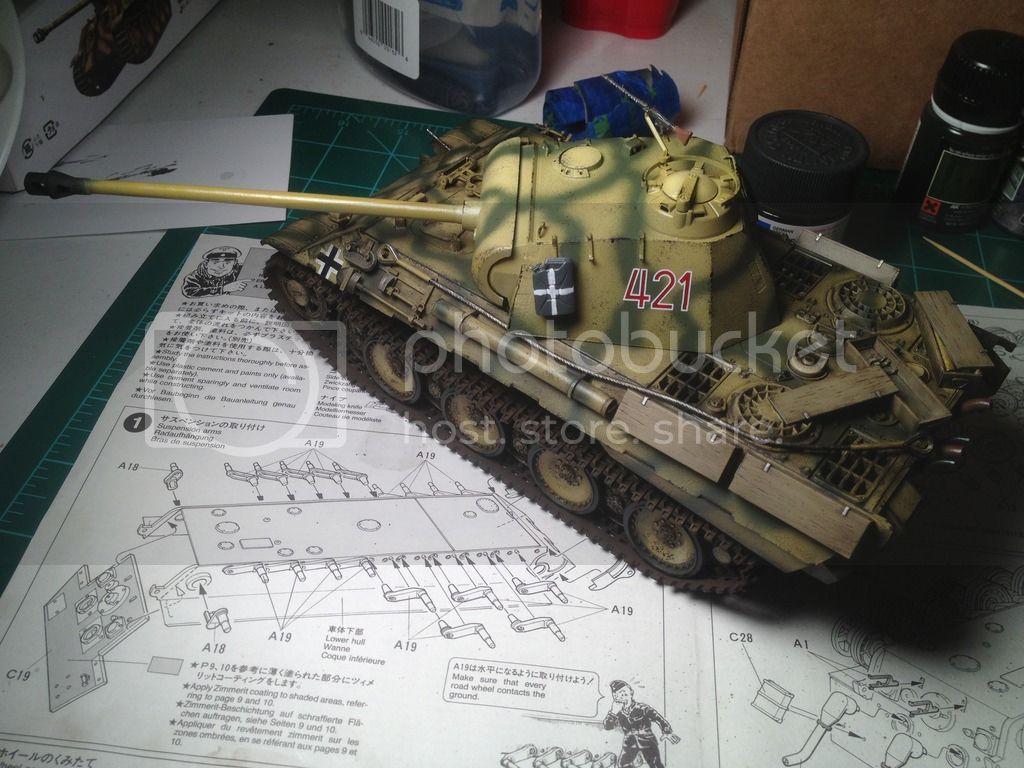
I'm calling this completed. This is my 2nd completed model.
I've learned a lot more this time and I feel like a pushed myself a bit further with new techniques. I'm pretty pleased with how this turned out. Although I wish I would have used after market tracks and PE grills.

Thanks for all of the help, advice and words of encouragement.
Cheers,
Dustin
I've learned a lot more this time and I feel like a pushed myself a bit further with new techniques. I'm pretty pleased with how this turned out. Although I wish I would have used after market tracks and PE grills.


Thanks for all of the help, advice and words of encouragement.
Cheers,
Dustin
MLD
Joined: July 21, 2002
KitMaker: 3,569 posts
Armorama: 2,070 posts
Posted: Thursday, April 21, 2016 - 04:11 AM UTC
Dustin,
That's a beauty of a Panther, old Tamiya kit warts and all. Plus, it is DONE!
Well done.
That's a beauty of a Panther, old Tamiya kit warts and all. Plus, it is DONE!
Well done.
Thirian24
Joined: September 30, 2015
KitMaker: 2,493 posts
Armorama: 2,344 posts
Posted: Thursday, April 21, 2016 - 04:23 AM UTC
Thank you, Mike!
I'm having troubling uploading a picture to the campaign gallery. It says uploaded successfully, but I don't see the picture. What gives?
I'm having troubling uploading a picture to the campaign gallery. It says uploaded successfully, but I don't see the picture. What gives?
MLD
Joined: July 21, 2002
KitMaker: 3,569 posts
Armorama: 2,070 posts
Posted: Thursday, April 21, 2016 - 04:39 AM UTC
Quoted Text
Thank you, Mike!
I'm having troubling uploading a picture to the campaign gallery. It says uploaded successfully, but I don't see the picture. What gives?
hmm, you are right. The pictures are not showing up there.
I have had troubles with getting pictures into the gallery in the past and do it so infrequently that I have to re-learn it each time.
Are you sure you tried to put it in UB 2016 campaign?
I've put pics in the wrong place before.
M

tatbaqui
#040

Joined: May 06, 2007
KitMaker: 2,713 posts
Armorama: 2,451 posts

Posted: Thursday, April 21, 2016 - 06:01 AM UTC
Quoted Text
Quoted TextThank you, Mike!
I'm having troubling uploading a picture to the campaign gallery. It says uploaded successfully, but I don't see the picture. What gives?
hmm, you are right. The pictures are not showing up there.
I have had troubles with getting pictures into the gallery in the past and do it so infrequently that I have to re-learn it each time.
Are you sure you tried to put it in UB 2016 campaign?
I've put pics in the wrong place before.
M
Dustin,
Congrats on your finish!
I believe the gallery can only take pics at 800 x 600 pixels max. Can you check yours, as this may be the culprit.
Cheers,
Tat
DaGreatQueeg
Joined: August 01, 2005
KitMaker: 1,049 posts
Armorama: 841 posts
Posted: Thursday, April 21, 2016 - 06:14 AM UTC
Quoted Text
I'm calling this completed. This is my 2nd completed model.
Cheers,
Dustin
Real great job Dustin! The look in those natural light shots is just superb ....
cheers
Brent
And my weekly progress, almost finished the whole group now.

Thirian24
Joined: September 30, 2015
KitMaker: 2,493 posts
Armorama: 2,344 posts
Posted: Thursday, April 21, 2016 - 10:06 AM UTC
Thank you everybody. I'll check the photo size.
Thirian24
Joined: September 30, 2015
KitMaker: 2,493 posts
Armorama: 2,344 posts
Posted: Thursday, April 21, 2016 - 10:12 AM UTC
Ok I uploaded a picture.
MLD
Joined: July 21, 2002
KitMaker: 3,569 posts
Armorama: 2,070 posts
Posted: Friday, May 06, 2016 - 07:48 PM UTC


Trumpeters T64B 1975 off the shelf of shame and onto the workbench.
it's been a 'spray with whatever paint is left in the airbrush' for the last couple of months, but will get a final paintjob here, hopefully soon.

Hudson29
#460
Joined: September 16, 2014
KitMaker: 1,156 posts
Armorama: 1,024 posts
Posted: Wednesday, May 11, 2016 - 04:35 AM UTC
Quoted Text
Paul, you should be able to simply wash the pigments off if you have not sealed them? Did you apply pigments directly to the T-34 or mixed with spirits or other? If you have just rubbed or dusted the pigments on, you should be able to wash them of with a wet brush.
The pigments were just dusted on. I'll try streaking or removing them. There is still other work to do on that kit so I'll shoot some pics of where I am now.
Dustin - Your Panther is very nice. I have one also that I'm working on for the DOG campaign and hope it will come out half as nice. One thing I don't understand. You pretty much assembled the whole model & then painted it. How did you do this? My models are assembled to sub-componants and then painted and weathered before final assembly. If you do it complete, how do you get paint behind things or keep it from getting other places where it is not wanted? Masking would be a terror . . .
Thirian24
Joined: September 30, 2015
KitMaker: 2,493 posts
Armorama: 2,344 posts
Posted: Wednesday, May 11, 2016 - 04:48 AM UTC
Quoted Text
Quoted TextPaul, you should be able to simply wash the pigments off if you have not sealed them? Did you apply pigments directly to the T-34 or mixed with spirits or other? If you have just rubbed or dusted the pigments on, you should be able to wash them of with a wet brush.
The pigments were just dusted on. I'll try streaking or removing them. There is still other work to do on that kit so I'll shoot some pics of where I am now.
Dustin - Your Panther is very nice. I have one also that I'm working on for the DOG campaign and hope it will come out half as nice. One thing I don't understand. You pretty much assembled the whole model & then painted it. How did you do this? My models are assembled to sub-componants and then painted and weathered before final assembly. If you do it complete, how do you get paint behind things or keep it from getting other places where it is not wanted? Masking would be a terror . . .
Hi Paul. Thank you for the kind words.
I assemble everything and then paint everything black. Then I spray a base coat being careful not to get anything on the rubber of the road wheels. I did a bit of modulation before the camo. Then weather everything and add pigments. Then flat clear and a dust coat.
This was the first time I did it like this with everything assembled and I feel like it was easier for me to keep motivated and get it finished. Leaving the tracks and road wheels off and doing them later seems to get me in a rut of finishing the model.
Hudson29
#460
Joined: September 16, 2014
KitMaker: 1,156 posts
Armorama: 1,024 posts
Posted: Thursday, May 12, 2016 - 02:54 AM UTC
Quoted Text
I assemble everything and then paint everything black. Then I spray a base coat being careful not to get anything on the rubber of the road wheels. I did a bit of modulation before the camo. Then weather everything and add pigments. Then flat clear and a dust coat.
I'm fascinated by this process as it seems like it should save a lot of time. What I don't understand is HOW you do it. How do you keep paint of the interleaved road wheels? How do you get paint BEHIND them without pudling in other places? I see that you DID do it, I just don't understand how.
 |

WEB HOSTING BY


Copyright ©2021 Armorama and Kitmaker Network, a subsidiary of Silver Star Enterprises
All Rights Reserved. Please read our Conditions of Use and Privacy Policy.
All Rights Reserved. Please read our Conditions of Use and Privacy Policy.