

It is looking good Dustin, I would go with the Ambush scheme they always look good that way. Also it will test your airbrush skills.
which ever way you go it looks great.
Robert
Constructive Feedback
For in-progress or completed build photos. Give and get contructive feedback!
For in-progress or completed build photos. Give and get contructive feedback!
Hosted by Darren Baker, Dave O'Meara
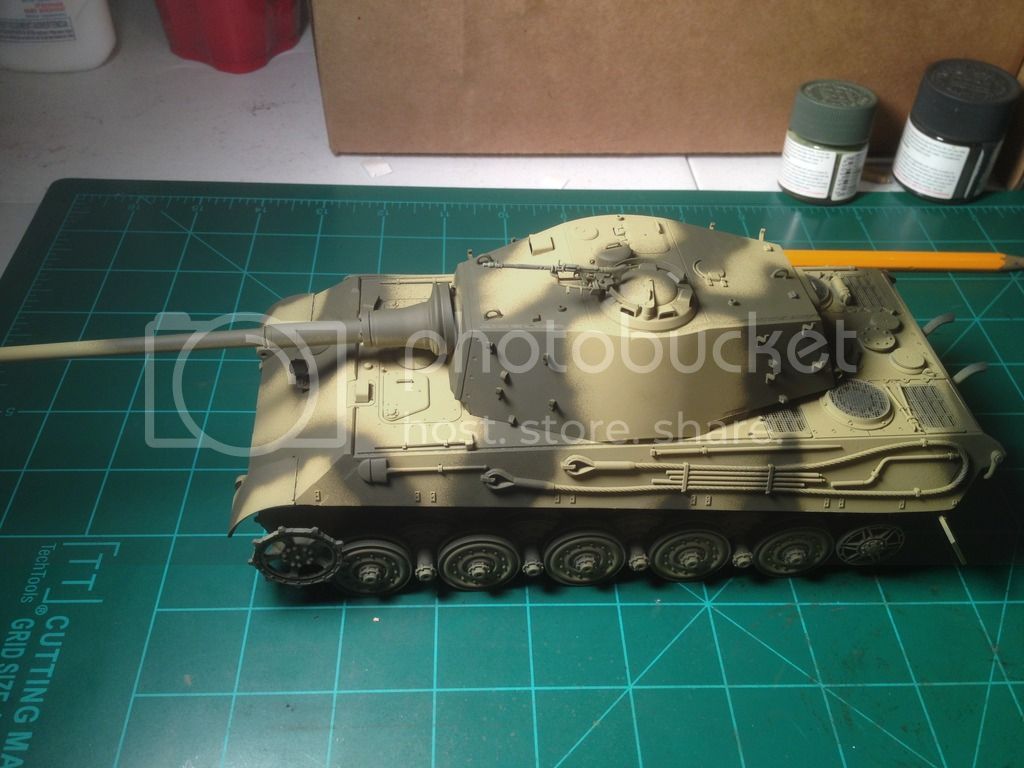
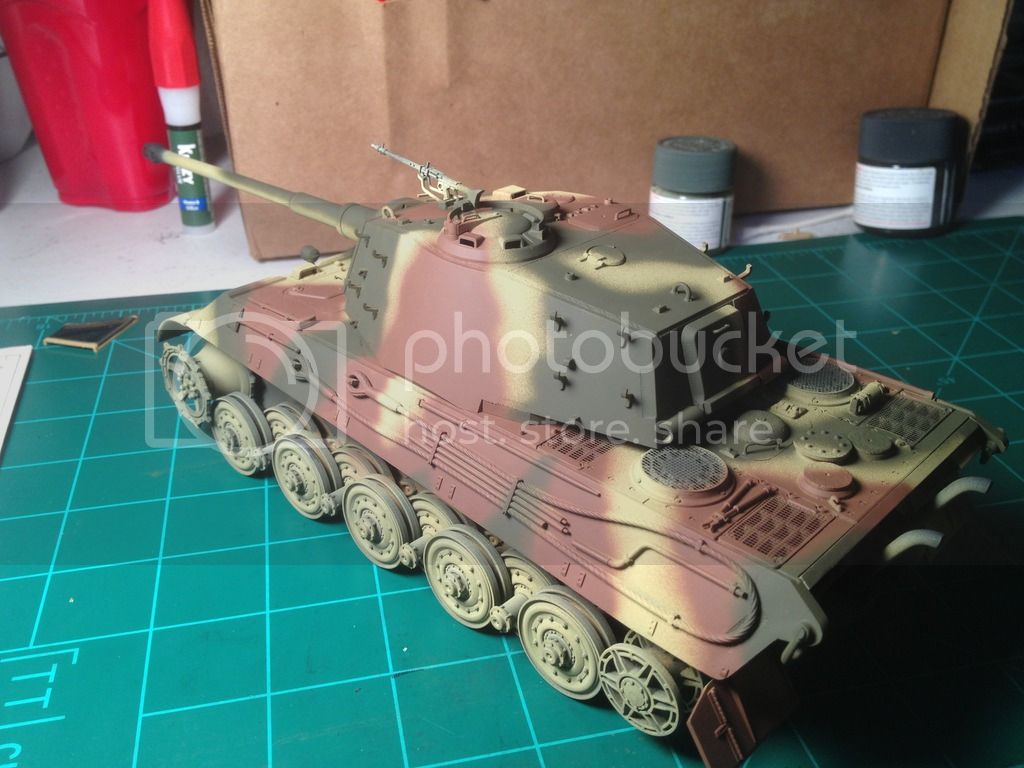
Pz.Kpfw VI Sd.Kfz.182 Tiger II

Modelrob

Joined: October 20, 2015
KitMaker: 304 posts
Armorama: 293 posts
Posted: Friday, May 06, 2016 - 03:29 AM UTC
Thirian24
Joined: September 30, 2015
KitMaker: 2,493 posts
Armorama: 2,344 posts
Posted: Friday, May 06, 2016 - 03:50 AM UTC
Gary, Rob,
Thank you fellas. I do want to try the ambush scheme, but I'm so nervous to mess up. Lol
Guess you never succeed without taking some risks, right?
Cheers,
Dustin
Thank you fellas. I do want to try the ambush scheme, but I'm so nervous to mess up. Lol
Guess you never succeed without taking some risks, right?
Cheers,
Dustin
Modelrob
Joined: October 20, 2015
KitMaker: 304 posts
Armorama: 293 posts
Posted: Friday, May 06, 2016 - 04:00 AM UTC
Dustin,
All you can do is charge ahead," It is only plastic" at lest that is what I keep reminding myself as I get ready to try a camo pattern with a Badger 250 and index cards. Can you say train wreck?
Robert
All you can do is charge ahead," It is only plastic" at lest that is what I keep reminding myself as I get ready to try a camo pattern with a Badger 250 and index cards. Can you say train wreck?
Robert

Armorsmith
Joined: April 09, 2015
KitMaker: 1,063 posts
Armorama: 1,000 posts
Posted: Friday, May 06, 2016 - 05:03 AM UTC
se coat looks good. If you leave it in the Dunkelgelb consider the dot filter technique to add some additional tones and depth. Ambush would also be good. Your call, have fun with it.
Thirian24
Joined: September 30, 2015
KitMaker: 2,493 posts
Armorama: 2,344 posts
Posted: Friday, May 06, 2016 - 06:34 AM UTC
Gary, that sounds like it will turn out awesome.
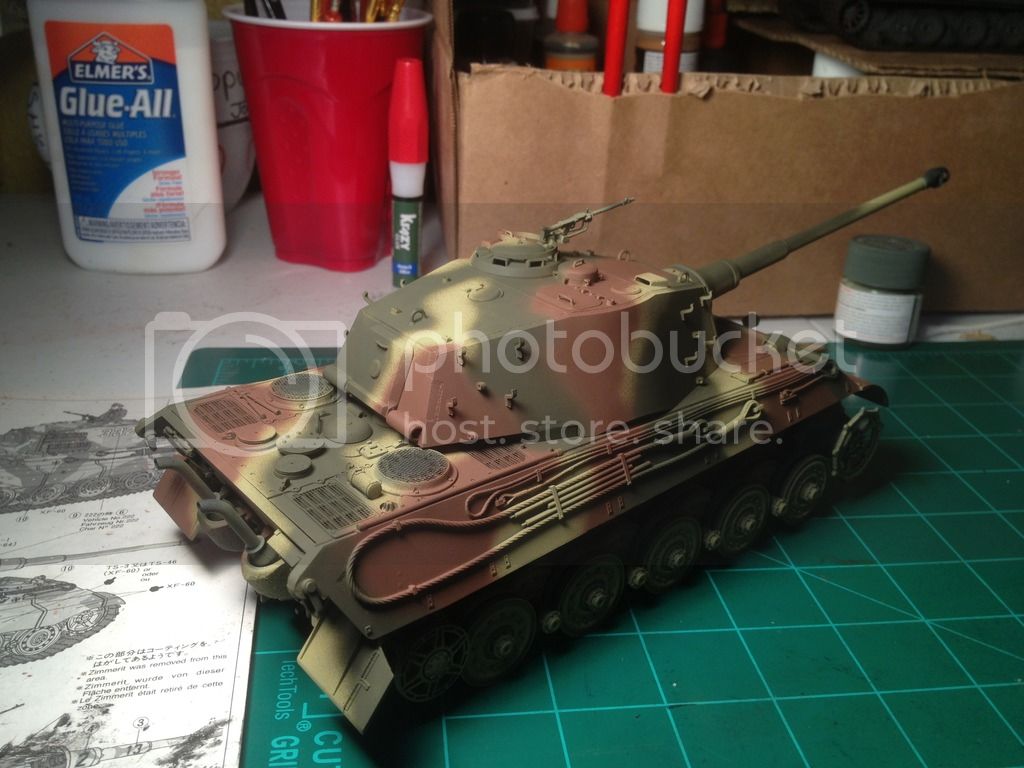
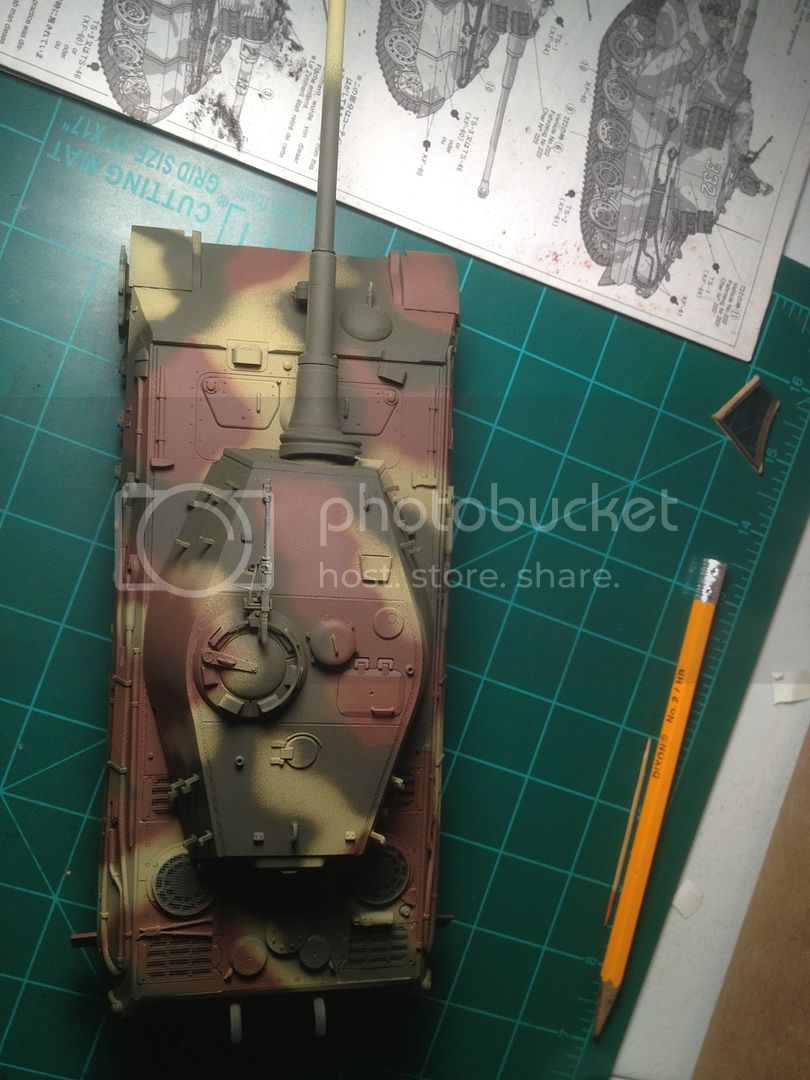
Armorsmith, thank you sir! I decided to go with the ambush scheme. Try something new. Since both of my completed kits have a single camo color. I have a plan to do the Dunkelgelb only scheme on a StuG III I think.
So far I sprayed the dark green on. There is a bit of over spray that I just can not seem to get under control, no matter what I try. I'm probably still doing something wrong, but I think it still looks good and will it will be less noticeable when the other colors are sprayed.
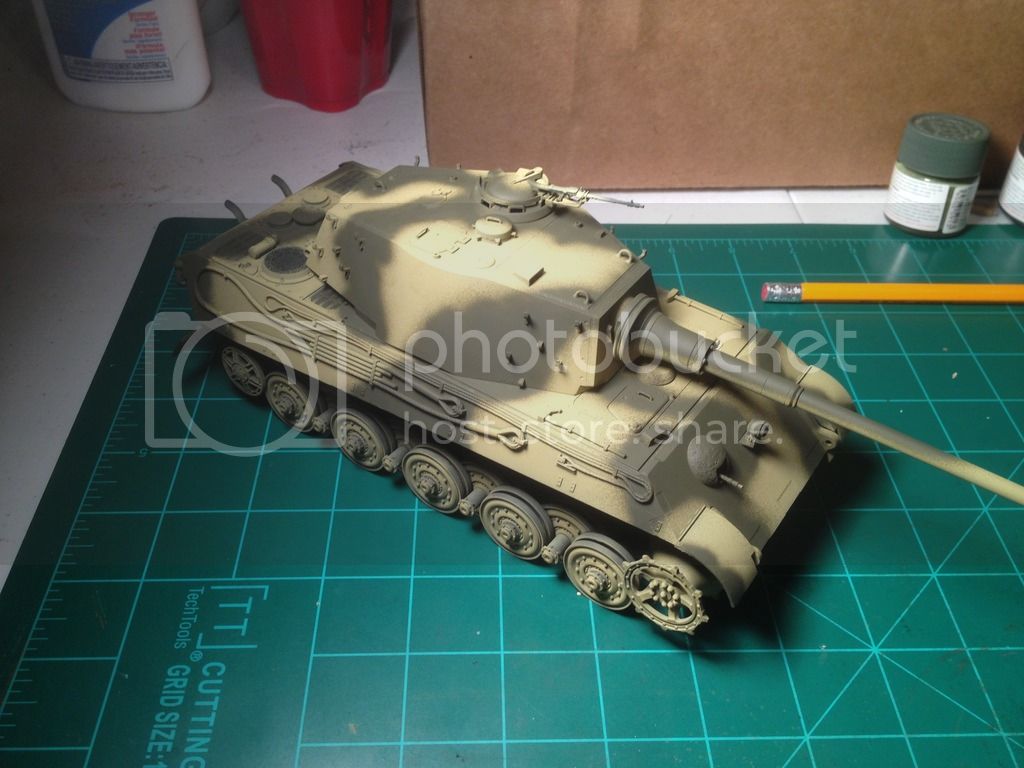
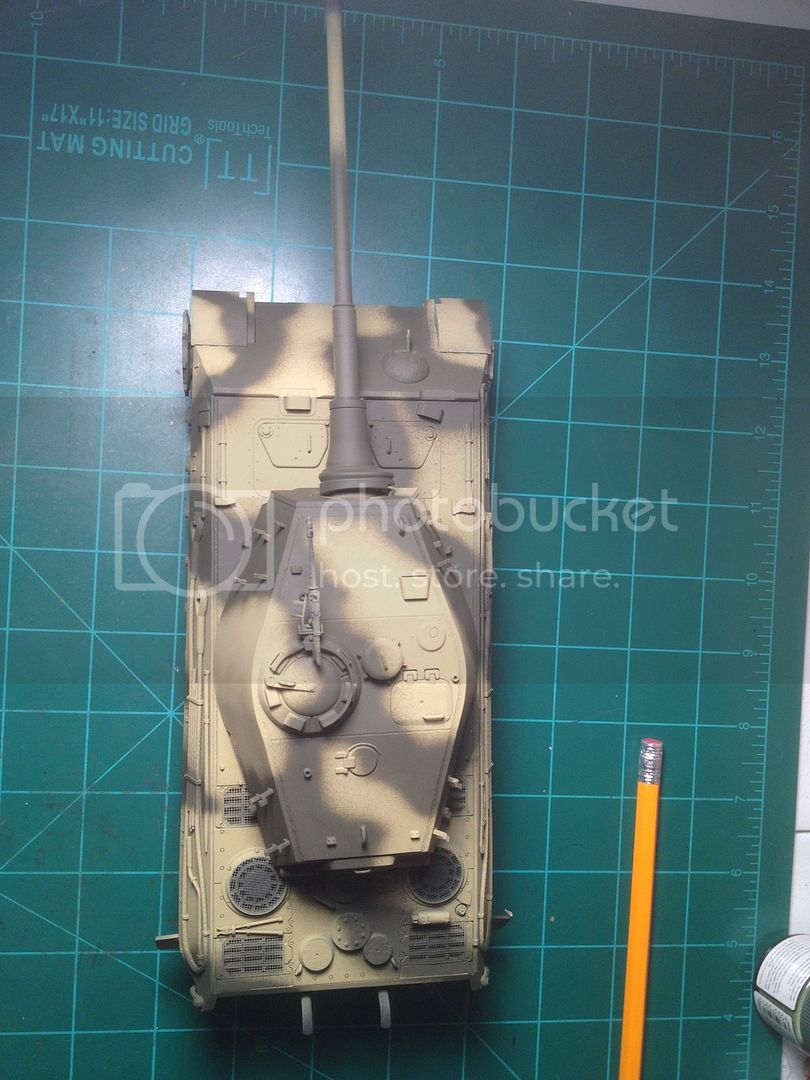
Thoughts?
Cheers,
Dustin

acebatau
Joined: February 10, 2008
KitMaker: 730 posts
Armorama: 616 posts

Posted: Friday, May 06, 2016 - 06:54 AM UTC
Nice progress, Tamiya is a pleasure to work with
Thirian24
Joined: September 30, 2015
KitMaker: 2,493 posts
Armorama: 2,344 posts
Posted: Friday, May 06, 2016 - 07:18 AM UTC
Thank you Acebatau!
brekinapez
Joined: July 26, 2013
KitMaker: 2,272 posts
Armorama: 1,860 posts
Posted: Friday, May 06, 2016 - 07:35 AM UTC
Maybe try lighter, thinner coats and build it up more slowly so you can control where the paint is landing better?
Also, the filtering and paint dot techniques can go a long way at blending in some overspray, so as long as it's not too heavy.
Also, the filtering and paint dot techniques can go a long way at blending in some overspray, so as long as it's not too heavy.
Armorsmith
Joined: April 09, 2015
KitMaker: 1,063 posts
Armorama: 1,000 posts
Posted: Friday, May 06, 2016 - 07:52 AM UTC
Much of that overspray will disappear during the weathering process. Not sure how you approach laying on the cammo colors but for larger areas such as you have you might try outlining it wit a very fine spray then fill it in. Trick to reducing overspray is very thin paint at low pressure working close to the surface. You will probably have to experiment with your setup to get the best results for you. In any case you will almost always have some overspray, but much of it will get blended in the weathering process. Wouldn't sweat it too much.
brekinapez
Joined: July 26, 2013
KitMaker: 2,272 posts
Armorama: 1,860 posts
Posted: Friday, May 06, 2016 - 07:59 AM UTC
Now, if you could shrink your airbrush down to 1/35 then things would work better.

GazzaS

#424

Joined: April 23, 2015
KitMaker: 4,648 posts
Armorama: 2,248 posts

Posted: Friday, May 06, 2016 - 08:08 AM UTC
Hi Dustin,
Looking good! I Build more 1/48 scale airplanes than anything, so the painting needs to be a little precise. I do tiny little spurts of paint in many layers just to get to the weathering paint.
I always have to say to myself: "hey, you're not painting a Buick! You have effects to show!"
Less paint per finger press means more time but yields a better result.
Or you can try soft edge masking. Use tape rolled into tubes, bluetack, or silly putty to keep your masking shape 2-5 mm above the surface of your model. It makes for a nice, more-to-scale soft edges.
Gaz
Thirian24
Joined: September 30, 2015
KitMaker: 2,493 posts
Armorama: 2,344 posts
Posted: Friday, May 06, 2016 - 08:11 AM UTC
I was doing the very thin outline, it didn't matter. I'm thinking I need a different regulator. One that I can fine tune to a lower pressure. My current regulator basically starts at 20 psi. So it's kind of a crap shoot on my pressure lower than 20.
Thirian24
Joined: September 30, 2015
KitMaker: 2,493 posts
Armorama: 2,344 posts
Posted: Friday, May 06, 2016 - 08:15 AM UTC
Thanks for all the tips fellas. Very much appreciated. Think I'll look for a better regulator to start with.
I need to figure this out. Because I want to do some NATO 3 tone scheme kits.. But I definitely can't have the over spray on those. This is holding me back from attempting those kits, currently.
I need to figure this out. Because I want to do some NATO 3 tone scheme kits.. But I definitely can't have the over spray on those. This is holding me back from attempting those kits, currently.
brekinapez
Joined: July 26, 2013
KitMaker: 2,272 posts
Armorama: 1,860 posts
Posted: Friday, May 06, 2016 - 10:14 AM UTC
Quoted Text
...I want to do some NATO 3 tone scheme kits.. But I definitely can't have the over spray on those. This is holding me back from attempting those kits, currently.
Mig probably has ammo for that.

flippen_waffles
Joined: June 01, 2010
KitMaker: 143 posts
Armorama: 116 posts
Posted: Friday, May 06, 2016 - 11:21 AM UTC
Thinning the paint will help, just be careful you dont overthin the as the paint will dry before it hits the surface and youll be left with a gritty finish. Also, going back over the over-spray with the base color can help too.
Thirian24
Joined: September 30, 2015
KitMaker: 2,493 posts
Armorama: 2,344 posts
Posted: Saturday, May 07, 2016 - 06:58 AM UTC
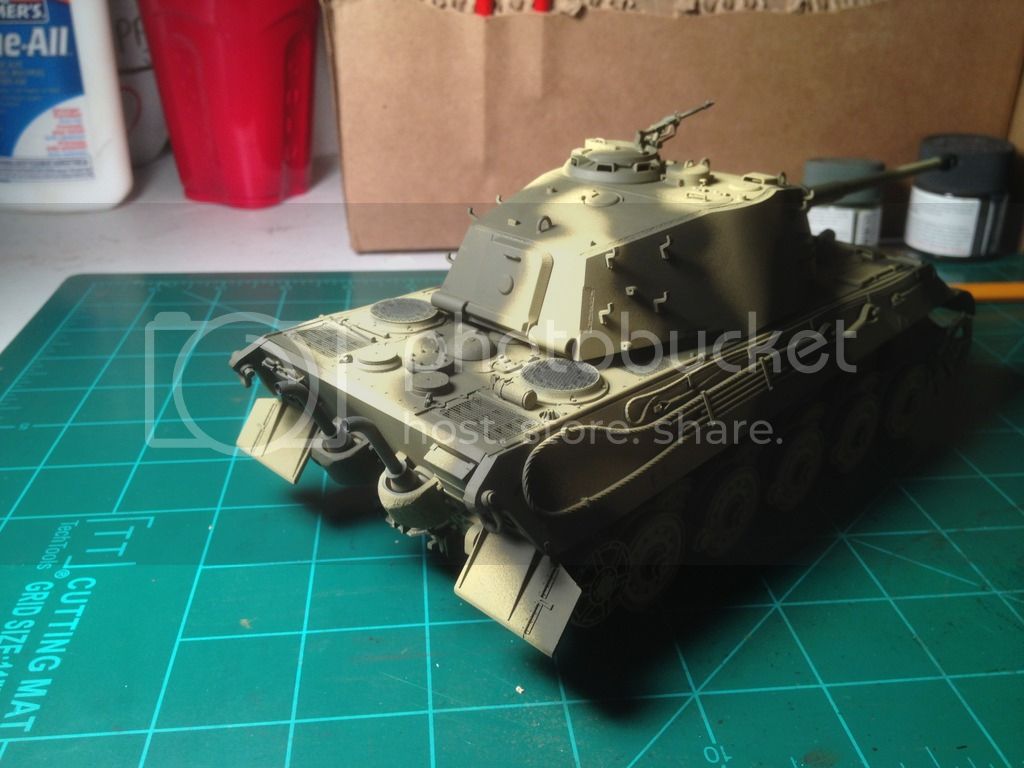
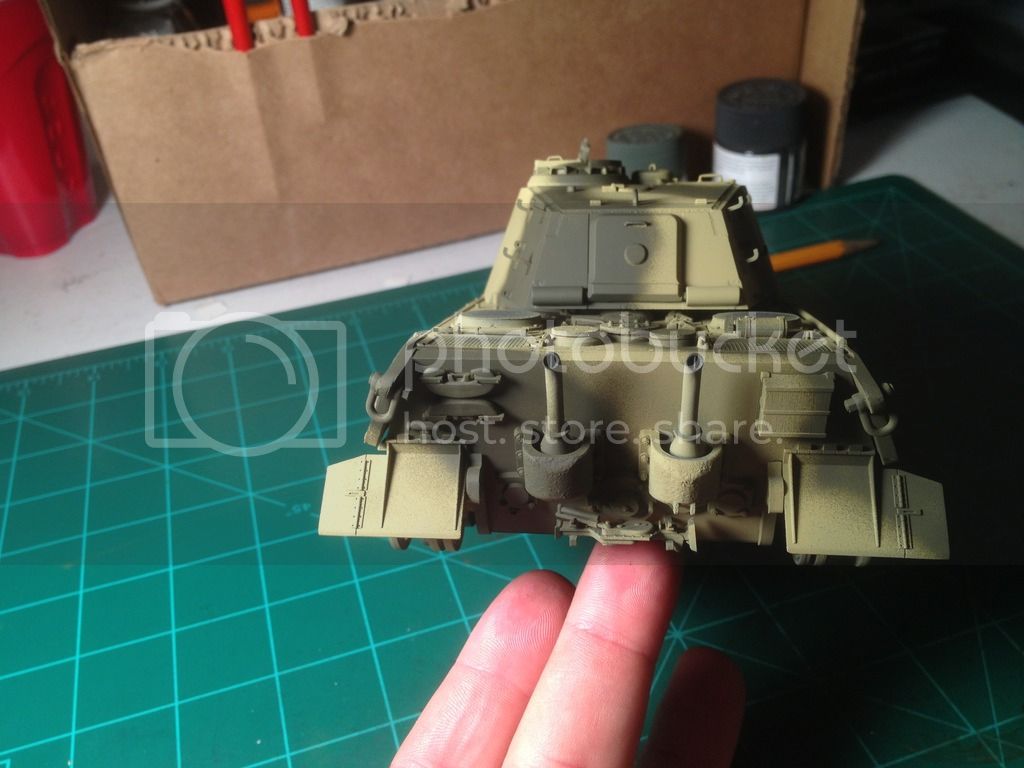
JM - Thank you for that info! I may go back over with the base coat, but once I sprayed the red brown, I'm pretty happy with the outcome.
Does anybody think the it needs a touch more base coat?


Cheers,
Dustin
EDIT: I followed the camo pattern in the instructions.
Does anybody think the it needs a touch more base coat?


Cheers,
Dustin
EDIT: I followed the camo pattern in the instructions.
Armorsmith
Joined: April 09, 2015
KitMaker: 1,063 posts
Armorama: 1,000 posts
Posted: Saturday, May 07, 2016 - 07:14 AM UTC
Really like the way it looks now. Overspray should not be a problem once you apply a wash, etc. Nice job.
Remember those are steel road wheels and should be painted accordingly.
Remember those are steel road wheels and should be painted accordingly.
Thirian24
Joined: September 30, 2015
KitMaker: 2,493 posts
Armorama: 2,344 posts
Posted: Saturday, May 07, 2016 - 07:24 AM UTC
Thank you very much! I really like it too. Kinda surprised myself I guess. I still need to add the "dots" I guess is what you'd call them?
I did remember that about the road wheels. I bought some dark iron paint, what's your thoughts on that?
Also, what's your thoughts on adding camo to the road wheels or leaving them in the base coat?
Cheers,
Dustin
I did remember that about the road wheels. I bought some dark iron paint, what's your thoughts on that?
Also, what's your thoughts on adding camo to the road wheels or leaving them in the base coat?
Cheers,
Dustin
Armorsmith
Joined: April 09, 2015
KitMaker: 1,063 posts
Armorama: 1,000 posts
Posted: Saturday, May 07, 2016 - 08:21 AM UTC
I generally don't cammo the road wheels but that's just my preference. Unless you can get a fairly small "dot" you're probably better off adding them using a brush. The other option is to make a stencil using an index card and spray through that. You can either hold it directly on the surface or attach it with some blue tac. Either way you should get some nice "dots." The advantage of blue tac is that it leaves both you hands free so you can still hold the model and turn it as needed. Good luck.
Thirian24
Joined: September 30, 2015
KitMaker: 2,493 posts
Armorama: 2,344 posts
Posted: Saturday, May 07, 2016 - 08:34 AM UTC
I thought about using the index card, but I'll probably just use a brush.
I think I'll leave the road wheels alone here.
I think I'll leave the road wheels alone here.
GazzaS
#424
Joined: April 23, 2015
KitMaker: 4,648 posts
Armorama: 2,248 posts
Posted: Saturday, May 07, 2016 - 11:17 AM UTC
Dustin,
Looks great!
Gaz
Looks great!
Gaz
Modelrob
Joined: October 20, 2015
KitMaker: 304 posts
Armorama: 293 posts
Posted: Saturday, May 07, 2016 - 02:19 PM UTC
The paint job is coming out great Dustin.

tatbaqui

#040

Joined: May 06, 2007
KitMaker: 2,713 posts
Armorama: 2,451 posts

Posted: Saturday, May 07, 2016 - 04:11 PM UTC
Looking good Dustin. Unless it's a hard-edged camo you're depicting, I won't be too much bothered with the overspray you have there. It should be toned down by the time you're done with weathering. Cheers, Tat

Tojo72
Joined: June 06, 2006
KitMaker: 4,691 posts
Armorama: 3,509 posts
Posted: Saturday, May 07, 2016 - 04:18 PM UTC
Excellent freehand camo work.
I would hand paint the ambush dots myself.
I don't know how you plan to do the steel wheels,but I fold up a paper towel,tape it down,and moisten an area with the paint,and no just roll the edge of the wheels thru it.
I would hand paint the ambush dots myself.
I don't know how you plan to do the steel wheels,but I fold up a paper towel,tape it down,and moisten an area with the paint,and no just roll the edge of the wheels thru it.
Thirian24
Joined: September 30, 2015
KitMaker: 2,493 posts
Armorama: 2,344 posts
Posted: Saturday, May 07, 2016 - 07:11 PM UTC
Gary - Thank you!
Rob - Thank you!
Tat - Much appreciated sir!
Anthony - Thank you for the kind words and info!
Rob - Thank you!
Tat - Much appreciated sir!
Anthony - Thank you for the kind words and info!
 |

WEB HOSTING BY


Copyright ©2021 Armorama and Kitmaker Network, a subsidiary of Silver Star Enterprises
All Rights Reserved. Please read our Conditions of Use and Privacy Policy.
All Rights Reserved. Please read our Conditions of Use and Privacy Policy.