Pz.Kpfw VI Sd.Kfz.182 Tiger II
Oklahoma, United States
Joined: September 30, 2015
KitMaker: 2,493 posts
Armorama: 2,344 posts
Posted: Wednesday, March 30, 2016 - 03:24 AM UTC
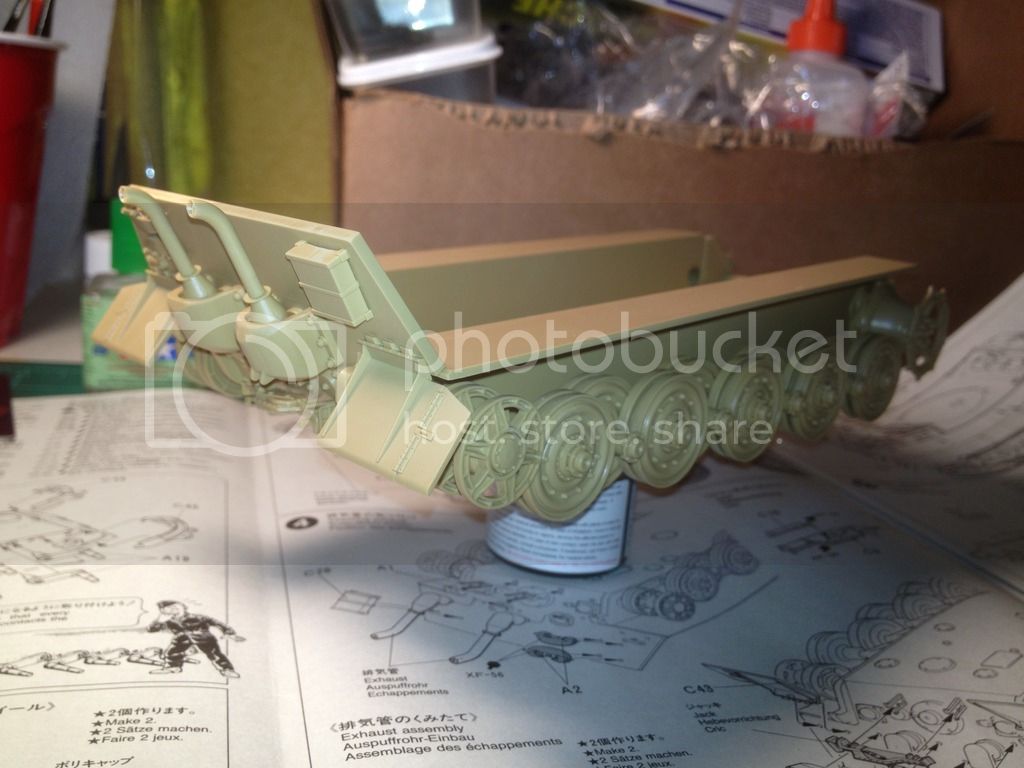
While the weather was a bit humid today because of some rain, I couldn't spray the clear coat on the Panther. So I decided to toss the kit together while I waited.
I don't have much time off of work, so I have to make my free time worth it.
I also decided to start putting my threads over here, as I gathered that's where they belong.
This kit is Tamiya's old kit #164. I bought aftermarket tracks and a set of PE grills to go along with it.
Progress so far.
Cheers,
Dustin
"Only the dead have seen the end of war." - Plato
Georgia, United States
Joined: July 26, 2013
KitMaker: 2,272 posts
Armorama: 1,860 posts
Posted: Wednesday, March 30, 2016 - 07:46 AM UTC
I would love to start a new kit, but I have three left to finish up before I begin a new project.
As I have an example from each panzer version except for the III, that is my next project. I also got a Triple D deal on the "Rommel and crew sitting atop a tank" figure set recently so an obvious DAK diorama is on the horizon.
Maybe I'll do my Dragon Krupp turret Tiger II with zimmerit (6302) after that.
On the Campaign Trail:
Tank Destroyer 2020
Oklahoma, United States
Joined: September 30, 2015
KitMaker: 2,493 posts
Armorama: 2,344 posts
Posted: Wednesday, March 30, 2016 - 07:55 AM UTC
Shell your ultimate goal sounds very familiar to mine.
I too would like one each of the Panzers.
Also, I would like to build one of each of the Tigers... And a few more of the Panthers. Lol.. That's A LOT of building.
Cheers,
Dustin
"Only the dead have seen the end of war." - Plato
Georgia, United States
Joined: July 26, 2013
KitMaker: 2,272 posts
Armorama: 1,860 posts
Posted: Wednesday, March 30, 2016 - 09:01 AM UTC
Yeah, I need more Tigers, too. I have two, but they are both early so obviously I need some mids, lates and finals. And everything in-between.
On the Campaign Trail:
Tank Destroyer 2020
California, United States
Joined: January 06, 2013
KitMaker: 98 posts
Armorama: 98 posts
Posted: Wednesday, March 30, 2016 - 12:21 PM UTC
Nice thread, I will start building Tiger II too when I finish my T28

For my project I will use Zvezda 3601 kit.
Which aftermarket track did you bought?

#424
Queensland, Australia
Joined: April 23, 2015
KitMaker: 4,648 posts
Armorama: 2,248 posts
Posted: Wednesday, March 30, 2016 - 02:12 PM UTC
Hey Dustin,
I'm building a B-29 right now, but I'll still follow you on this one.
Gaz
"Artillery adds dignity, to what would otherwise be an ugly brawl."
Frederick The Great
Arizona, United States
Joined: October 20, 2015
KitMaker: 304 posts
Armorama: 293 posts
Posted: Wednesday, March 30, 2016 - 03:40 PM UTC
I will keep tuned in Dustin looks like it should be a good build as always.
Robert
Oklahoma, United States
Joined: September 30, 2015
KitMaker: 2,493 posts
Armorama: 2,344 posts
Posted: Wednesday, March 30, 2016 - 07:26 PM UTC
Quoted Text
Nice thread, I will start building Tiger II too when I finish my T28
For my project I will use Zvezda 3601 kit.
Which aftermarket track did you bought?
Matt, thank you. I bought Tamiya's individual link tracks for this kit.
Gary and Rob, I'm glad to have you guys on board. It's much appreciated.
Cheers,
Dustin
"Only the dead have seen the end of war." - Plato
Oklahoma, United States
Joined: September 30, 2015
KitMaker: 2,493 posts
Armorama: 2,344 posts
Posted: Thursday, March 31, 2016 - 02:36 AM UTC
While I did spray the Panther in gloss clear today, I do have to let it cure atleast 24 hours. So I spent some time on this.
Here is the progress from just about an hour.


I have to go back to work tomorrow night. So there probably won't be any updates for about 6 days.
Cheers,
Dustin
"Only the dead have seen the end of war." - Plato
Oklahoma, United States
Joined: September 30, 2015
KitMaker: 2,493 posts
Armorama: 2,344 posts
Posted: Sunday, April 03, 2016 - 08:50 AM UTC
I plan to build this without the side mudguards. So I have a few questions.
Along the side of the hull, where the the mudguards would have been, would that area show the primer coat? Like hull red? Or would it be the base coat?
Also, in this picture on the front fender, would this tab not be there? It seems to just be a locating tab for the side mudguards. Just trim that off?

Thanks,
Dustin
"Only the dead have seen the end of war." - Plato
Napier, New Zealand
Joined: August 01, 2005
KitMaker: 1,049 posts
Armorama: 841 posts
Posted: Sunday, April 03, 2016 - 09:16 AM UTC
Hey Dustin, nice clean looking build.
Yup the tab comes off, that's just a modelling feature to assist with attaching the outer guard.
On the colour under the guards, as you mention it's based on the order the paint is applied. As standard the hull is primed and basecoated.
I would then expect the guards to be attached before the factory applies the tri-colour or more detailed scheme is sprayed so they get a uniform pattern. So depending on the timing of your build a worn Dunkelgelb or Dunkelgruen for a later build is most likely on the hull under the track guards imo.
Of course a field repaired or modified vehicle could have a different finish if the workshop did any repainting. Even troops in the field repainting an area with a missing guard would then show as camouflaged ... so you have options.
cheers
Brent
Available for commissions,visit my Flickr Albums and modelling/painting blog to discuss .......
http://houseofqueeg.wordpress.com/
https://www.flickr.com/photos/134514258@N04/albums
Arizona, United States
Joined: October 20, 2015
KitMaker: 304 posts
Armorama: 293 posts
Posted: Sunday, April 03, 2016 - 04:48 PM UTC
The build is coming along nicely Dustin.
Robert
Oklahoma, United States
Joined: September 30, 2015
KitMaker: 2,493 posts
Armorama: 2,344 posts
Posted: Monday, April 04, 2016 - 12:53 AM UTC
Brent - Thank you for that information.
Rob - Thank you for the kind comments sir.
"Only the dead have seen the end of war." - Plato
Queensland, Australia
Joined: October 02, 2008
KitMaker: 658 posts
Armorama: 629 posts
Posted: Monday, April 04, 2016 - 03:16 AM UTC
G'day Dustin
Looking good. If I may offer a suggestion, there are four fuel tank vent lines missing, two on each side. The rear ones start right at the rearmost corner of the hull, drop down 4mm or so, continue forward horizontally for about 30mm. then angle down at about 45 degrees for a couple of millimetres. 4mm lead wire is what I used.
The front ones start at about the middle of each of the front rectangular mesh covers and head more or less straight for the hull side before turning down the hull side for about 3-4mm. You'll need to notch the edge of the mesh where it passes over the fuel vent pipe.
On the front, there should be a wire from the headlight straight up the glacis, then turns at right angles to connect to the little round bump which is slightly left of centre.
Last but not least, on the engine hatch there is what appears to be a hemispherical lump about 4mm long. This needs to be hollowed out. It was there so the crew could insert a crowbar into it to lever the engine hatch open. The hatch was made out of 40mm steel, so must have been a beast to move.
Have fun.
Regards
Rob
Oklahoma, United States
Joined: September 30, 2015
KitMaker: 2,493 posts
Armorama: 2,344 posts
Posted: Monday, April 04, 2016 - 03:22 AM UTC
Rob,
Thank you for that information sir. Do you think you could provide pictures for a better reference as to what you are mentioning? That would be a great help.
Thanks again.
"Only the dead have seen the end of war." - Plato
Oklahoma, United States
Joined: September 30, 2015
KitMaker: 2,493 posts
Armorama: 2,344 posts
Posted: Tuesday, April 19, 2016 - 06:44 AM UTC
A bit if progress. I'll probably have more to follow since it is raining here and it'll be the perfect time to work on this.
I added some texture to various things that were very smooth and didnt seem realistic to me.

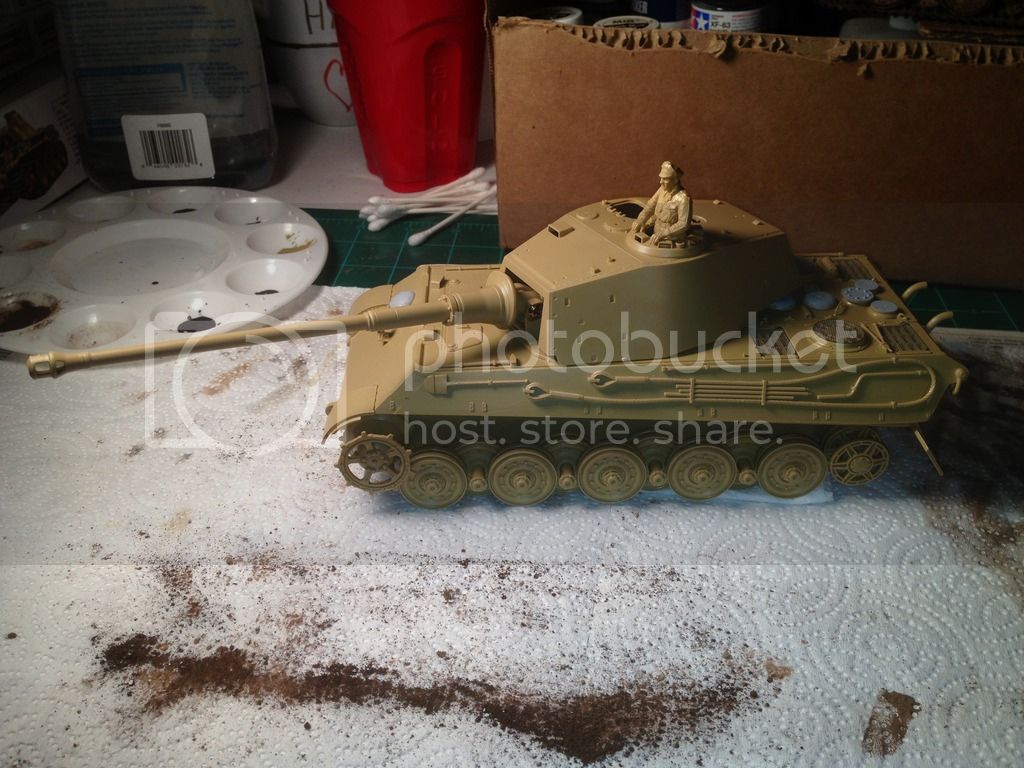
I'm also going to attempt my first figure here.
Sorry for the poor lighting.
"Only the dead have seen the end of war." - Plato
Massachusetts, United States
Joined: January 03, 2010
KitMaker: 2,159 posts
Armorama: 707 posts
Posted: Tuesday, April 19, 2016 - 07:29 AM UTC
Just catching up to this one Dustin...looking great! Enjoy painting the beast!

Oklahoma, United States
Joined: September 30, 2015
KitMaker: 2,493 posts
Armorama: 2,344 posts
Posted: Tuesday, April 19, 2016 - 07:58 AM UTC
Thank you, Todd!
You should have a look at my Panther. It's almost complete.
http://armorama.com/forums/240999&page=6#2084780"Only the dead have seen the end of war." - Plato
Arizona, United States
Joined: October 20, 2015
KitMaker: 304 posts
Armorama: 293 posts
Posted: Tuesday, April 19, 2016 - 02:42 PM UTC
It is coming along nicely Dustin. Good luck with the figure I really enjoy painting them.
Robert
Oklahoma, United States
Joined: September 30, 2015
KitMaker: 2,493 posts
Armorama: 2,344 posts
Posted: Wednesday, April 20, 2016 - 02:49 AM UTC
Thank you Rob. This will be my first figure. I need to study up on how to do them properly. The figure has a rather large seam down both sides that I need to clean up
"Only the dead have seen the end of war." - Plato
Oklahoma, United States
Joined: September 30, 2015
KitMaker: 2,493 posts
Armorama: 2,344 posts
Posted: Wednesday, April 20, 2016 - 07:00 AM UTC
Assembly complete except for the tracks.

Cheers,
Dustin
"Only the dead have seen the end of war." - Plato
Pennsylvania, United States
Joined: April 09, 2015
KitMaker: 1,063 posts
Armorama: 1,000 posts
Posted: Wednesday, April 20, 2016 - 07:57 AM UTC
Gotta love the way Tamiya kits just fall together. Looks like a clean build. Plans for paint/campo?
"No plan survives contact with the enemy." Helmuth von Moltke the Elder
Oklahoma, United States
Joined: September 30, 2015
KitMaker: 2,493 posts
Armorama: 2,344 posts
Posted: Wednesday, April 20, 2016 - 08:11 AM UTC
I know, these Tamiya kits are so nice to build. I'm kinda dreading a Dragon kit.
I plan do to an ambush scheme on this. It'll be a test of my airbrushing skills.
"Only the dead have seen the end of war." - Plato
Oklahoma, United States
Joined: September 30, 2015
KitMaker: 2,493 posts
Armorama: 2,344 posts
Posted: Thursday, May 05, 2016 - 08:31 PM UTC
Got the base coat applied. I'm thinking strongly about leaving this just in the base coat Dunkelgelb. That would work as long as I found the right unit markings?


Cheers,
Dustin
"Only the dead have seen the end of war." - Plato
#424
Queensland, Australia
Joined: April 23, 2015
KitMaker: 4,648 posts
Armorama: 2,248 posts
Posted: Friday, May 06, 2016 - 03:20 AM UTC
Looks tough, Dustin! Love the lines of this tank.
Gaz
"Artillery adds dignity, to what would otherwise be an ugly brawl."
Frederick The Great


