Campaigns: Completed Campaigns
Campaigns that are completed should be grouped here.
Hosted by Richard S.
Poland 1939
Ranger74
Visit this Community
Tennessee, United States
Joined: April 04, 2002
KitMaker: 1,290 posts
Armorama: 658 posts
Posted: Sunday, December 11, 2016 - 08:46 PM UTC

Quoted Text


Quoted Text


Quoted Text

What a great project! It looks like even the frame rails are vac. The trucks were imported from France who made them?


I was curious when I read that myself because I thought Ursus was a Polish company and the truck was a license built Italian design. I have been following the First to Fight braille scale line and saw this truck was coming in 1/72.


Mebbee a FIAT design?


According to Wikipedia, "Ursus A was a series of Polish lorries and buses. It was a license-built modification of the Italian SPA 25C Polonia trucks." I also have a partially built vacform kit of a Polish Army Fiat 508 Ambulance. Since it was started I can't use for this campaign.
d6mst0
#453
Visit this Community
Texas, United States
Joined: August 28, 2016
KitMaker: 1,925 posts
Armorama: 601 posts
Posted: Monday, December 12, 2016 - 05:01 AM UTC
Panzer I command Tank

Just a quick update. Assembled the road wheels and attached PE to the hull.


This Panzer requires 10 road wheels and during assembly I discovered that Dragon only supplied 8 wheels in this kit.


Contacted Dragon and they are sending me additional wheels.

I have many parts trimmed and ready to assemble so I should have better pictures for the next post.

Marcus
ClaytonFromEllijay
#454
Visit this Community
Georgia, United States
Joined: July 10, 2016
KitMaker: 1,273 posts
Armorama: 1,138 posts
Posted: Monday, December 12, 2016 - 06:50 AM UTC
Geez, there's really no excuse for that unless you bought the kit opened on E-Bay or something...;-(
Bravo1102
Visit this Community
New Jersey, United States
Joined: December 08, 2003
KitMaker: 2,864 posts
Armorama: 2,497 posts
Posted: Monday, December 12, 2016 - 06:58 AM UTC

Quoted Text

Geez, there's really no excuse for that unless you bought the kit opened on E-Bay or something...;-(


Legacy of the kit originally designed as an Ausf A. When they did the Ausf B. Somebody overlooked adding additional road wheels. I remember it mentioned back when the Ausf B kits first came out. Dragon goofs are nothing new.
ClaytonFromEllijay
#454
Visit this Community
Georgia, United States
Joined: July 10, 2016
KitMaker: 1,273 posts
Armorama: 1,138 posts
Posted: Monday, December 12, 2016 - 07:28 PM UTC

Quoted Text


Quoted Text

Geez, there's really no excuse for that unless you bought the kit opened on E-Bay or something...;-(


Legacy of the kit originally designed as an Ausf A. When they did the Ausf B. Somebody overlooked adding additional road wheels. I remember it mentioned back when the Ausf B kits first came out. Dragon goofs are nothing new.


Ah,ok, that makes (some) sense...;-)
Hudson29
#460
Visit this Community
California, United States
Joined: September 16, 2014
KitMaker: 1,156 posts
Armorama: 1,024 posts
Posted: Monday, December 12, 2016 - 10:09 PM UTC
Looking good Mark, its great to see some progress on your project.

Your missing wheels are a warning to the rest of us. I know I have piles of kits that arrived and were given only the most breezy of inspections or in some cases not even opened at all.

I'm amazed at how good the model makers have become in getting all of the bits into the box. Back in the day, you really had to check each kit carefully as missing parts or short shots were much more common.
Removed by original poster on 12/17/16 - 19:16:38 (GMT).
supplyssg
Visit this Community
Connecticut, United States
Joined: February 04, 2003
KitMaker: 82 posts
Armorama: 71 posts
Posted: Saturday, December 17, 2016 - 02:11 AM UTC
Tamiya, 3T Cgo Trk (Opel Blitz), 1/35

Hey Guys!

Looks like we've been a little dormant here for the last few days so figured I'd give it a shot and try to post a progress report. This is all new to me...new camera, uploading and editing photos to the PC and Gallery then to this thread via all this HTML and BB Code stuff! Hell, this is just as much work as building the model.

On day two of the Campaign I broke-in my newly fabricated hobby station (no more kitchen table ) and began work on assembling the Opel's frame and drive train.

It's been a good decade or so since any serious build and the one disappointment I've got to say is that my eyesight is not what it was 10 years ago. Now armed with some decent reading glasses, I look utterly amazed at the detail work I accomplished on past builds when I had perfect 20/20 vision! This glasses stuff is an annoyance I certainly could do without while getting back into the hobby,

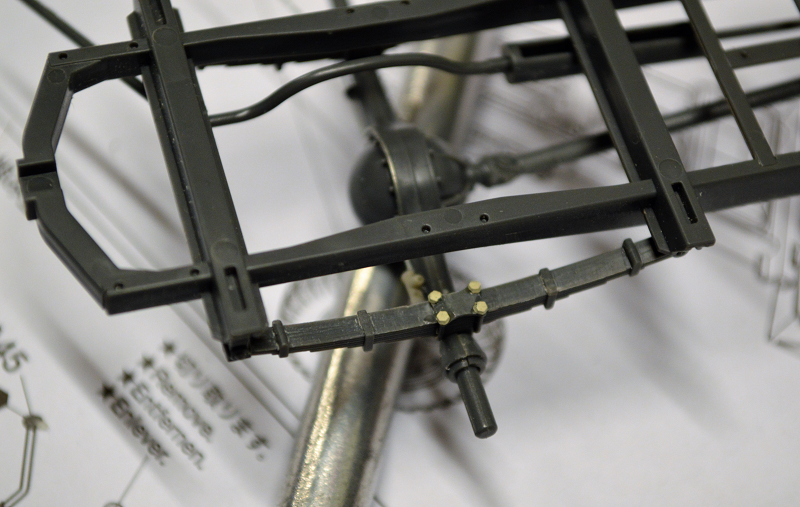
In the photo below, I began with modifying the rear leaf spring assembly by removing the late model helper springs, thereby back dating it to the early model suspension appropriate for 1939. This is a modification that has been posted often and is well known with modelers of this truck, so I won't go into details.

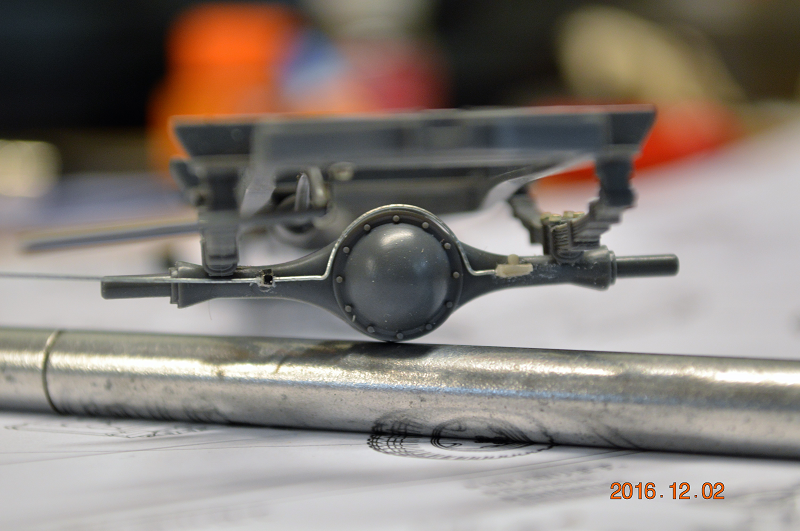
after some general cleaning and seam removal I wasn't happy with the way the exhaust appears without any kind of support system, so I added a simple hanger fashioned from lead foil and hex head bolt fastened to the frame at a reasonable location.

Now, I never was a fan of adding detail to an area of a kit that could not be reasonably viewed by the observer...just seems like a huge waste of time and effort only to go unseen. Viewing other's builds of this kit, however, reveals quite a lot of the kit undercarriage mainly because of the high mounted cargo bed on this truck. So, on with the plumbing of brake lines and wiring of lights.
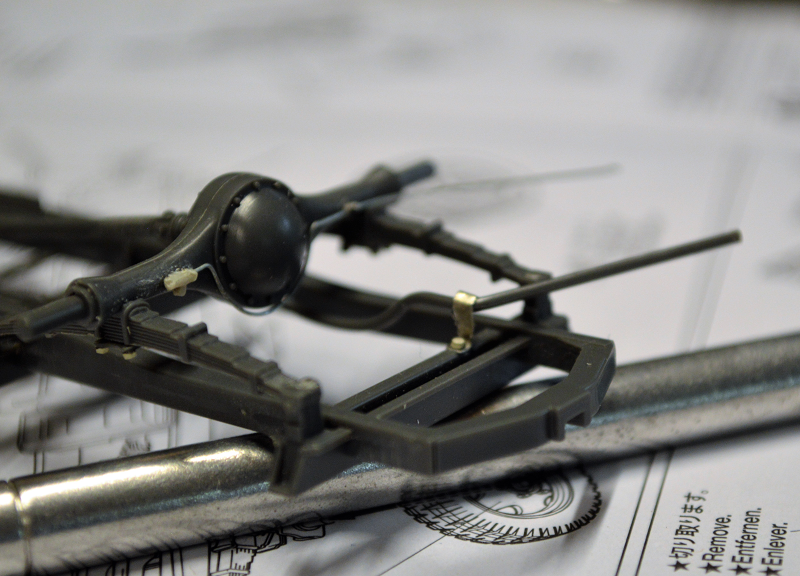
In this view I have just begun a simple hydraulic brake line which will be connected to the drums.


Unforeseen issues with the Panzer Art commercial style tires put the brakes on (no pun intended ) this subassembly for the moment. More to come on the frame later, on to the wheel dilemma...
supplyssg
Visit this Community
Connecticut, United States
Joined: February 04, 2003
KitMaker: 82 posts
Armorama: 71 posts
Posted: Saturday, December 17, 2016 - 05:09 AM UTC
Tamiya, 3T Cgo Trk (Opel Blitz), 1/35

Well, Hey Now...whataya know! My above posted test fire worked out, all in one shot!

Dinner's in the oven and I've got my cocktail in hand and feeling cocky now...I think I'll drive on with my "Love-Hate" relationship review of the resin aftermarket Panzer Art Early Commercial Tires intended for the Opel Blitz.

I've seen this set on many retail sites and on Panzer Art's home page more than once and always with a CAD photo of their product. I searched high and low and couldn't find a review or a pic of the actual product and finally decided to pull the trigger and ordered the set and crossed my fingers. When the wheels arrived, lightning fast, to my doorstep I was more than happy with my purchase.
Armed with my newly purchased magnified reading glasses
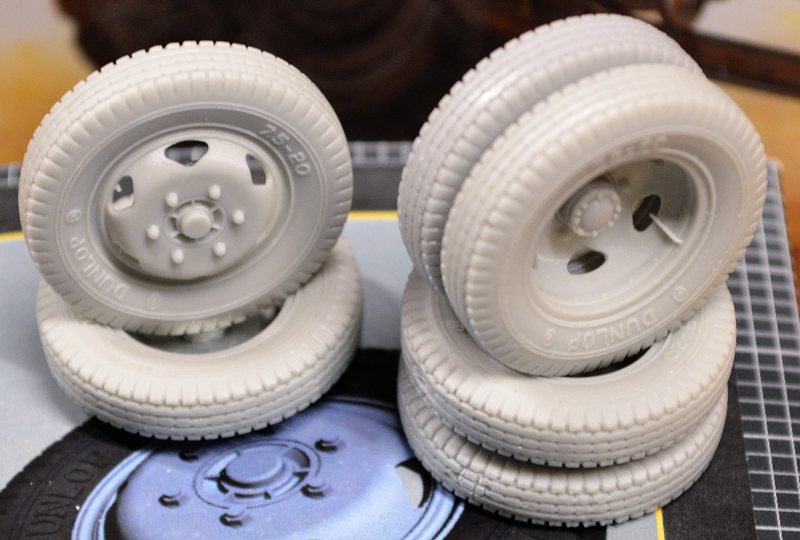
I quickly busted open the well defined box (also adorned in the CAD drawing) and proceeded to examine my purchase - $14 or $15ish, by the way. I was more than impressed! The resin detail is comparable with that of Model Victoria. The tread detail is crisp and clear with only a small pore stub to deal with. The sidewalls are adorned with Dunlop and size lettering and is absolutely phenomenal in clarity. The 6-hole opening wheels even have a finely molded air filler valve! I couldn't have been happier and I was on may way to backdating an early 1938-39
Opel Blitz for this campaign.
The pic below shows the Tamiya front wheel on the left and the Panzer Art front wheel on the right. In this view you can clearly see the fine detail and even the minute valve stem.
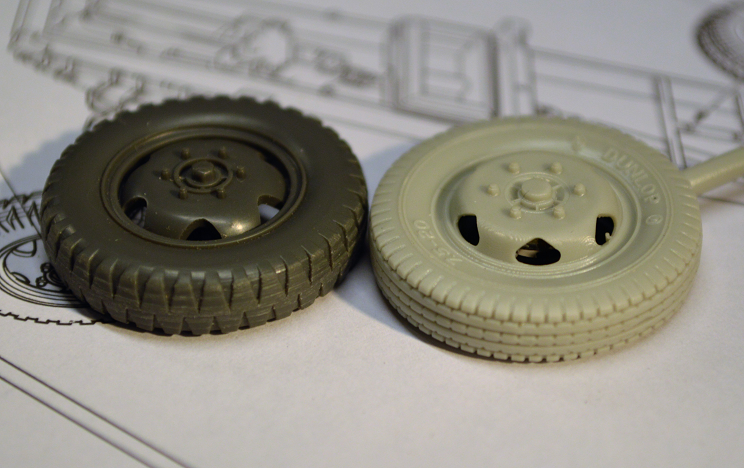

Well, while working on the earlier mentioned brakeline plumbing and while attempting to dryfit the wheels/brake drums to the frame's drivetrain, I soon discovered Panzer Art's downfall.
Though they are exquisite in detail, Panzer Art fell down in a big way in the engineering department! There is no way these engage with the Tamiya kit or any other manufacturer's Opel Blitz Kit, I suspect. The reverse side of the hub or the mounting interior of the wheel, if you prefer, is nothing more than a solid stub not able to accept any kind pin from the front or rear axle. This set is going to require some thought, creativity and patience if you wish to "Make it Happen" as they say in the Army!
First off a 5/64 hole was carefully drilled into the center of the inside plug, making sure not to drill to far and punch through the exterior detail. Next a test fit of the kit brake drum inside the wheel assembly revealed a deep dish profile on the Panzer Art wheel. Left unaltered I think the finished assembly when mounted to the front suspension would end up with to narrow of a profile when view from the front and sitting inside the fenders. This was when I was about to abandon Panzer Art's early road wheels and just go with the kit's wheels, but that wouldn't go with the early interpretation of the Blitz I intended just for this campaign, so I thought and thought over some days and drove on...Hell, this is a lot for a decade break in service from this building. In the end I resorted to the tool hardware bins and found a metal flat washer which inserted inside the wheel assembly and then followed by the brakedrum brought the assembly to where I wanted it to be.

Clear as Mud, Right?

Well, maybe some pics might explain it better.

Below the modified wheel on the left and the original product on the right, waiting for drilling and application of flat washer.
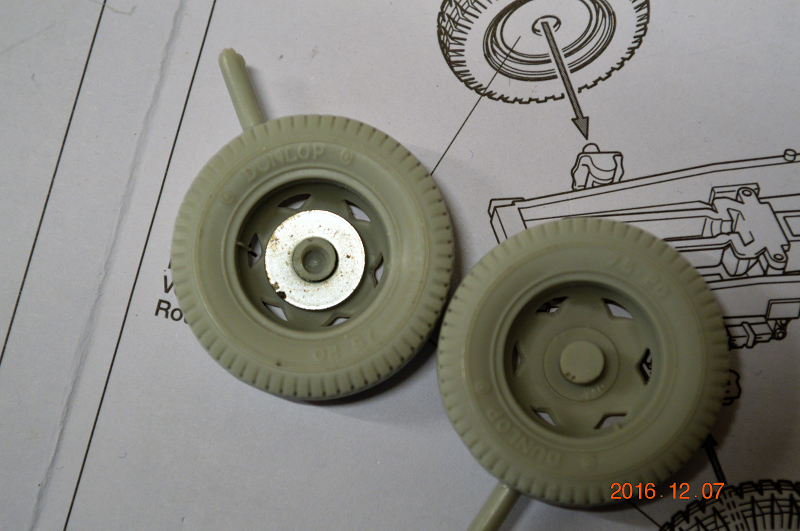
Don't ask me what size washer this is because, honestly, I grabbed the first one from my bin of many and low and behold it fit snugly and perfectly on the first pass. This was one of those moments I had to step back with OMS (Open Mouth Syndrome} and just gaped in amazement, because it's never supposed to be that easy...not the first round at least! I know some of you know what I'm talking about.

In this pic, hopefully you can see the difference between the unmodified wheel and brakedrum on the right - and the flat washer modified wheel and brakedrum on the left. This modified assembly is more like the kit assembly and will hopefully allow for correct wheel spacing when assembled to the suspension. Another bonus is the flat washer is identical in diameter to the kit brakedrum and actually enhances the look when viewed from the openings of the wheel exterior!
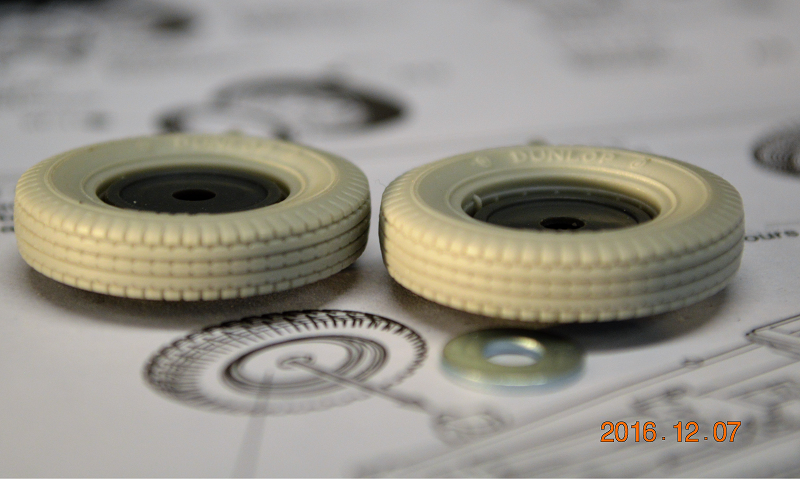

The rear wheels brought on their own set of problems to solve, if the front set was not enough. Panzer Art
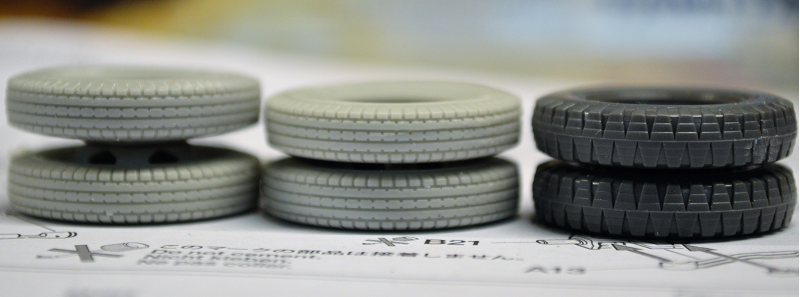
provides five (5) identical rear wheels for assembly. One, which is supposed to be used as a spare requires you to drill out the molded lugs. I was really surprised at this, really, come on Panzer Art! But, drill away you must to represent a proper spare for your kit. Again, all being identical pieces the deep dish when paired created an extreme gap between the two paired rear wheels, much like the Russian GAZ series of trucks. Again, some more thought and a couple beers and premium cigar

In the pic below you will see the two paired together unaltered with an extreme gap {l} they would probably become an issue with the fender when installed later.
My modified set (c) which resembles more closely the original Tamiya assembly (r).
The deep dish on the interior wheel needs to be cut out and then glued to the exterior/wheel adding the separate hub to the assembly, which, by the way, also needs to be carefully drilled out to mate properly with the rear axle pin

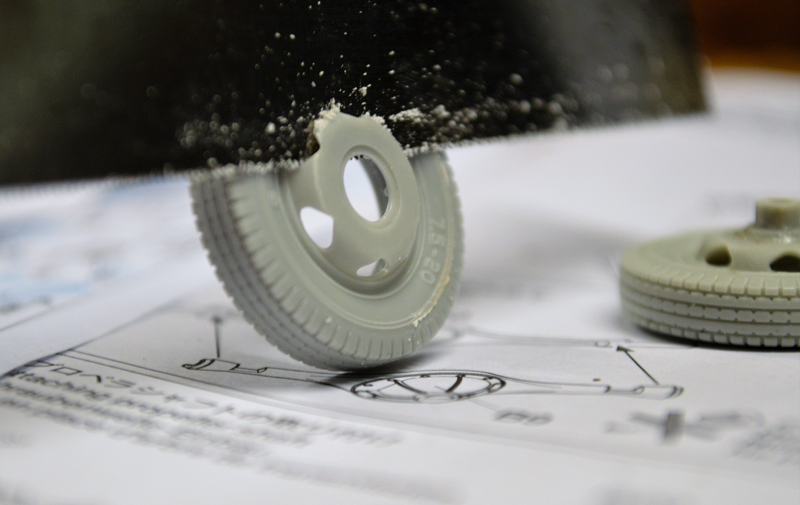

When viewed from the outside of the assembly, if the six(6) lightening holes are aligned properly the interior cut is not visible and all looks correct.

Whew!!! Don't know if I'll do that again.

Finished wheels below
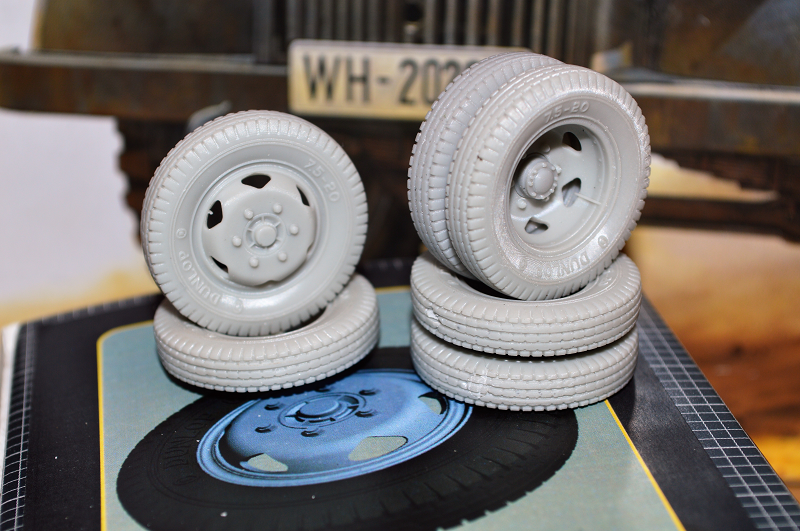

Love those air valves, tho!

Time for a
ClaytonFromEllijay
#454
Visit this Community
Georgia, United States
Joined: July 10, 2016
KitMaker: 1,273 posts
Armorama: 1,138 posts
Posted: Saturday, December 17, 2016 - 06:12 AM UTC
They look great, Richard, but Lordy what a trip to get there! You are a patient soul!
goofmuilwijk
Visit this Community
Zuid-Holland, Netherlands
Joined: April 19, 2013
KitMaker: 179 posts
Armorama: 117 posts
Posted: Saturday, December 17, 2016 - 09:10 PM UTC
Well.... Hoping the deadline of a campaign will spur me on and help me finish some models in 2017, i joined a few campaigns here again. Of course this is one of them

For this campaign i'll build Alan's Panzer II D and add a Tristar figure set.

The box:


The interior:


As some of you may notice, the lower and upper hull have been cut from the sprues already. This is a rather large box with a very small bag of sprues inside. But when trying to compact my stash, i couldn't fit the figure set from Tristar inside. Cutting the parts from the sprue and cutting the Tristar set's sprues to smaller pieces made it all fit in the box. In retrospect, the stash wasn't compacted as much as i hoped so i could have spent my time better


Time to get started!!
d6mst0
#453
Visit this Community
Texas, United States
Joined: August 28, 2016
KitMaker: 1,925 posts
Armorama: 601 posts
Posted: Saturday, December 17, 2016 - 11:46 PM UTC

Quoted Text

For this campaign i'll build Alan's Panzer II D and add a Tristar figure set.


I have this kit so I will be watching your build closely.
Hudson29
#460
Visit this Community
California, United States
Joined: September 16, 2014
KitMaker: 1,156 posts
Armorama: 1,024 posts
Posted: Sunday, December 18, 2016 - 04:10 AM UTC
Richard - You put a lot of thought & work into your backdating and the results speak for themselves. Kudos to you, enjoy the beer!

BTW, I especially enjoy the way you describe your work and provide lots of high quality photos, that really helps us understand what you are doing.
Hudson29
#460
Visit this Community
California, United States
Joined: September 16, 2014
KitMaker: 1,156 posts
Armorama: 1,024 posts
Posted: Sunday, December 18, 2016 - 04:12 AM UTC
Alan's Panzer II D

I do not know this company or the kit. Is it a good one? I look forward to seeing how you progress!
goofmuilwijk
Visit this Community
Zuid-Holland, Netherlands
Joined: April 19, 2013
KitMaker: 179 posts
Armorama: 117 posts
Posted: Sunday, December 18, 2016 - 01:27 PM UTC

Quoted Text

Alan's Panzer II D

I do not know this company or the kit. Is it a good one? I look forward to seeing how you progress!


It's a Russian company that seems to exchange molds with other manufacturers like Alanger, Ark, Maquette, Eastern Express and even early ICM and Dragon kits. They used to produce some lesser known variants, like the Luchs, 1F, 2J etc. before they got discovered by companies like Hobbyboss and Bronco

I've (partially) built their Flamingo and it went together quite well. But i haven't really had much problems building eastern-European kits really. Sometimes the flash is a bit overwhelming, the fit isn't always the best, but they're not difficult to pu together. Obviously it isn't the quality of Tamiya, but it definitely isn't over-engineered like some kits out there.
Bravo1102
Visit this Community
New Jersey, United States
Joined: December 08, 2003
KitMaker: 2,864 posts
Armorama: 2,497 posts
Posted: Monday, December 19, 2016 - 10:11 AM UTC
I also like Eastern European kits. As my eyesight has gone and fingers lost their deftness I welcome the slightly chunky parts.

I built the ICM Pzkpfw II Ausf D just before this campaign was proposed. It is not the same kit as Alan so I looking forward to the build.

I have been working on both a RPM/Mirage TK-3 and TKS tankettes. Both are extra chunky for 1/35. Anyone else planning on them get the Aber photoetch. It wasn't in my budget but it would improve the kits all around.
Ranger74
Visit this Community
Tennessee, United States
Joined: April 04, 2002
KitMaker: 1,290 posts
Armorama: 658 posts
Posted: Monday, December 19, 2016 - 08:19 PM UTC

Quoted Text


Quoted Text

For this campaign i'll build Alan's Panzer II D and add a Tristar figure set.


I have this kit so I will be watching your build closely.


I also have this kit, so will be extra interested in your build.
Ranger74
Visit this Community
Tennessee, United States
Joined: April 04, 2002
KitMaker: 1,290 posts
Armorama: 658 posts
Posted: Monday, December 19, 2016 - 08:37 PM UTC
I have completed the frame for my Ursus A truck. I reinforced the vacform frame rails with some strips of Evergreen 90-degree angle stock glued on inside to top and outside surfaces. I also added the reinforcing plates at joints per the drawings that were in the instructions.

The first three cross-members are resin and the last one as provided in the kit is vacformed. I replaced the last one with Evergreen stock as the kit part was rounded. I used a hollow, square strip cut to proper length, then thinned what would become the top and bottom by sanding until the strip fit the height of the frame rails. Then I removed the side, by sanding, that would face forward to form a U-channel per the original part. I added a reinforcing plate, drilled a hole the tow pintle, and added rivets. I also added rivets to the reinforcing plates on bottom of frame. I left off rivets on top of frame as resin rails for the flat-bed will be added there.

The frame is square but is warped lengthwise.I taped it to a piece of glass to try using a hair dryer to see if I could straighten it. Ended up snapping off front of one rail ahead of first cross member. I am in process of reinforcing and reattaching the piece. I may have to trust the cab and flat bed to take out the warp.
goofmuilwijk
Visit this Community
Zuid-Holland, Netherlands
Joined: April 19, 2013
KitMaker: 179 posts
Armorama: 117 posts
Posted: Monday, December 19, 2016 - 11:40 PM UTC
After a bit of work, this is where it is now:


Sorry for the crappy pictures. Next time i'll get out the camera and not use the phone

Basically the fit is ok, the cleanup not really much. Only issue i had was when fitting the upper to lower hull. I don't remember having this issue when building the Flamingo, but the hull didn't fit very well. Nothing that can't be fixed with some basic modelling skills really: sanding and fitting, clamping and gluing and filling and sanding some more. Although that probably won't be seen afterwards, when there is some dirt in the running gear.

But in all honesty, it's not a very difficult kit to build. Tonight i'll work some more on the single link tracks. They fit well enough but are tedious to cut and clean
ClaytonFromEllijay
#454
Visit this Community
Georgia, United States
Joined: July 10, 2016
KitMaker: 1,273 posts
Armorama: 1,138 posts
Posted: Tuesday, December 20, 2016 - 04:27 AM UTC

Quoted Text

After a bit of work, this is where it is now:


Sorry for the crappy pictures. Next time i'll get out the camera and not use the phone


That's funny, I find my Android phone takes better pictures than my Nikon...
goofmuilwijk
Visit this Community
Zuid-Holland, Netherlands
Joined: April 19, 2013
KitMaker: 179 posts
Armorama: 117 posts
Posted: Tuesday, December 20, 2016 - 12:04 PM UTC

Quoted Text

That's funny, I find my Android phone takes better pictures than my Nikon...


When the lights get a little dimmer, my phone starts giving up. I have a Microsoft Lumia phone. I assume Bill Gates doesn't take photo's at night
Ranger74
Visit this Community
Tennessee, United States
Joined: April 04, 2002
KitMaker: 1,290 posts
Armorama: 658 posts
Posted: Tuesday, December 20, 2016 - 09:14 PM UTC

Quoted Text


Quoted Text

After a bit of work, this is where it is now:


Sorry for the crappy pictures. Next time i'll get out the camera and not use the phone


That's funny, I find my Android phone takes better pictures than my Nikon...


My Samsung G7 takes better close-up photos than my Sony Cyber Shot camera!
PasiAhopelto
Visit this Community
Uusimaa, Finland
Joined: October 01, 2016
KitMaker: 514 posts
Armorama: 171 posts
Posted: Thursday, December 22, 2016 - 11:15 PM UTC
And here's my campaign entry with timing "device"


I think the kit has two decal options for Poland 1939, and I'm planning to build "525" with yellow national insignia.

ClaytonFromEllijay
#454
Visit this Community
Georgia, United States
Joined: July 10, 2016
KitMaker: 1,273 posts
Armorama: 1,138 posts
Posted: Friday, December 23, 2016 - 01:12 AM UTC
Looks like an interesting build, Pasi! Looking forward to it.
iakarch
Visit this Community
Louisiana, United States
Joined: May 19, 2007
KitMaker: 459 posts
Armorama: 421 posts
Posted: Saturday, December 24, 2016 - 12:21 AM UTC
I'm going to build a Tamiya Pz. II Ausf. C