California, United States
Joined: March 03, 2016
KitMaker: 142 posts
Armorama: 137 posts
Posted: Saturday, December 31, 2016 - 05:11 AM UTC
Quoted Text
Quoted Text
Hi everyone!
I'll be entering my Panther G Late Production for this campaign.

 " BORDER="0">
JohnA
Hi John, you've a nice Braille Panther there!
Do pay close attention once you start fitting n mounting the tracks. I think the Dragon tracks for this kit is short. Had to do some gentle stretching of the tracks when I was building this same model kit. And even with the stretched tracks, I suffered concaving of the track portion that goes around the rear idler wheel. I found out that it was best to use CA glue to attach the Dragon tracks to the roadwheels and get them to stay in place when I was getting them to sag. Hope this helps!
-Marcos
Marcus, Thanks for the heads up on the tracks! Even the instruction says you might have to stretch or cut a lil to make them fit.
Here is my progress report on my Panther D.

" BORDER="0">

" BORDER="0">

" BORDER="0">

" BORDER="0">
Almost finished with the build process. Then it's off to the paint shop. Been thinking about a lil Dio for the Panther. Maybe strolling through a field in high grass. It will be my first attempt at a Dio.
@Cristian, I really like paint scheme you did on your flying egg, You improvised!
Happy New Years!!

JohnA
Bayern, Germany
Joined: September 30, 2013
KitMaker: 1,615 posts
Armorama: 1,500 posts
Posted: Saturday, December 31, 2016 - 03:57 PM UTC
Thank you, John!

I like how your Panther is shaping up. The details are really nice for a kit in this sale. Looking forward to seeing it painted.
Building logs: http://armored76.wordpress.com/
Finished projects: http://armored76.wordpress.com/portfolio/
Oklahoma, United States
Joined: September 30, 2015
KitMaker: 2,493 posts
Armorama: 2,344 posts
Posted: Saturday, December 31, 2016 - 10:30 PM UTC
This is my official entry.


"Only the dead have seen the end of war." - Plato
Bayern, Germany
Joined: September 30, 2013
KitMaker: 1,615 posts
Armorama: 1,500 posts
Posted: Saturday, December 31, 2016 - 11:53 PM UTC
Building logs: http://armored76.wordpress.com/
Finished projects: http://armored76.wordpress.com/portfolio/
Colorado, United States
Joined: December 25, 2004
KitMaker: 3,770 posts
Armorama: 2,263 posts
Posted: Sunday, January 01, 2017 - 04:57 AM UTC
Wings:

Mike


#454
Georgia, United States
Joined: July 10, 2016
KitMaker: 1,273 posts
Armorama: 1,138 posts
Posted: Sunday, January 01, 2017 - 06:24 AM UTC
Yep, that's one strange-looking airplane...

"I can make armored cars, safe and unassailable...and behind these our infantry will be able to follow quite unharmed and without any opposition."
-Leonardo da Vinci, 1487
Alberta, Canada
Joined: November 18, 2003
KitMaker: 61 posts
Armorama: 57 posts
Posted: Monday, January 02, 2017 - 09:03 PM UTC
Started my m151a2 Mutt. Making this one straight out of the box with only the addition of a handset and coiled cord for the radio, and a few wires for the antenna.

Bayern, Germany
Joined: September 30, 2013
KitMaker: 1,615 posts
Armorama: 1,500 posts
Posted: Monday, January 02, 2017 - 11:45 PM UTC
Great progress guys! Keep it coming
Building logs: http://armored76.wordpress.com/
Finished projects: http://armored76.wordpress.com/portfolio/
California, United States
Joined: November 01, 2009
KitMaker: 657 posts
Armorama: 481 posts
Posted: Wednesday, January 04, 2017 - 08:39 AM UTC
Hello all
This will be my entry to this GB and only my 4th. It will also be my first 1/72 kit and my 1st Helicopter. It is the Italeri As-532 Puma I will make in Royal Netherlands Airforce Colors.
 image hosting 5mb
 pic upload
" For those who fought for it Freedom has a flavor the protected will never know"
Italeri T-55, Syrian Army 6 Day War Taken out. 2%
AFV IDF Shot. 6 Day War 0%..
Bayern, Germany
Joined: September 30, 2013
KitMaker: 1,615 posts
Armorama: 1,500 posts
Posted: Wednesday, January 04, 2017 - 02:22 PM UTC
Welcome Eugene!
The first image is not showing. Could you please double-check? I guess it is the one with the box content and date proof.
Building logs: http://armored76.wordpress.com/
Finished projects: http://armored76.wordpress.com/portfolio/
California, United States
Joined: November 01, 2009
KitMaker: 657 posts
Armorama: 481 posts
Posted: Thursday, January 05, 2017 - 02:13 AM UTC
I forgot to say it has 95 parts.
 img host
" For those who fought for it Freedom has a flavor the protected will never know"
Italeri T-55, Syrian Army 6 Day War Taken out. 2%
AFV IDF Shot. 6 Day War 0%..
Bayern, Germany
Joined: September 30, 2013
KitMaker: 1,615 posts
Armorama: 1,500 posts
Posted: Thursday, January 05, 2017 - 11:46 AM UTC
Thanks for the update Eugene! This is going to be nice! Are you going for the three-color camo scheme?
Building logs: http://armored76.wordpress.com/
Finished projects: http://armored76.wordpress.com/portfolio/
#298
Hong Kong S.A.R. / 繁體
Joined: August 08, 2002
KitMaker: 1,182 posts
Armorama: 665 posts
Posted: Thursday, January 05, 2017 - 08:50 PM UTC
I'm going to build this for the campaign, Hasegawa 1/72 Space Wolf SW-190.

Bayern, Germany
Joined: September 30, 2013
KitMaker: 1,615 posts
Armorama: 1,500 posts
Posted: Friday, January 06, 2017 - 01:08 AM UTC
Wow, cool, Lap Man! Now that's something different here on armorama
Looking forward to seeing this one done.
Building logs: http://armored76.wordpress.com/
Finished projects: http://armored76.wordpress.com/portfolio/
California, United States
Joined: November 01, 2009
KitMaker: 657 posts
Armorama: 481 posts
Posted: Friday, January 06, 2017 - 12:20 PM UTC
Christian
I hope to try, I saw them in Afghanistan. But the new scheme is nice too.
" For those who fought for it Freedom has a flavor the protected will never know"
Italeri T-55, Syrian Army 6 Day War Taken out. 2%
AFV IDF Shot. 6 Day War 0%..
Bayern, Germany
Joined: September 30, 2013
KitMaker: 1,615 posts
Armorama: 1,500 posts
Posted: Friday, January 06, 2017 - 01:04 PM UTC
You mean the gray/gray scheme used by the French/Spanish? That one's nice, too.
Building logs: http://armored76.wordpress.com/
Finished projects: http://armored76.wordpress.com/portfolio/
#041
Kobenhavn, Denmark
Joined: July 20, 2006
KitMaker: 10,069 posts
Armorama: 4,677 posts
Posted: Friday, January 06, 2017 - 09:17 PM UTC
Wow, that is something different Lap Man. I love it! Looking forward to follow that one.
Campaign'oholic - 252+ campaigns completed
England - East Midlands, United Kingdom
Joined: January 17, 2006
KitMaker: 1,694 posts
Armorama: 1,584 posts
Posted: Saturday, January 07, 2017 - 03:00 PM UTC
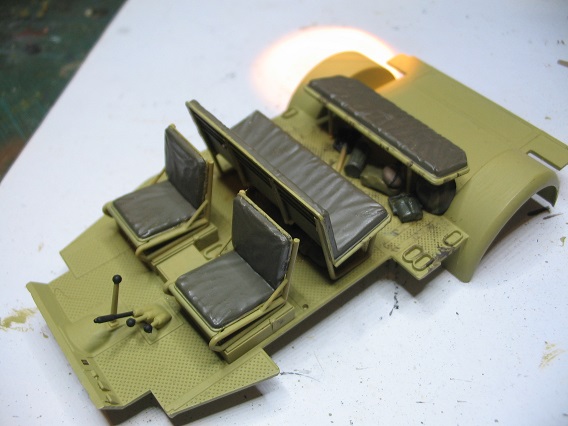
Finally got round to doing some more work on the Steyr yesterday. Hoping to get it finished off in the next few days as there's not a lot of building left to do. Here's where I'm up to so far...
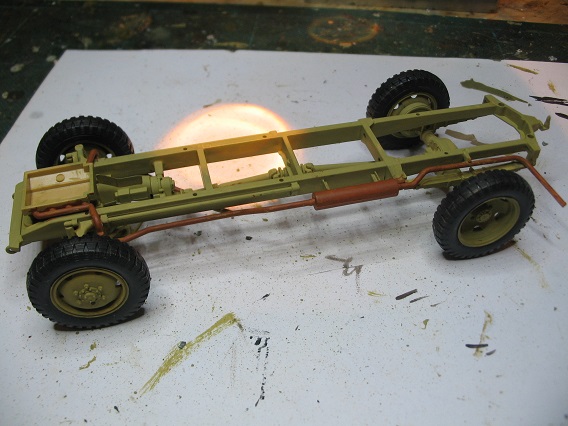
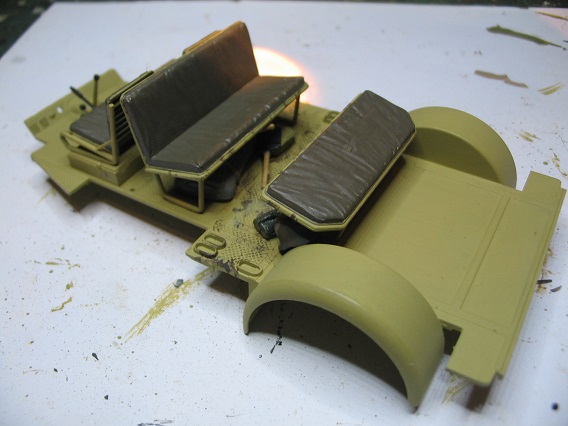
I've weathered the inside before I finish putting it together otherwise there'd be areas that I couldn't reach properly. I always paint as I go along as there's no way I could paint it well when it's all together. Hats off to the guys who can do that but I'd make a mess if I did that.
I've not decided on it's role yet as it's destined for a dio I'm working on. I need to do a bit more research on which division to have it marked up as for the location. Hopefully I should manage to finish putting it together later today.
Nothing is so exhilarating in life as to be shot at with no result.
- Winston Churchill
Bayern, Germany
Joined: September 30, 2013
KitMaker: 1,615 posts
Armorama: 1,500 posts
Posted: Saturday, January 07, 2017 - 05:34 PM UTC
Those seats look excellent! Have you modified them in any way or do these come like this in the box?
Building logs: http://armored76.wordpress.com/
Finished projects: http://armored76.wordpress.com/portfolio/
#454
Georgia, United States
Joined: July 10, 2016
KitMaker: 1,273 posts
Armorama: 1,138 posts
Posted: Saturday, January 07, 2017 - 07:48 PM UTC
I agree, your interior looks great!
"I can make armored cars, safe and unassailable...and behind these our infantry will be able to follow quite unharmed and without any opposition."
-Leonardo da Vinci, 1487
Buenos Aires, Argentina
Joined: September 07, 2006
KitMaker: 918 posts
Armorama: 212 posts
Posted: Saturday, January 07, 2017 - 08:17 PM UTC
Hi, I{m going to begin this campaign with a Miniart T-70, a very simply kit.

England - East Midlands, United Kingdom
Joined: January 17, 2006
KitMaker: 1,694 posts
Armorama: 1,584 posts
Posted: Saturday, January 07, 2017 - 10:14 PM UTC
Thanks guys, comments much appreciated.
Cristian- They're straight out of the box. They're quite nicely detailed considering the age of the kit (1998) with the lumpiness of the cushions and the bracing on the back of the seats. Took a very steady hand and a magnifier to get those right but I'm quite pleased with them. I'm going to give the seat surfaces a light drybrush before I put the sides on to show a bit of wear to the cushions.Photos I've seen of restored vehicles have the vinyl coating of the cushion worn away in some places from usage. I've only done it once before but it came out okay so I thought I'd try it on here as well.
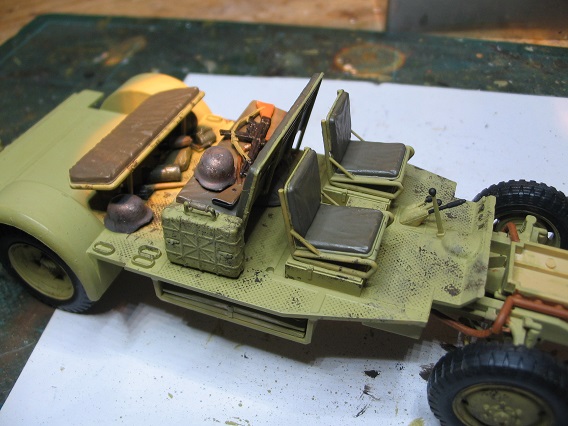
Clayton- I tried a new technique doing the weathering this time. I've been watching a guy on YouTubes videos and tried one of his techniques. I'd got some cheap make up sponges I usually use for oil washes on brickwork. I ripped off a small corner so one edge was all uneven, put it between some spring loaded tweezers and blotted it in some Vallejo German Cam Black Brown(VJ70822). I wiped the bulk of the paint off, blotted it a couple of times on paper to make sure most of it had gone then dabbed it gently on areas where kit and hobnails would take paint off the floor and walls(not shown yet). I changed the lump a few times when doing the walls so I didn't repeat the scratch pattern. I have to admit I'm quite pleased with it as it's a simple technique (I like simple lol) and you can vary the wear by adding more pressure or using less. I'll see if I can find the link for the You Tube guy as he's got some interesting "How To" videos and they're all straightforward and well demonstrated. I like doing open topped vehicles as I get the opportunity to make them look lived in and a bit more unique. It's surprising how effective a few bits of kit thrown into a vehicle lifts it up a bit. From my own experience I know just how much kit gets chucked under seats,down the back of seats or just dumped as squaddies, no matter which army, will always try to get away with carrying as little as possible. Glad you like it so far.
Nothing is so exhilarating in life as to be shot at with no result.
- Winston Churchill
England - East Midlands, United Kingdom
Joined: January 17, 2006
KitMaker: 1,694 posts
Armorama: 1,584 posts
Posted: Saturday, January 07, 2017 - 10:18 PM UTC
Clayton, this is the video I was on about. Some of his videos are really useful so I've saved them in my You Tube favourites. This is the chipping one
https://www.youtube.com/watch?v=xsceaIRCFyU&index=12&list=PLuis5ijgTqFLOhYajEKdxdf1Hdw2AaQb1Nothing is so exhilarating in life as to be shot at with no result.
- Winston Churchill
#454
Georgia, United States
Joined: July 10, 2016
KitMaker: 1,273 posts
Armorama: 1,138 posts
Posted: Sunday, January 08, 2017 - 12:55 AM UTC
"I can make armored cars, safe and unassailable...and behind these our infantry will be able to follow quite unharmed and without any opposition."
-Leonardo da Vinci, 1487
Quebec, Canada
Joined: January 12, 2004
KitMaker: 274 posts
Armorama: 159 posts
Posted: Tuesday, January 10, 2017 - 12:08 AM UTC
Hello everyone, I'm pretty happy to see this campaign, not all kits have to be 500+ parts!
Here is my entry, a PanzerKampfAnzug Ausf M (Melusine) from the Maschinen Krieger universe created by Kow Yokoyama. This is a conversion based on a Nitto PanzerKampfAnzug Ausf G (Gustav) with Modelkasten conversion from 2001, long out-of-production but I still had one in my stash. Time to build it!
First, the required picture with the date on it...

And then, the innards of the boxes...


Cheers,
Chris
On the workbench:
M1117 - HB Leo 2A6M Can - RM LAV-III - Meng AMX-30B2 - Takom Leopard C2 MEXAS - Strv 103B and FM Boba Fett Slave-1 (taking forever to finish)