Campaigns: Completed Campaigns
Campaigns that are completed should be grouped here.
Hosted by Richard S.
British Brigade
petbat
Visit this Community
Queensland, Australia
Joined: August 06, 2005
KitMaker: 3,353 posts
Armorama: 3,121 posts
Posted: Tuesday, July 10, 2018 - 07:47 AM UTC
Excellent Tim. The way you brought out the detail in the painting is superb. You would think this was a much larger scale. Thanks for joining in.

Hi Bogicevic. Seems joining builds has become your thing!

Welcome aboard. I'll look forward to seeing this built too.
BogiBg
Visit this Community
Västra Götaland, Sweden
Joined: May 29, 2018
KitMaker: 397 posts
Armorama: 388 posts
Posted: Tuesday, July 10, 2018 - 10:37 PM UTC
Thanks Peter. Not "only" joining. I planed to finish all three campaigns which are ending in July. So I work simultaneously...
petbat
Visit this Community
Queensland, Australia
Joined: August 06, 2005
KitMaker: 3,353 posts
Armorama: 3,121 posts
Posted: Wednesday, July 11, 2018 - 03:01 PM UTC

Quoted Text

Thanks Peter. Not "only" joining. I planed to finish all three campaigns which are ending in July. So I work simultaneously...


HMMM

Nito74
Visit this Community
Lisboa, Portugal
Joined: March 04, 2008
KitMaker: 5,386 posts
Armorama: 4,727 posts
Posted: Wednesday, July 11, 2018 - 09:31 PM UTC
If you need an extension on the deadline, let me know.
phantom_phanatic309
#372
Visit this Community
United Kingdom
Joined: March 10, 2010
KitMaker: 2,568 posts
Armorama: 423 posts
Posted: Thursday, July 12, 2018 - 08:52 AM UTC
Not sure how I missed this one, but I'm in at a late date too.
Some really great builds, I especially like Iain's Valentine in the caunter camouflage.

I'll be building the Airfix rebox of the ex-JB Vickers Light Tank. Really nice little kit and the last time I built one I did it in a weekend (and that was painting with Hmbrol enamel too!). A real shame Airfix have ditched the entire range of JB models as they really are great little kits.


Probably going to build it as the 15mm machine gun armed C model, but torn between the kits BEF scheme and the Malta Garrison stone wall camouflage.

Should be fun.
petbat
Visit this Community
Queensland, Australia
Joined: August 06, 2005
KitMaker: 3,353 posts
Armorama: 3,121 posts
Posted: Friday, July 13, 2018 - 09:03 AM UTC

Quoted Text

If you need an extension on the deadline, let me know.


Thanks for the reminder John

Oh boy. For some reason I thought this and the Armored CarMax builds finished at the end of August. Need to get my digit out.... hopefully will finish both in time. Construction on the A39 Tortoise is almost finished, just a few details to add then pics.... and then paint
petbat
Visit this Community
Queensland, Australia
Joined: August 06, 2005
KitMaker: 3,353 posts
Armorama: 3,121 posts
Posted: Saturday, July 14, 2018 - 02:05 PM UTC
Okay, construction done. Just a wash down and then on to painting.
Meng A39 Tortoise Heavy Assault Tank

The vehicle out of the box represents Protoype 2, having the smoke dischargers and lacking the hatch on the side of the hull that was present on prototypes after this one.

Not sure about the jerry can holder, as there are very few pics of the Tortoise from the rear and those that do show none, but they are not P2. Went with it any way (it is on the Bovington example). Added detail from brass strip and spares.

Casting numbers from Archer Decals. Barrel is RB Model. Will use RB Besa barrels if they get here in time.

Added texture to the rotating turret as it is smooth in the kit. Also needed to use Putty and glue to repair texture lost during cleanup of mould lines,after relocating the front tow hooks and adding the rear hull panel. There are a few bolts added, either missing or too small on the kit.


Replaced the wiring in the kit, very fine and hard to get the seam line off the parts without breaking them, although 2 were already broken in the box. Also added the missing cables to the front lights, why all others but not these? - probably because the tow hooks are the wrong shape and are located way too far forward and the shape the wires would have to be to get around them would be very noticably wrong.

Also reworked the exhaust pipes and mounts which are just the housings and a tube in the kit, not the bolted flange, etc.

Brass rod used to repalace grab handles and weld seams added to the exhaust cylinder.


BogiBg
Visit this Community
Västra Götaland, Sweden
Joined: May 29, 2018
KitMaker: 397 posts
Armorama: 388 posts
Posted: Saturday, July 21, 2018 - 09:18 AM UTC
Nice work Peter, and as I can see, a lot of it...
BogiBg
Visit this Community
Västra Götaland, Sweden
Joined: May 29, 2018
KitMaker: 397 posts
Armorama: 388 posts
Posted: Saturday, July 21, 2018 - 09:29 AM UTC
I finished everything. Tamiya haven't give me time for bonding with this kit. It went together so fast...

First green.

Then something I mixed... After some washing.
BogiBg
Visit this Community
Västra Götaland, Sweden
Joined: May 29, 2018
KitMaker: 397 posts
Armorama: 388 posts
Posted: Saturday, July 21, 2018 - 09:31 AM UTC
Then some weathering.

BogiBg
Visit this Community
Västra Götaland, Sweden
Joined: May 29, 2018
KitMaker: 397 posts
Armorama: 388 posts
Posted: Saturday, July 21, 2018 - 09:36 AM UTC
Decals...
petbat
Visit this Community
Queensland, Australia
Joined: August 06, 2005
KitMaker: 3,353 posts
Armorama: 3,121 posts
Posted: Saturday, July 21, 2018 - 09:38 AM UTC

Quoted Text

Tamiya haven't give me time for bonding with this kit. It went together so fast...


Very nice Vlad, love the chipped paint look you do. After seeing your 222 for the Armored CarMax thread, I think I can guess how you did the filters on this one... decaf?
BogiBg
Visit this Community
Västra Götaland, Sweden
Joined: May 29, 2018
KitMaker: 397 posts
Armorama: 388 posts
Posted: Saturday, July 21, 2018 - 09:40 AM UTC
Then details, matt lack and...
I call this finished.


BogiBg
Visit this Community
Västra Götaland, Sweden
Joined: May 29, 2018
KitMaker: 397 posts
Armorama: 388 posts
Posted: Saturday, July 21, 2018 - 09:44 AM UTC

Quoted Text


Quoted Text

Tamiya haven't give me time for bonding with this kit. It went together so fast...


Very nice Vlad, love the chipped paint look you do. After seeing your 222 for the Armored CarMax thread, I think I can guess how you did the filters on this one... decaf?


AHAHAHAHAHA!!!
Good one.
d6mst0
#453
Visit this Community
Texas, United States
Joined: August 28, 2016
KitMaker: 1,925 posts
Armorama: 601 posts
Posted: Saturday, July 21, 2018 - 12:11 PM UTC
Bogicevic,

Nice finish, she looks like she has traveled more than a few miles.

Mark
BogiBg
Visit this Community
Västra Götaland, Sweden
Joined: May 29, 2018
KitMaker: 397 posts
Armorama: 388 posts
Posted: Saturday, July 21, 2018 - 05:03 PM UTC
Thanks Mark. By the look of this few tanks, I would say that I was quite conservative.
eMan
#298
Visit this Community
Hong Kong S.A.R. / 繁體
Joined: August 08, 2002
KitMaker: 1,182 posts
Armorama: 665 posts
Posted: Sunday, July 22, 2018 - 04:47 PM UTC
Progress update.


petbat
Visit this Community
Queensland, Australia
Joined: August 06, 2005
KitMaker: 3,353 posts
Armorama: 3,121 posts
Posted: Sunday, July 22, 2018 - 09:05 PM UTC
Looking good Lapman. Clock is ticking!
25PDRFG
Visit this Community
England - East Anglia, United Kingdom
Joined: August 09, 2009
KitMaker: 187 posts
Armorama: 181 posts
Posted: Sunday, July 22, 2018 - 09:29 PM UTC
Anyone spot the Coventer
petbat
Visit this Community
Queensland, Australia
Joined: August 06, 2005
KitMaker: 3,353 posts
Armorama: 3,121 posts
Posted: Monday, July 23, 2018 - 08:08 PM UTC

Quoted Text

Anyone spot the Coventer


Not until you pointed it out! The gap between the roadwheels is an indication of a Covenanter, as is the covers on the front hull though. Only a handful of these went to the desert for trials, so this is a rare pick indeed.

Thanks for pointing it out
phantom_phanatic309
#372
Visit this Community
United Kingdom
Joined: March 10, 2010
KitMaker: 2,568 posts
Armorama: 423 posts
Posted: Sunday, July 29, 2018 - 02:51 AM UTC
BogiBg, fantastic work on your Valentine. I recently added the Tamiya kit to my stash and I'm really looking forward to starting it soon.

petbat, your Tortoise is looking really good. That tank was a beast! Would have been something to have seen it in action.

Here's my progress on my Vickers light tank. The kit practically falls together. The inside of the turret needed packing with some scrap to get the bottom to fit flush. I also drilled out the gun barrels, smoke grenade launchers and exhaust.
The longer barreled 15mm BESA makes it look a bit like a Scimitar CVRT I think.


And finally with some paint. I used Mig acrylics khaki green and SCC15 UK olive drab for the disruptive camouflage. I based the pattern on some photos I found online.

d6mst0
#453
Visit this Community
Texas, United States
Joined: August 28, 2016
KitMaker: 1,925 posts
Armorama: 601 posts
Posted: Sunday, July 29, 2018 - 04:43 AM UTC
Stephen,

Nice progress. Looking forward to the finish.

Mark
roman
Visit this Community
Slovakia
Joined: July 20, 2004
KitMaker: 99 posts
Armorama: 95 posts
Posted: Sunday, July 29, 2018 - 07:10 AM UTC
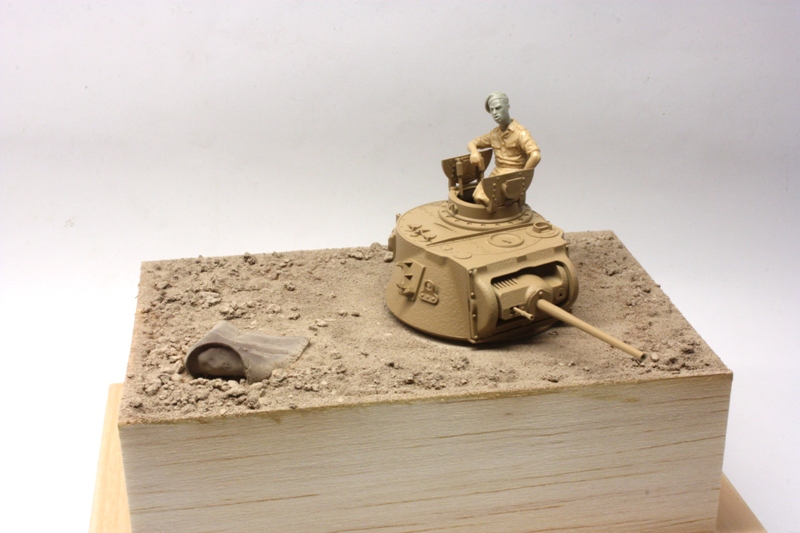
my Matilda - turret bunker from North Africa


petbat
Visit this Community
Queensland, Australia
Joined: August 06, 2005
KitMaker: 3,353 posts
Armorama: 3,121 posts
Posted: Sunday, July 29, 2018 - 09:00 AM UTC
Looking Good Stephen.

Roman, somewhere in North Africa, a headless Matilda continues to search for its lid..... and a Zombie Tommy waits forlornly for its return....


Nicely done. Will look great when its all finished.
petbat
Visit this Community
Queensland, Australia
Joined: August 06, 2005
KitMaker: 3,353 posts
Armorama: 3,121 posts
Posted: Sunday, July 29, 2018 - 06:51 PM UTC
Okay Time is running out and the Besa barrels and wire cable I ordered has not come through yet. Apart from that, the A39 Tortoise is finished. So I am calling it in time for the build end date.

I was going for the look of P2 going through trials - dried mud and dusty, but only on the lower half. I presume they were cleaned down regularly.

The Bovington example has the wavy grey under the barrel, like the Firefly had. The Firefly was painted that way so the barrel would look shorter so the Germans couldn't pick them out from regular Sherman's, but why do that on the Tortoise? Not like it is going to be mistaken for something less innocuous! So... I left mine green all the way around.

I can't seem to access the gallery pages, so I'll have to try that later.


The Archer Resin decals for casting numbers held up quite well. I thoroughly recommend them.


Thanks for looking.


Had a ball building this and watching all your builds. Until next build...