

Styrodur is perfect for stone work/bricks/ cobbles and all that
https://nl.pinterest.com/pin/857232110297239366/
https://www.google.nl/search?rlz=1C1PRFG_nlNL749NL749&biw=1911&bih=877&tbm=isch&sa=1&ei=KGV9W-GVK4nawALCn7fgAQ&q=styrodur+blue++australia&oq=styrodur+blue++australia&gs_l=img.3...46498.48285.0.49285.6.6.0.0.0.0.66.363.6.6.0....0...1c.1.64.img..0.0.0....0.owgtyn-BwmE#imgrc=RID0bh3eOXOVQM:
Ps
they come in different colors (has to do with density)
Dioramas
Do you love dioramas & vignettes? We sure do.
Do you love dioramas & vignettes? We sure do.
Hosted by Darren Baker, Mario Matijasic
Operation Anthropoid

maartenboersma

Joined: October 10, 2010
KitMaker: 764 posts
Armorama: 742 posts
Posted: Wednesday, August 22, 2018 - 01:32 AM UTC

BUTA46

Joined: May 05, 2015
KitMaker: 117 posts
Armorama: 113 posts
Posted: Wednesday, August 22, 2018 - 01:32 AM UTC
And the reason you dont hear from me much Tim, is the music videos you link to. I wind up way down the utube list listening to the Killdares do Whiskey in the Jar or The Who, live, doing Wont Get Fooled Again and I forget to come back and comment on your amazing mechanical plastic Frankenmobiles. Thanks for the show and
Wack for ma daddyo
Wack for ma daddyo

Dioramartin

Joined: May 04, 2016
KitMaker: 1,476 posts
Armorama: 1,463 posts
Posted: Friday, August 24, 2018 - 01:20 AM UTC
Thanks Phil & apologies, thats the inexorable YouTube tractor-beam programmed to pull us down ever deeper to look at more ads. But there's a sure-fire way to break loose just type in The Birdie Song by The Tweets and youll be a free man again in seconds 
While away this week I dredged up 45 year-old fragmentary memories of school Tech Drawing classes & then got nervous about the trams dimensions. MiniArts European version seems to have been generic to Germany & Belgium mostly between the wars, and does bear a close resemblance to the 1909 Prague model being represented. However close is a relative term the sketch below shows the 1:1 kit chassis on top in plan - the upper left cab quarter shows the Euros front doors/windows arrangement & the lower left cab quarter shows the Prague arrangement as best as I can draw it from image references. The lower drawing of a side view for the Prague modifications revealed that in the absence of an easier fix, Ill have to chop out a 11mm slice (as represented by the diagonal hatching) from each end of both driver-trams...
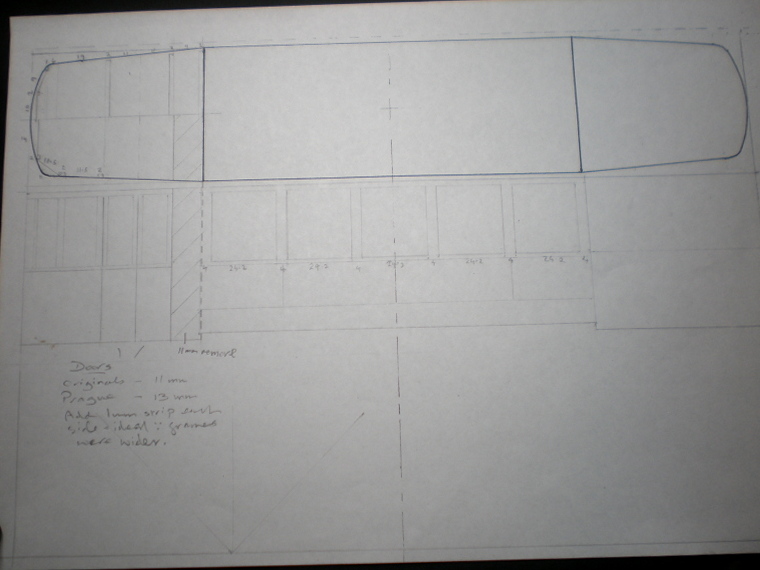
This will reduce the length by 0.75 metres scaled-up, which happens to get close to my guesstimate that the Prague tram was approx. 8.75 metres long whereas the Euro scales to 9.8 metres. A comparison
Itll require some unwelcome surgery but I noticed some evidence that Id be making the right cuts Prague trams had their leaf-springs centred over the axles, while the Euros leaf-springs are positioned way off the axles towards the ends - a stretch-tram. Re-positioning them should be easy enough & Im not too bothered if some/all the invisible underside metalwork doesnt take kindly to shortening.
The Pragues 5-window configuration along the main compartment should look OK in terms of each window looking nearly square, once Ive tweaked the dimensions of the dividing frames. The Pragues double-doors were wider than Euros & it should also be easy to make the cabs big Prague front window. But Im in trouble with the cabs side windows diagonally across the corners
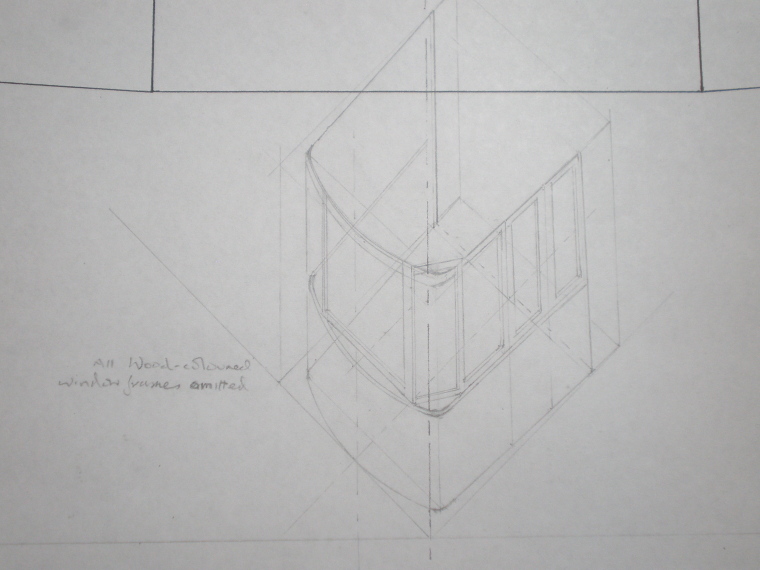
As I recall this used to be called an Isometric Projection...so Old School. The diagonal window is cramped/not at 45°/leaves an awkward corner triangle in the frame because the Euros cab tapers towards each end, whereas the Pragues doesnt appear to do that, or if it does only slightly. So in other words the Euro cab isnt wide enough & the solutions to widen the cab front, which will help make the curve around to the sides less acute, and the cab sections going to be almost as wide as the main compartment
Using that front panel with the sprue-damaged window frame for test purposes, trying out Evergreen half-round & alternative strips to widen the cab. The headlight needs to be relocated about 1 cm lower but to avoid destroying/re-making it Ill try cutting a central vertical strip containing the light fitting out & gluing it back together upside down.

The consequence of cab-widening/shortening is of course that the roof(s) will need to follow the new lines too, meaning fillets/fillers/putty/sanding/sweat/blood/global catastrophe/hearing the first bar of the Birdie Song again.
Next time: Tram trauma
While away this week I dredged up 45 year-old fragmentary memories of school Tech Drawing classes & then got nervous about the trams dimensions. MiniArts European version seems to have been generic to Germany & Belgium mostly between the wars, and does bear a close resemblance to the 1909 Prague model being represented. However close is a relative term the sketch below shows the 1:1 kit chassis on top in plan - the upper left cab quarter shows the Euros front doors/windows arrangement & the lower left cab quarter shows the Prague arrangement as best as I can draw it from image references. The lower drawing of a side view for the Prague modifications revealed that in the absence of an easier fix, Ill have to chop out a 11mm slice (as represented by the diagonal hatching) from each end of both driver-trams...
This will reduce the length by 0.75 metres scaled-up, which happens to get close to my guesstimate that the Prague tram was approx. 8.75 metres long whereas the Euro scales to 9.8 metres. A comparison
Itll require some unwelcome surgery but I noticed some evidence that Id be making the right cuts Prague trams had their leaf-springs centred over the axles, while the Euros leaf-springs are positioned way off the axles towards the ends - a stretch-tram. Re-positioning them should be easy enough & Im not too bothered if some/all the invisible underside metalwork doesnt take kindly to shortening.
The Pragues 5-window configuration along the main compartment should look OK in terms of each window looking nearly square, once Ive tweaked the dimensions of the dividing frames. The Pragues double-doors were wider than Euros & it should also be easy to make the cabs big Prague front window. But Im in trouble with the cabs side windows diagonally across the corners
As I recall this used to be called an Isometric Projection...so Old School. The diagonal window is cramped/not at 45°/leaves an awkward corner triangle in the frame because the Euros cab tapers towards each end, whereas the Pragues doesnt appear to do that, or if it does only slightly. So in other words the Euro cab isnt wide enough & the solutions to widen the cab front, which will help make the curve around to the sides less acute, and the cab sections going to be almost as wide as the main compartment
Using that front panel with the sprue-damaged window frame for test purposes, trying out Evergreen half-round & alternative strips to widen the cab. The headlight needs to be relocated about 1 cm lower but to avoid destroying/re-making it Ill try cutting a central vertical strip containing the light fitting out & gluing it back together upside down.
The consequence of cab-widening/shortening is of course that the roof(s) will need to follow the new lines too, meaning fillets/fillers/putty/sanding/sweat/blood/global catastrophe/hearing the first bar of the Birdie Song again.
Next time: Tram trauma
jrutman
Joined: April 10, 2011
KitMaker: 7,941 posts
Armorama: 7,934 posts
Posted: Friday, August 24, 2018 - 04:01 AM UTC
Nice to see someone else that gets way way down in the weeds concerning detail,etc. At this point,you are looking UP at the weeds.
Nice,
J
Nice,
J

justsendit
Joined: February 24, 2014
KitMaker: 3,033 posts
Armorama: 2,492 posts
Posted: Friday, August 24, 2018 - 08:39 AM UTC
Tim, I am thoroughly entertained by this most incredible project. I really enjoy the blow-by-blow explanations as you go. ... Let no detail remain unturned! This is weed-whacking at its best!🌿
Cheers!🍺
mike
Cheers!🍺
mike
Dioramartin
Joined: May 04, 2016
KitMaker: 1,476 posts
Armorama: 1,463 posts
Posted: Saturday, August 25, 2018 - 10:41 PM UTC
Details.....weed......hmmm......
Dioramartin
Joined: May 04, 2016
KitMaker: 1,476 posts
Armorama: 1,463 posts
Posted: Friday, August 31, 2018 - 02:10 AM UTC
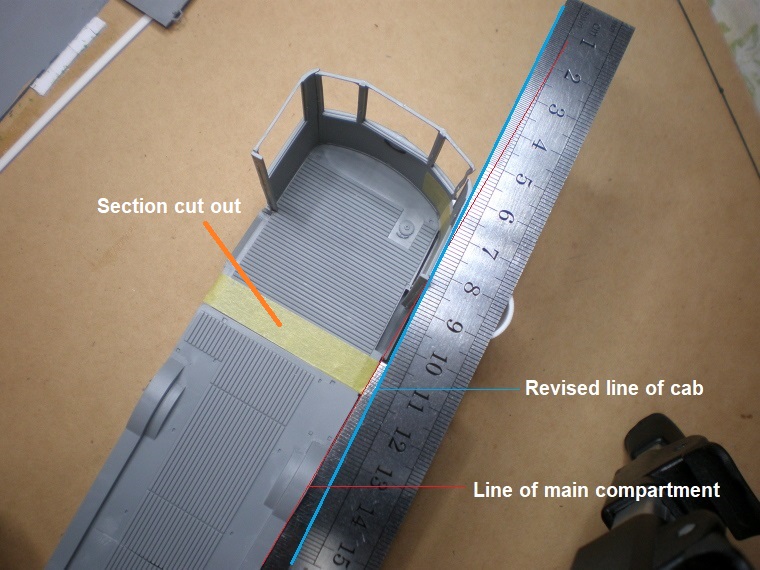
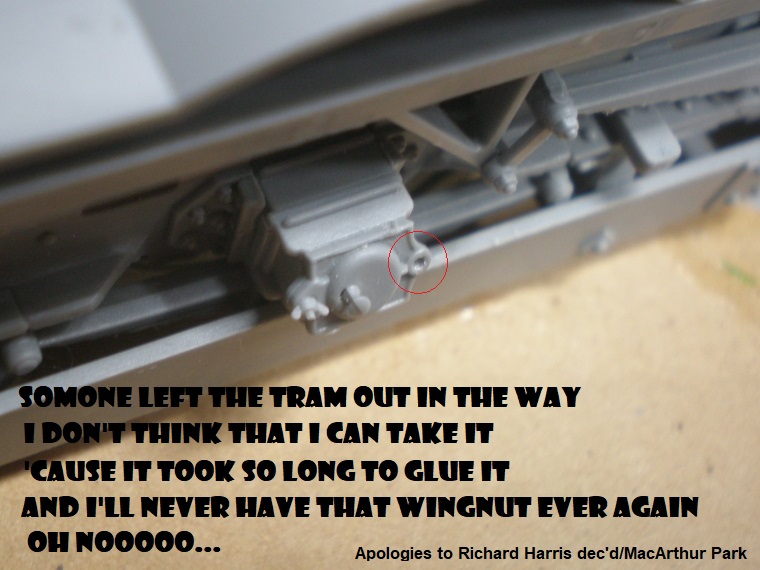
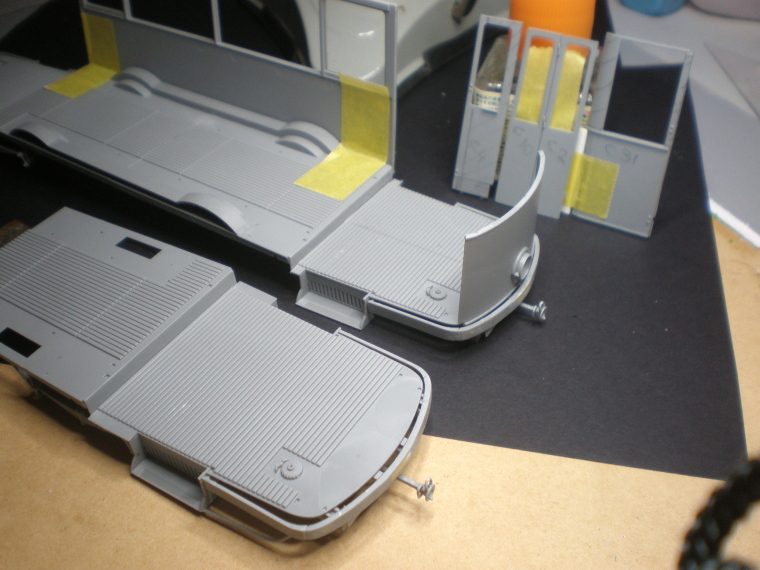
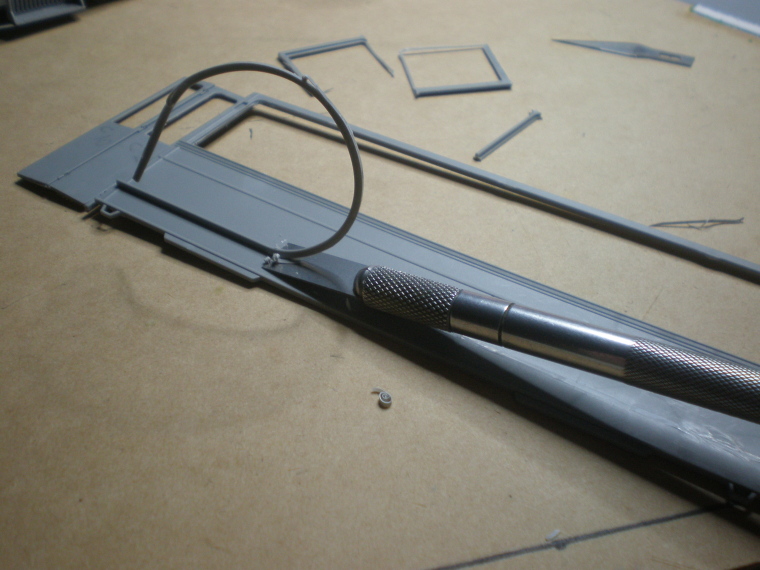
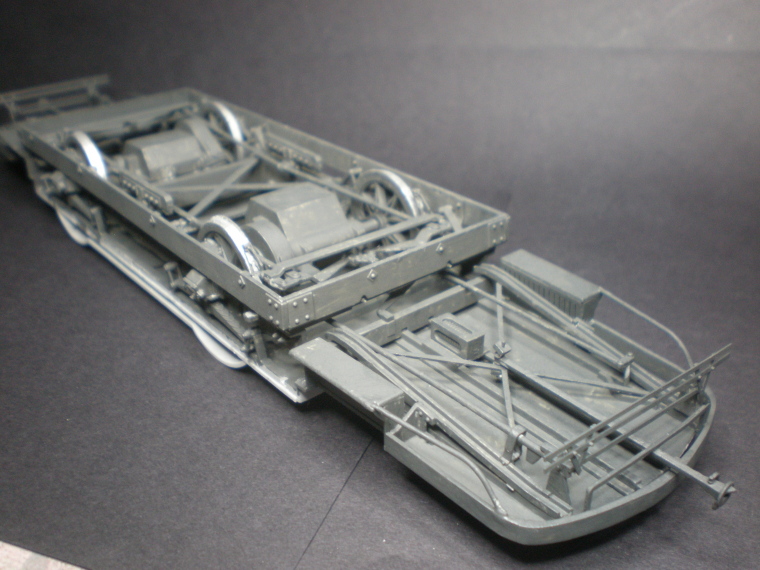
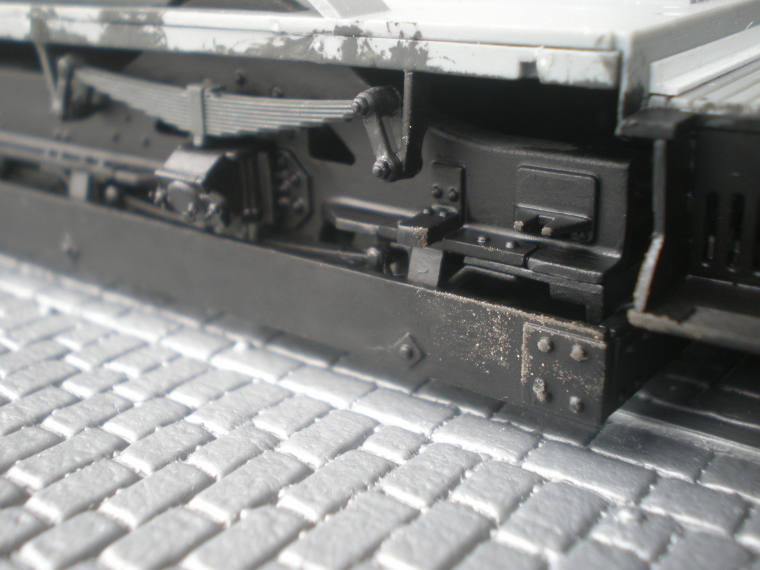
So much for light relief. To the Operating Table then, excising the first of two 11mm sections from the chassis which involved removal of some braces/brackets & the leaf springs before the scalpel went about its grim work
I decided not to do the other end in parallel yet because of the high probability of (a) screwing something up & learning the hard way how to do it right, and (b) slight variability of measurements. As for the headlight issue
duh - all I needed to do was turn the whole panel upside down because the window frames had to come off anyway. The beading & light-collar details are relatively easy to amend
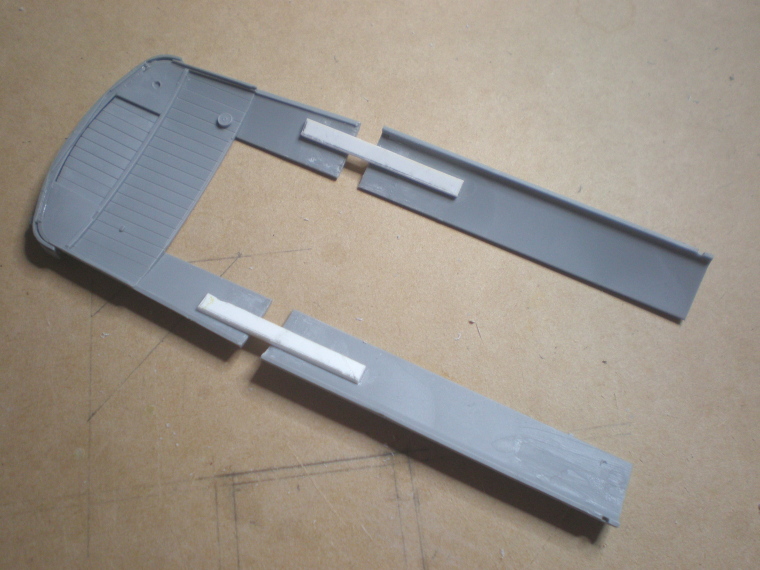
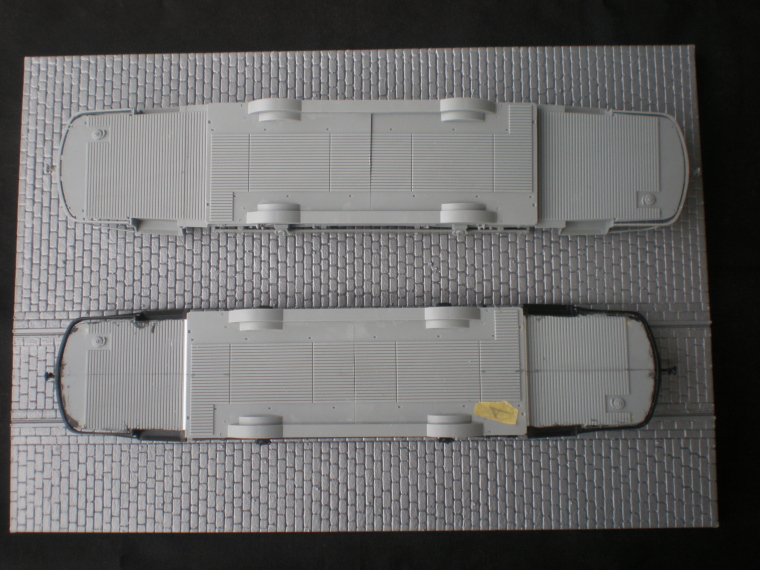
Below shows the shortened chassis vs. an original version, & in the background the next victims lined up for the blade. Its always worth trying to preserve as much as possible e.g. panel C4s left-hand edge has hinge brackets on both sides so slicing that vertical strip & re-using saved scratching em...
Mostly a glue-free zone held together with masking tape & held breath, with test-fits to establish the exact width of the gap created at the front panel I didnt trust my drawings for this

and the fillets
followed by Milliput, left side sanded & right side next
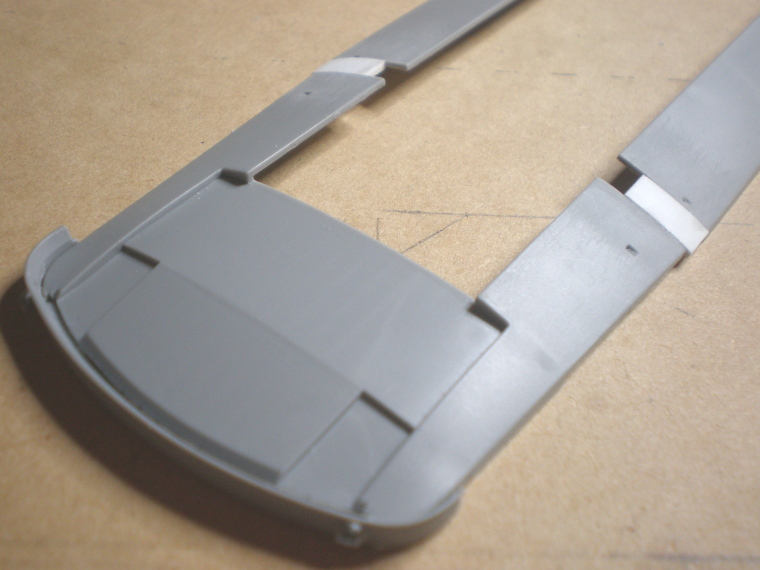
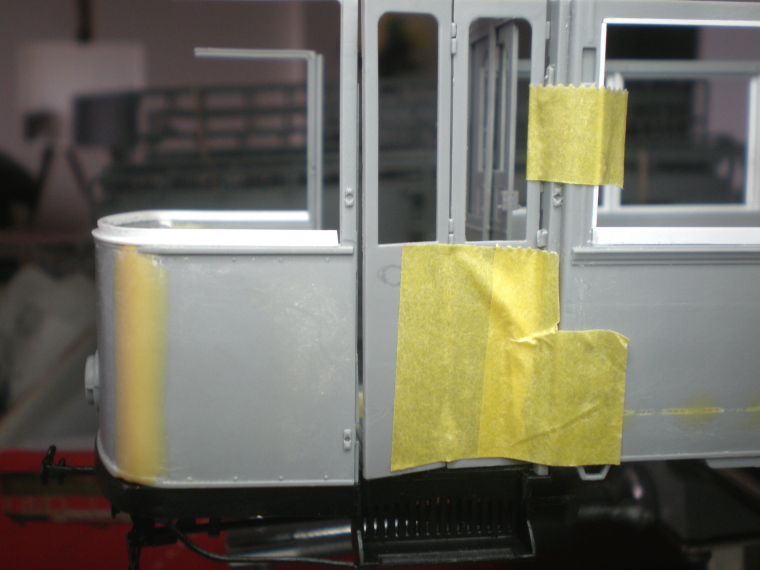
Botched nose-job! In the image below Id totally forgotten that the large square front window frame & support needs to rest on the top of the drivers console which therefore needs to be much deeper. I blame the glue fumes, Im sure they cause short term memory loss. And the other problem is Im sure the glue fumes cause short term memory loss. Id cut off the consoles locating tabs, filled in their holes in the floor just in front of the last wooden floor-slat & glued it to the back of the front panel. The need for a deeper console-top meant that the original kit position was exactly where the console should go & I had to march it back from this too-far-forward position. So predictable that it was the ONLY item Id dared to cement in place
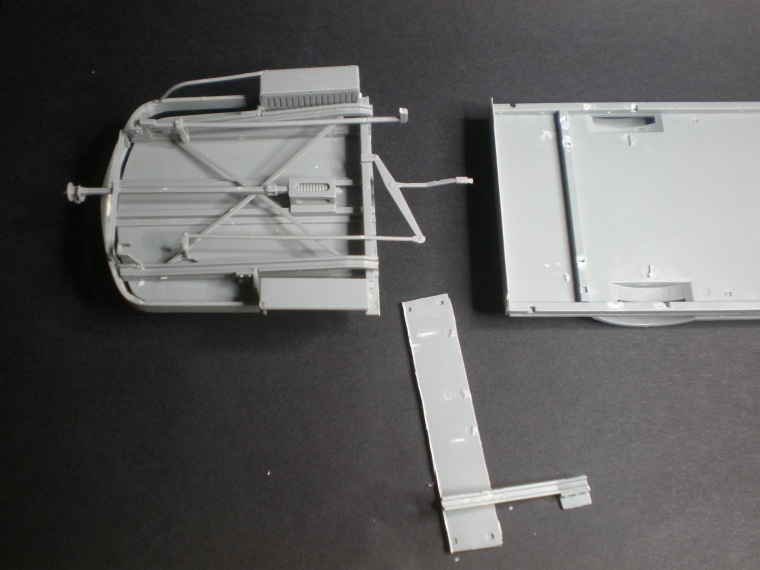
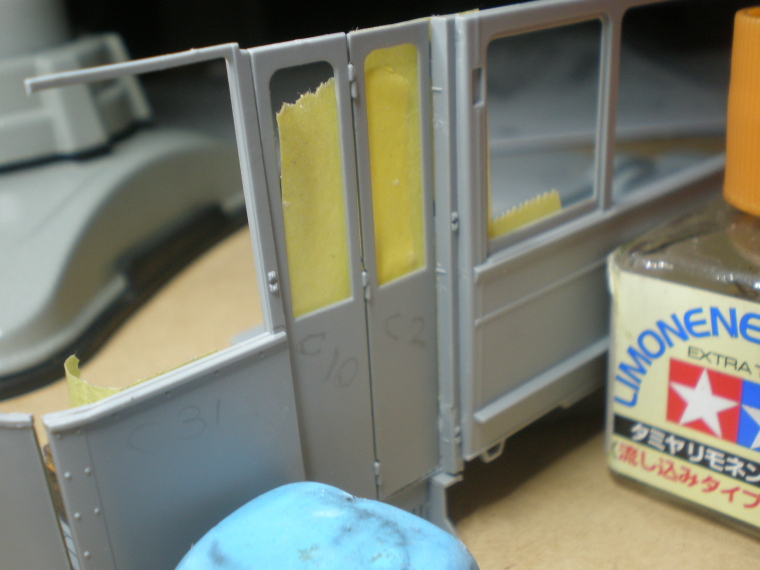
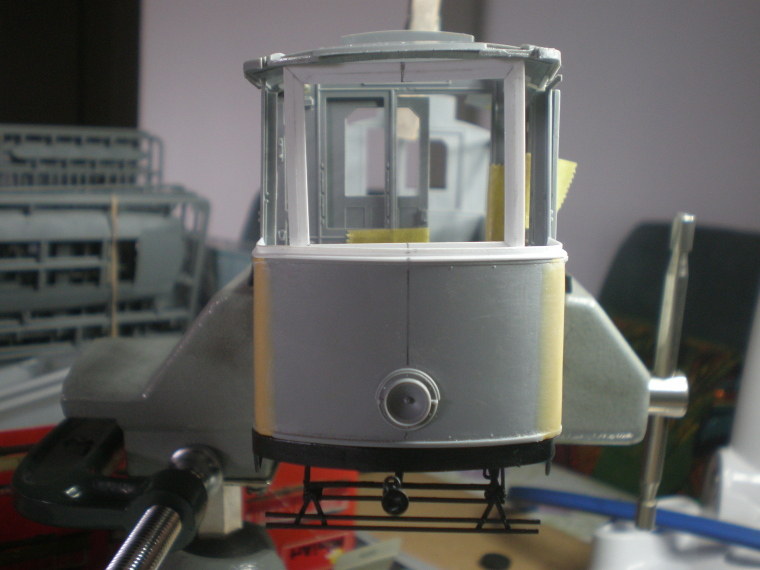
Heres the big front window frame made from Evergreen L-angle (0.6/1.5mm) while the tray steadily accumulates debris from the slash-fest
All the cab windows will need secondary wood-coloured frames within them (as seen in the 2nd image of this post) made in slim sandwiches, painted, then the glass filling inserted & probably some of the very last items to be installed.

Above more test-fits, after cutting the standard 11 mm section out of the inner-roof shell. Theres an outer roof shell to cut later too & Im glad I didnt do it now because Ive just realised tonight that the cut should only have been 6mm because the cabs been moved forward. Id refer to the Anger Management for Dummies manual but I threw it out the window last week.
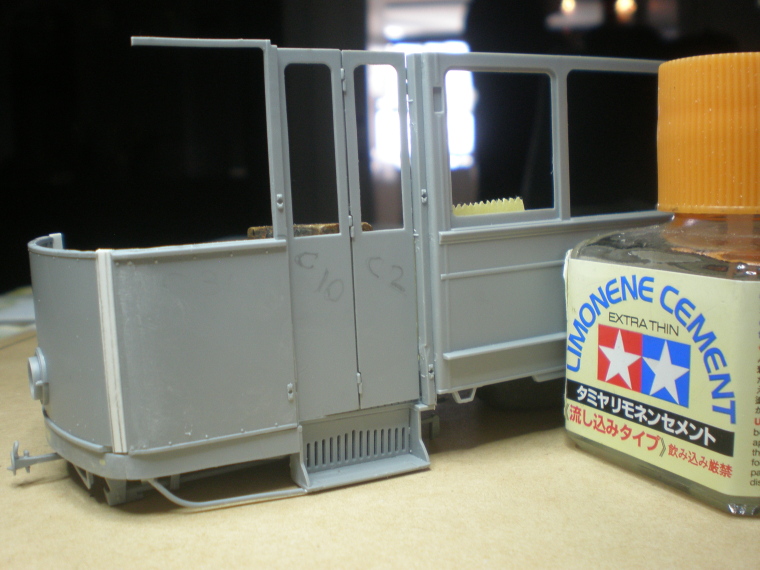
The lip round the top of the front panel was made of a single piece of L-angle persuaded round the corners with glue & optimism. The cab went askew during photography but didnt matter, I just needed to see if/how the window frame engaged with the roof underside it doesnt, but now I know how/by how much I need to modify the roof line before its lip is attached. Also visible is the long port-side compartment panel stripped of its pillars, and the external beading like so
Doing that brought back dark memories of my first & last experience of making a lino-cut when my fingers holding the lino plate down were idiotically one inch in front of the U-bladed knife, which with great force suddenly deflected out of the channel being cut. That involuntary surgery is lurking throughout this phase in wafts of déjà vu
I decided not to do the other end in parallel yet because of the high probability of (a) screwing something up & learning the hard way how to do it right, and (b) slight variability of measurements. As for the headlight issue
duh - all I needed to do was turn the whole panel upside down because the window frames had to come off anyway. The beading & light-collar details are relatively easy to amend
Below shows the shortened chassis vs. an original version, & in the background the next victims lined up for the blade. Its always worth trying to preserve as much as possible e.g. panel C4s left-hand edge has hinge brackets on both sides so slicing that vertical strip & re-using saved scratching em...
Mostly a glue-free zone held together with masking tape & held breath, with test-fits to establish the exact width of the gap created at the front panel I didnt trust my drawings for this
and the fillets
followed by Milliput, left side sanded & right side next
Botched nose-job! In the image below Id totally forgotten that the large square front window frame & support needs to rest on the top of the drivers console which therefore needs to be much deeper. I blame the glue fumes, Im sure they cause short term memory loss. And the other problem is Im sure the glue fumes cause short term memory loss. Id cut off the consoles locating tabs, filled in their holes in the floor just in front of the last wooden floor-slat & glued it to the back of the front panel. The need for a deeper console-top meant that the original kit position was exactly where the console should go & I had to march it back from this too-far-forward position. So predictable that it was the ONLY item Id dared to cement in place
Heres the big front window frame made from Evergreen L-angle (0.6/1.5mm) while the tray steadily accumulates debris from the slash-fest
All the cab windows will need secondary wood-coloured frames within them (as seen in the 2nd image of this post) made in slim sandwiches, painted, then the glass filling inserted & probably some of the very last items to be installed.
Above more test-fits, after cutting the standard 11 mm section out of the inner-roof shell. Theres an outer roof shell to cut later too & Im glad I didnt do it now because Ive just realised tonight that the cut should only have been 6mm because the cabs been moved forward. Id refer to the Anger Management for Dummies manual but I threw it out the window last week.
The lip round the top of the front panel was made of a single piece of L-angle persuaded round the corners with glue & optimism. The cab went askew during photography but didnt matter, I just needed to see if/how the window frame engaged with the roof underside it doesnt, but now I know how/by how much I need to modify the roof line before its lip is attached. Also visible is the long port-side compartment panel stripped of its pillars, and the external beading like so
Doing that brought back dark memories of my first & last experience of making a lino-cut when my fingers holding the lino plate down were idiotically one inch in front of the U-bladed knife, which with great force suddenly deflected out of the channel being cut. That involuntary surgery is lurking throughout this phase in wafts of déjà vu
Stickframe

#362
Joined: December 01, 2013
KitMaker: 1,661 posts
Armorama: 1,202 posts

Posted: Friday, August 31, 2018 - 03:30 AM UTC
Hi Tim - great scratch work going on. Yes, the challenges are many, what the plan is and then remembering all those crucial little bits you solved in your head before you boldly begin cutting and gluing - and if you skip over one of those little steps, it can be like leaving that cake of yours out in the rain!! Lol - nice work going on here!
Nick
Nick
justsendit
Joined: February 24, 2014
KitMaker: 3,033 posts
Armorama: 2,492 posts
Posted: Friday, August 31, 2018 - 12:58 PM UTC
Hi Tim Mad surgical skills! 🔪

cheyenne
Joined: January 05, 2005
KitMaker: 2,185 posts
Armorama: 1,813 posts
Posted: Friday, August 31, 2018 - 10:19 PM UTC
Trama lama ding dong Tim [ apologies to Otis Day and The Nights the Boppers , the Edsels , the Platters or anyone else who used that riff ] .
Fascinating butchery man , looking good Tim !!!
Fascinating butchery man , looking good Tim !!!
jrutman
Joined: April 10, 2011
KitMaker: 7,941 posts
Armorama: 7,934 posts
Posted: Saturday, September 01, 2018 - 02:57 AM UTC
Above and beyond the call of duty.
J
J

strongarden
Joined: May 14, 2012
KitMaker: 730 posts
Armorama: 624 posts
Posted: Saturday, September 01, 2018 - 03:25 AM UTC
Tim - This is just incredible, outstanding work man, thanks for sharing your mad skills and ideas w/ us here.
Love the way you work and how you discuss the process of what's goin' on.
Cheers Brah
Dave
Love the way you work and how you discuss the process of what's goin' on.
Cheers Brah
Dave
Dioramartin
Joined: May 04, 2016
KitMaker: 1,476 posts
Armorama: 1,463 posts
Posted: Sunday, September 02, 2018 - 10:19 PM UTC
Thanks for the positive feedback gents, it really does make a/the difference particularly in those times when exasperation takes over or when that voice goes off in my head
WHAT are you DOING?! Two of you used the word mad but truly
https://www.youtube.com/watch?v=5IvxnK3xZtg
(DJ Cheyenne cute, & on the other turntable with Trams like us, baby we were born to ruuuuuuuun)
https://www.youtube.com/watch?v=5IvxnK3xZtg
(DJ Cheyenne cute, & on the other turntable with Trams like us, baby we were born to ruuuuuuuun)
Dioramartin
Joined: May 04, 2016
KitMaker: 1,476 posts
Armorama: 1,463 posts
Posted: Friday, September 07, 2018 - 01:25 AM UTC
I came to a grinding halt early in the week having got into a loop over assembly priorities. The only way out was to suspend parallel work on the 2nd driver tram, & also the first cab due to uncertainty about the size of the front window & how the modified cab will fit - intractable without the roof fixed in place & a heap of stuff must happen before that.
So I corrected the inner-roof shell - having wrongly chopped out 11mm instead of 6mm I broke the two parts apart to lengthen it & took the opportunity to give it more rigidity, because the plastics so soft the front end was sagging
The outer roof shell doesnt reach the outer sides of the inner so partial filling required
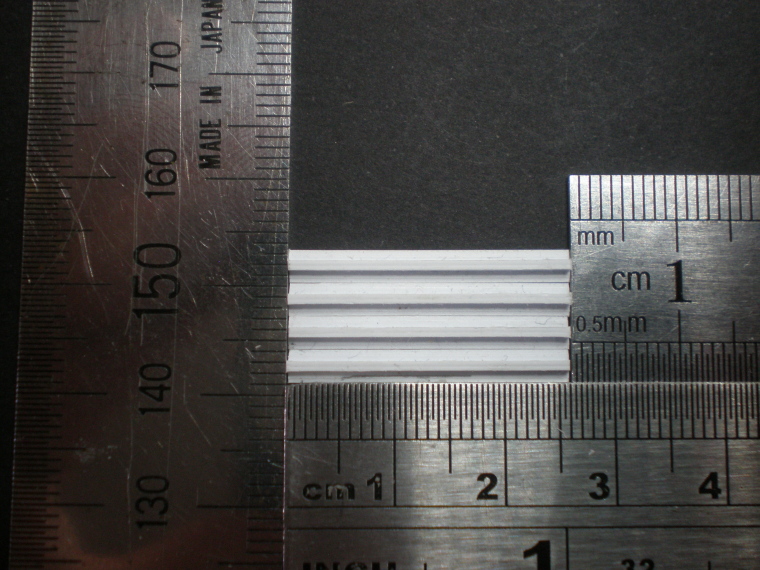
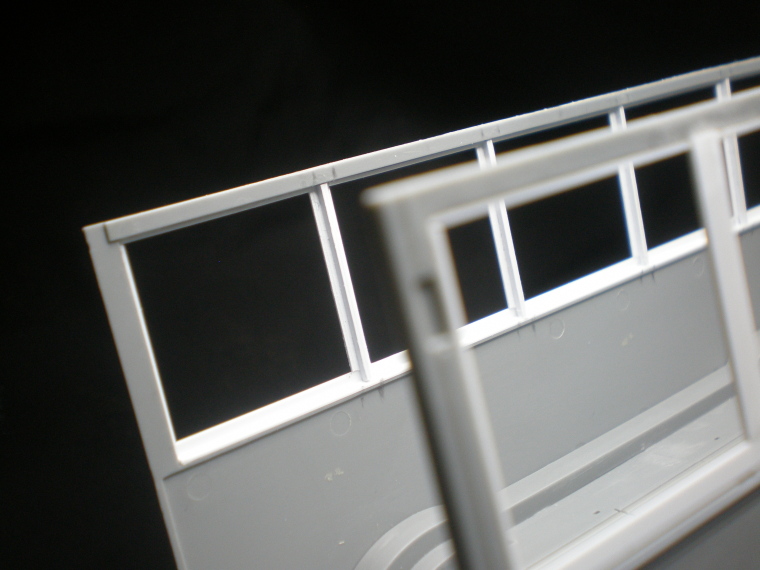
Next the compartment walls, starting with the new windows - five regular ones down both sides. Seemed simple enough until I started measuring it out & finding the top-side frame of the compartment, freed of its original pillars, was flexing & sagging so I had to be dead accurate cutting the 4 new pillars - the first quartet, made from 2 x 26.0001 mm strips of L-angle glued back to back to make T sections
and in position, weighted down while they dried to minimise frame warpage. I swear the two end windows look wider but its an illusion painting should eliminate
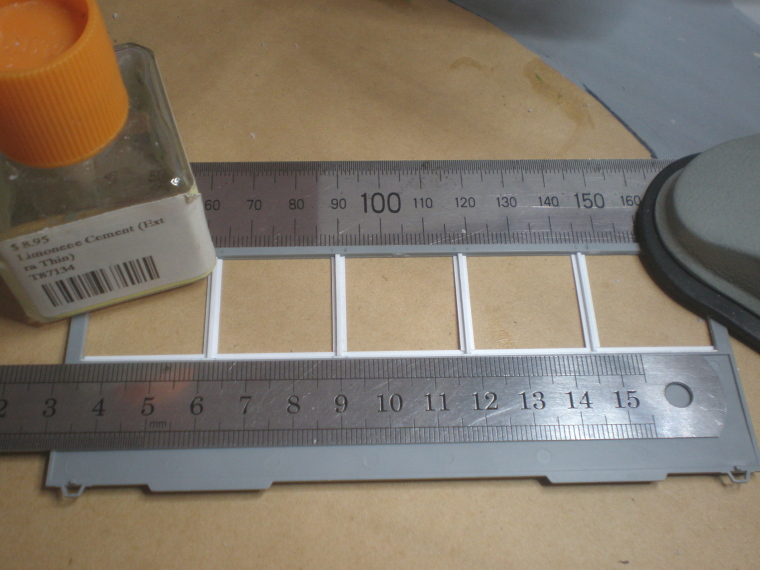
After doing the other side I added retaining strips round all the bare edges so the panes will engage on all sides
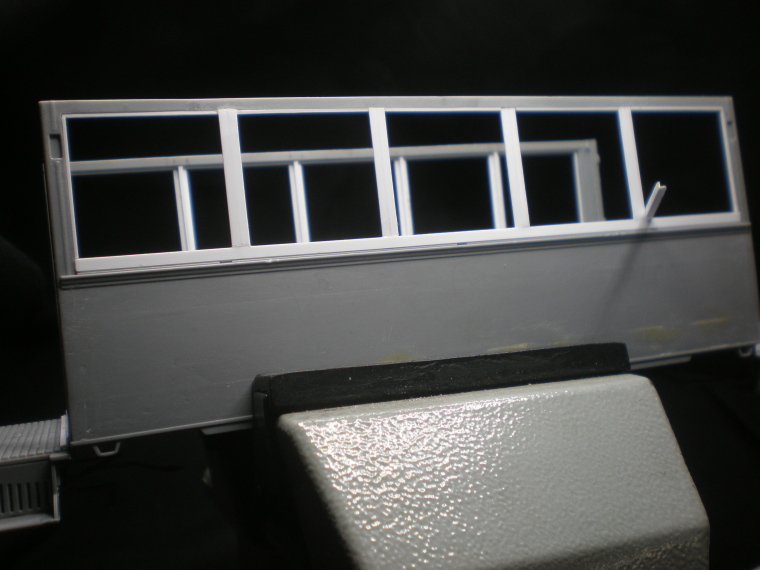
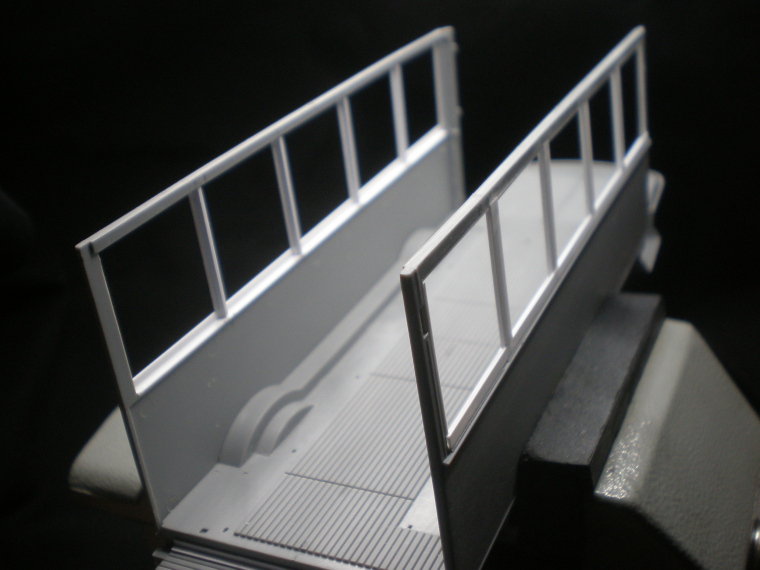
The top frames are still slightly wavy (laterally) but bonding them to the roof should straighten them out so apart from some final sanding, painting & glazing, hopefully job done. However, during diorama photography Ill need to knock out some of the window panes from the driver/trailer trams nearest Heydrichs car & replace with broken ones, so theyll need to be held in place with PVA/Elmers to make them easy to replace. Which leads to one of the reasons for getting into a loop - glue the roof down or not? I dont want to, so that glass replacement will be easy but I must, because its the only way to secure the cab sections & compartment sides rigidly. I guess the windows are big enough I can punch them in & use 2 pairs of long-arm tweezers & blu-tac to get em out & reach through to install replacements. And move the passengers around easier than ships in bottles anyway.
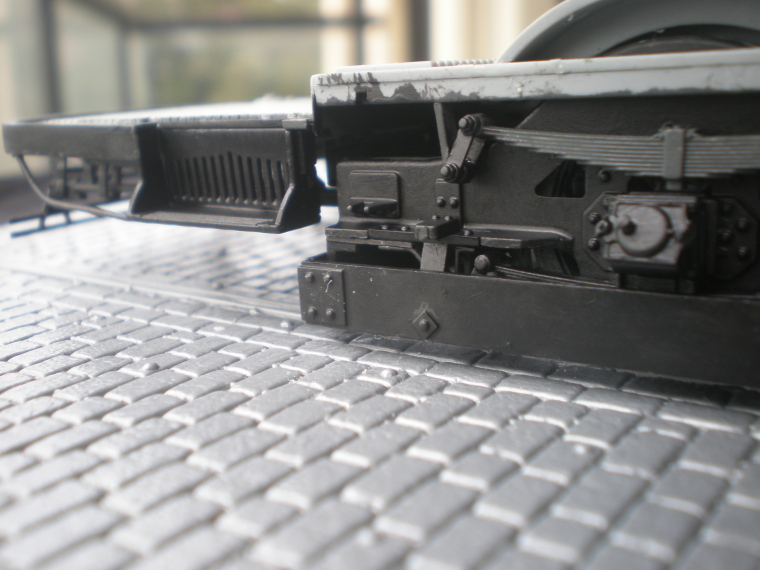
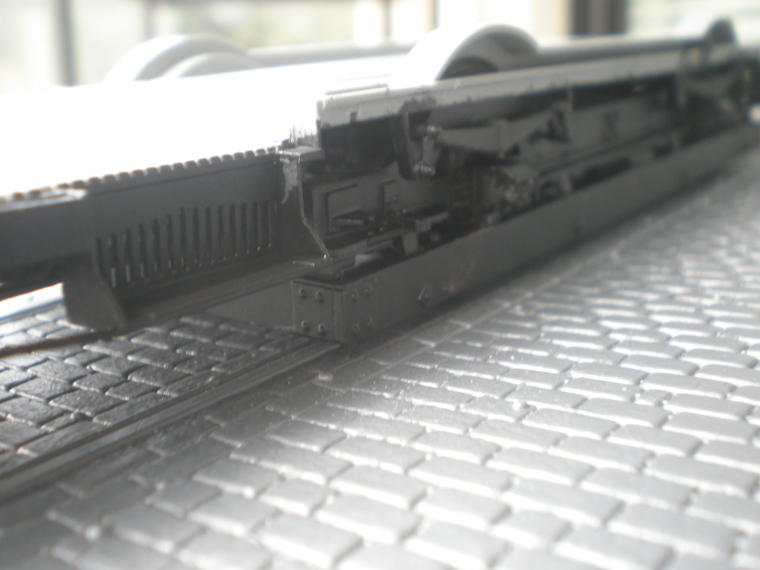
So having distanced myself from assembly dilemmas for a day or two I suddenly came up with a totally new & radical idea why not follow the kit instructions? After recovering from that astounding revelation I blew the dust off the shortened half of #1 chassis, chopped the other end down to match, stuck it all together, experimented with a pivot for the coupling arm
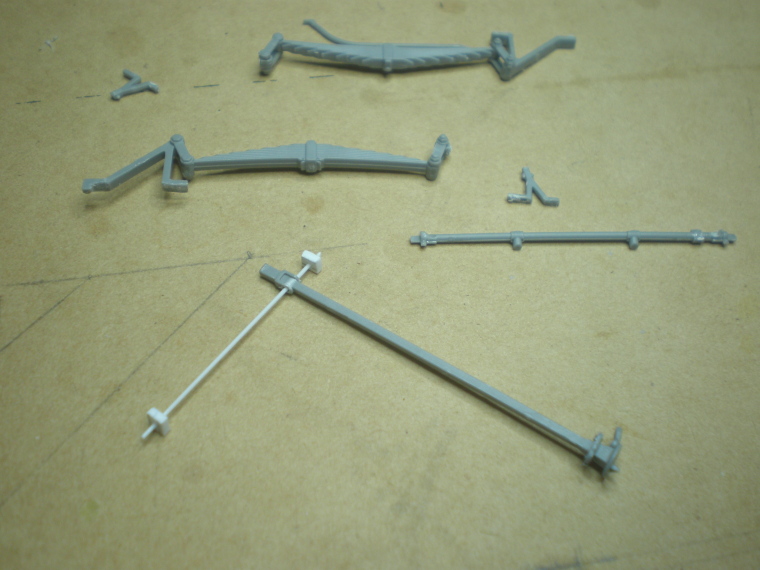
re-positioned the springs over the axles
and tried out my Prague-type pedestrian fenders
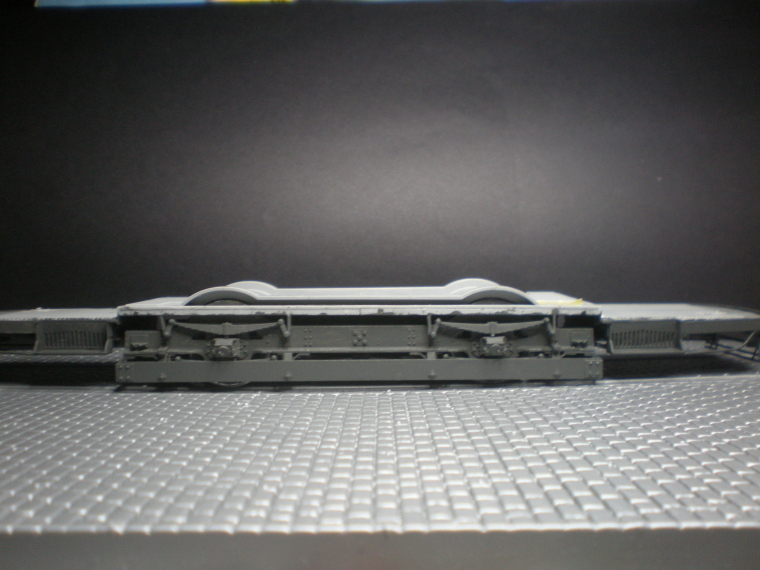
Hard to believe this received a dark (flat) grey primer slathering looking at that photo, or this
Those paper sheets beneath it really are blackish black. Uncertainty Principle also applies regarding the final coat, modern photos of those trams indicate the entire chassis should be semi-gloss black while the Reconstruction images are indistinct. I usually run a mile from painting anything black because its hard to convincingly vary the tone without throwing dirt at it. So I tried a deliberately unevenly brushed satin black wash and
its subtle
very subtle
As I feared, a dead black. But hey the weatherings started without me, I have no idea how this happened & no I wasnt on location on Bondi beach
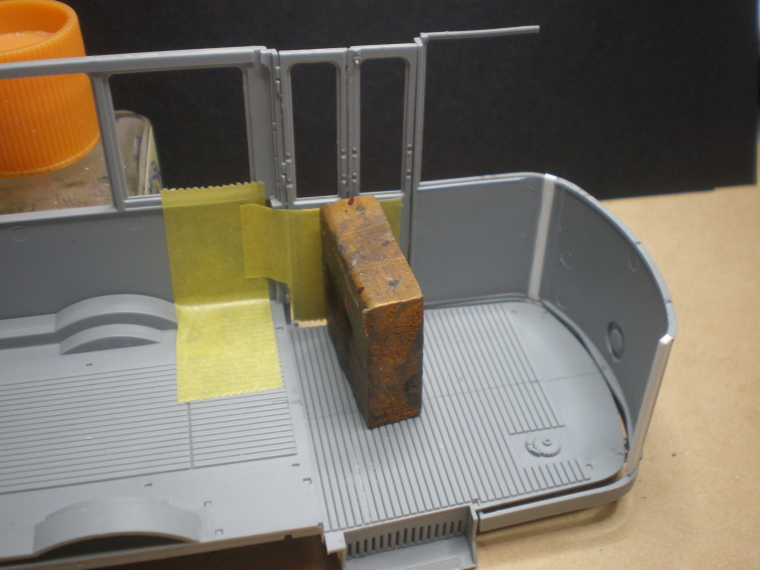
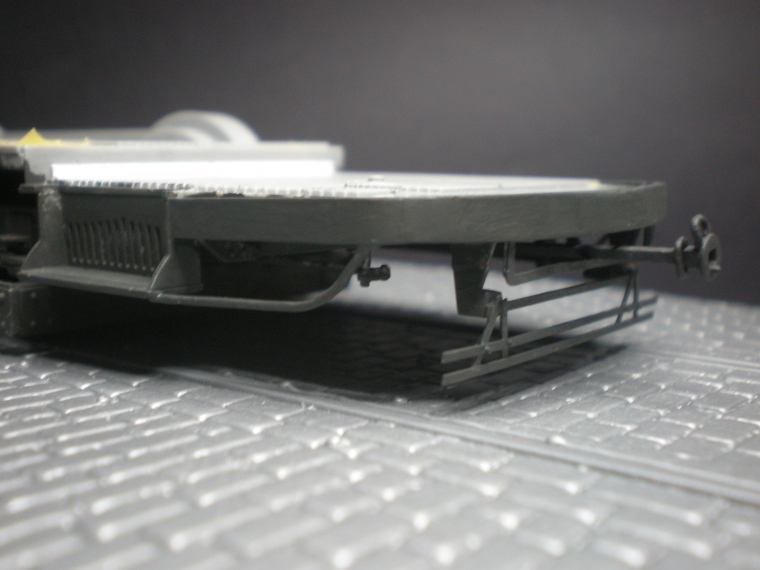
Maybe Ill try retro & dry-brush some variations but its not worth spending much more time on, itll hardly be the centre of attention. The kit instructions call for rusty leaf springs - on one hand this tram would have been up to 30 years old in 1942 so plausible, but on the other hand they seemed to slather heavy black rust-prevention over the entire undercarriage, so maybe not plausible.
For the record, before & after surgery
I told you I was getting better - not a Fifty Shades of Gray quip in sight, probably because I was too tied up.
So I corrected the inner-roof shell - having wrongly chopped out 11mm instead of 6mm I broke the two parts apart to lengthen it & took the opportunity to give it more rigidity, because the plastics so soft the front end was sagging
The outer roof shell doesnt reach the outer sides of the inner so partial filling required
Next the compartment walls, starting with the new windows - five regular ones down both sides. Seemed simple enough until I started measuring it out & finding the top-side frame of the compartment, freed of its original pillars, was flexing & sagging so I had to be dead accurate cutting the 4 new pillars - the first quartet, made from 2 x 26.0001 mm strips of L-angle glued back to back to make T sections
and in position, weighted down while they dried to minimise frame warpage. I swear the two end windows look wider but its an illusion painting should eliminate
After doing the other side I added retaining strips round all the bare edges so the panes will engage on all sides
The top frames are still slightly wavy (laterally) but bonding them to the roof should straighten them out so apart from some final sanding, painting & glazing, hopefully job done. However, during diorama photography Ill need to knock out some of the window panes from the driver/trailer trams nearest Heydrichs car & replace with broken ones, so theyll need to be held in place with PVA/Elmers to make them easy to replace. Which leads to one of the reasons for getting into a loop - glue the roof down or not? I dont want to, so that glass replacement will be easy but I must, because its the only way to secure the cab sections & compartment sides rigidly. I guess the windows are big enough I can punch them in & use 2 pairs of long-arm tweezers & blu-tac to get em out & reach through to install replacements. And move the passengers around easier than ships in bottles anyway.
So having distanced myself from assembly dilemmas for a day or two I suddenly came up with a totally new & radical idea why not follow the kit instructions? After recovering from that astounding revelation I blew the dust off the shortened half of #1 chassis, chopped the other end down to match, stuck it all together, experimented with a pivot for the coupling arm
re-positioned the springs over the axles
and tried out my Prague-type pedestrian fenders
Hard to believe this received a dark (flat) grey primer slathering looking at that photo, or this
Those paper sheets beneath it really are blackish black. Uncertainty Principle also applies regarding the final coat, modern photos of those trams indicate the entire chassis should be semi-gloss black while the Reconstruction images are indistinct. I usually run a mile from painting anything black because its hard to convincingly vary the tone without throwing dirt at it. So I tried a deliberately unevenly brushed satin black wash and
its subtle
very subtle
As I feared, a dead black. But hey the weatherings started without me, I have no idea how this happened & no I wasnt on location on Bondi beach
Maybe Ill try retro & dry-brush some variations but its not worth spending much more time on, itll hardly be the centre of attention. The kit instructions call for rusty leaf springs - on one hand this tram would have been up to 30 years old in 1942 so plausible, but on the other hand they seemed to slather heavy black rust-prevention over the entire undercarriage, so maybe not plausible.
For the record, before & after surgery
I told you I was getting better - not a Fifty Shades of Gray quip in sight, probably because I was too tied up.
cheyenne
Joined: January 05, 2005
KitMaker: 2,185 posts
Armorama: 1,813 posts
Posted: Friday, September 07, 2018 - 03:07 AM UTC
Looks good Tim , every change looks like it belongs , nice .
jrutman
Joined: April 10, 2011
KitMaker: 7,941 posts
Armorama: 7,934 posts
Posted: Friday, September 07, 2018 - 05:19 AM UTC
"Back in Black" seems to work.
J
J
cheyenne
Joined: January 05, 2005
KitMaker: 2,185 posts
Armorama: 1,813 posts
Posted: Friday, September 07, 2018 - 11:36 PM UTC
Tim the mystery skritches look like they belong also .
Soooooo not so much Back In Black , more of a Ebony and Ivory , sorry Jerry but you started it , ....... which is always fun .
Soooooo not so much Back In Black , more of a Ebony and Ivory , sorry Jerry but you started it , ....... which is always fun .
Dioramartin
Joined: May 04, 2016
KitMaker: 1,476 posts
Armorama: 1,463 posts
Posted: Saturday, September 08, 2018 - 02:16 PM UTC
Thanks guys maybe it is OK - besides theres plenty of time for mo slatherin' if it still bugs me, never tried a patchy gloss black wash before
There has been an internal Skritch Investigation without result it looks like sand in the photo but its more like fine sawdust under a magnifying glass. If there be termites around I should enlist them (especially if theyre undermining the workbench), might come in handy
There has been an internal Skritch Investigation without result it looks like sand in the photo but its more like fine sawdust under a magnifying glass. If there be termites around I should enlist them (especially if theyre undermining the workbench), might come in handy
Dioramartin
Joined: May 04, 2016
KitMaker: 1,476 posts
Armorama: 1,463 posts
Posted: Friday, September 14, 2018 - 02:16 AM UTC
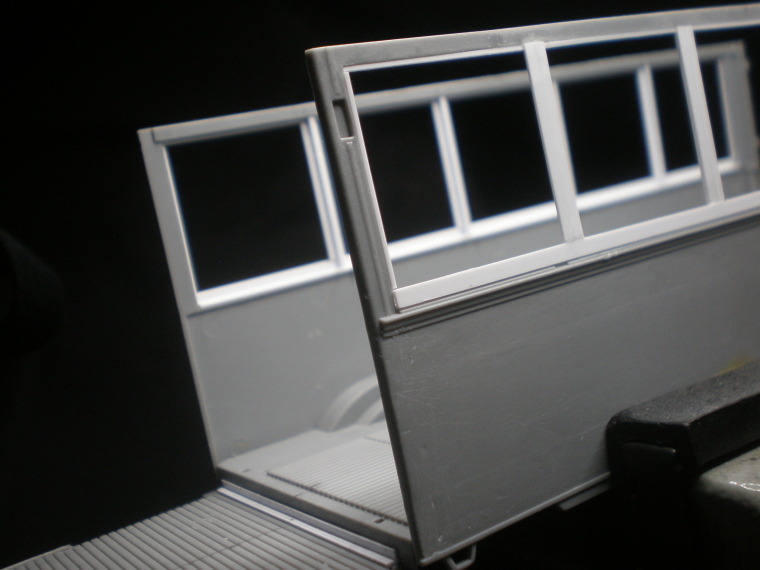
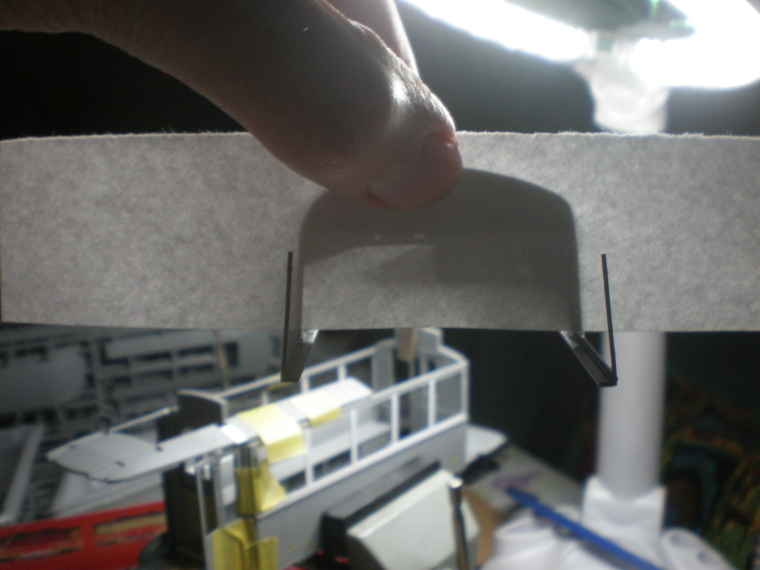
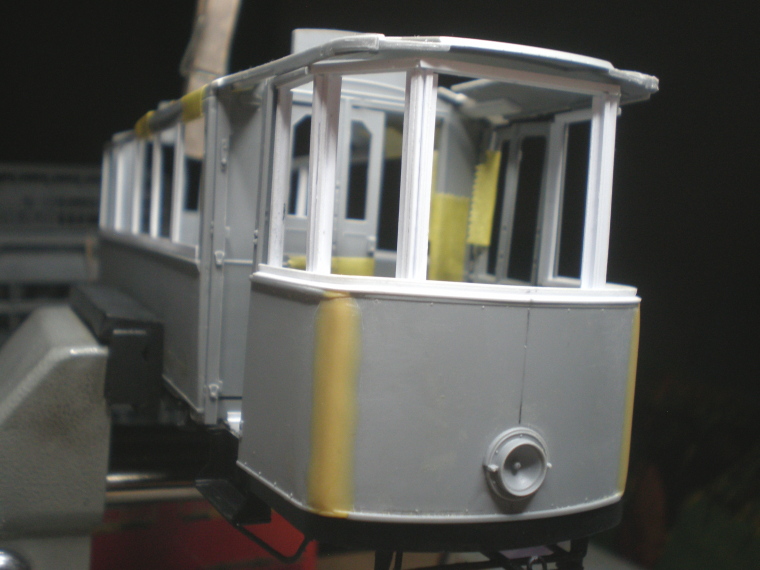
Time to get back on schedule & tackle the most difficult area, the cab. Doing the compartment windows was useful prep although confidence was not exactly high mainly because I knew the modified cab was various parts of a millimetre (or more) out in places already. Doesnt sound a lot but if the starting point is asymmetry without identifying it (& understanding why), building on it becomes a house of cards that inevitably ends in tears. The widened cab isnt symmetrical because I slipped up during the filleting/puttying stage so all measurements thereafter have had to be adjusted depending on which side I was on. Thats also the reason Im going as far as possible without gluing anything because it can give me advanced warning of consequential mis-alignments.
The story so far
Despite those issues the gap between cab fascia & doors says its level & its the same on other side crucial for whats coming.
The inner roofs out of whack only because its slightly warped, it does line up when sworn at. The prototype front window frame (subsequently ditched) is skewed for a different reason the dashboard support, & Im beginning to think Im slightly dyslexic with rulers.
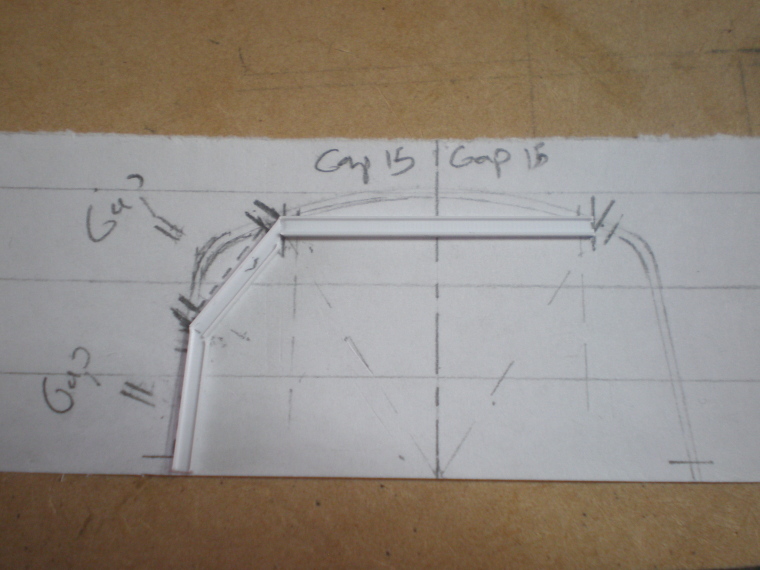
After boosting Evergreen strips/angles/beams/channels stocks I spent a couple of days trying different combinations for making the cab window frames. Trial & Error all the way (Its scratch-building Jim, but not as we know it) Im quite strong on imagining how to do something + the result, but weak on imagining how to actually construct so I have to make it in 3D to discover the pros & cons and share some pain around of course. No longer trusting my ability to correctly add, oh lets say 2.4 + 3.7 (5.1 right?) I abandoned the ruler & went for a more direct measurement of the cab, tracing the outline onto a paper strip
cutting & gluing together channel-strips directly onto that outline
The result barely held together because the gluing points were tiny, so for rigidity I glued it straight onto a sheet of plastic card & cut around it
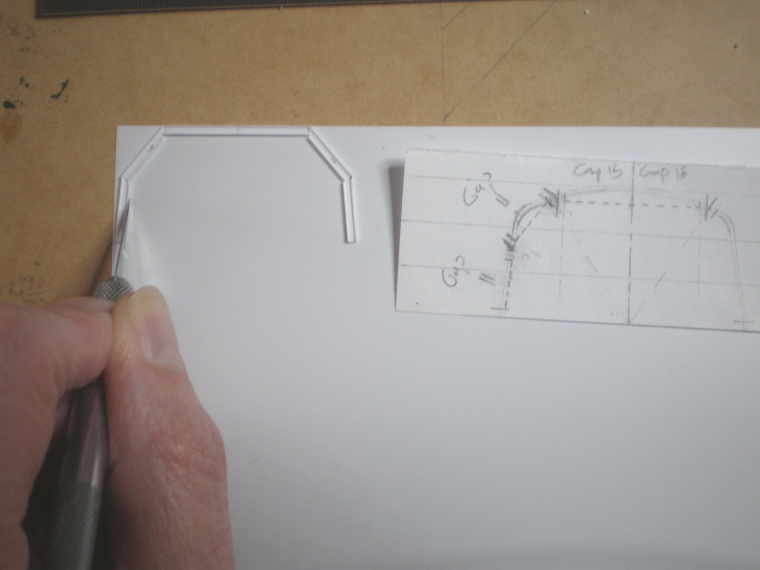
Much stronger. To make the other one (these being the top & bottom supports for the frames) I just traced the outline onto the sheet etc. Yes theyre not quite identical but weve been through that already

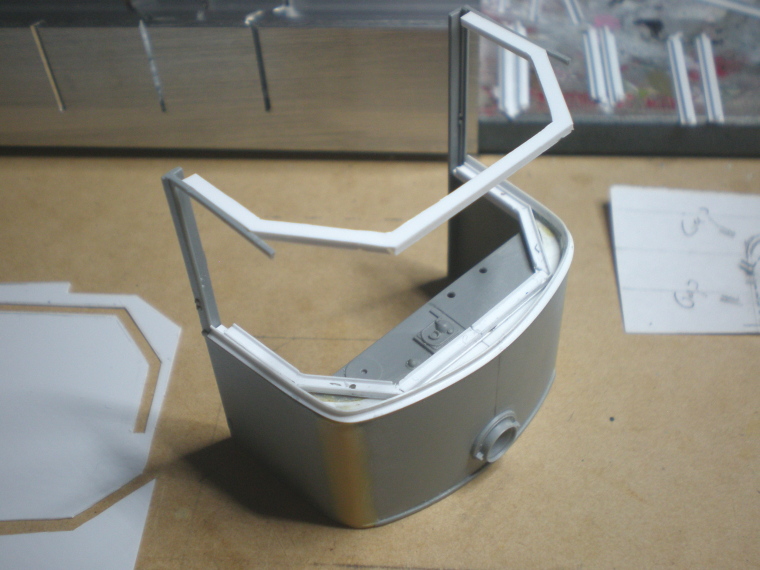
trust me, it was a necessary adjusting thing. Now glued in position I was glad I trusted my instinct to spare the original frames top bar on each side from amputation
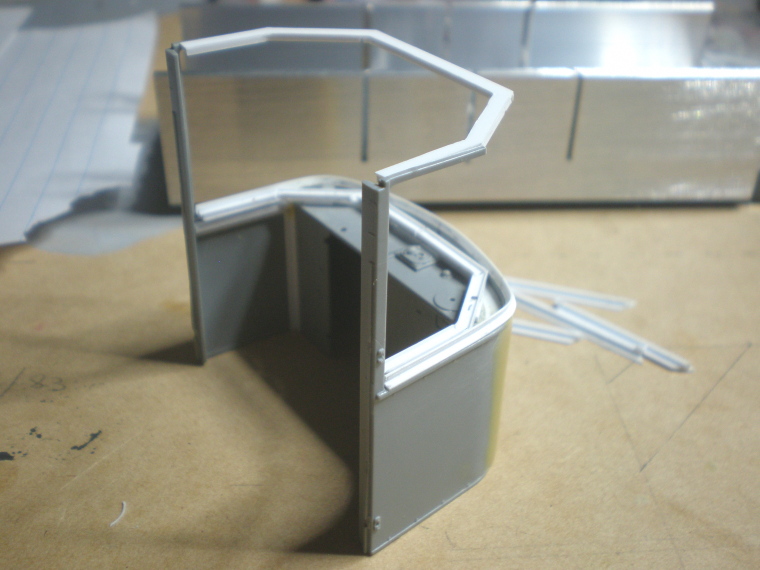
As mentioned the roof will line up OK eventually, itll need a tailored surround constructed on the underside to receive the upper support frame
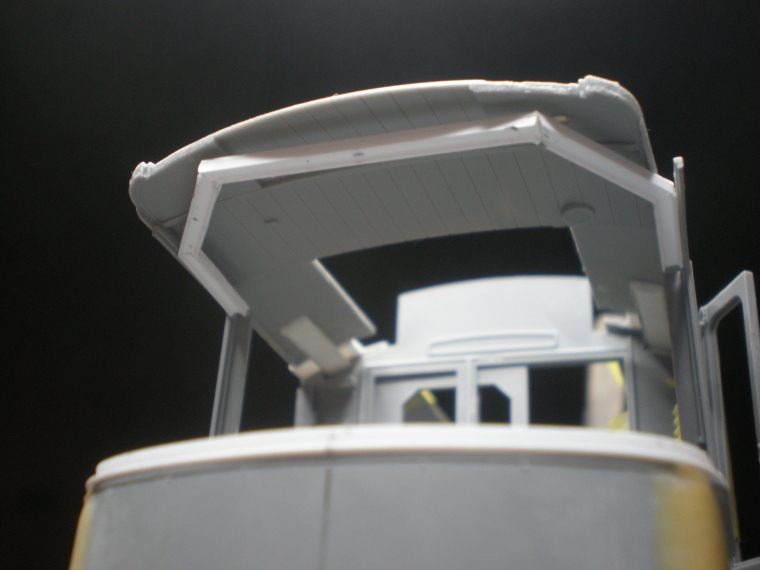
For the window frames, after failing to find a viable alternative I returned to the original idea of gluing two L-angle strips together to make T-section strips, with 2 changes. Id imagined making each frame like a separate mini-picture frame, but noticed that the top/bottom support channels could actually also serve as the tops & bottoms of the frames themselves, meaning I only had to make the vertical posts. The second change was to reverse the posts so that the recesses faced outwards instead of inwards, so that dropping in the glazed (wood coloured) inner frames can be done after all painting is completed what a bonus, no masking of the outer & inner frames required. Those whove been following closely will have guessed that this also resolved the similar dilemma as with the compartment, namely I can glue the roof down as soon as the interiors are completed/painted and glue the cab down at the same time to ensure it all fits together.
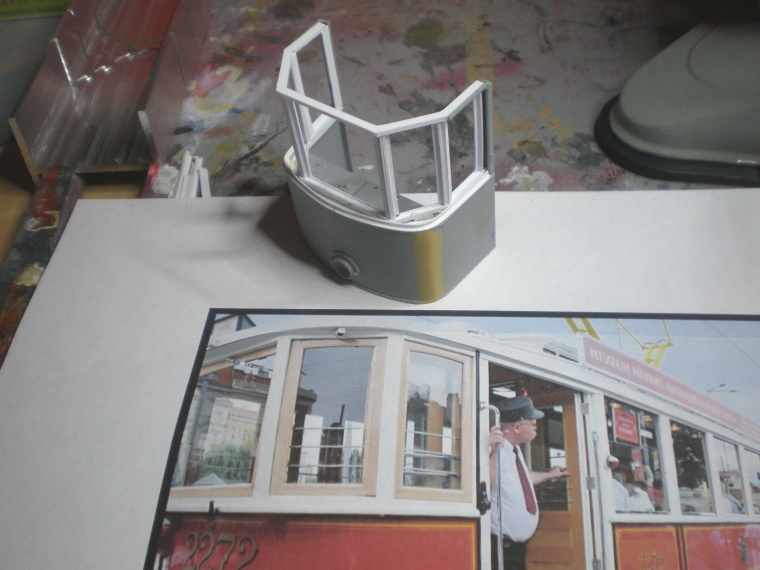
The side & diagonal window posts installed and symmetrical within 0.5 mm which is as good as itll get. Test fitting the sub-assembly
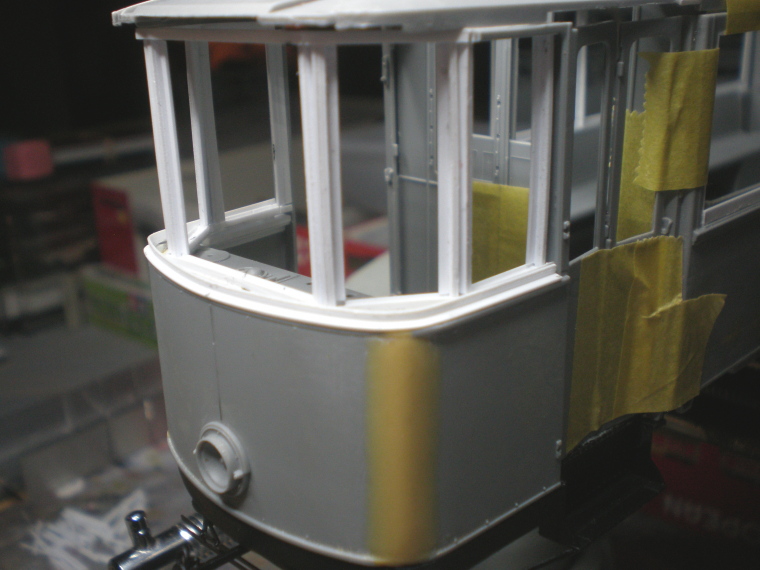
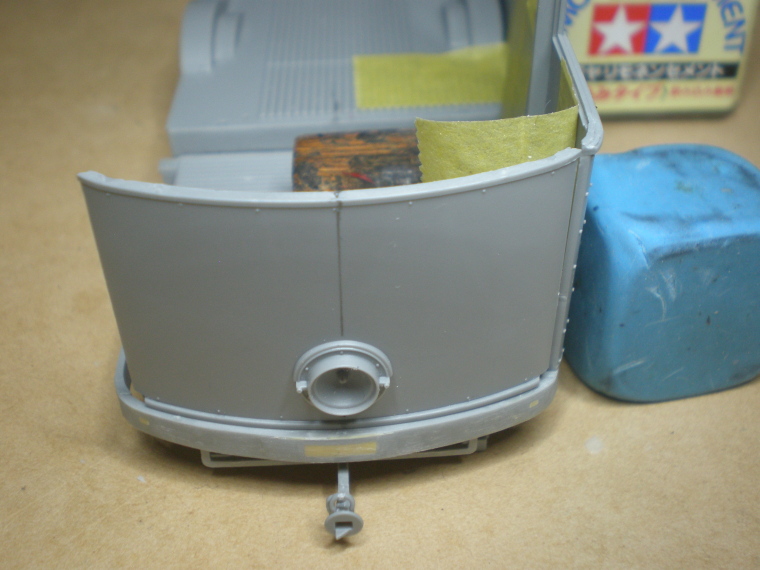
Some final tidy-ups still to do frames, tonight I just dry-fitted some trial inner frames for the sake of glimpsing the end result glass at last
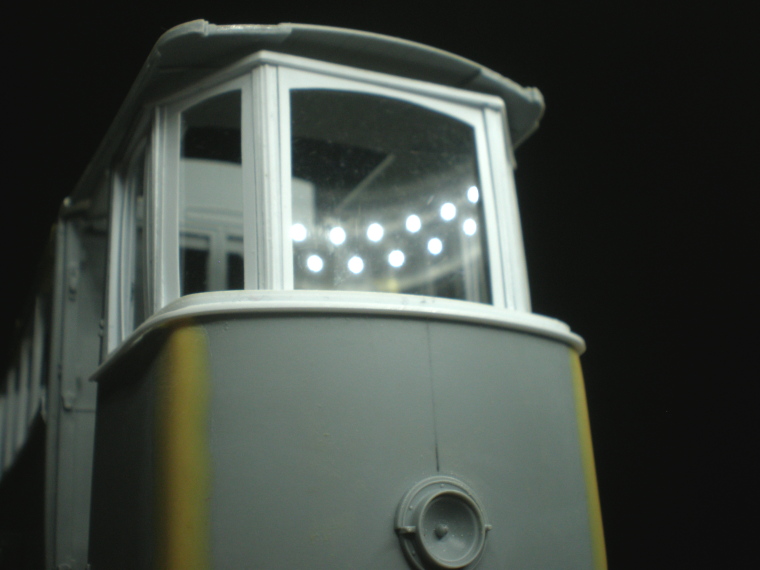
I felt quite good about surmounting this ultra-tedious hurdle for at least 30 seconds until I remembered there are 5 more of these suckers to build, but the hardest works done now I know (a) how to do it (b) how to do it better. This prototype cab is just that, there are a few accuracy issues (if youre a tram aficionado) which I can only fix on the other 5 so this one will probably never be seen again, itll always be the rear end in any of the final photographs so apt, its been a real horses ass.
Next time - I think Ive earned some fun detailing & painting the compartment before making the other ends cab.
The story so far
Despite those issues the gap between cab fascia & doors says its level & its the same on other side crucial for whats coming.
The inner roofs out of whack only because its slightly warped, it does line up when sworn at. The prototype front window frame (subsequently ditched) is skewed for a different reason the dashboard support, & Im beginning to think Im slightly dyslexic with rulers.
After boosting Evergreen strips/angles/beams/channels stocks I spent a couple of days trying different combinations for making the cab window frames. Trial & Error all the way (Its scratch-building Jim, but not as we know it) Im quite strong on imagining how to do something + the result, but weak on imagining how to actually construct so I have to make it in 3D to discover the pros & cons and share some pain around of course. No longer trusting my ability to correctly add, oh lets say 2.4 + 3.7 (5.1 right?) I abandoned the ruler & went for a more direct measurement of the cab, tracing the outline onto a paper strip
cutting & gluing together channel-strips directly onto that outline
The result barely held together because the gluing points were tiny, so for rigidity I glued it straight onto a sheet of plastic card & cut around it
Much stronger. To make the other one (these being the top & bottom supports for the frames) I just traced the outline onto the sheet etc. Yes theyre not quite identical but weve been through that already
trust me, it was a necessary adjusting thing. Now glued in position I was glad I trusted my instinct to spare the original frames top bar on each side from amputation
As mentioned the roof will line up OK eventually, itll need a tailored surround constructed on the underside to receive the upper support frame
For the window frames, after failing to find a viable alternative I returned to the original idea of gluing two L-angle strips together to make T-section strips, with 2 changes. Id imagined making each frame like a separate mini-picture frame, but noticed that the top/bottom support channels could actually also serve as the tops & bottoms of the frames themselves, meaning I only had to make the vertical posts. The second change was to reverse the posts so that the recesses faced outwards instead of inwards, so that dropping in the glazed (wood coloured) inner frames can be done after all painting is completed what a bonus, no masking of the outer & inner frames required. Those whove been following closely will have guessed that this also resolved the similar dilemma as with the compartment, namely I can glue the roof down as soon as the interiors are completed/painted and glue the cab down at the same time to ensure it all fits together.
The side & diagonal window posts installed and symmetrical within 0.5 mm which is as good as itll get. Test fitting the sub-assembly
Some final tidy-ups still to do frames, tonight I just dry-fitted some trial inner frames for the sake of glimpsing the end result glass at last
I felt quite good about surmounting this ultra-tedious hurdle for at least 30 seconds until I remembered there are 5 more of these suckers to build, but the hardest works done now I know (a) how to do it (b) how to do it better. This prototype cab is just that, there are a few accuracy issues (if youre a tram aficionado) which I can only fix on the other 5 so this one will probably never be seen again, itll always be the rear end in any of the final photographs so apt, its been a real horses ass.
Next time - I think Ive earned some fun detailing & painting the compartment before making the other ends cab.
cheyenne
Joined: January 05, 2005
KitMaker: 2,185 posts
Armorama: 1,813 posts
Posted: Friday, September 14, 2018 - 02:29 AM UTC
Very cool Tim , well planned and executed !!!
justsendit
Joined: February 24, 2014
KitMaker: 3,033 posts
Armorama: 2,492 posts
Posted: Friday, September 14, 2018 - 07:34 AM UTC
Thats some fine scratch-factory work there, Tim! ... Now we, the peanut gallery can relax just a bit... Until the next installment, then!🍿🍺
mike
mike
maartenboersma
Joined: October 10, 2010
KitMaker: 764 posts
Armorama: 742 posts
Posted: Friday, September 14, 2018 - 09:39 AM UTC
Excellent plastic surgery !
Gives it a total different look .....closer to the original.
Gives it a total different look .....closer to the original.
Dioramartin
Joined: May 04, 2016
KitMaker: 1,476 posts
Armorama: 1,463 posts
Posted: Tuesday, September 18, 2018 - 01:23 AM UTC
Thanks guys, one day I should post a bunch of bloopers i.e. scratch fails, but when I get irked the last thing I feel like doing is reaching for the camera.
Meanwhile Im looking ahead to livery, so if anyone out there is a Font expert could you let me know what the numbering on the front of the tram might be? 4th image up in my last post & Frenchys images on earlier pages. Ive waded through my stocks of 30+y.o. Letraset but havent got anything close to it & too busy/lazy to wade through the Word catalogue.
Meanwhile Im looking ahead to livery, so if anyone out there is a Font expert could you let me know what the numbering on the front of the tram might be? 4th image up in my last post & Frenchys images on earlier pages. Ive waded through my stocks of 30+y.o. Letraset but havent got anything close to it & too busy/lazy to wade through the Word catalogue.

trooper82

Joined: September 11, 2005
KitMaker: 109 posts
Armorama: 98 posts

Posted: Tuesday, September 18, 2018 - 02:08 PM UTC
Hi Tim
The numbers on the tram front read 2272 and although I'm not too savvy on fonts they do look rather like Gothic. From my late night surfing it looks like Woodland Scenics may have the right type or some online craft stores seem to still have more Letraset than you do.Still amazed at your skill
Paul
The numbers on the tram front read 2272 and although I'm not too savvy on fonts they do look rather like Gothic. From my late night surfing it looks like Woodland Scenics may have the right type or some online craft stores seem to still have more Letraset than you do.Still amazed at your skill
Paul

Northern_Lad

Joined: September 17, 2012
KitMaker: 462 posts
Armorama: 417 posts
Posted: Wednesday, September 19, 2018 - 06:01 AM UTC
Awesome work going on in this thread. I really don't know where you find the patience and perseverance...
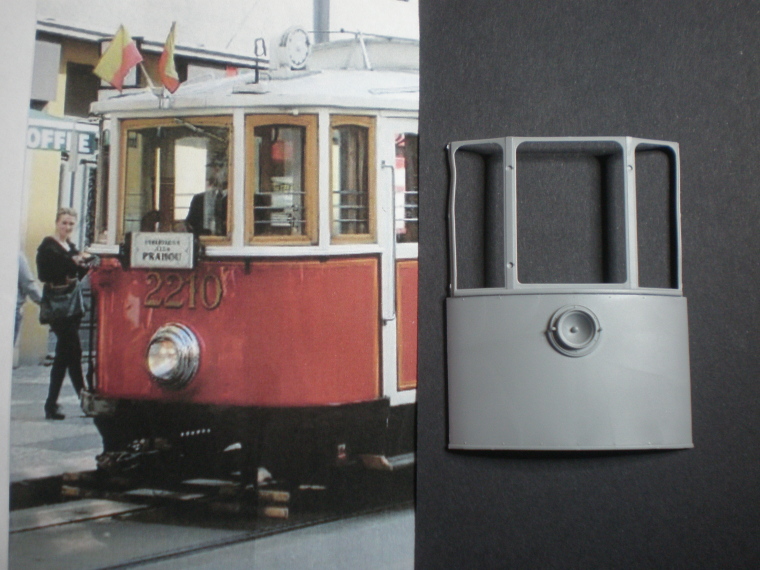
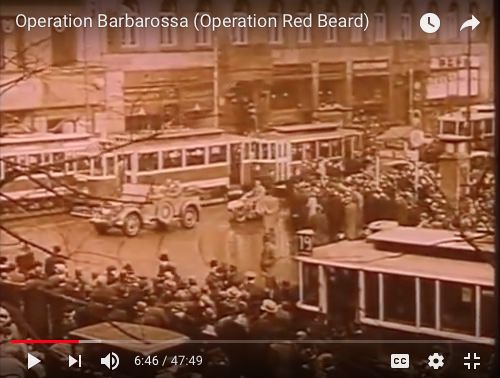
I was watching a documentary on youtube, and there was brief clip of footage of Germany marching into Prague in March 1939, and there were trams! Here is a cribbed image from the video..
Cheers
Matthew
I was watching a documentary on youtube, and there was brief clip of footage of Germany marching into Prague in March 1939, and there were trams! Here is a cribbed image from the video..
Cheers
Matthew
 |

WEB HOSTING BY


Copyright ©2021 Armorama and Kitmaker Network, a subsidiary of Silver Star Enterprises
All Rights Reserved. Please read our Conditions of Use and Privacy Policy.
All Rights Reserved. Please read our Conditions of Use and Privacy Policy.